Schwinn EVO Airdyne Assembly Manual
Schwinn EVO Airdyne Manual
 |
View all Schwinn EVO Airdyne manuals
Add to My Manuals
Save this manual to your list of manuals |
Schwinn EVO Airdyne manual content summary:
- Schwinn EVO Airdyne | Assembly Manual - Page 1
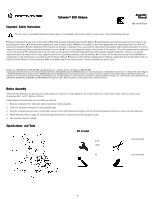
Safety Instructions Schwinn ® EVO Airdyne Assembly Manual 003-3241 use. Keep the Owner's Manual for future reference. • Do all assembly steps in the sequence given. Incorrect assembly can lead to injury. Nautilus, Inc., (800) NAUTILUS / (800) 628-8458, www.NautilusInc.com - Customer Service - Schwinn EVO Airdyne | Assembly Manual - Page 2
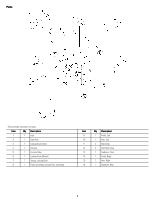
Parts * Fan Assembly removed for clarity. Item Qty Description 1 1 Seat 2 1 Seat Post 3 1 Locking Knob (Seat) 4 1 Console 5 1 Console Mast 6 1 Locking Knob (Wheel) 7 1 Spring, Locking Knob 8 1 Frame Assembly (includes Fan Assembly) Item Qty Description 9 1 Pedal, Left 10 1 - Schwinn EVO Airdyne | Assembly Manual - Page 3
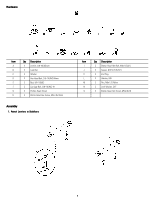
Head Bolt, 3/8-16UNC-88mm E 2 Nut, 3/8-16UNC F 2 Carriage Bolt, 3/8-16UNC-18 G 2 Phillips Head Screw H 4 Button Head Hex Screw, M6x1.0x12mm Assembly 1. Attach Levelers to Stabilizers Item Qty Description I 2 Button Head Hex Bolt, M8x1.25x41L J 4 Spacer, D10.5x15.5xT2.5 K 2 End Plug - Schwinn EVO Airdyne | Assembly Manual - Page 4
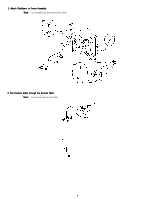
2. Attach Stabilizers to Frame Assembly Note: Fan Assembly has been removed for clarity. 3. Run Console Cable through the Console Mast Note: Do not crimp the Console Cable. 4 - Schwinn EVO Airdyne | Assembly Manual - Page 5
4. Attach Console and Console Mast to Frame Assembly Note: Do not crimp the Console Cable. Connect the Console Cable to the fan sensor on the right side of the Fan Assembly. Place all excess cable in the Console Mast. 5. Attach Right and Left Arms to Frame Assembly 5 - Schwinn EVO Airdyne | Assembly Manual - Page 6
6. Attach Pedals to Frame Assembly Note: Be sure to attach Pedals on the proper side of the Bike. Orientation is based from a seated position on the bike. The Left Pedal has an "L", the Right Pedal an "R". 7. Connect Arms to the Lever Arms 6 - Schwinn EVO Airdyne | Assembly Manual - Page 7
8. Attach Foot Rest Covers and Hand Grips 9. Attach Wheel Locking Knob and Spring Guide 7 - Schwinn EVO Airdyne | Assembly Manual - Page 8
11. Attach Water Bottle Holder Screws to Console Mast Final Inspection Inspect your machine to ensure that all fasteners are tight and components are properly assembled. Do not use until the machine has been fully assembled and inspected for correct performance in accordance with the Owner
-
 1
1 -
 2
2 -
 3
3 -
 4
4 -
 5
5 -
 6
6 -
 7
7 -
8
 |
 |

Schwinn
Schwinn
Schwinn
®
EVO
EVO
EVO Airdyne
Airdyne
Airdyne
Assembly
Assembly
Assembly
Manual
Manual
Manual
003–3241.021510.A
Important
Important
Important Safety
Safety
Safety Instructions
Instructions
Instructions
This icon means a potentially hazardous situation which, if not avoided, could result in death or serious injury. Obey the following warnings:
•
Read and understand all warnings on this machine.
•
Carefully read and understand the Assembly Manual.
•
Keep bystanders and children away from the product you are
assembling at all times.
•
Do not assemble equipment in a wet or damp location.
•
Make sure assembly is done in an appropriate work space away from foot traffic and
exposure to bystanders.
•
Some components of the machine can be heavy or awkward. Use a second person when doing the assembly steps involving these parts. Do not do
steps that involve heavy lifting or awkward movements on your own.
•
Do not try to change the design or functionality of this machine. This could compromise the safety and
can void the warranty.
•
If replacement parts are necessary use only genuine Schwinn® replacement parts and hardware supplied by Nautilus. Failure to use genuine
replacement parts can cause a risk to users, keep the machine from operating correctly or void the warranty.
•
Do not use until the machine has been fully assembled and
inspected for correct performance in accordance with the Owner’s Manual.
•
Read and understand the complete Owner’s Manual supplied with this machine before first use.
Keep the Owner’s Manual for future reference.
•
Do all assembly steps in the sequence given. Incorrect assembly can lead to injury.
Nautilus, Inc., (800) NAUTILUS / (800) 628-8458, www.NautilusInc.com - Customer Service: North America (800) 605-3369,
[email protected] | Europe, Middle East & Africa 49 02203 2020 0, [email protected] | Germany & Austria + 49 02203 2020 0, Switzerland + 41 26 460 77 66, United Kingdom
+ 44 1908 267 345, Asia Pacific & Latin America (360) 859-5180, [email protected] | Patent information: This product may be covered by US and Foreign Patents and Patents Pending. See
Product for more information. | Printed in Taiwan | © 2010 Nautilus, Inc., All rights reserved. ™ and ® indicate a trademark or registered trademark. Nautilus, Inc. (www.nautilus.com) trademarks include
NAUTILUS®, BOWFLEX®, SCHWINN® and UNIVERSAL® and respective logos. Other trademarks are the property of their respective owners.
Before
Before
Before Assembly
Assembly
Assembly
Select the area where you are going to set up and operate your machine. For safe operation, the location must be on a hard, level surface. Allow a workout area
of minimum 65.4” x 87.4” (166 cm x 222 cm).
Follow these basic points when you assemble your machine:
1.
Read and understand the “Important Safety Instructions” before assembly.
2.
Collect all the pieces necessary for each assembly step.
3.
Using the recommended wrenches, turn the bolts and nuts to the right (clockwise) to tighten, and the left (counterclockwise) to loosen, unless instructed otherwise.
4.
When attaching 2 pieces, lightly lift and look through the bolt holes to help insert the bolt through the holes.
5.
The assembly requires 2 people.
Specifications
Specifications
Specifications and
and
and Tools
ools
ools
Not
Not
Not Included
Included
Included
5/16”
15mm
(recommended)
#2
(recommended)
1