Schwinn Tango Tandem Seven IPS Schwinn Owner's Manual - Page 38
Cable Detangler
 |
View all Schwinn Tango Tandem Seven IPS manuals
Add to My Manuals
Save this manual to your list of manuals |
Page 38 highlights
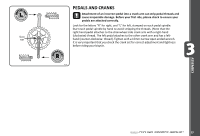
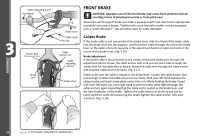
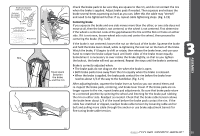
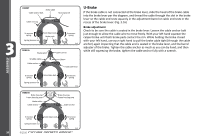
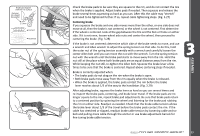
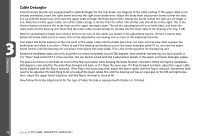
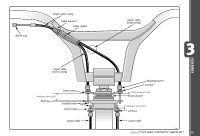
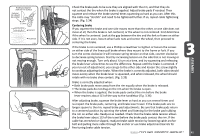
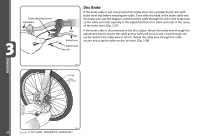
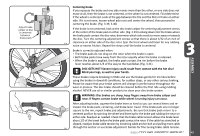
Cable Detangler Some freestyle bicycles are equipped with a cable detangler for the rear brake. See diagram of the cable routing. If the upper cable is not already assembled, insert the cable barrel end into the right (rear) brake lever. Adjust the brake lever adjustment barrel so that the slots line up with the brake lever and insert the upper cable through the brake barrel slots. Rotate the barrel so that the slots are no longer in line. Note that on the upper cable, one of the cable casings is shorter than the other. The shorter side should be on the right. This is the shorter distance between the brake lever and the upper detangler plate. Thread the adjusting barrels in on both sides, and hook the cable ends into the bearing unit. Note that the lower cable should already be hooked into the lower tabs of the bearing unit. (Fig. 3.28) Next try squeezing the brake lever several times to be sure all the cables are seated in the adjustment barrels. If there is excess play before the brake cable starts to move, this can be adjusted by unscrewing one or more of the adjustment barrels. First adjust the barrel adjuster at the mid point of the upper cable until the brake lever does not have any free play. Next squeeze the brake lever and allow it to return. Check to see if the bearing unit bottoms out on the lower detangler plate? If so, unscrew the adjust barrel further until the bearing unit sits about 1mm above the lower plate. This is the correct position for the bearing unit. Rotate the handlebars back and forth, and then turn them completely around 360 degrees. Note whether the bearing unit spins quietly, or if it "flops" back and forth? If it has any flop, this can be fine tuned with the 4 adjustment barrels in the upper and lower detangler plates. The goal is to reduce or eliminate as much of the flop as possible, while keeping the brake function consistent. While turning the handlebars 360 degrees, note whether the plate flops forward and back, or if it flops the same way. If it flops forward and back, adjust the upper cable barrel adjusters until the flop is reduced. If the flop is the same way, then adjust the lower cables until the flop is reduced. Sometimes both need to be adjusted. The best thing to do is to adjust the lower cables first until the bearing unit has an equal gap on the left and right sides, then adjust the upper barrel adjusters until the flop is minimal or none at all. Now follow the brake adjustments for the type of brake the bike is equipped with (Caliper or U brake). ASSEMBLY 38 ©2010
-
 1
1 -
2
-
3
-
4
-
5
-
6
-
7
-
8
-
9
-
10
-
11
-
12
-
13
-
14
-
15
-
16
-
17
-
18
-
19
-
20
-
21
-
22
-
23
-
24
-
25
-
26
-
27
-
28
-
29
-
30
-
31
-
32
-
 33
33 -
 34
34 -
 35
35 -
 36
36 -
 37
37 -
 38
38 -
 39
39 -
 40
40 -
 41
41 -
 42
42 -
 43
43 -
44
-
45
-
46
-
47
-
48
-
49
-
50
-
51
-
52
-
53
-
54
-
55
-
56
-
57
-
58
-
59
-
60
-
61
-
62
-
63
-
64
-
65
-
66
-
67
 |
 |