Seagate FreeAgent Go Installation Guide
Seagate FreeAgent Go Manual
 |
View all Seagate FreeAgent Go manuals
Add to My Manuals
Save this manual to your list of manuals |
Seagate FreeAgent Go manual content summary:
- Seagate FreeAgent Go | Installation Guide - Page 1
Only smart people read the manual. - Seagate FreeAgent Go | Installation Guide - Page 2
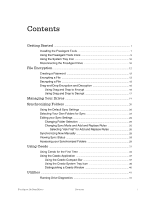
Icons 9 Using the System Tray Icon 10 Disconnecting the FreeAgent Drive 10 File Encryption ...12 Creating a Password 12 Rules 25 Selecting "Ask First" for Add and Replace Rules 26 Synchronizing Now Manually 28 Viewing Sync Status 28 Accessing your Synchronized Folders 29 Using Ceedo ...33 - Seagate FreeAgent Go | Installation Guide - Page 3
Adjusting the Drive Sleep Interval 43 Adjusting the Drive Lights 45 Index ...i FreeAgent Go Data Mover Contents ii - Seagate FreeAgent Go | Installation Guide - Page 4
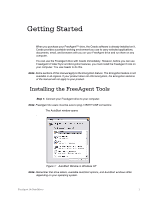
regions. If your product does not offer Encryption, the Encryption sections of the manual will not apply to your product. Installing the FreeAgent Tools Step 1: Connect your FreeAgent drive to your computer. Note: FreeAgent Go users must be sure to plug in BOTH USB connectors. The AutoStart window - Seagate FreeAgent Go | Installation Guide - Page 5
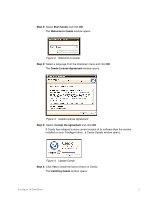
4: Select I accept the agreement and click OK. If Ceedo has released a more current version of its software than the version installed on your FreeAgent drive, a Ceedo Update window opens: Figure 4: Update Ceedo Step 5: Click Yes to install the latest version of Ceedo. The Installing Ceedo window - Seagate FreeAgent Go | Installation Guide - Page 6
menu, you may have a firewall conflict. For further information and assistance, go to http://www.ceedo.com/. When Ceedo has loaded, the Welcome to Ceedo window and the Ceedo EasyAccess menu both open: Figure further information and assistance, go to http://www.ceedo.com/. FreeAgent Go Data Mover 3 - Seagate FreeAgent Go | Installation Guide - Page 7
at the bottom of the Welcome window if you don't want to see this screen again. The Ceedo Easy-Access menu contains a link to the FreeAgent Tools installer: FreeAgent Go Data Mover 4 - Seagate FreeAgent Go | Installation Guide - Page 8
Figure 9: Ceedo Easy-Access Menu Step 7: Click Install FreeAgent Tools. The Choose Setup Language window opens: Figure 10: Choose Setup Language Step 8: Select a language for this installation from the dropdown menu and click OK. The Welcome window opens: FreeAgent Go Data Mover 5 - Seagate FreeAgent Go | Installation Guide - Page 9
Figure 11: Welcome Step 9: Click Next. The License Agreement window opens: Figure 12: License Agreement Step 10: Select Yes if you agree to the terms of the License Agreement. The Choose Destination Location window opens: FreeAgent Go Data Mover 6 - Seagate FreeAgent Go | Installation Guide - Page 10
to the desired folder and click OK in the Choose Folder window, then Next in the Choose Destination Location window. The Setup Status window opens: FreeAgent Go Data Mover 7 - Seagate FreeAgent Go | Installation Guide - Page 11
complete, the Registration window opens: Figure 16: Registration Step 12: If you wish, click Register to go to the Seagate registration website and register your FreeAgent drive. Step 13: Click Next. The InstallShield Wizard Complete window opens: - Seagate FreeAgent Go | Installation Guide - Page 12
use. Note: Although most features on your FreeAgent drive will work without a restart, a restart is required for full use of the FreeAgent software. Using the FreeAgent Tools Icons After you've installed the FreeAgent Tools software on your computer, FreeAgent Tools icons are placed in two locations - Seagate FreeAgent Go | Installation Guide - Page 13
Mouseover Information The information popup confirms the drive's connection status and identifies the drive letter. Step 2: Click on the system tray icon to display the FreeAgent popup menu: Figure 21: System Tray Popup Menu Step 3: Select the feature you want to access or select Exit to close the - Seagate FreeAgent Go | Installation Guide - Page 14
Ceedo has been ejected, the Safe to Remove Hardware popup appears in your system tray. Figure 25: Safe to Remove Hardware Popup Step 4: Disconnect the FreeAgent drive from your computer. FreeAgent Go Data Mover 11 - Seagate FreeAgent Go | Installation Guide - Page 15
If your product does not offer Encryption, this section of the manual does not apply to your product. File encryption prevents others from have to open the FreeAgent™ software in order to use this feature. The encryption feature is not physically part of the FreeAgent application. Instead, it - Seagate FreeAgent Go | Installation Guide - Page 16
a File To encrypt a file, Step 1: Right-click on the file. Step 2: Select Encrypt on the dropdown menu: Figure 2: Encrypt Menu The Seagate Encryption window opens: FreeAgent Go Data Mover 13 - Seagate FreeAgent Go | Installation Guide - Page 17
Yes. The Encryption window displays the progress of the encryption: Figure 5: Encryption in Progress When the window closes, an encrypted version of the file appears: FreeAgent Go Data Mover 14 - Seagate FreeAgent Go | Installation Guide - Page 18
-click on the file - OR - Right-click on the file and select Decrypt from the dropdown menu: Figure 7: Decrypt Menu The Seagate Decryption window opens: FreeAgent Go Data Mover 15 - Seagate FreeAgent Go | Installation Guide - Page 19
with you as you drag it to a folder. Note: You cannot Drag and Drop a file for encryption to a folder within Ceedo (for example, My Documents). FreeAgent Go Data Mover 16 - Seagate FreeAgent Go | Installation Guide - Page 20
encrypted version remains on your computer. You're asked permission to replace the existing version with this more current version: Figure 12: Encryption File Replacement FreeAgent Go Data Mover 17 - Seagate FreeAgent Go | Installation Guide - Page 21
same name exists in the location to which you are decrypting, you're asked permission to replace the existing version with this more current version: FreeAgent Go Data Mover 18 - Seagate FreeAgent Go | Installation Guide - Page 22
Figure 15: Decryption File Replacement A decrypted version of the file appears in the new location. FreeAgent Go Data Mover 19 - Seagate FreeAgent Go | Installation Guide - Page 23
1: Your Drives The Command panel allows you to access your drive features and manage drive utilities. In the Your Drives window, Step 1: Select a FreeAgent drive. Step 2: Click an option in the Command panel. Note: External drives are automatically detected and listed in the Your Drives window. It - Seagate FreeAgent Go | Installation Guide - Page 24
change is made, or you can synchronize folders manually. • New files added to a synchronized folder on either your computer or your FreeAgent drive can be automatically copied to the corresponding synchronized folder in the other location, or you can instruct FreeAgent Tools to ask you each time the - Seagate FreeAgent Go | Installation Guide - Page 25
Folder Sync Note: This Folder Sync window appears only during your initial Folder Sync configuration. Step 3: Click Sync "My Documents". The Folder Sync window opens: FreeAgent Go Data Mover 21 - Seagate FreeAgent Go | Installation Guide - Page 26
yourself, Step 1: Click Folder Sync in the Command panel. The initial Folder Sync window opens: Figure 4: Initial Folder Sync Step 2: Click Select Folders to Sync. FreeAgent Go Data Mover 22 - Seagate FreeAgent Go | Installation Guide - Page 27
: Figure 6: Folder Sync with Mouseover Drag your mouse over the options for Sync Mode and Add and Replace Rules to see descriptions of the options: FreeAgent Go Data Mover 23 - Seagate FreeAgent Go | Installation Guide - Page 28
automatically each time a file within them changes. • Manual Sync: Sync my folders only when I click Sync Now. Add and Replace Rules • Add New File/Replace Existing File: Always add a new file to the synchronized folders on both my computer and my FreeAgent drive and replace an existing file with - Seagate FreeAgent Go | Installation Guide - Page 29
Changing Folder Selection If your current Sync Mode is Manual Sync and you select a new folder for sync or uncheck a selected folder, FreeAgent Tools resets the Sync Mode to Automatic Sync. The sync process starts immediately after you confirm your new folder selection and remains in Automatic Sync - Seagate FreeAgent Go | Installation Guide - Page 30
option on the Command panel. Selecting "Ask First" for Add and Replace Rules When you select Ask First for Add and Replace Rules, you're instructing FreeAgent Tools to ask you before it • adds a new file to a synchronized folder when you click Sync Now or re-connect your - Seagate FreeAgent Go | Installation Guide - Page 31
10: Add File Before replacing an existing file in a synchronized folder with a new version, FreeAgent Tools displays this window: Figure 11: Replace File YES or NO refers to adding or replacing the need to display this window for all files in question for this sync. FreeAgent Go Data Mover 27 - Seagate FreeAgent Go | Installation Guide - Page 32
. Step 3: Click Sync Now. Your folders are synchronized immediately. Note: Remember that when you select Manual Sync for Sync Mode, your files will sync only when you click Sync Now; they will no longer Folder Sync in the command panel. The Folder Sync window opens: FreeAgent Go Data Mover 28 - Seagate FreeAgent Go | Installation Guide - Page 33
Figure 13: Folder Sync Step 2: Click View Sync Status. The Sync Status window opens: Figure 14: Sync Status Listed are the computers to which this FreeAgent drive is synchronized, the date and time of the last sync, and the current On/Off status of Automatic Sync. Step 3: Click OK to return - Seagate FreeAgent Go | Installation Guide - Page 34
the computer with which it's synchronized, the file changes are saved to the synchronized folder on the computer. Your synchronized folders are located on the FreeAgent drive in the FreeAgent Sync folder. To access your synchronized folders, Step 1: In your My Computer window, right-click on the - Seagate FreeAgent Go | Installation Guide - Page 35
vary depending upon your operating system. The windows shown here are from Windows XP. Step 2: Open the FreeAgent Sync folder: Figure 17: FreeAgent Drive Folder Sync Location 2 Stored in the FreeAgent Sync folder is a folder with your computer name (in the image above, named Computer Name). Step - Seagate FreeAgent Go | Installation Guide - Page 36
Figure 18: FreeAgent Drive Folder Sync Location 3 Inside the folder are your synchronized folders. In the example images above, the path to the synchronized folders on this FreeAgent drive is E:\FreeAgent Sync\Computer Name\My Documents. FreeAgent Go Data Mover 32 - Seagate FreeAgent Go | Installation Guide - Page 37
the Ceedo Easy-Access menu, you may have a firewall conflict. For further information and assistance, go to http://www.ceedo.com/. Using Ceedo for the First Time The first time you connect your FreeAgent drive, you must choose a language and accept the Ceedo license agreement. Step 1: Connect your - Seagate FreeAgent Go | Installation Guide - Page 38
Step 4: Select I accept the agreement and click OK. If Ceedo has released a more current version of its software than the version installed on your FreeAgent drive, a Ceedo Update window opens: Figure 4: Update Ceedo Step 5: If you wish, click Learn more about this update. You're directed to the - Seagate FreeAgent Go | Installation Guide - Page 39
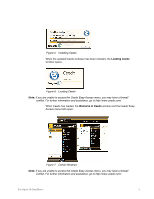
installed, the Loading Ceedo window opens: Figure 7: Loading Ceedo When Ceedo has loaded, the Welcome to Ceedo window and the Ceedo EasyAccess menu both open: FreeAgent Go Data Mover 35 - Seagate FreeAgent Go | Installation Guide - Page 40
starts at the bottom of the window. The Ceedo Easy-Access menu provides access to the programs, documents, email, and browsers you install in Ceedo: FreeAgent Go Data Mover 36 - Seagate FreeAgent Go | Installation Guide - Page 41
Ceedo. For complete information on all the features available in Ceedo, visit the Ceedo website at http://www.ceedo.com. Using the Ceedo Compact Bar When you're not using Ceedo, the Easy-Access menu collapses to a it to the left or right at the bottom of your screen. FreeAgent Go Data Mover 37 - Seagate FreeAgent Go | Installation Guide - Page 42
return the Compact Bar to the bottom of your screen. • Click the Eject button to the right of the Ceedo icon to safely remove your FreeAgent drive. (You can also eject Ceedo by selecting Eject from the Ceedo popup menu in your system tray or clicking the Safely Remove Hardware icon - Seagate FreeAgent Go | Installation Guide - Page 43
Options Window • View information about your version of Ceedo: Figure 14: About Ceedo • Go to the Ceedo Support web page. • Exit Ceedo. • Eject Ceedo for safe removal of your FreeAgent drive. Ceedo automatically closes all running windows, programs, web pages, and folders when it shuts down. If - Seagate FreeAgent Go | Installation Guide - Page 44
's what a web browser window opened from Ceedo looks like: Figure 15: Ceedo Window For further information about or help with Ceedo, visit http://www.ceedo.com. FreeAgent Go Data Mover 40 - Seagate FreeAgent Go | Installation Guide - Page 45
maintenance. A health check determines hard disk integrity and can help troubleshoot potential problems with disk surface, partitioning, and drive recognition. To run a drive diagnostic, Step 1: Close all open files located on the FreeAgent drive. Step 2: Click Utilities on the Command panel. The - Seagate FreeAgent Go | Installation Guide - Page 46
Figure 2: FreeAgent Go Small Utilities Step 3: Click Run Drive Diagnostics. The Run Drive Diagnostics window opens: Figure 3: Run Drive Diagnostics Step drive and takes only a short time to complete. When the test is complete, the Utilities window displays the results: FreeAgent Go User Guide 42 - Seagate FreeAgent Go | Installation Guide - Page 47
during testing, the window displays an error code with instructions to contact Seagate for service and support. Step 5: Click OK to return to the Utilities window Adjusting the Drive Sleep Interval You can choose how long your FreeAgent drive should remain inactive before it goes into power-saving - Seagate FreeAgent Go | Installation Guide - Page 48
Apply to save the Drive Sleep Interval setting. The Adjust Drive Sleep Interval window confirms that the power setting for your drive has been changed: FreeAgent Go User Guide 44 - Seagate FreeAgent Go | Installation Guide - Page 49
Go drive flicker to indicate drive activity and status. You can turn these lights off if you wish. Note: The lights on the FreeAgent Go Small drive are not adjustable, so the Adjust Drive Lights option does not appear in its Utilities window. To adjust the drive lights, Step 1: - Seagate FreeAgent Go | Installation Guide - Page 50
Figure 8: Drive Utilities Step 2: Click Adjust Drive Lights. The Drive Lights window opens: Figure 9: Adjust Drive Lights Step 3: Choose whether to display status and activity lights on your FreeAgent drive. Step 4: Click Apply to return to the Utilities window. FreeAgent Go User Guide 46 - Seagate FreeAgent Go | Installation Guide - Page 51
Selection 25 Changing Sync Mode and Add and Replace Rules 25 Creating a Password 12 D Decrypting a File 15 Default Sync Settings 20 Disconnecting the FreeAgent Drive 10 Distinguishing a Ceedo Window 40 Drag-and-Drop Decryption 17 Drag-and-Drop Encryption 16 Drag-and-Drop Encryption and Decryption 16 - Seagate FreeAgent Go | Installation Guide - Page 52
Using the Default Sync Settings 20 Viewing Sync Status 28 Synchronizing Now Manually 28 U Using Ceedo 33 Using Ceedo for the First Time 33 Utilities and Diagnostics 41 Adjusting the Drive Lights 45 Adjusting the Drive Sleep Interval 43 Running Drive Diagnostics 41 FreeAgent Go Data Mover Index ii - Seagate FreeAgent Go | Installation Guide - Page 53
V Viewing Sync Status 28 070131 FreeAgent Go Data Mover Index iii
-
 1
1 -
 2
2 -
 3
3 -
 4
4 -
 5
5 -
 6
6 -
 7
7 -
8
-
9
-
10
-
11
-
12
-
13
-
14
-
15
-
16
-
17
-
18
-
19
-
20
-
21
-
22
-
23
-
24
-
25
-
26
-
27
-
28
-
29
-
30
-
31
-
32
-
33
-
34
-
35
-
36
-
37
-
38
-
39
-
40
-
41
-
42
-
43
-
44
-
45
-
46
-
47
-
48
-
49
-
50
-
51
-
52
-
53
 |
 |

Only smart people
read the manual.