Sealey LED139 Instruction Manual
Sealey LED139 Manual
 |
View all Sealey LED139 manuals
Add to My Manuals
Save this manual to your list of manuals |
Sealey LED139 manual content summary:
- Sealey LED139 | Instruction Manual - Page 1
instructions, and properly maintained, give you years of trouble free performance. IMPORTANT: PLEASE READ THESE INSTRUCTIONS INSTRUCTIONS SAFE FOR FUTURE USE. Refer to instruction manual open, disassemble, modify or service the battery pack. 8 to allow it to be supported from a ferrous surface / - Sealey LED139 | Instruction Manual - Page 2
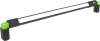
ffigig.1.1 Power / Mode Indicator LEDs Selector Rotate 9 positions USB Connection Rotate 1800 fig.2 Parts support is available for this product. Please email [email protected] or telephone 01284 757500 BATTERY REMOVAL / REPLACEMENT Remove the screws in the black section
-
 1
1 -
 2
2
 |
 |

13W SMD LED RECHARGEABLE UNDER-
BONNET LIGHT
MODEL NO:
LED139
Thank you for purchasing a Sealey product. Manufactured to a high standard, this product will, if used according to these instructions,
and properly maintained, give you years of trouble free performance.
1. SAFETY
1.1.
GENERAL
9
It is important to ensure that the lamp is fully charged before initial use.
8
DO NOT
turn the lamp on when it is being charged.
8
DO NOT
shine directly into your, another person’s or an animal’s eyes.
8
DO NOT
allow children to use the lamp.
8
DO NOT
leave battery in a discharged state. Recharge battery immediately.
9
Recharge the battery at least once every six months of non-use.
±
WARNING!
Ensure Health and Safety, local authority and general workshop practice regulations are adhered to when using this light.
Account for all tools being used and
DO NOT
leave them in or near the engine.
1.2.
BATTERY SAFETY
±
WARNING!
To reduce the risk of burns or fire:
8
DO NOT
attempt to open, disassemble, modify or service the battery pack.
8
DO NOT
crush, puncture, short external contacts or dispose of in fire or water.
8
DO NOT
expose to temperatures above 60°C (140°).
2. INTRODUCTION
Rechargeable Under Bonnet 1200 Lumen SMD LED work light with three brightness settings. 180-degree adjustable ends allowing for an
adjustable lighting angle. Each end has a 360-degree swivel/hanging hooks and a magnet. 3.7V 4400mAh Li-ion battery and 1.8m USB charging
cable. Includes LED charge indicator. Max. 4hr run time.
3. SPECIFICATION
Model No
..................................................................
LED139
Battery
..................................................
3.7V 4400mAh Li-ion
Charging Time
...........................................
4-6hr at 5V DC 1A
IP Rating
........................................................................
IPXX
LED Qty
...........................................................................
100
LED Type
.......................................................................
SMD
Lumen Output
....................................................
1200 Lumen
Operating Time
............................
High 1hr, Mid 2hr, Low 4hr
Power
..............................................................................
13W
4. OPERATION
4.1.
OPERATIONAL MODES
(Refer to fig.1)
4.1.1.
Press On/Off button once to turn the unit on. This will also light up the four LEDs (fig.1) to indicate the battery state. 4 bars lit
indicates 100%, 1 bar lit indicates 25% (or less).
4.1.2.
Press On/Off button again and the unit operates in full power mode.
4.1.3.
Press On/Off button again and the unit operates in mid-power mode.
4.1.4.
Press On/Off button again and the unit operates in low power mode.
4.1.5.
Press On/Off button again and the unit switches off.
4.2.
UNIT MOUNTING AND ADJUSTMENT
(Refer to fig.2)
4.2.1.
The unit is fitted with a hook at each end to enable suspension from a suitable source.
4.2.2.
The unit also has a magnet at each end to allow it to be supported from a ferrous surface / object.
4.2.3.
To enable lighting position adjustment, the unit is fitted with hinging/rotating elbows at both ends.
4.2.4.
Pull the end caps out to expose the joint (fig.2). Each elbow can be rotated through 180
0
and in one of 9 set positions.
5. MAINTENANCE
5.1.
Keep lamp clean and check for damage before every use. If damage is observed, remove from use until unit is repaired.
LED139
Issue 2
22/06/22
Original Language Version
© Jack Sealey Limited
Refer to
instruction
manual