Seiko 8M25 Manual
Seiko 8M25 Manual
 |
View all Seiko 8M25 manuals
Add to My Manuals
Save this manual to your list of manuals |
Seiko 8M25 manual content summary:
- Seiko 8M25 | Manual - Page 1
and performance of the watch, its actual life once in your possession may be less than 2.5 years. *Battery replacement will be made at cost even within the guarantee period. CONSUMPTION OF BATTERY POWER • 8M25/8M26 G727-90 SEIKO 't•-ti"3- .77t7,1 IrmivAls INSTRUCTION 8M25/8M26 Z.ODtztY1St-f o_E - Seiko 8M25 | Manual - Page 2
( 1/4 *, TE 0 IM 0 TIME s,• ' ''-I, e 0 II ALARM ON PEMI e; TIME I))) r14.II 51z (75 --/A.ON) TIMf o 00"I MACH 1/, 7 ALARM SET I))) SET -L 7 1- Sta)OftNN( 1E c:IMC-7. 1S- 6MizoZ,TVi)' 0 litE(.=-E-, k,' 75swa, < • if 1 .) L, -C o fe_EMO'§. .7T. < tt" 'IAN (I 2iii100-5-0,fit(Z) tc
-
 1
1 -
 2
2
 |
 |
®TIME
SETTING
IISTOPWATCH
(measures
up
to
60
minutes)
IINOTES
ON
THE
BATTERY
8M25/8M26
G727-90
IIFEATURES
•
SEIKO
Quartz
Watches
Cal.
8M25
and
8M26
are
multi
-function
watches
with
two
hands
that
feature
alarm,
stopwatch
and
timer
functions.
The
hour
and
minute
hands
are
driven
by
two
different
motors,
and
thus
they
can
serve
for
various
purposes.
(The
desired
mode
can
be
selected
simply
by
turning
the
crown
clockwise
or
counterclockwise.
0
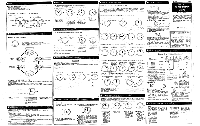
DISPLAY
AND
CROWN/BUTTON
OPERATION
Two
types
of
mode
indicators
are
available.
Button®
Hour
hand
Button®
60
a
Minute
hand
Crown
30
Mode
indication
with
hand
Button®
Hour
hand
60
Button®
Mode
indicator
a
Minute
hand
Crown
Mode
indication
with
marker
HOWTOWSE,
(J,
•CHANGEOVER
OF
MODES
CD
STOPWATCH
mode
Mode
for
adjusting
the
hand
position
IA
°
The
mode
changes
in
the
following
order
by
turning
the
crown
at
the
normal
position
clockwise
or
counterclockwise.
The
desired
mode
is
indicated
by
the
mode
indication
hand
or
marker.
*
The
crown
can
be
turned
both
clockwise
and
counterclockwise.
rIMEa
TIME
mode
(Alarm
disengaged)
It
.4
Tr
ot
TIME
t
ALARM
ON
CHRONO
STOP.W
OMAGH
r,
9
OO
TIMER
ODOm
TIMER
-
mode
()
ADJUSTING
THE
HAND
POSITION
Before
setting
the
time,
be
sure
to
use
the
12
o'clock
position.
*
Turn
the
crown
to
set
the
mode
indicator
to
Mode
for
adjusting
the
hand
position
•
If
the
hands
do
not
return
to
the
12
o'clock
position,
reset
them
to
the
12
o'clock
position
following
the
procedure
below.
0
tr
TO'
C0 01
L
'
0
%
r,.,$)
.
ALARM
SET
iu1)
SET
Mode
for
adjusting
the
hand
position
TIME
mode
(Alarm
engaged)
ALARM
SETTING
mode
mode
to
put
both
hands
in
the
Minute
hand
adjustment
®A
Hour
hand
adjustment
MPull
out
the
crown
to
the
first
click.
CI
Press
®
and
repeatedly
but
separately
to
reset
the
minute
and
hour
hands
respectively
to
the
12
o'clock'
positon.
*The
hands
move
quickly
if
the
re-
spective
buttons
are
kept
pressed
2
seconds.
UPush
back
the
crown
securely
into
the
normal
position.
■SPECIFICATI0NS
1.
Frequency
of
crystal
oscillator
2.
Loss/gain
(monthly
rate)
3.
Operation
temperature
range
4.
Driving
system
5.
Display
system
TIME
mode
(Alarm
disengaged)
l
TIME
mode
(Alarm
engaged)
ALARM
SETTING
mode
TIMER
mode
Mode
for
adjusting
the
hand
position
I
32,768Hz.
(Hz=
-Hertz.•
-Cycles
per
second)
Less
than
15
seconds
at
normal
temperature
range
(5
°
C-35
°
C)(41°F
—95°F)
10°C.
-
460'C
(14°F
-14O
°
F)
Step
motor,
2
pieces
STOPWATCH
mode
6.
Battery
7.
IC
(Integrated
Circuit)
*The
above
specifications
are
subject
to
change
without
prior
notice,
for
product
improvement.
Time
display
(hour
and
minute
hands)
Time
display
(hour
and
minute
hands)
Alarm
setting
display
(hour
and
minutes
hands),
The
alarm
can
be
set
in
the
12
-hour
indication.
Timer
display
(minutes
and
second
hands),
Up
to
60
minutes.
Adjustment
of
the
hand
position
and
demonstration
movement
of
the
hands
(hour
and
minute
hands).
Stopwatch
display
(minute
and
second
hands),
The
stopwatch
can
measure
up
to
60
minutes
in
0.2
seconds.
Silver
oxide
battery,
SB-BN,
1
piece
C-MOS-LSI,
1
piece
•Turn
the
crown
to
set
the
mode
indicator
to
or
TIME
mode
(Alarm
engaged)
Hour
hand
TIME
mode
(Alarm
disengaged)
Minute
hand
(Minute
hand
setting)
MPull
out
the
crown
to
the
first
click.
*
When
pulling
out
the
crown,
the
minute
hand
stops
on
the
spot,
or
advances
to
the
nearest
minute
marker
and
stops.
[]Press
®
repeatedly
to
set
the
minute
hand.
It
advances
one
minute
with
each
press
of
the
button,
*
As
the
minute
hand
moves,
the
hour
hand
also
moves
correspondingly.
*The
hand
moves
quickly
if
seconds.
(Hour
hand
setting)
IllPress
repeatedly
to
set
the
hour
hand.
It
advances
one
hour
with
each
press
of
the
button.
*The
minute
hand
will
not
move
if
©
is
pressed.
the
button
is
kept
pressed
for
2
®Push
back
the
crown
into
the
normal
posi-
tion
in
accordance
with
a
time
signal.
MIHOW
TO
USE
:
TI
-F
ALARM
•Turn
the
crown
to
set
the
mode
indicator
to
(Alarm
time
setting)
Hour
hand
setting
®Press
®
repeatedly
to
set
the
minute
hand.
It
advances
one
minute
with
each
press
of
the
button.
ALARM
SETTING
mode
Minute
hand
setting
lE1Press
6
repeatedly
to
set
the
hour
hand,
It
advances
one
hour
with
each
press
of
the
button.
*The
hand
moves
quickly
if
the
respective
buttons
are
kept
pressed
for
2
seconds.
*
As
the
minute
hand
moves,
the
hour
hand
also
moves
correspon-
dingly.
*The
minute
hand
will
not
move
if
©
is
pressed.
(To
engage
the
alarm)
(To
disengage
the
alarm)
(®)
•
Turn
the
crown
to
set
the
mode
indicator
to
TIME
mode
(Alarm
engaged)
*The
alarm
rings
at
the
designated
alarm
time
for
20
seconds,
(Beep,
beep,
beep
-.1
*
To
stop
the
alarm
manually,
press
®
or
(g).
•
Turn
the
crown
to
set
the
mode
indicator
to
TIME
mode
(Alarm
disengaged)
2
R
(Can
be
set
to
count
down
up
to
60
minute'S
•Turn
the
crown
to
set
the
mode
indicator
to
•The
timer
can
be
set
to
count
down
up
to
60
minutes
in
minutes.
•While
in
the
TIMER
mode,
the
hands
move
counterclockwise.
*
Before
using
the
timer,
be
sure
to
reset
Th
e
hands
to
"0"
position.
(For
details,
refer
to
"ADJUSTING
THE
HAND
POSITION".)
TIMER
mode
To
set
20
minutes
for
the
timer
(Timer
setting)
co)
•
Press
0
repeatedly
to
advance
the
min-
ute
hand
to
the
20
minutes
marker.
•
The
hand
moves
quickly,
if
the
button
is
kept
pressed.
Minute
hand
(Start)
—•
•
(Time
up)
econd
hand
Minute
hand
Stop
and
restart
of
the
timer
can
be
repeated
with
a
beep
by
pressing
®.
•
When
the
set
time
is
up,
a
warning
sound
beeps
for
approximately
5
seconds.
*To
stop
it
manually,
press
®
or
6.
(To
reset
the
timer)
Stop
®
04
1
Reset
•
Press
®
to
stop
the
timer.
A
beep
sounds.
•
Press
to
reset
the
hands
to
"0"
position.
A
beep
also
sounds.
:ALARM
TEST
2
AND
HAND
DEMONSTRATION..
(Alarm
test)
•
Turn
the
crown
to
set
the
mode
indicator
to
•
mode
(Alarm
engaged)
(Demonstration
movement
of
the
hands)
TIME
•
Turn
the
crown
to
set
the
mode
indicator
to
the
•
Press
both
g)
and
C)
at
the
same
time.
The
alarm
sound
can
be
tested
while
the
buttons
are
kept
pressed.
Mode
for
adjusting
the
hand
position
(A)
(®Y'
•
Press
®
or
0
.
The
hour
and
minute
hands
automatically
turn
counterclockwise
and
clock-
wise,
respectively,
with
some
intermittent
pauses.
•
Press
®
or
8
again.
The
hands
will
be
reset
to
the
12
o'clock
position.
•
If
the
watch
is
left
untouched
with
the
hands
showing
demonstration
movement,
the
hands
will
be
automatically
reset
to
the
12
o'clock
position
in
about
3
minutes.
•Turn
the
crown
to
set
the
mode
indicator
to
STOPWATCH
mode
•The
stopwatch
can
measure
up
to
60
minutes
in
0.2
seconds.
•Even
if
the
mode
is
changed
from
STOPWATCH
mode
to
another
while
the
stopwatch
is
measuring,
it
continues
counting.
However,
when
the
stopwatch
is
stopped,
the
hands
will
be
reset
to
"0"
position,
and
when
the
split
time
is
measured,
it will
be
released,
if
the
mode
is
changed.
*
Before
using
the
stopwatch,
be
sure
to
reset
the
hands
to
"0"
position.
(For
details,
refer
to
"ADJUSTING
THE
HANDS
POSITION".)
(Standard
measurement)
Press
the
buttons
in
the
following
order:
C)
—.C)
—
.0
Sec
d
hand
START
(A
beep
sounds)
(A
beep
sounds)
(A
beep
sounds)
STOP
RESET
nute
hand
(Accumulated
elapsed
time
measurement)
Press
the
buttons
in
the
following
order:
®--->®—"®
—•
•
START
STOP
--,
RESTART
-•
•
•--,
STOP
-"
RESET
(A
beep
sounds)
(A
beep
sounds)
(A
beep
sounds)
(A
beep
sounds)
(A
beep
sounds)
ti
Restart
and
stop
of
the
stopwatch
can
be
repeated
by
pressing
®.
(Split
(intermediate)
time
measurement)
Press
the
buttons
in
the
following
order:
®
-,
0,0
—
••
---,
®
-,
0
beep
ST
sounds)
ART
--,
SPLIT
SPLIT
RELEASE
-•"-'
STOP
RESET
(A
(A
beep
sounds)
(A
beep
sounds)
(A
beep
sounds)
(To
beep
sounds)
C
')
Measurement
and
release
of
the
split
time
can
be
repeated
by
pressing
0.
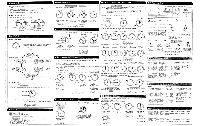
(Measurement
of
two
competitors)
Press
the
buttons
in
the
following
order:
(D
-s--->®-0-0
START
FINISH
OF
FIRST
---"
FINISH
OF
SECOND
-,
TIME
OF
SECOND
RESET
(A
beep
sounds)
COMPETITOR
COMPETITOR
COMPETITOR
(A
beep
sounds)
(A
beep
sounds)
(A
beep
sounds)
(A
beep
sounds)
et*
TIME
OF
FIRST
COMPETITOR
HOW
TO
USE
THE
TACHYMETER
(For
the
models
with
a
tachymeter
scale
on
the
dial)
•
The
tachymeter
can
be
used
to
measure
the
hourly
average
speed
of
a
vehicle
and
the
hourly
rate
of
operation.
(To
measure
the
hourly
average
speed
of
a
vehicle)
(To
measure
the
hourly
rate
of
operation)
START
STOP
START
STOP
00"
Tachymeter
1km
•
Use
the
stopwatch
to
determine
how
many
seconds
it
takes
to
go
one
kilometer.
•
Read
the
tachymeter
scale
where
the
second
hand
points.
8Okm/h
One
product
•
Use
the
stopwatch
to
measure
the
time
required
to
complete
one
product.
•
Read
the
tachymeter
where
the
second
hand
points.
300
products/hour
„MINECESSARY
CPERATION
I
AFTER
THE
BATTERY
CHANGE
•When
the
battery
is
replaced
with
a
new
one,
the
time
information
stored
in
the
built-in
IC
and
the
time
indicated
by
the
hands
do
not
correspond
with
each
other.
Before
using
the
watch,
therefore,
be
sure
to
reset
the
hands
to
the
12
o'clock
position
following
the
procedures
below.
•Turn
the
crown
to
set
the
mode
indicator
to
B
ifi
•
Pull
out
the
crown
to
the
first
click.
•
Keep
®
and
0
pressed
at
the
same
time
for
about
3
seconds.
•
A
beep
sounds
when
the
buttons
are
released.
•
The
hands
start
to
show
demonstra-
tion
movement.
0
(®)
MODE
for
adjusting
the
hand
position
21
Press
®
or
to
stop
the
hands.
CI
Press
®
and
ig
repeatedly
to
set
the
hands
to
the
12
o'clock
position.
(Refer
to
"ADJUST-
ING
THE
HAND
POSITION".)
4
oPush
in
the
crown
to
the
normal
position.
*Turn
the
crown
to
set
the
mode
indicator
to
TIMER
mode
to
set
the
desired
time.
(Refer
to
"TIME
SETTING".)
BATTERY
LIFE
When
a
new,
normal
battery
is
installed,
your
watch
will
operate
for
approximately
2.5
years.
*
If
the
alarm
is
used
more
than
once
a
day
and/or
if
the
stopwatch
or
timer
is
used
more
than
5
minutes
a
day,
the
battery
life
may
be
less
than
2.5
years.
*
As
the
battery
in
your
watch
is
a
monitor
battery
inserted
at
the
factory
to
check
the
function
and
performance
of
the
watch,
its
actual
life
once
in
your
possession
may
be
less
than
2.5
years.
*Battery
replacement
will
be
made
at
cost
even
within
the
guarantee
period.
CONSUMPTION
OF
BATTERY
POWER
•
Battery
power
is
consumed
even
though
the
hands
are_
not
moving.
An
extremely
small
amount
of
electricity
is
always
sup-
plied
to
the
electronic
circuit
in
order
to
make
the
watch
start
moving
immediately
and
correctly
after
it
is
stopped
and
the
battery
itself
discharges
electricity.
BATEERY
CHANGE
When
replacing
the
battery,
please
specify
the
"SEIKO
SB
Battery"
at
the
retailer
from
whom
your
watch
was
purchased
or
at
an
authorized
SEIKO
DEALER.
We
suggest
that
the
battery
should
be
replaced
as
soon
as
possible
when
you
see
the the
second
hand
moving
in
two
second
intervals.
If
an
old
battery
is
kept
in
the
watch
for
a
long
time,
electrolyte
leakage
from
the
battery
may
damage
the
module.
*
When
a
battery
is
taken
out
of
a
watch,
it
must
be
kept
at
a
place
beyond
the
reach
of
an
infant.
In
case
it
is
swallowed
by
an
infant,
consult
a
doctor
immediately.
SEIKO
't•-ti"3
-
.77t7,1
IrmivAls
INSTRUCTION
8M25/8M26
Z.ODtztY1St-f
o_E(lotzt::6V.175'L
-
5.
-
_
-
"otLtz
o
z'fV11
0
ATTI.7..:0DIMAJEA,V.t<87,t°
7
-)
.0-5
MAL°Elell—E4f
ZolfRIREARA*V3TtLia%4L-,
R.1=Te31.1C:2%<tt'
LN,,'
a-0,1.dt
jEgOt-(D-
-
44
41
*Inli+ARAff•,2TI164
,
21
-
V
.
-
T104
f3S€toxfmc((±,
tz[18a<o>
ft•fa—IRDIZJ
Z•T
.
:.n.110),(MITS50)
1
tzll
2.]
"
ftvf
(
S
S
C)
T
-
060
tlfill0(PARM
—
AM7
-
20-11fLRA*4eN)
(011)231-0615
+
-
T
-
9SO
falitlitirfXR
—
VT1
-
4
-
3O81±Meiv)
(022)227-4171
4„,
,,g.
Tort
(14A
e/y)
(052)971-7474
I
3.
7'
550
*fg$Eglilf1
-
32
-
11(4LiR
,
O
1,
7'*INt.'M
(
1
06
8
)
8
5
)
31-
-
4
90
30
0
1
T
o
Till
.
.
0
,
7
33
Tor
Er,hirm
,
vElitiffs-21(rtsAvfit
.,,
)
(082)248-1020
I.
TM
IiiiigliMilXErttiffl5-1-23(OnSeiv)
(092)271-2538
+
0
'
SSCIVIRNI-b
4
—
et
,
,stritA
FiRat
-(7-
is
f.Ifvf
t
Flit
*1013
,
IlARN14:4-0
-
i6(iliFI4T
EWA')
(031
535-2211
7
Q
3
-
-
T
-
54i
(06)
244-6871
+
!
4.4
MGARS
OF
YOUR.
WATCH
:11
•
Water
resistance
The
following
table
shows
the
degree
of
water
resistance
of
your
watch.
Please
check
the
case
back
and
dial
to
find
the
indication
for
the
water
resistance
quality
of
your
watch,
and
refer
to
the
table
for
the
use
of
your
watch.
Indication
for
water
resis-
Lance
a:
Indication
on
the
dial
b:
Indication
on
the
case
back
Condition
of
use
Degree
of
water
resistance
A
C._—
,
.7.
,L,
I
---,
%.11.._
>
Designed
and
manufactured
to
withstand
accidental
con-
tact
with
water
such
as
spl-
ashes
and
rain.
Suitable
for
kitchen
work,
swimming,
yachting
and
shallow
diving
without
brea-
thing
apparatus.
Suitable
for
scubadwing.
a
b
No
indication
No
indication
Non
-water
resistance
X
X
a
b
No
indication
'WATER
RESIST'
Water
resistance
(
3
bar)
O
X
X
-
6
Na
indication,
"SILVER
WAVE"
or
'WATER
RESIST
10
BAR'
"ii."8,'WATER
RESIST'
or
'WATER
RESIST
10
BAR"
Water
resistance
(
10
barl
O
O
X
*If
your
watch
is
non-resistant,
care
should
be
taken
not
to
get
it
wet
with
water
such
as
splashes,
rain
or
pouring
perspiration.
If
the
watch
becomes
wet,
wipe
it
thoughly
dry
with
highly
absorbent
cloth.
•
*
Do
not
turn
or
pull
out
the
crown
when
the
watch
is
wet,
as
water
may
go
inside
the
watch.
*
If
your
watch
is
water
resistant
(10
bar)
and
exposed
to
saltwater
or
pouring
perspiration,
rinse
it
in
fresh
water
and
then
wipe
it
thoroughly
dry.
*As
a
small
amount
of
moisture
is
included
inside
the
watch,
the
inner
surface
of
the
glass
may
be
temporarily
blurred
if
the
atmospheric
temperature
is
lower
than
that
inside
the
watch.
This
does
not
adversely
affect
the
watch.
However,
if
the
blur
persists
for
a
long
time,
we
suggest
that
you
have
your
watch
checked
by
the
retainer
from
whom
it
was
purchased
of
by
an
AUTHO-
RIZED
SEIKO
DEALER.
ANTI
-MAGNETIC
0
9
k
ANTI
-SHOCK
0
Your
watch
can
be
worn
while
participating
in
most
sports.;
*
But
ti
e
careful
not
to
drop
or
hit
the
watch
against
hard
objects
or
otherwise
subject the
watch
to
violent
shocks.
Your
watch
will
not
be
affected
by
the
magnetism
of
household
electrical
appliances.
Magnetism
emitted
from
household
electric
appli-
ances
will
not
affect
the
watch.
Keep
the
watch
away
from
close
contact
with
magnetic
objects
that
generate
strong
magnetic
field,
such
as
magnets,
health
appliances,
magnetic
doors
of
refrigerators,
etc.
*
If
"ANTI
-MAGNETIC
60G"
or
"ANTI
-MAGNETIC
200G"
is
in-
scribed
on
the
case
back
of
your
watch,
it
is
designed
and
manufactured
to
withstand
strong
magnetism.
However,
keep
it
away
from
close
contact
with
electric
appliances
that
generate
strong
magnetic
field.
*
If
your
watch
is
affected
by
magnetism,
it
will
lose
or
gain
temporarily.
However,
normal
accuracy
will
return
if
it
is
moved
away
from
the
magnetic
field.
In
that
case,
be
sure
to
reset
the
time
before
use.
VIBRATION
Your
watch
will
lose
time
temporarily
when
it
is
sub-
jected
to
strong
vibrations
while
operating
a
motor-
cycle,
chain
-saw,
jack-
hammer,
etc.
CHEMICALS
Please
note
that
the
watch
case,
metal
brace-
let
and
dial
will
be
dis-
colored
by
chemicals,
gas
or
mercury.
This
watch
is
so
adjusted
that
it
TEMPERATURE
will
maintain
stable
time
accuracy
in
normal
temperature
(5
C-35
CI.
X
Do
not
be
exposed
Do
not
leave
your
watch
direct
to
the
sun
or
in
a
cold
place
for
a
heat
for
hours..
long
time.
*
It
the
watch
is
lett
in
extremely
high
or
low
temperature,
a
slight
time
loss/gain
and
unstable
movement
of
the
second
hand
may
be
caused.
However,
those
conditions
will
be
corrected
when
the
watch
returns
to
normal
tem-
perature.
*
Be
sure
to
-
note
that
if
your
watch
is
left
in
a
place
where
the
temperature
is
below
—10
C
or
over
+00
C,
it
will
malfunction,
and
the
battery
electrolyte
leakage
will
shorten
the
battery
life.
RIO
PRESERVE
THE
QUALITY
OF
YOUR'W
-
AICH
CHECK
We
suggest
that
you
have
your
watch
checked
by
a
SEIKO
DEALER,
every
2
or
3
years
or
when
the
bat-
tery
is
replaced,
for
oil
condition,
battery
elec-
trolyte
leakage
or
dam-
age
due
to
water
or
sweat.
After
checking
the
watch,
adjusted
or
re-
paired
may
be
required.
*
Be
sure
to
have
the
gasket
and
push
-pin
replaced
with
new
ones
by
a
SEIKO
DEALER
after
the
watch
is
adjusted
or
repaired.
*Specify
"SEIKO
GENUINE
PARTS"
when
replacing
the
parts.
CARE
OF
THE
CASE
AND,
METAL
BRACELET
Stains
or
water
will
rust
the
watch
case
and
metal
bracelet.
Wipe
them
off
with
a
soft
cloth.
Adjust
the
metal
brace-
let
so
that
there
will
be
a
little
clearance
between
the
metal
bracelet
and
your
wrist
to
reduce
accumula-
tion
of
dirt
and
sweat.
Clean
the
metal
brace-
let
with
a
soft
tooth-
brush
dipped
in
water
or
soapy
water.
*
Be
careful
not
to
get
the
case
wet
when
cleaning.
If
your
watch
has
a
rotating
bezel,
alway
keep the
bezel
clean.
Otherwise,
dust
will
collect
under
the
bezel
and
it
cannot
be
rotate
smoothly.