Sharp AJ-6010 AJ6010 Operation Manual
Sharp AJ-6010 Manual
 |
View all Sharp AJ-6010 manuals
Add to My Manuals
Save this manual to your list of manuals |
Sharp AJ-6010 manual content summary:
- Sharp AJ-6010 | AJ6010 Operation Manual - Page 1
- Sharp AJ-6010 | AJ6010 Operation Manual - Page 2
the Print Head 72 Aligning the Print Head 75 Troubleshooting Identifying Unit Problems 77 Check the Connection between the Unit and Computer 78 Check Your Computer 79 Failed to Install the AJ-6000 Series Driver (USB Interface) Nothing Prints 81 Uninstalling the Printer Driver Faint - Sharp AJ-6010 | AJ6010 Operation Manual - Page 3
Manual How to Use the Online Manual This Online Manual provides instruction for the operation of your new unit. It is designed to assist you in the operation of the Online Manual select "Print". After specifying the printer setting, click the "OK" button to print. In this online manual, screen - Sharp AJ-6010 | AJ6010 Operation Manual - Page 4
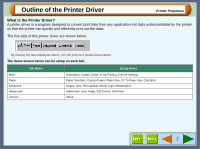
the Printer Driver Printer Properties What is the Printer Driver? A printer driver is a program designed to convert print data from any application into data understandable by the printer so that the printer can quickly and efficiently print out the data. The five tabs of this printer driver are - Sharp AJ-6010 | AJ6010 Operation Manual - Page 5
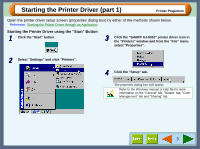
the "Start" button. 3 Click the "SHARP AJ-6010" printer driver icon in the "Printers" window and from the "File" menu select "Properties". 2 Select "Settings" and click "Printers". 4 Click the "Setup" tab. The properties dialog box will appear. Refer to the Windows manual or help file for more - Sharp AJ-6010 | AJ6010 Operation Manual - Page 6
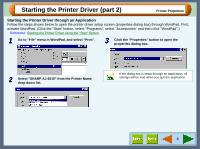
" and then click "WordPad".) Reference: Starting the Printer Driver using the "Start" Button 1 Go to "File" menu in WordPad, and select "Print". 3 Click the "Properties" button to open the properties dialog box. 2 Select "SHARP AJ-6010" from the Printer Name drop-down list. If the dialog box is - Sharp AJ-6010 | AJ6010 Operation Manual - Page 7
Printer Driver Functions Printer Properties Tab Index which allows you to switch between the various setup screens. Check button Allows you to select one item from a list of options. Output Image The settings you made at "Orientation" and "N-Up Printing" are shown in this image. Check box Click - Sharp AJ-6010 | AJ6010 Operation Manual - Page 8
options, including orientation and the number of copies, are controlled through this dialog box. You can usually print simply by adjusting and confirming the printer options listed in this dialog box. Select the orientation for your documents. Further information on each option is available by - Sharp AJ-6010 | AJ6010 Operation Manual - Page 9
"Main" Tab Settings (part 2) Printer Properties Orientation Set the orientation for your documents either to "Portrait" or "Landscape". Portrait Check this setting to print your documents vertically. Order Allows you to change the print out order of your documents. Collate When multiple copies - Sharp AJ-6010 | AJ6010 Operation Manual - Page 10
"Main" Tab Settings (part 3) Printer Properties 2-Up N-Up Printing Set this feature to place multiple reduced pages onto a single page. Select the "2-Up" option to copy two pages or the "4-Up" option to copy four pages onto a single printed page. Orientation Portrait Landscape Original Size - Sharp AJ-6010 | AJ6010 Operation Manual - Page 11
paper size, tray and zoom. Reference: Guaranteed area and printable area Printer Properties Select the paper source. Allows you to customize the size of fit to the size of paper in the printer. Allows you to reduce or enlarge the size of the print. On the above screen, click on options shown - Sharp AJ-6010 | AJ6010 Operation Manual - Page 12
" or "Bypass" for your print job. Tray Paper is fed to the printer from the paper tray. Bypass Paper will be fed to the printer from the bypass tray. Only one sheet can be loaded into the to the bypass tray. Make sure that your application supports Banners when you intend to print onto Banners. 10 - Sharp AJ-6010 | AJ6010 Operation Manual - Page 13
of measurement for paper size settings: either "millimetres" or "inches". Paper sizes larger than 215.9mm x 355.6mm (8.5" x 14") cannot be used in this printer. You can print the image by using the reduction feature of the "Zoom[%]" setting. Fit To Paper Size Fit To Page Check this box to fit the - Sharp AJ-6010 | AJ6010 Operation Manual - Page 14
(part 4) Guaranteed area and printable area This printer can print onto the following area of the paper. It is of the paper. Printable area The void area of the printer driver is 3mm from the paper edges. The print quality may be degraded outside the guaranteed area according to the contents of - Sharp AJ-6010 | AJ6010 Operation Manual - Page 15
"Advanced" Tab Settings (part 1) Set your colour and quality preferences for printing using this screen. Printer Properties Set printer output preferences to colour or greyscale. Customize printer output quality to suit your needs. Click to access maintenance options. Open to set output quality - Sharp AJ-6010 | AJ6010 Operation Manual - Page 16
Properties Quality Set the printer output quality settings below. Print Quality This option sets printing speed and quality. You can trade off speed for quality. "Draft" is the fastest and lowest quality, "Best" is the slowest and best quality. Draft Sharp Special Normal Best Select this option - Sharp AJ-6010 | AJ6010 Operation Manual - Page 17
Printer Properties Set the colour matching as well as the brightness, contrast and colour balance of an image. Set the brightness, contrast and colour balance level of your print the result of the print job. SHARP Colour matching Select this option to utilise SHARP's original Colour Management - Sharp AJ-6010 | AJ6010 Operation Manual - Page 18
Settings (part 1) Use this screen to set watermarks. Printer Properties Use this screen to view how the watermark will to set the font size of a watermark from 6 to 500 points. Use the scroll bar to set the print angle of a watermark from -90˚ to 90˚. (The angle can be set in 15˚ multiples.) You - Sharp AJ-6010 | AJ6010 Operation Manual - Page 19
Settings (part 2) Printer Properties Watermark Select the colour of a watermark, click this button to display the "Color" dialog box. For more information on this dialog box, click the Only Check this box to ensure a watermark is printed only on the first page of the document. By leaving this box - Sharp AJ-6010 | AJ6010 Operation Manual - Page 20
"Version" Tab Settings Printer Properties Information about the printer driver version is shown on this screen. "About" button Click this button to display the "About" dialog box for information on the driver name and version. 18 - Sharp AJ-6010 | AJ6010 Operation Manual - Page 21
TRAY" in the Setup Guide and Operation Manual. Open the printer driver setup screen and set the print preferences Reference: Basic Printing, Printing a Watermark, Enlarge/Reduce the Printed Image, Printing Multiple Pages on One Page, Printing a Photograph Send print data from your computer Load - Sharp AJ-6010 | AJ6010 Operation Manual - Page 22
drop-down list. 2 Select "Print" from the application's "File" menu. Make sure that "SHARP AJ-6010" is selected as the current printer, and then click the "Properties" button. The properties dialog box will open. Reference: See the Starting the Printer Driver through an Application for details on - Sharp AJ-6010 | AJ6010 Operation Manual - Page 23
After setting your preferences, click the "OK" button. To print a single copy of a document in portrait orientation, confirm the "Portrait" option in the "Orientation", and "1" in the "Copies" box. Print 5 Click the "OK" button in the "Print" dialog box. Reference: See the "Main" Tab Settings for - Sharp AJ-6010 | AJ6010 Operation Manual - Page 24
", on your document, refer to the following steps. Open the printer driver and click the "Watermark" tab. Reference: See the Starting the Printer Driver through an Application for details on how to open the printer driver. How to Print a Watermark From the "Watermark" drop-down list, select the - Sharp AJ-6010 | AJ6010 Operation Manual - Page 25
. Reference: See the "Paper" Tab Settings for details on "Zoom[%]" option. Automatic Zooming to the Loaded Paper This printer driver can adjust the zoom ratio for printing according to the paper loaded in the printer. To use this function, select the "Paper" tab from the properties dialog box of the - Sharp AJ-6010 | AJ6010 Operation Manual - Page 26
Multiple Pages on One Page Print This feature allows you to print two or four document pages onto a single page. To use this function, open the properties dialog box, select "2-Up" or "4-Up" for "N-Up Printing" on the "Main" tab, and then select the same paper size from the drop-down list of - Sharp AJ-6010 | AJ6010 Operation Manual - Page 27
taken with a digital camera are printed clearly, use quality photo paper and follow the instructions below. When loading photo paper "Output Type" option is set to "Colour". 2 In the "Quality" area, set the "Print Quality" option to "Best". 3 In the "Quality" area, set the "Media Type" option to - Sharp AJ-6010 | AJ6010 Operation Manual - Page 28
window is a program designed to show the remaining ink levels and current printer status including the document name printing and error messages. It also controls head cleaning and head position adjustment. The print status window contains status window and three tabs. The status window displays - Sharp AJ-6010 | AJ6010 Operation Manual - Page 29
status window are shown below. Program icon This icon informs you of the print status. Reference: Understanding Error Messages Status icon This icon informs you of the print status. Reference: Understanding Error Messages Tab Index which allows you to switch between the three setup screens. "Cancel - Sharp AJ-6010 | AJ6010 Operation Manual - Page 30
an explanation of the printer condition. Program icon Status icon None Normal Condition Fault Printing has stopped because of a problem. Follow the instruction on the status window to solve the problem immediately. Warning A problem requires your attention. Follow the instruction on the status - Sharp AJ-6010 | AJ6010 Operation Manual - Page 31
Window Click this tab to conduct print head maintenance, and to check the amount of available ink. Remaining ink indicator window This window indicates the level of ink remaining in the printer. A message appears when the ink tank is nearly empty. Prepare a new ink tank and replace it when required - Sharp AJ-6010 | AJ6010 Operation Manual - Page 32
Tab Allows you to select when to display the print status window. Select one option from the three shown below. Print Status Window Display Print Status Window when printing The print status window will be displayed automatically at the start of the print job. It will close automatically when the - Sharp AJ-6010 | AJ6010 Operation Manual - Page 33
on the following assumptions; there is an established network in place. Client Client with shared printer Shared printer Client Client With Peer To Peer connections, the print server is a client to which a printer is directly connected, and a "Client" is any computer, which is connected to the - Sharp AJ-6010 | AJ6010 Operation Manual - Page 34
The "Network" dialog box will appear. 7 Right-click the "SHARP AJ-6010" printer driver icon, and select "Sharing" from the pop-up menu. 3 Click the "File and Print Sharing" button. 4 Enable "I want to be able to allow others to print to my printer(s)." by clicking the check box ( ), and then click - Sharp AJ-6010 | AJ6010 Operation Manual - Page 35
below. For details on installing the printer driver, refer to "INSTALLING THE PRINTER DRIVER" in the Setup Guide and Operation Manual. 1 Click the "Start" button, select "Settings", and then click "Printers". 2 Right-click the "SHARP AJ-6010" printer driver icon, and select "Properties" from the - Sharp AJ-6010 | AJ6010 Operation Manual - Page 36
screens respectively as shown below. Reference: Starting the SHARP TWAIN Driver, SHARP TWAIN Driver Functions Set-up screen Display image screen "Standard" screen for interface of image data processing devices including scanners. By installing a TWAIN driver onto your computer, you can scan and - Sharp AJ-6010 | AJ6010 Operation Manual - Page 37
the "File" menu, or click the "Acquire" button ( ) to display the SHARP TWAIN driver. The SHARP TWAIN driver will appear. 2 Select "SHARP TWAIN AJ1", and click the "Select" button. If you use more than one scanning device, select the scanner you want to use through the application. The method for - Sharp AJ-6010 | AJ6010 Operation Manual - Page 38
that the SHARP TWAIN driver has been installed without changing the default setting, and Sharpdesk is running. 1 Place a document on the original table. Reference: For information on setting a document for scanning, refer to "MAKING COPIES" in the Setup Guide and Operation Manual. 2 From Sharpdesk - Sharp AJ-6010 | AJ6010 Operation Manual - Page 39
button, check if your preferences are set correctly. Scanning Quit button Click this button to quit the SHARP TWAIN driver. "Help" button Click to display the help file for the SHARP TWAIN driver. "Auto Scan Area Judgement" button Click when the preview screen is displayed to automatically set the - Sharp AJ-6010 | AJ6010 Operation Manual - Page 40
scanning through the "Standard" screen are fixed. Colour Matching: For Printer, Interactive: On, Zoom: 100%, Reverse: Off, Auto Contrast/ be displayed as desktop image, or showed onscreen. Sets preferences to scan and print a picture, image, etc. Sets preferences to send a pamphlet, catalogue, - Sharp AJ-6010 | AJ6010 Operation Manual - Page 41
"Professional" Scan Preferences ("Main" Tab) (part 1) Scanning By setting the "Scanning Mode" menu to "Professional", the "Professional" screen will be displayed. Use this screen to specify more detailed settings than the "Standard" screen. Tab Index which allows you to switch between the three - Sharp AJ-6010 | AJ6010 Operation Manual - Page 42
or catalogues, through facsimile. Select this option when you scan the originals containing the shaded drawings. This option is also useful when you print out the scanned data in monochrome, because the file size is small. Select this option when you scan an image, which consists of characters - Sharp AJ-6010 | AJ6010 Operation Manual - Page 43
. On the other hand, decrease the threshold to increase areas represented in white. Specify the value for "B/W Threshold" setting to let your OCR software read text data clearly. The text data cannot be recognised correctly when the data includes blurred or faint characters. Reverse When using the - Sharp AJ-6010 | AJ6010 Operation Manual - Page 44
off. Colour Matching Click the ( ) button to select from the drop-down list. Setting For Printer For CRT For LCD ICM Explanation Sharp's original colour matching function; matches colours with the printer. Sharp's original colour matching function; matches colours displayed on a CRT monitor - Sharp AJ-6010 | AJ6010 Operation Manual - Page 45
preferences shown on the "Standard" and "Professional" screens back to the default settings. "About" button Click for details on the version of the SHARP TWAIN driver. On the above screen, click on options shown in the green boxes to make additional changes. Click this button if you do not want - Sharp AJ-6010 | AJ6010 Operation Manual - Page 46
"Standard Mode Setting" Dialog Box Scanning Click the "Standard Mode Setting" button to display the dialog box shown below. On this dialog, you can change the preferences of four buttons including "Monitor", "Photo", "FAX", and "OCR" on the "Standard" screen. Select the corresponding tab to change - Sharp AJ-6010 | AJ6010 Operation Manual - Page 47
Preview Screen Scanning Click the "Preview" button ( ) to display a preview image on the preview screen. Specify the scanning area on this screen following the steps shown below. If the variation preview screen is displayed, switch to the preview screen by clicking the "Preview Screen" button ( - Sharp AJ-6010 | AJ6010 Operation Manual - Page 48
the variation preview screen. Nine images, which have different variations of brightness and contrast, will be displayed on this screen. By clicking on one of the images, the scan settings will be changed to correspond to the selected image. ! This setting is unavailable when the "Colour Mode - Sharp AJ-6010 | AJ6010 Operation Manual - Page 49
Default Settings for the SHARP TWAIN Driver Scanning The default settings for the SHARP TWAIN driver are shown below. "Standard" screen Colour Matching Default setting On( ) 128 Off( ) Soft For Printer "Professional" screen ("Preference" tab) Setting Interactive Standard Mode Setting Default - Sharp AJ-6010 | AJ6010 Operation Manual - Page 50
Outline of the AJ Series Utility Utility Software You can use your AJ-series unit with two attractive software utilities, "Copy JX2" and "Button Manager". These utilities make this unit more useful to fit various office works. This page shows the outline of these AJ-series utilities. To show each - Sharp AJ-6010 | AJ6010 Operation Manual - Page 51
the "Start" button, select "Programs", select "SHARP AJ-6000 Series", select "Utility", and then click "Copy JX2 for AJ Series" to display the screen shown below. Reference: For the detail of the steps for printing, refer to How to Print, How to Print Multiple Copies. Application icon Displays the - Sharp AJ-6010 | AJ6010 Operation Manual - Page 52
Print (part 1) Copy JX2 Follow the steps shown below for basic operation of Copy JX2. 1 Place the document on the original table. Refer to "MAKING COPIES" in the Setup Guide and Operation Manual the watermark setting dialog box in the printer driver opens, specify your choice of required - Sharp AJ-6010 | AJ6010 Operation Manual - Page 53
stop" button, or press the [Esc] key. If you have already sent the print data to the printer driver, follow the printer driver instructions to cancel print job. Copies Set the number of copies to be printed here. Default setting is "01". Indicates the procedure of scanning process and data transfer - Sharp AJ-6010 | AJ6010 Operation Manual - Page 54
's left margin 5.6cm (2.2") 1.3cm (0.5") Printer driver's top margin 3.8cm (1.5") 1.3cm (0.5") 3 pages 5 pages "Rotate" button Click the button to rotate the image 90 degrees. "Cutting Lines" button Click this button to print out the frame highlighted by the line. "Background Colour" button Click - Sharp AJ-6010 | AJ6010 Operation Manual - Page 55
screen again, click the "Image Repeat" button, and then select "On" from its drop-down list. 4 Click the "Start" button ( ). The printer settings dialog box will open. Set the print conditions as required. Click the "OK" button. Printing will be started after scanning the document. Copy JX2 53 - Sharp AJ-6010 | AJ6010 Operation Manual - Page 56
Scan Preview Copy JX2 The preview image can be displayed after setting your original. Click the "Change Preview" button, select "Scan Preview", and then click the "Scan Preview" button ( ). On this screen, you can specify the clipping area. Follow the steps shown below to specify the clipping area - Sharp AJ-6010 | AJ6010 Operation Manual - Page 57
values for margins within the quality guaranteed area to ensure your print quality. ! The paper size indicated on the "Print Margin Settings" screen is the size which has been selected through the printer driver. ! By changing the print position, the setting of "Page Layout" will return to "Custom - Sharp AJ-6010 | AJ6010 Operation Manual - Page 58
of the scan area using the drop-down list. Brightness setting is also available by clicking one of the five buttons indicating the level of brightness located above this button. Select the desired brightness Automatically adjusts the scan size of the image to fit the size of print paper. 56 - Sharp AJ-6010 | AJ6010 Operation Manual - Page 59
" button Copy JX2 "Save/Load settings" button "Image Repeat" button "Printer Settings" button On the above screen, click on options shown in the to set the print position using the drop-down list. Setting Normal Centring Custom Contents Prints image at top-left of the page. Prints image in the - Sharp AJ-6010 | AJ6010 Operation Manual - Page 60
data and printer driver settings. print multiple copies function. Deactivates the print multiple copies function. (Default setting) Copy JX2 "Printer Settings" button Click the "Printer Settings" button to display the print setup dialog box. Confirm the "SHARP AJ-6010" is selected as a printer - Sharp AJ-6010 | AJ6010 Operation Manual - Page 61
to "SCAN" button on the unit. This software enables you to set scanning functions to five different scan menus, which will be linked the "SCAN" button on the unit. Reference: Refer to "USING THIS UNIT WITH YOUR COMPUTER" in the Setup Guide and Operation Manual for details on accessing the scan menu - Sharp AJ-6010 | AJ6010 Operation Manual - Page 62
Button Manager Functions The functions of Button Manager are shown below. Tab Click to set scan menu options. Button Manager Quit button Click this button to quit the Button Manager. "Scan Setup" area Set the scan conditions. Some applications may limit your choice of settings. "Application - Sharp AJ-6010 | AJ6010 Operation Manual - Page 63
Button Manager Settings Button Manager After being installed, the Button Manager keeps active under the Windows operating system. Follow the steps shown below to set scan options as you like. 1 Right-click the Button Manager icon ( ) on the task bar. 2 Select "Settings" from the displayed pop-up - Sharp AJ-6010 | AJ6010 Operation Manual - Page 64
image here. Click the ( ) button to select from "None", "Soft", "Sharp", and "Normal". When the colour mode is set to "Monochrome", this option is colours of the image to be scanned. Click the ( ) button to select from "For Printer", "For CRT", "For LCD", and "ICM". • When the colour mode is set to - Sharp AJ-6010 | AJ6010 Operation Manual - Page 65
clicking this button, "FAX Source" dialog box will appear. Select the FAX software you intend to use, and click "OK" button. The selected item will and then specify required settings. For the detail, refer to the operation manual or the help file of your Mail application. If any MAPI-compliant mail - Sharp AJ-6010 | AJ6010 Operation Manual - Page 66
OCR software. File Format Select the format for the scanned image here. Click the ( ) button to select from "BMP" and "TIFF". The file name is created automatically. "Word" settings The setting options for "Word" do not appear. With computers which have been installed with more than one version - Sharp AJ-6010 | AJ6010 Operation Manual - Page 67
Default Setting for Each Function Button Manager The default settings for each of the functions in the "Scan Setup" area are shown below. Function File Email FAX OCR Word Application Colour Mode Full Colour Full Colour Greyscale Monochrome Full Colour Full Colour Edge Enhancement Scanning Area - Sharp AJ-6010 | AJ6010 Operation Manual - Page 68
change. Reference: Changing the Ink Tank The "Out of ink" error message is displayed on the print status window. If the "Out of ink" error message appears on the print status window, more than two of the ink tanks are out of ink. Check the ink indicators to find the empty ones, and then immediately - Sharp AJ-6010 | AJ6010 Operation Manual - Page 69
locking knob with one hand and lift the front cover with the other hand, while keeping the knob in the unlocked position. The carriage will automatically move to the centre position. Reference: See "INSTALLING THE PRINT HEADS AND THE INK TANKS" in the Setup Guide and Operation Manual for more detail - Sharp AJ-6010 | AJ6010 Operation Manual - Page 70
wrapping and slowly remove the tape. 5 Turn the ink upside down, and then immediately insert it to the print head of corresponding number. Match the ink tank number to the print head number. Example: Removing the tape of the yellow ink tank ! Hold the tank upright when removing the tape - Sharp AJ-6010 | AJ6010 Operation Manual - Page 71
on the operation panel to complete the ink tank replacement. Reference: For more detail, refer to "THE INK TANK" in the Setup Guide and Operation Manual. 10 Print a test page to check if the unit prints properly. Click the "Start" button of "Test print head" found in the "Maintenance" dialog box of - Sharp AJ-6010 | AJ6010 Operation Manual - Page 72
"Start" button of "Auto head cleaning" to clean the print heads. If you cannot get a good result printing a test page even after cleaning the print head five times, change the print head. Reference: Cleaning the Print Head 7 Change the print head. Replace the black print head if white lines appear - Sharp AJ-6010 | AJ6010 Operation Manual - Page 73
Maintenance If the test page from "Test print head" is faint or uneven, confirm that you are printing on the correct side of the paper, and the driver setting and ink levels are correct. If these items are OK, then follow the steps below to clean the print head. 1 Click the "Advanced" tab in the - Sharp AJ-6010 | AJ6010 Operation Manual - Page 74
locking knob with one hand and lift the front cover with the other hand, while keeping the knob in the unlocked position. The carriage will automatically move to the centre position. Reference: See "INSTALLING THE PRINT HEADS AND THE INK TANKS" in the Setup Guide and Operation Manual for more detail - Sharp AJ-6010 | AJ6010 Operation Manual - Page 75
(part 2) 4 Remove the old black or colour print head with the ink tank(s) still inserted. Lift it straight up to remove. 6 Insert the new print head. Maintenance 5 Remove the new print head from its protective case. Be careful not to damage the print head. If any part is damaged, the unit may - Sharp AJ-6010 | AJ6010 Operation Manual - Page 76
panel to complete the ink tank replacement. Reference: For more detail, refer to "THE PRINT HEAD" in the Setup Guide and Operation Manual. 12 To maintain print quality after changing the print head, always align the print head. Click the "Start" button of "Print alignment patterns" located in - Sharp AJ-6010 | AJ6010 Operation Manual - Page 77
Aligning the Print Head (part 1) Maintenance Align the print head after installing or changing the print head, or if printed lines are not straight, or have blank spaces. Follow the steps below to align the print head. 1 Make sure that A4 sized paper is set in the tray. 2 Click the "Advanced" - Sharp AJ-6010 | AJ6010 Operation Manual - Page 78
"Pattern A" to "Pattern D" settings, select the best ones among the printed pattern samples, and then go back to step 3. ! The unit cannot perform other operations while aligning the print head. -8 -7 -6 -5 -4 -3 -2 -1 0 +1 +2 +3 +4 +5 +6 +7 +8 3 Select pattern samples for "Pattern C" and "Pattern - Sharp AJ-6010 | AJ6010 Operation Manual - Page 79
to "TROUBLESHOOTING" in the Setup Guide and Operation Manual. 1 Check the Connection between the Unit and Computer 2 Check Your Computer Failed to Install the AJ-6000 Series Driver (USB Interface) What type of trouble do you have? • Printing trouble A • Scanning trouble B • AJ Series Utility - Sharp AJ-6010 | AJ6010 Operation Manual - Page 80
Computer Troubleshooting CHECK1 the recommended cable. Check if either type of interface is supported by your computer. CHECK2 Is the interface cable connected securely "CONNECTING THE INTERFACE CABLE" in the Setup Guide and Operation Manual for more details on interface connection. CHECK3 Are - Sharp AJ-6010 | AJ6010 Operation Manual - Page 81
: Failed to Install the AJ-6000 Series Driver (USB Interface) CHECK1 Is there enough computer memory or hard disk space? To use this unit, you must have an adequate amount of hard disk space. If there is insufficient hard disk space, delete unnecessary files to increase the free space of the hard - Sharp AJ-6010 | AJ6010 Operation Manual - Page 82
, you must check your computer manual for USB troubleshooting or contact your computer manufacturer. 4 When you make sure that the USB port is enabled, install the AJ-6000 series driver including the USB port driver, referring "INSTALLING THE SOFTWARE" in the Setup Guide and Operation Manual. 80 - Sharp AJ-6010 | AJ6010 Operation Manual - Page 83
THE SOFTWARE" in the Setup Guide and Operation Manual to reinstall the AJ-6000 series driver. Check if the printer driver has been installed, following the steps listed below. 1 Click the "Start" button, select "Settings" and then click "Printers". 2 Check if the "SHARP AJ-6010" printer driver icon - Sharp AJ-6010 | AJ6010 Operation Manual - Page 84
printer driver again. Reference: See "INSTALLING THE PRINTER DRIVER" in the Setup Guide and Operation Manual. Before uninstalling the printer driver, close all applications. 1 Click the "Start" button, select "Settings", and then click "Printers". 2 Right-click the "SHARP AJ-6010" printer driver - Sharp AJ-6010 | AJ6010 Operation Manual - Page 85
Print Output Troubleshooting If the print output is faint or uneven If print output is faint or uneven, refer to checks 1 to 3 below for possible remedies. CHECK1 Has the paper been inserted into the printer with the print side facing the right way? Some types of paper have only one printable - Sharp AJ-6010 | AJ6010 Operation Manual - Page 86
Characters or Graphics are not Printed in Correct Position Troubleshooting If a document is printed skewed or partly off the paper, follow the steps listed below. CHECK1 Is the paper size loaded in the tray the same as that specified in the printer driver? Click the "Paper" tab in the properties - Sharp AJ-6010 | AJ6010 Operation Manual - Page 87
Spaces Troubleshooting When printed lines are not straight, or have blank spaces, follow the steps listed below. 1 Specify the print quality setting in the printer driver. Click the "Advanced" tab located in the properties dialog box, and check if the "Print Quality" option is set to "Sharp Special - Sharp AJ-6010 | AJ6010 Operation Manual - Page 88
Colour". Reference: "Advanced" Tab Settings CHECK2 Does the application you are using support colour printing? Some applications may not support colour printing. Use an application that supports colour printing. For more information, see your application's manual or help file. Troubleshooting 86 - Sharp AJ-6010 | AJ6010 Operation Manual - Page 89
Unable to Scan the Image Troubleshooting If you cannot scan the image, refer to the AJ-6000 series driver is not installed in your computer. Refer to "INSTALLING THE SOFTWARE" in the Setup Guide and Operation Manual to reinstall the AJ6000 series driver. CHECK6 Is the "SHARP TWAIN AJ1" driver - Sharp AJ-6010 | AJ6010 Operation Manual - Page 90
Poor Scanning Result Troubleshooting If you get poor quality as a result of scanning job, the suitable resolution? Make sure that the value for the "Resolution" setting in the SHARP TWAIN driver satisfies the requirement of the set original. Reference: "Professional" Scan Preferences (Main) CHECK3 - Sharp AJ-6010 | AJ6010 Operation Manual - Page 91
original straight on the original table. Reference: Refer to "ORIGINAL PLACEMENT" in the Setup Guide and Operation Manual for the detail on how to set the original. CHECK2 Have you set the original correctly Align the corner of the original with ( ) mark. 11 B5 A4 Troubleshooting B5 A4 8 1/2 89 - Sharp AJ-6010 | AJ6010 Operation Manual - Page 92
click "Deleting SHARP AJ-6000 Series Utility". 2 Click the "Yes" button in the confirmation dialog box. 3 When the uninstalling process completes, click the "OK" button. 4 Refer to "INSTALLING THE AJ-6000 SERIES SOFTWARE" in the Setup Guide and Operation Manual to reinstall the AJ series utility - Sharp AJ-6010 | AJ6010 Operation Manual - Page 93
area 12 H How to Use the Online Manual 1 Preview Copy JX2 Scanning Print Print alignment patterns Print head Alignment Changing Cleaning Print Margin Settings 54 U Uninstalling 45 AJ Series Utility 90 19 Printer Driver 82 29 Utility Software Button Manager 59 75 Copy JX2 49 72
-
 1
1 -
 2
2 -
 3
3 -
 4
4 -
 5
5 -
 6
6 -
 7
7 -
8
-
9
-
10
-
11
-
12
-
13
-
14
-
15
-
16
-
17
-
18
-
19
-
20
-
21
-
22
-
23
-
24
-
25
-
26
-
27
-
28
-
29
-
30
-
31
-
32
-
33
-
34
-
35
-
36
-
37
-
38
-
39
-
40
-
41
-
42
-
43
-
44
-
45
-
46
-
47
-
48
-
49
-
50
-
51
-
52
-
53
-
54
-
55
-
56
-
57
-
58
-
59
-
60
-
61
-
62
-
63
-
64
-
65
-
66
-
67
-
68
-
69
-
70
-
71
-
72
-
73
-
74
-
75
-
76
-
77
-
78
-
79
-
80
-
81
-
82
-
83
-
84
-
85
-
86
-
87
-
88
-
89
-
90
-
91
-
92
-
93
 |
 |