Sharp AL 1655CS AL-1655CS Operation Manual - Page 27
Using the RSPF, document feeder tray. - user guide
 |
UPC - 074000074712
View all Sharp AL 1655CS manuals
Add to My Manuals
Save this manual to your list of manuals |
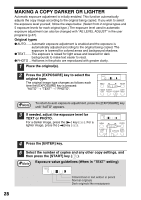
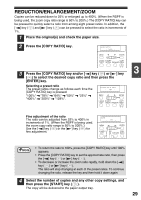
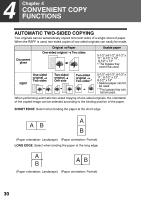
Page 27 highlights
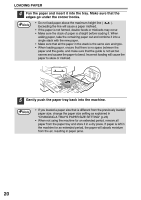
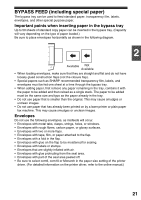
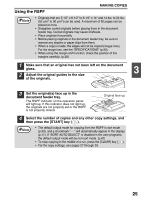
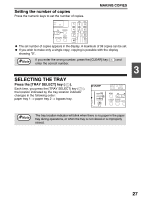
MAKING COPIES Using the RSPF Note • Originals that are 5-1/2" x 8-1/2" to 8-1/2" x 14" and 14 lbs. to 24 lbs. (52 g/m2 to 90 g/m2) can be used. A maximum of 30 pages can be placed at once. • Straighten curled originals before placing them in the document feeder tray. Curled originals may cause misfeeds. • Place originals horizontally. • Before placing originals in the document feeder tray, be sure to remove any staples or paper clips from them. • When a copy is made, the edges will not be copied (image loss). For the image loss, see the "SPECIFICATIONS" (p.93). • When using the margin shift function, check the position of the margins carefully. (p.38) 1 Make sure that an original has not been left on the document glass. 3 2 Adjust the original guides to the size of the originals. 3 Set the original(s) face up in the document feeder tray. The RSPF indicator on the operation panel will light up. If this indicator does not light up, the originals are not properly set or the RSPF is not properly closed. Original face up 4 Select the number of copies and any other copy settings, and then press the [START] key ( ). Note • The default output mode for copying from the RSPF is sort mode (p.33), and a checkmark " " will automatically appear in the display (p.11). If "SORT AUTO SELECT" is disabled in the user programs, the default output mode will be non-sort mode. (p.67) • To stop copying in the middle of a run, press the [CLEAR] key ( ). • For the copy settings, see pages 27 through 29. 25
-
 1
1 -
2
-
3
-
4
-
5
-
6
-
7
-
8
-
9
-
10
-
11
-
12
-
13
-
14
-
15
-
16
-
17
-
18
-
19
-
20
-
21
-
 22
22 -
 23
23 -
 24
24 -
 25
25 -
 26
26 -
 27
27 -
 28
28 -
 29
29 -
 30
30 -
 31
31 -
 32
32 -
33
-
34
-
35
-
36
-
37
-
38
-
39
-
40
-
41
-
42
-
43
-
44
-
45
-
46
-
47
-
48
-
49
-
50
-
51
-
52
-
53
-
54
-
55
-
56
-
57
-
58
-
59
-
60
-
61
-
62
-
63
-
64
-
65
-
66
-
67
-
68
-
69
-
70
-
71
-
72
-
73
-
74
-
75
-
76
-
77
-
78
-
79
-
80
-
81
-
82
-
83
-
84
-
85
-
86
-
87
-
88
-
89
-
90
-
91
-
92
-
93
-
94
-
95
-
96
-
97
-
98
-
99
-
100
-
101
-
102
-
103
-
104
-
105
-
106
-
107
-
108
-
109
-
110
-
111
-
112
-
113
-
114
-
115
-
116
-
117
-
118
-
119
-
120
-
121
-
122
-
123
-
124
 |
 |