Sharp AR M207 Operation Manual
Sharp AR M207 - B/W Laser - All-in-One Manual
 |
View all Sharp AR M207 manuals
Add to My Manuals
Save this manual to your list of manuals |
Sharp AR M207 manual content summary:
- Sharp AR M207 | Operation Manual - Page 1
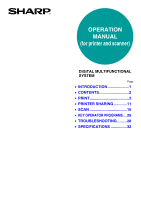
OPERATION MANUAL (for printer and scanner) DIGITAL MULTIFUNCTIONAL SYSTEM Page • INTRODUCTION 1 • CONTENTS 2 • PRINT 3 • PRINTER SHARING 11 • SCAN 15 • KEY OPERATOR PROGRAMS ...26 • TROUBLESHOOTING .........28 • SPECIFICATIONS 32 - Sharp AR M207 | Operation Manual - Page 2
drivers and software cited in this manual, please refer to the separate "Software setup guide". • For information on the operating system, please refer to your operating system manual or the online Help function. • The screen images and procedures that appear in this manual are mainly for Windows XP - Sharp AR M207 | Operation Manual - Page 3
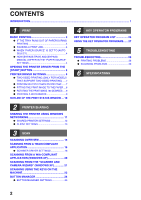
TROUBLESHOOTING 28 PRINTING PROBLEMS 28 SCANNING PROBLEMS 30 6 SPECIFICATIONS 2 PRINTER SHARING SHARING THE PRINTER USING WINDOWS NETWORKING 11 SHARED PRINTER SETTINGS 12 CLIENT SETTINGS 13 3 SCAN SCANNING OVERVIEW 15 SCANNING FROM A TWAIN-COMPLIANT APPLICATION 16 SCANNER DRIVER - Sharp AR M207 | Operation Manual - Page 4
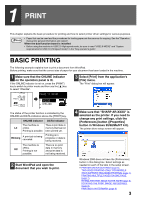
you wish to print. 4 Make sure that "SHARP AR-XXXX" is selected as the printer. If you need to change any print settings, click the [Preferences] button ([Properties] button in Windows 95/98/Me/NT 4.0). The printer driver setup screen will appear. Windows 2000 does not have the [Preferences] button - Sharp AR M207 | Operation Manual - Page 5
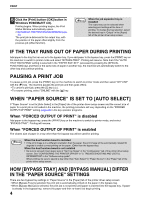
"CONFIGURING THE PRINTER DRIVER" in "3. TROUBLESHOOTING AND USEFUL INFORMATION" in the "Software setup guide". When printing, be sure to specify a tray other than "Auto Select" in "Paper Source" in the "Paper" tab of the printer driver setup screen. HOW [BYPASS TRAY] AND [BYPASS MANUAL] DIFFER IN - Sharp AR M207 | Operation Manual - Page 6
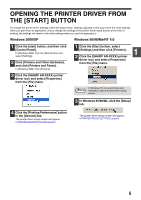
Start] button, select [Settings] and then click [Printers]. 1 2 Click the [SHARP AR-XXXX] printer driver icon and select [Properties] from the [File] menu. Note In Windows NT 4.0, select [Document Defaults] to open the printer driver setup screen. 3 In Windows 95/98/Me, click the [Setup] tab - Sharp AR M207 | Operation Manual - Page 7
help file for the printer driver. Note The settings and the image of the machine will vary depending on the model. If a tray or job separator tray option is installed, see "CONFIGURING THE PRINTER DRIVER" in "3. TROUBLESHOOTING AND USEFUL INFORMATION" in the "Software setup guide" to configure the - Sharp AR M207 | Operation Manual - Page 8
Up] or [4-Up] for "N-Up Printing" on the [Main] tab. To open the printer driver, see "BASIC PRINTING" (page 3). The "N-Up Printing" setting is not available when [Fit to Page] is selected. Note FITTING THE PRINT IMAGE TO THE PAPER (page 8) N-Up Border Border [2-Up] [4-Up] If you select the - Sharp AR M207 | Operation Manual - Page 9
"N-Up Printing" is selected. Note PRINTING MULTIPLE PAGES ON ONE PAGE (page 7) 1 Click the [Paper] tab in the printer driver setup screen. 2 Select the original size (Ledger or A3) of the print image in "Paper Size". or 4 Select the size of the paper (Letter or A4) that is loaded in the machine - Sharp AR M207 | Operation Manual - Page 10
The procedure for loading paper is explained in the "Operation manual (for general information and copier)". PRINTING A WATERMARK You can print a watermark such as "CONFIDENTIAL" on your document. To print a watermark, open the printer driver setup screen, click the [Watermarks] tab, and follow the - Sharp AR M207 | Operation Manual - Page 11
icons The status icons appear to alert you to printer errors. Nothing appears when printing is taking place normally. The icons are explained below. Follow the instructions in the status window to solve the problem. Icon Print Status An error has occurred that requires immediate attention. An - Sharp AR M207 | Operation Manual - Page 12
connected to the machine to print to the machine. SHARING THE PRINTER USING WINDOWS NETWORKING The machine can be used as a shared printer in a Windows 95/98/Me/NT 4.0/2000/XP network environment. Note that the Windows network environment must already be established. Client Print server Shared - Sharp AR M207 | Operation Manual - Page 13
continue the setup procedure from Step 6. 6 Click [Printers and Other Hardware] in the [Control Panel], and click [Printers and Faxes]. In operating systems other than Windows XP, double-click the [Printers] icon. 7 Click the [SHARP AR-XXXX] printer driver icon and select [Sharing] from the [File - Sharp AR M207 | Operation Manual - Page 14
computer] and then click the [Next] button. In Windows 95/98/Me/2000, select [Network printer] and then click the [Next] button. The contents of this window will vary depending on your network environment. 8 Select settings in the [Default Printer] screen and then click the [Next] button. 9 Click - Sharp AR M207 | Operation Manual - Page 15
. For the procedure for installing the printer driver, see "1. INSTALLING THE SOFTWARE (THAT ACCOMPANIES THE MACHINE)" in the "Software setup guide". 1 Click the [Start] button, select [Settings] and then click [Printers]. 2 Click the [SHARP AR-XXXX] printer driver icon and select [Properties] from - Sharp AR M207 | Operation Manual - Page 16
TWAIN-compliant applications. *2 WIA (Windows Imaging Acquisition) is a Windows function that allows a scanner, digital camera or other imaging device to communicate with an image processing application. The WIA driver for this machine can only be used in Windows XP. *3 To begin scanning using the - Sharp AR M207 | Operation Manual - Page 17
"3. PERIPHERAL DEVICES AND SUPPLIES" in the "Operation manual (for general information and copier)". Note • If you are using Windows XP, you can also select [WIA-SHARP AR-XXXX] to scan using the WIA driver. SCANNING FROM A WIA-COMPLIANT APPLICATION (WINDOWS XP) (page 20) • Depending on your system - Sharp AR M207 | Operation Manual - Page 18
full color at 300 dpi with only the standard memory installed, the machine will scan the original in full color at 150 dpi and the scanner driver will enhance the resolution to 300 dpi. To scan a ledger or A3 original in full color at 600 dpi without using enhancement, the dual function - Sharp AR M207 | Operation Manual - Page 19
fax, or OCR according to the purpose of scanning. If you wish to change the default settings for these four buttons, or select custom settings such as the image in the preview window. 18 (4) [Zoom Preview] checkbox When this is selected, the selected part of the preview image will be enlarged when - Sharp AR M207 | Operation Manual - Page 20
is displayed to automatically set the scanning area to the entire preview image. Click the [Auto Scan Area Adjustment] button to automatically set the scanning area to the entire preview image. Preview image Preview window (5) [Help] button Click to display the help file for the scanner driver. 19 - Sharp AR M207 | Operation Manual - Page 21
manual (for general information and copier)". 2 Start Paint and then select [From Scanner or Camera] from the [File] menu. The scan screen of the WIA driver If you have WIA drivers for other devices installed on your computer, the "Select Device" screen will open. Select [SHARP AR-XXXX] and click the - Sharp AR M207 | Operation Manual - Page 22
manual (for general information and copier)". 2 Click the [start] button, the [Control Panel], [Printers and Other Hardware], and then [Scanners to display the preview image. 3 Click the [SHARP AR-XXXX] icon and then click [Get pictures] in [Imaging Tasks]. 3 The "Scanner and Camera Wizard" will - Sharp AR M207 | Operation Manual - Page 23
SCAN 6 Specify a group name, format and folder for saving the image, and then click the [Next] button. JPG, BMP, TIF or PNG . I'm finished working with these pictures]. 8 Click the [Finish] button. The "Scanner and Camera Wizard" closes and the scanned image is saved in the specified folder. 22 - Sharp AR M207 | Operation Manual - Page 24
mode. • For restrictions on using copy, printer, or fax mode while in scanner mode, or using scanner mode while in copy, printer, or fax mode, see "OPERATION IN COPY, PRINT, SCAN, AND FAX MODES" in "1. BEFORE USING THE PRODUCT" in the "Operation manual (for general information and copier)". 23 - Sharp AR M207 | Operation Manual - Page 25
is a software utility that allows the scanner function to be used by means of the [SCAN] key on the machine. The Button Manager software allows you BUTTON MANAGER" in "1. INSTALLING THE SOFTWARE (THAT ACCOMPANIES THE MACHINE)" in the "Software setup guide". Setup window To view Help for a setting, - Sharp AR M207 | Operation Manual - Page 26
Programs] ([Programs] in other than Windows XP), select [Sharp Button Manager G], and then click [ FAX] is selected, you can select the "File format" of the scanned image. If [PDF] is selected for the file format, the image the "Operation manual (for general information and copier)". • Some settings - Sharp AR M207 | Operation Manual - Page 27
set at the factory, see "PROGRAMMING A KEY OPERATOR CODE" in the "Key operator's guide". KEY OPERATOR PROGRAM LIST The key operator programs for the printer and scanner functions are shown in the following table. Factory default settings are indicated in bold. When "ENABLE, DISABLE" appears in - Sharp AR M207 | Operation Manual - Page 28
code. OK ABC DEF GHI JKL MNO PQRS TUV WXYZ FUNCTION @.-_ ACC. #-C READ-END MODE SELECT KEY OP. # CHANGE COPIER PRINTER SCANNER • " " will appear for each digit program appear. 4 8 Press the [OK] key and follow the instructions in the program screen. OK 9 To use another program for the - Sharp AR M207 | Operation Manual - Page 29
manual (for general information and copier)". Troubleshooting information can also be found in the README files for each of the software programs. To view a README file, see "1. INSTALLING THE SOFTWARE (THAT ACCOMPANIES THE MACHINE)" in the "Software setup guide". PRINTING PROBLEMS Problem - Sharp AR M207 | Operation Manual - Page 30
TROUBLESHOOTING Problem Printing does not take place (DATA indicator is blinking.) Printing is slow. The printed image is light and uneven. The printed image is dirty. The printed image specified print quality area. The paper size set in the printer driver is not the same as the paper size loaded in - Sharp AR M207 | Operation Manual - Page 31
the dual function board. Install the standard print driver as explained in "1. INSTALLING THE SOFTWARE (THAT ACCOMPANIES THE MACHINE)" in the "Software setup guide" and select the standard driver when printing. SCANNING PROBLEMS Problem Poor scanning quality. 30 Cause and solution The document - Sharp AR M207 | Operation Manual - Page 32
TROUBLESHOOTING Problem Poor scanning quality. Unable to scan the image. Scanner transfer speed is slow guide", and then set "USB2.0 MODE" to "HI-SPEED" in the key operator programs. Page - 18 Operation manual (for general information and copier) Operation manual (for general information and copier - Sharp AR M207 | Operation Manual - Page 33
AR-M206/AR-M207: 20 pages/min, AR-M161/AR-M162/AR-M165: 16 pages/min When the dual function board is not installed: 12 pages/min Resolution 600 dpi Page memory AR-M165/AR-M206/AR-M207: 32 MB, AR-M161/AR-M162: 16 MB Memory IMC Memory*2 16 MB Emulation SHARP GDI / SPLC (Sharp Printer support USB - Sharp AR M207 | Operation Manual - Page 34
Yes Supported operating systems Windows 98/Windows Me Windows 2000 Professional/Windows XP Home Edition/Windows XP Professional (For more information, see "1. INSTALLING THE SOFTWARE (THAT ACCOMPANIES THE MACHINE)" in the "Software setup guide".) Void area Top and bottom edges 7/64" (2.5 mm - Sharp AR M207 | Operation Manual - Page 35
OPERATION MANUAL (for printer and scanner) SHARP CORPORATION ARM207-EN-PRINTER
-
 1
1 -
 2
2 -
 3
3 -
 4
4 -
 5
5 -
 6
6 -
 7
7 -
8
-
9
-
10
-
11
-
12
-
13
-
14
-
15
-
16
-
17
-
18
-
19
-
20
-
21
-
22
-
23
-
24
-
25
-
26
-
27
-
28
-
29
-
30
-
31
-
32
-
33
-
34
-
35
 |
 |

OPERATION
MANUAL
(for printer and scanner)
DIGITAL MULTIFUNCTIONAL
SYSTEM
Page
•
INTRODUCTION
....................
1
•
CONTENTS
............................
2
•
PRINT
.....................................
3
•
PRINTER SHARING
............
11
•
SCAN
...................................
15
•
KEY OPERATOR PROGRAMS
...26
•
TROUBLESHOOTING
.........
28
•
SPECIFICATIONS
...............
32