Sharp DX-B350P DX-B350P DX-B450P Operation Manual - Page 127
Open the cover of the Fuser Unit and remove any jammed paper. If paper is torn, check, for any
 |
View all Sharp DX-B350P manuals
Add to My Manuals
Save this manual to your list of manuals |
Page 127 highlights
At the Fuser Unit Clearing Paper Jams 4. Open the cover of the Fuser Unit and remove any jammed paper. If paper is torn, check for any remaining torn pieces of paper. The Fuser Unit is hot. Be careful not to touch it as you can get burned. Make sure that the levers at both ends of the Fuser Unit are returned to the positions they were in before clearing the jam. If you let go of the cover of the Fuser Unit, it will return to its original position. 5. Close the rear cover. NOTE: Make sure that the levers at the rear of the printer, as shown in the diagram, are returned to the positions they were in before clearing the jam. User's Guide 10-5
-
 1
1 -
2
-
3
-
4
-
5
-
6
-
7
-
8
-
9
-
10
-
11
-
12
-
13
-
14
-
15
-
16
-
17
-
18
-
19
-
20
-
21
-
22
-
23
-
24
-
25
-
26
-
27
-
28
-
29
-
30
-
31
-
32
-
33
-
34
-
35
-
36
-
37
-
38
-
39
-
40
-
41
-
42
-
43
-
44
-
45
-
46
-
47
-
48
-
49
-
50
-
51
-
52
-
53
-
54
-
55
-
56
-
57
-
58
-
59
-
60
-
61
-
62
-
63
-
64
-
65
-
66
-
67
-
68
-
69
-
70
-
71
-
72
-
73
-
74
-
75
-
76
-
77
-
78
-
79
-
80
-
81
-
82
-
83
-
84
-
85
-
86
-
87
-
88
-
89
-
90
-
91
-
92
-
93
-
94
-
95
-
96
-
97
-
98
-
99
-
100
-
101
-
102
-
103
-
104
-
105
-
106
-
107
-
108
-
109
-
110
-
111
-
112
-
113
-
114
-
115
-
116
-
117
-
118
-
119
-
120
-
121
-
 122
122 -
 123
123 -
 124
124 -
 125
125 -
 126
126 -
 127
127 -
 128
128 -
 129
129 -
 130
130 -
 131
131 -
 132
132 -
133
-
134
-
135
-
136
-
137
-
138
-
139
-
140
-
141
-
142
-
143
-
144
-
145
-
146
 |
 |

User’s Guide
10-5
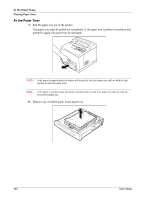
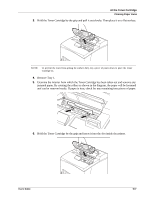
At the Fuser Unit
Clearing Paper Jams
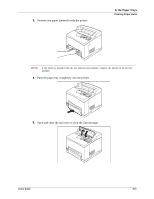
4.
Open the cover of the Fuser Unit and remove any jammed paper. If paper is torn, check
for any remaining torn pieces of paper.
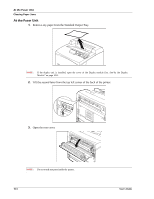
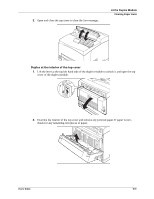
5.
Close the rear cover.
NOTE:
Make sure that the levers at the rear of the printer, as shown in the diagram, are returned to the
positions they were in before clearing the jam.
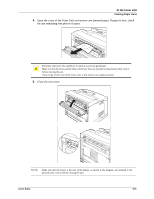
The Fuser Unit is hot. Be careful not to touch it as you can get burned.
Make sure that the levers at both ends of the Fuser Unit are returned to the positions they were in
before clearing the jam.
If you let go of the cover of the Fuser Unit, it will return to its original position.