Sharp DX-B350P DX-B350P DX-B450P Operation Manual - Page 16
Use the Operator Panel Paper>Media Size/Type Menu to select the Label Media Type and size - windows 7 driver
 |
View all Sharp DX-B350P manuals
Add to My Manuals
Save this manual to your list of manuals |
Page 16 highlights
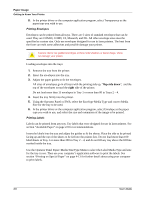
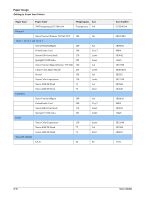
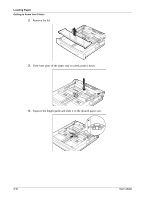
Paper Usage Getting to Know Your Printer 8. In the printer driver or the computer application program, select Transparency as the paper type you wish to use. Printing Envelopes Envelopes can be printed from all trays. There are 5 sizes of standard envelopes that can be used. They are COM10, COM9, C5, Monarch, and DL. All other envelope sizes must be specified as custom size. Only use envelopes designed for use in laser printers. The heat from the fuser can melt some adhesives and possible damage your printer. Caution: Never use padded envelopes or those with windows or metal clasps. These can damage your printer. Loading envelopes into the trays: 1. Remove the tray from the printer. 2. Insert the envelopes into the tray. 3. Adjust the paper guides to fit the envelopes. All sizes of envelopes go in all trays with the printing side up, "flap-side down", and the top of the envelopes toward the right side of the printer. Do not load more than 15 envelopes in Tray 1 or more than 80 in Trays 2 - 4. 4. Insert the tray firmly into the printer. 5. Using the Operator Panel or EWS, select the Envelope Media Type and correct Media Size for the tray to be used. 6. In the printer driver or the computer application program, select Envelope as the paper type you wish to use, and select the size and orientation of the image to be printed. Printing Labels Labels can be printed from any tray. Use labels that were designed for use in laser printers. See section "Available Paper" on page 2-9 for recommendations. Insert the labels into the tray and adjust the guides to fit the sheets. Place the side to be printed facing up and the top of the sheets to be fed into the printer first. Do not load more than 100 label sheets in Tray 1 or more than 290 in Tray 2 - 4, and do not fill any tray above the fill line marked inside the tray. Use the Operator Panel Paper>Media Size/Type Menu to select the Label Media Type and size for the tray in use. Then use your computer's application software to print the labels. See section "Printing on Special Paper" on page 4-13 for further detail about using your computer to print labels. 2-8 User's Guide
-
 1
1 -
2
-
3
-
4
-
5
-
6
-
7
-
8
-
9
-
10
-
 11
11 -
 12
12 -
 13
13 -
 14
14 -
 15
15 -
 16
16 -
 17
17 -
 18
18 -
 19
19 -
 20
20 -
 21
21 -
22
-
23
-
24
-
25
-
26
-
27
-
28
-
29
-
30
-
31
-
32
-
33
-
34
-
35
-
36
-
37
-
38
-
39
-
40
-
41
-
42
-
43
-
44
-
45
-
46
-
47
-
48
-
49
-
50
-
51
-
52
-
53
-
54
-
55
-
56
-
57
-
58
-
59
-
60
-
61
-
62
-
63
-
64
-
65
-
66
-
67
-
68
-
69
-
70
-
71
-
72
-
73
-
74
-
75
-
76
-
77
-
78
-
79
-
80
-
81
-
82
-
83
-
84
-
85
-
86
-
87
-
88
-
89
-
90
-
91
-
92
-
93
-
94
-
95
-
96
-
97
-
98
-
99
-
100
-
101
-
102
-
103
-
104
-
105
-
106
-
107
-
108
-
109
-
110
-
111
-
112
-
113
-
114
-
115
-
116
-
117
-
118
-
119
-
120
-
121
-
122
-
123
-
124
-
125
-
126
-
127
-
128
-
129
-
130
-
131
-
132
-
133
-
134
-
135
-
136
-
137
-
138
-
139
-
140
-
141
-
142
-
143
-
144
-
145
-
146
 |
 |