Sharp ER-A420 ER-A410 ER-A420 Operation Manual - Page 20
Prior To Entries - how to program
 |
View all Sharp ER-A420 manuals
Add to My Manuals
Save this manual to your list of manuals |
Page 20 highlights
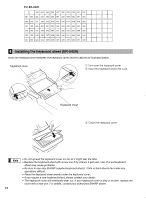
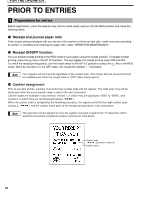
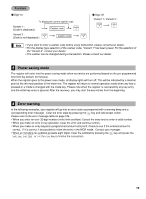
FOR THE OPERATOR PRIOR TO ENTRIES 1 Preparations for entries Before registrations, insert the operator key into the mode switch and turn it to the REG position and check the following items: Receipt and journal paper rolls If the receipt and journal paper rolls are not set in the machine or there are low rolls, install new ones according to section "4. Installing and removing the paper rolls" under "OPERATOR MAINTENANCE." Receipt ON/OFF function You can disable receipt printing in the REG mode to save paper using the receipt function. To disable receipt q printing, press the key in the OP X/Z position. This key toggles the receipt printing status ON and OFF. c To check the receipt printing status, turn the mode switch to the OP X/Z position or press the key in the REG mode. When the function is in the OFF status, the receipt off indicator "_" illuminates. Note Your register will print reports regardless of the receipt state. This means that the receipt roll must be installed even when the receipt state is "OFF" when taking reports. Cashier assignment Prior to any item entries, cashiers must enter their cashier code into the register. The code entry may not be necessary when the same cashier code is used in the next transaction. Cashier codes are available in two variants: Variant 1, in which they are displayed ("0000" to "9999"), and Variant 2, in which they are not displayed (always " "). When the cashier code is assigned by the following procedure, the register prints the four-digit cashier code (variant 2: " ") and the cashier name both on the receipt and journal for every transaction. Note The operation entries depend on how the register has been programmed. To determine which selections should be considered, please consult your local dealer. Cashier code (" " is printed in Variant 2.) Cashier name 18
-
 1
1 -
2
-
3
-
4
-
5
-
6
-
7
-
8
-
9
-
10
-
11
-
12
-
13
-
14
-
 15
15 -
 16
16 -
 17
17 -
 18
18 -
 19
19 -
 20
20 -
 21
21 -
 22
22 -
 23
23 -
 24
24 -
 25
25 -
26
-
27
-
28
-
29
-
30
-
31
-
32
-
33
-
34
-
35
-
36
-
37
-
38
-
39
-
40
-
41
-
42
-
43
-
44
-
45
-
46
-
47
-
48
-
49
-
50
-
51
-
52
-
53
-
54
-
55
-
56
-
57
-
58
-
59
-
60
-
61
-
62
-
63
-
64
-
65
-
66
-
67
-
68
-
69
-
70
-
71
-
72
-
73
-
74
-
75
-
76
-
77
-
78
-
79
-
80
-
81
-
82
-
83
-
84
-
85
-
86
-
87
-
88
-
89
-
90
-
91
-
92
-
93
-
94
-
95
-
96
-
97
-
98
-
99
-
100
-
101
-
102
-
103
-
104
-
105
-
106
-
107
-
108
-
109
-
110
-
111
-
112
-
113
-
114
-
115
-
116
-
117
-
118
-
119
-
120
-
121
-
122
-
123
-
124
-
125
-
126
-
127
-
128
-
129
-
130
-
131
-
132
-
133
-
134
-
135
-
136
-
137
-
138
-
139
-
140
-
141
-
142
-
143
-
144
-
145
-
146
-
147
-
148
-
149
-
150
-
151
-
152
-
153
-
154
-
155
-
156
-
157
-
158
-
159
-
160
-
161
-
162
-
163
-
164
-
165
-
166
-
167
-
168
-
169
-
170
-
171
-
172
-
173
-
174
-
175
-
176
-
177
-
178
-
179
-
180
-
181
-
182
-
183
-
184
-
185
-
186
-
187
-
188
-
189
-
190
 |
 |