Sharp ER-A420 ER-A410 ER-A420 Operation Manual - Page 62
Printing of header and footer graphic logos, Printing of the employee, s arrival and departure times - change time
 |
View all Sharp ER-A420 manuals
Add to My Manuals
Save this manual to your list of manuals |
Page 62 highlights
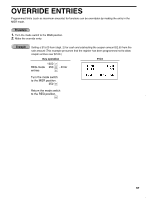
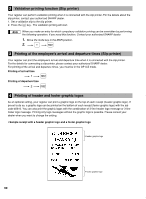
2 Validation printing function (Slip printer) Your register can perform validation printing when it is connected with the slip printer. For the details about the slip printer, contact your authorized SHARP dealer. 1. Set a validation slip to the slip printer. ∏ 2. Press the key. The validation printing will start. Note When you make an entry for which compulsory validation printing can be overridden by performing the following operation. If you need this function, Contact your authorized SHARP dealer. 1. Move the mode key to the MGR position. 2. . ∏ 3 Printing of the employee's arrival and departure times (Slip printer) Your register can print the employee's arrival and departure time when it is connected with the slip printer. For the details for connecting a slip printer, please contact your authorized SHARP dealer. For printing of the arrival and departure times, you must be in the OP X/Z mode. Printing of arrival time 1 ∏ Printing of departure time 2∏ 4 Printing of header and footer graphic logos As an optional setting, your register can print a graphic logo on the top of each receipt (header graphic logo). If preset to do so, a graphic logo can be printed on the bottom of each receipt (footer graphic logo) with the job code #2616. You can also print the graphic logos with the combination of 3-line header logo message or 3-line footer logo message. Printing only logo messages without the graphic logo is possible. Please consult your dealer when you want to change the setting. • Sample receipt with a header graphic logo and a footer graphic logo Header graphic logo Footer graphic logo 60
-
 1
1 -
2
-
3
-
4
-
5
-
6
-
7
-
8
-
9
-
10
-
11
-
12
-
13
-
14
-
15
-
16
-
17
-
18
-
19
-
20
-
21
-
22
-
23
-
24
-
25
-
26
-
27
-
28
-
29
-
30
-
31
-
32
-
33
-
34
-
35
-
36
-
37
-
38
-
39
-
40
-
41
-
42
-
43
-
44
-
45
-
46
-
47
-
48
-
49
-
50
-
51
-
52
-
53
-
54
-
55
-
56
-
 57
57 -
 58
58 -
 59
59 -
 60
60 -
 61
61 -
 62
62 -
 63
63 -
 64
64 -
 65
65 -
 66
66 -
 67
67 -
68
-
69
-
70
-
71
-
72
-
73
-
74
-
75
-
76
-
77
-
78
-
79
-
80
-
81
-
82
-
83
-
84
-
85
-
86
-
87
-
88
-
89
-
90
-
91
-
92
-
93
-
94
-
95
-
96
-
97
-
98
-
99
-
100
-
101
-
102
-
103
-
104
-
105
-
106
-
107
-
108
-
109
-
110
-
111
-
112
-
113
-
114
-
115
-
116
-
117
-
118
-
119
-
120
-
121
-
122
-
123
-
124
-
125
-
126
-
127
-
128
-
129
-
130
-
131
-
132
-
133
-
134
-
135
-
136
-
137
-
138
-
139
-
140
-
141
-
142
-
143
-
144
-
145
-
146
-
147
-
148
-
149
-
150
-
151
-
152
-
153
-
154
-
155
-
156
-
157
-
158
-
159
-
160
-
161
-
162
-
163
-
164
-
165
-
166
-
167
-
168
-
169
-
170
-
171
-
172
-
173
-
174
-
175
-
176
-
177
-
178
-
179
-
180
-
181
-
182
-
183
-
184
-
185
-
186
-
187
-
188
-
189
-
190
 |
 |