Sharp ER-A420 ER-A410 ER-A420 Operation Manual - Page 68
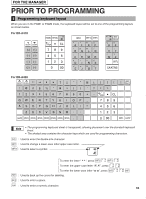
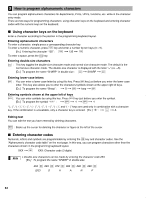
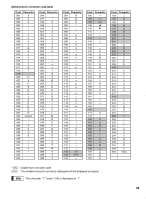
Programming - programming instructions
 |
View all Sharp ER-A420 manuals
Add to My Manuals
Save this manual to your list of manuals |
Page 68 highlights
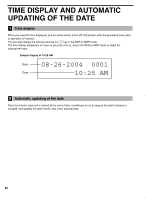
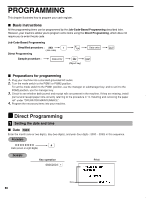
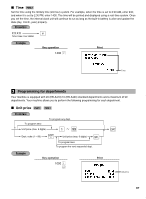
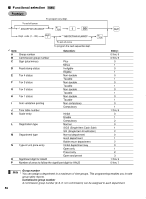
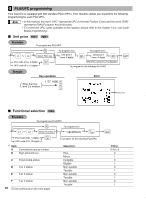
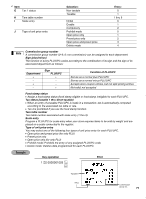
PROGRAMMING This chapter illustrates how to program your cash register. Basic instructions All the programming items can be programmed by the Job-Code-Based Programming described later. However, your machine allows you to program some items using the Direct Programming, which does not require you to enter the job code. Job-Code-Based Programming Simplified procedure : XXX (Job code) Direct Programming . @ Sample procedure : Data entry - (Object key) Data entry Ç Ç Preparations for programming 1. Plug your machine into a standard grounded AC outlet. 2. Turn the mode switch to the PGM1 or PGM2 position. To set the mode switch to the PGM1 position, use the manager or submanager key; and to set it to the PGM2 position, use the manager key. 3. Check to see whether both journal and receipt rolls are present in the machine. If they are missing, install journal and receipt paper rolls correctly referring to the procedure in "4. Installing and removing the paper roll" under "OPERATOR MAINTENANCE". 4. Program the necessary items into your machine. Direct Programming 1 Setting the date and time Date PGM 2 Enter the month (one or two digits), day (two digits), and year (four digits : 2000 - 2099) in this sequence. Procedure XXXXXXXX Date (seven or eight digits) = Example Key operation 08262004 = Print Date 66
-
 1
1 -
2
-
3
-
4
-
5
-
6
-
7
-
8
-
9
-
10
-
11
-
12
-
13
-
14
-
15
-
16
-
17
-
18
-
19
-
20
-
21
-
22
-
23
-
24
-
25
-
26
-
27
-
28
-
29
-
30
-
31
-
32
-
33
-
34
-
35
-
36
-
37
-
38
-
39
-
40
-
41
-
42
-
43
-
44
-
45
-
46
-
47
-
48
-
49
-
50
-
51
-
52
-
53
-
54
-
55
-
56
-
57
-
58
-
59
-
60
-
61
-
62
-
 63
63 -
 64
64 -
 65
65 -
 66
66 -
 67
67 -
 68
68 -
 69
69 -
 70
70 -
 71
71 -
 72
72 -
 73
73 -
74
-
75
-
76
-
77
-
78
-
79
-
80
-
81
-
82
-
83
-
84
-
85
-
86
-
87
-
88
-
89
-
90
-
91
-
92
-
93
-
94
-
95
-
96
-
97
-
98
-
99
-
100
-
101
-
102
-
103
-
104
-
105
-
106
-
107
-
108
-
109
-
110
-
111
-
112
-
113
-
114
-
115
-
116
-
117
-
118
-
119
-
120
-
121
-
122
-
123
-
124
-
125
-
126
-
127
-
128
-
129
-
130
-
131
-
132
-
133
-
134
-
135
-
136
-
137
-
138
-
139
-
140
-
141
-
142
-
143
-
144
-
145
-
146
-
147
-
148
-
149
-
150
-
151
-
152
-
153
-
154
-
155
-
156
-
157
-
158
-
159
-
160
-
161
-
162
-
163
-
164
-
165
-
166
-
167
-
168
-
169
-
170
-
171
-
172
-
173
-
174
-
175
-
176
-
177
-
178
-
179
-
180
-
181
-
182
-
183
-
184
-
185
-
186
-
187
-
188
-
189
-
190
 |
 |