Sharp LC-46D64U LC-42D64U LC-46D64U LC-52D64U Operation Manual - Page 33
Displaying an image from HDMI equipment, Input Skip, equipment
 |
UPC - 074000370463
View all Sharp LC-46D64U manuals
Add to My Manuals
Save this manual to your list of manuals |
Page 33 highlights
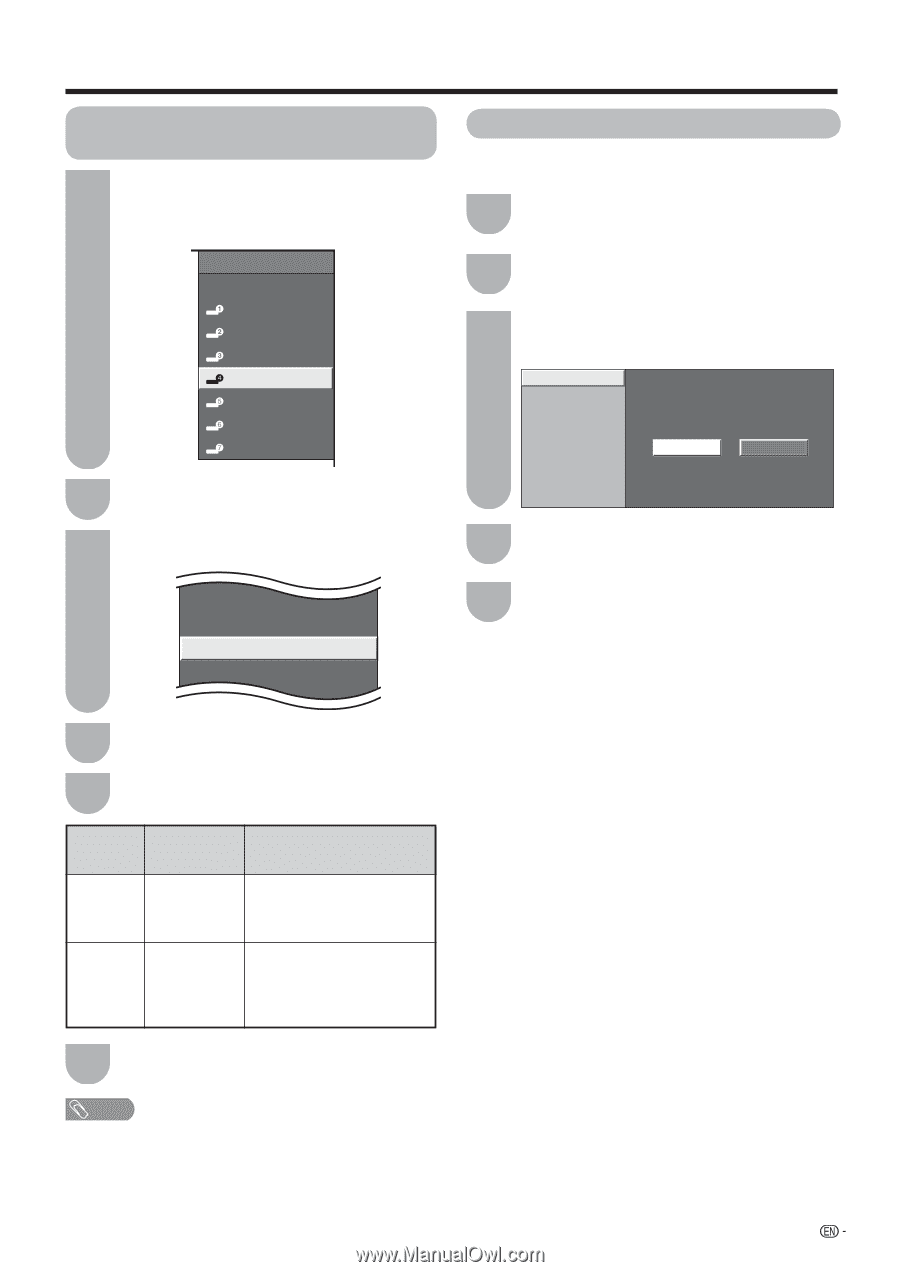
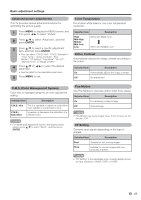
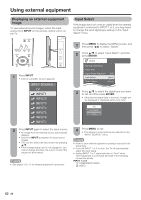
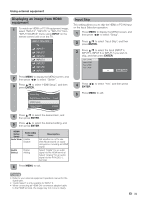
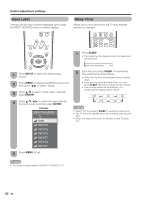
Using external equipment Displaying an image from HDMI equipment 1 To watch an HDMI or PC-IN equipment image, select "INPUT4", "INPUT5" or "INPUT 6" from "INPUT SOURCE" menu using INPUT on the remote control unit or on the TV. INPUT SOURCE TV INPUT1 INPUT2 INPUT3 INPUT4 INPUT5 INPUT6 INPUT7 Input Skip This setting allows you to skip the HDMI or PC-IN Input on the Input Selection operation. 1 Press MENU to display the MENU screen, and then press c/d to select "Setup". 2 Press a/b to select "Input Skip", and then press ENTER. 3 Press a/b to select the Input (INPUT 4, INPUT 5, INPUT 6 or INPUT 7) you wish to skip, and then press ENTER. Input 4 (HDMI) Input 5 (HDMI) Input 6 (HDMI) Input 7 (RGB) Yes No 2 Press MENU to display the MENU screen, and then press c/d to select "Option". 3 Press a/b to select "HDMI Setup", and then press ENTER. Audio Only Digital Noise Reduction [Low] HDMI Setup Output Select [Fixed] 4 Press c/d to select "Yes", and then press ENTER. 5 Press MENU to exit. 4 Press a/b to select the desired item, and then press ENTER. 5 Press c/d to select the desired setting, and then press ENTER. HDMI Setup items Auto View Selectable items Enable Disable Audio Select Digital Analog Description Set whether or not to use View Mode based on signal recognition, including an HDMI signal. Select "Digital" for an audio signal via the HDMI terminal. Select "Analog" for an audio signal via the R-AUDIO -L terminal. 6 Press MENU to exit. NOTE • Refer to your external equipment operation manual for the signal type. • "Audio Select" is only available for INPUT 6. • When connecting an HDMI-DVI conversion adapter/cable to the HDMI terminal, the image may not come in clearly. 31
-
 1
1 -
2
-
3
-
4
-
5
-
6
-
7
-
8
-
9
-
10
-
11
-
12
-
13
-
14
-
15
-
16
-
17
-
18
-
19
-
20
-
21
-
22
-
23
-
24
-
25
-
26
-
27
-
 28
28 -
 29
29 -
 30
30 -
 31
31 -
 32
32 -
 33
33 -
 34
34 -
 35
35 -
 36
36 -
 37
37 -
 38
38 -
39
-
40
-
41
-
42
-
43
-
44
-
45
-
46
-
47
-
48
-
49
-
50
-
51
-
52
-
53
-
54
-
55
-
56
-
57
-
58
-
59
-
60
-
61
-
62
-
63
-
64
-
65
-
66
-
67
-
68
-
69
-
70
-
71
 |
 |