Sharp LC32SB23U Operation Manual - Page 20
Power Control Menu, Setup Menu - shuts off during use
 |
View all Sharp LC32SB23U manuals
Add to My Manuals
Save this manual to your list of manuals |
Page 20 highlights
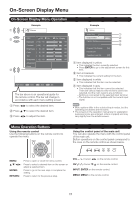
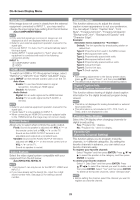
On-Screen Display Menu Power Control Menu Power control setting allows you to save energy. Example Power Control No Signal Off No Operation Off [Disable] [Disable] 1 Press MENU to display the MENU screen, and then press c/d to select "Power Control". 2 Press a/b to select a "No Signal Off" or "No Operation Off", and then press ENTER. 3 Press c/d to select "Enable", and then press ENTER. 4 Press MENU to exit. No Signal Off When set to"Enable", the power will automatically shut down if there is no signal for 15 minutes. • When it is 5 minutes before the power shuts down, the remaining time will start to keep appearing every minute. • "Disable" is the factory preset value. • When a TV program finishes, this function may not operate. No Operation Off When set to "Enable", the power will automatically shut down if there is no operation for 3 hours. • When it is 5 minutes before the power shuts down, the remaining time will start to keep appearing every minute. • "Disable" is the factory preset value. Setup Menu Example Setup EZ Setup CH Setup Antenna Setup-DIGITAL Input Skip Parental CTRL Position Language Reset [English] 1 Press MENU to display the MENU screen, and then press c/d to select "Setup". 2 Press a/b to select a specific adjustment item, and then press ENTER. • When you select "EZ Setup", "CH Setup", "Parental CTRL" and "Reset", you can enter the 4-digit secret number here. See page 22 for setting a secret number. 3 Press a/b (or c/d) to select the desired setting, and then press ENTER. 4 Press MENU to exit. EZ Setup You can run EZ Setup again, even after setting up the preset channels. Language: Select from among 3 languages (English, French and Spanish). TV Location: Select "Home" or "Store" for the location where you plan to install the TV. • If you select "Home", AV MODE is set to "STANDARD". • If you select "Store", AV MODE is set to "DYNAMIC (Fixed)". If there is no operation for 30 minutes, AV MODE will return to "DYNAMIC (Fixed)" automatically, regardless of previous changes to the AV MODE settings. Air/Cable: Make sure what kind of connection is made with your TV when selecting "Air" or "Cable". CH Search: Channel auto search makes the TV look for all channels viewable in the set area. • See "Initial Setup" on page 12 for setting each item. • If no channel is found, confirm the type of connection made with your TV and try EZ Setup again. • If you select "Analog Search Start" and initiate the channel search, the CH Memory for Cable Digital will be deleted. CH Setup If initial setup does not memorize all the channels in your region, follow the instructions below to manually memorize the channels. Air/Cable: Make sure what kind of connection is made with your TV when selecting "Air" or "Cable". CH Search: Channel auto search makes the TV look for all channels viewable in the set area. CH Memory: You can select the channels to skip in each ANALOG (Air), ANALOG (Cable), DIGITAL (Air) and DIGITAL (Cable). On: Skips channels. (Channel selection disabled using CH r/s.) Off: Does not skip channels. (Channel selection enabled using CHr/s.) • See "Initial Setup" on page 12 for setting each item. • If no channel is found, confirm the type of connection made with your TV and try channel search again. • If you select "Analog Search Start" and initiate the channel search, the CH Memory for Cable Digital will be deleted. Antenna Setup - DIGITAL In order to receive digital air broadcasts, you need a digital broadcast antenna. You can confirm the antenna configuration through the "Antenna Setup DIGITAL" screen. If necessary, adjust the direction of the antenna to obtain the maximum signal strength. Signal Strength: The signal strength of DIGITAL channel is displayed. The signal information is based on the current channel. Channel Strength: Input the 2-digit channel number to check the signal strength of the selected channel. Make sure the signal is strong enough for each channel. • This function is available for DIGITAL (Air) only. 20
-
 1
1 -
2
-
3
-
4
-
5
-
6
-
7
-
8
-
9
-
10
-
11
-
12
-
13
-
14
-
 15
15 -
 16
16 -
 17
17 -
 18
18 -
 19
19 -
 20
20 -
 21
21 -
 22
22 -
 23
23 -
 24
24 -
 25
25 -
26
-
27
-
28
-
29
-
30
-
31
-
32
 |
 |