Sharp MX-2300N Quick Start Guide
Sharp MX-2300N Manual
 |
View all Sharp MX-2300N manuals
Add to My Manuals
Save this manual to your list of manuals |
Sharp MX-2300N manual content summary:
- Sharp MX-2300N | Quick Start Guide - Page 1
MODEL: MX-2300N MX-3500N MX-2700N MX-3501N MX-4500N MX-4501N DIGITAL FULL COLOR MULTIFUNCTIONAL SYSTEM Quick Start Guide Keep this manual close the printer function. Scanning Using the scan function. Document filing Storing jobs as files on the hard drive. System settings Configuring settings to - Sharp MX-2300N | Quick Start Guide - Page 2
and configure settings to use the machine as a printer or scanner. Facsimile Quick Reference Guide This manual explains the basic procedures for using the fax function of the machine, and provides an overview of the features of the fax function, troubleshooting procedures, and specifications - Sharp MX-2300N | Quick Start Guide - Page 3
function allows you to save the document data of a copy or fax job, or the data of a print job, as a file on the machine's hard drive. The file can be called up as needed. System Settings Guide This manual explains the "System Settings", which are used to configure a variety of parameters to suit - Sharp MX-2300N | Quick Start Guide - Page 4
the IP address To check the IP address of the machine, print out the all custom setting list in the system settings. SYSTEM SETTINGS 1 Press the [SYSTEM SETTINGS] key. System Settings Total Count Paper Tray Settings Printer Condition Settings Admin Password Exit Default Settings Address - Sharp MX-2300N | Quick Start Guide - Page 5
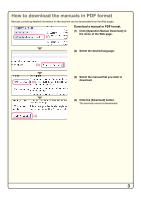
to download the manuals in PDF format Manuals containing detailed information on the machine can be downloaded from the Web pages. Download a manual in PDF format. (1) Click [Operation Manual Download] in the menu of the Web page. (1) (2) Select the desired language. (2) (3) (3) Select the manual - Sharp MX-2300N | Quick Start Guide - Page 6
TABLE OF CONTENTS General information PART NAMES AND FUNCTIONS 8 OPERATION PANEL 10 USING THE TOUCH PANEL 12 USER CANCELING A PRINT JOB 46 USING PRINTER DRIVER HELP 47 PRINTER DRIVERS 48 SELECTING PRINTER DRIVER SETTINGS 49 CONVENIENT PRINTER FUNCTIONS 50 PRINTING FROM A MACINTOSH - Sharp MX-2300N | Quick Start Guide - Page 7
Scanning NETWORK SCANNER FUNCTION 56 SCANNING AN ORIGINAL 57 CHANGING THE RESOLUTION 59 SELECTING TRANSMISSION METHODS 66 SPECIAL SCAN MODES 68 SELECTING SPECIAL MODES FOR THE SCANNER FUNCTION 69 CONVENIENT SCANNER FUNCTIONS 71 Document filing DOCUMENT FILING 74 QUICKLY SAVING DOCUMENT DATA ( - Sharp MX-2300N | Quick Start Guide - Page 8
- Sharp MX-2300N | Quick Start Guide - Page 9
about the machine, including the names and functions of the parts of the machine and its peripheral devices, and the procedures for placing originals and loading paper. X PART NAMES AND FUNCTIONS 8 X OPERATION PANEL 10 X USING THE TOUCH PANEL 12 X USER AUTHENTICATION 13 X PLACING ORIGINALS - Sharp MX-2300N | Quick Start Guide - Page 10
(2) B (7) (3) (9) (10) (11) (12) (13)(14) (8) (1) Automatic document feeder This automatically feeds and scans multiple originals. Both sides of 2-sided originals can be scanned at once. Illustration A shows the MX-3501N/4501N models. Illustration B shows the MX-2300N/2700N/3500N/4500N models - Sharp MX-2300N | Quick Start Guide - Page 11
DEVICES" in the User's Guide. PS3 expansion kit (MX-PKX1) This kit enables the machine to be used as a PostScript 3 compatible printer. Facsimile expansion kit (MX-FXX1) This kit enables the fax function of the machine to be used. Internet fax expansion kit (MX-FWX1) This kit enables Internet - Sharp MX-2300N | Quick Start Guide - Page 12
tray settings and storing addresses. Print hard drive, press this key to select document filing mode. [IMAGE SEND] key When you wish to use the scan or fax functions, press this key to select network scanner / fax the total page count and how much toner remains. 10 [JOB STATUS] key Press this key - Sharp MX-2300N | Quick Start Guide - Page 13
( ) Press this key to use a job program when using the copier function. When using the fax function, press this key to dial using a program. LOGOUT [CLEAR ALL key is also used to send a fax in fax mode. [CLEAR] key Press this key to return settings such as the number of copies to "0". [STOP] key - Sharp MX-2300N | Quick Start Guide - Page 14
Detail Priority Stop/Delete Print Job Scan to Fax Job Internet Fax A selected job can be given priority and Settings Auto Clear Setting OK 2/4 Transparency Covers/Inserts Inserts Multi Shot Set the time for auto clear. Book Copy Tab Copy Card Shot (1) (2) Cancel Timer 60 (10 - Sharp MX-2300N | Quick Start Guide - Page 15
AUTHENTICATION" in the User's Guide. Login by user number Enter your user number. This method requires that you log in by entering your user number (5 to 8 digits), which is stored in the OK system settings of the machine. Admin Login Login by login name and password Please enter your login - Sharp MX-2300N | Quick Start Guide - Page 16
to automatically scan many originals at once. This saves you the trouble of manually feeding each original. For originals that cannot be scanned using the place the originals in the document feeder tray. Adjust the original guides to the width of the originals. Place the originals face up - Sharp MX-2300N | Quick Start Guide - Page 17
must load the desired paper in the tray and then change the tray settings in the machine to specify the loaded paper. As an example, this in a tray Pull out the paper tray. If paper remains in the tray, remove it. Move the two guides on the tray to change the size from 8-1/2" x 14" (B4) to 8-1/2" - Sharp MX-2300N | Quick Start Guide - Page 18
DATA COPY SYSTEM JOB STATUS SETTINGS 1 Press the [SYSTEM SETTINGS] key. LOGOUT System Settings Total Count Paper Tray Settings (1) Printer Condition Settings Admin Password Exit Default Settings Address Control Document Filing Control List Print (User) Fax Data Receive/Forward USB-Device - Sharp MX-2300N | Quick Start Guide - Page 19
330 mm (8-1/2" x 13"), (8K, 16K, 16KR) Plain Paper, Pre-Printed, Recycled Paper, Letter Head, Pre-Punched, Color 11" x 17", 8-1/2" x 14", 8-1/2" x 11", 8-1/2" x 11"R, 7-1/4" x 10-1/2"R, (8K, 16K, 16KR) A3, B4, A4, A4R, B5, B5R, 216 mm x 330 mm (8-1/2" x 13"), (8K, 16K, 16KR) Plain Paper, Pre-Printed - Sharp MX-2300N | Quick Start Guide - Page 20
extension. The maximum number of sheets that can Guide. Loading 7-1/4" x 10 address side of envelopes can be printed on. Place envelopes with the address side face down. Load paper in the large capacity tray as shown. The size of paper used in the large capacity tray can only be changed by a service - Sharp MX-2300N | Quick Start Guide - Page 21
Copying This section explains the basic procedures for using the copier function. This section also introduces the various types of copying that can be performed using the special modes. X MAKING COPIES 20 X 2-SIDED COPYING (Automatic Document - Sharp MX-2300N | Quick Start Guide - Page 22
base screen of copy mode appears. 2 Place the original. When using the document glass, place the original with the side to be scanned face down. 3 Set the number of copies and then press the [COLOR START] key or the [BLACK & WHITE START] key. When [Auto] is selected for the color mode, the - Sharp MX-2300N | Quick Start Guide - Page 23
document feeder to make automatic 2-sided copies without the bother of manually turning the originals over and re-inserting them. This section explains 2-Side] key. (3) Touch the [OK] key. (2) or 3 Set the number of copies and then press the [COLOR START] key or the [BLACK & WHITE START] key. - Sharp MX-2300N | Quick Start Guide - Page 24
scanned face down. The side to be copied on must be face down! 2 Insert paper in the bypass tray. Full Color Color Mode Job Detail Settings (Au1to) Exposure 100% Copy Ratio Auto Original Auto 81/2x11 Paper Select (2) Plain Special Modes 81/2x11 2-Sided Copy Output Special Modes File Quick File - Sharp MX-2300N | Quick Start Guide - Page 25
-Inch] key. (6) Touch the [OK] key. (7) Touch the bypass tray key. (8) Touch the [OK] key. 4 Set the number of copies and then press the [COLOR START] key or the [BLACK & WHITE START] key. Correct sets Cancel scanning Cancel copying Selecting a tray Ready to scan for copy. Full color Color mode - Sharp MX-2300N | Quick Start Guide - Page 26
OK 1/2 Text/Photo Photo (2) Exposure Map Manual (4) 1 3 5 Light Original (3) OK (25/2) 2 Select exposure settings in the touch panel. (1) Touch the [Exposure the key. (5) Touch the [OK] key. 3 Set the number of copies and then press the [COLOR START] key or the [BLACK or & - Sharp MX-2300N | Quick Start Guide - Page 27
the original. When using the document glass, place the original with the side to be scanned face down. Full Color Color Mode Job Detail Settings (Au1to) Exposure 100% Copy Ratio Auto Original Auto 81/2x11R Paper Select (2) Plain Special Modes 81/2x11 2-Sided Copy Output Special Modes File Quick - Sharp MX-2300N | Quick Start Guide - Page 28
3 Set the number of copies and then press the [COLOR START] key or the [BLACK or & WHITE START] key. Correct sets Cancel scanning Cancel copying 26 - Sharp MX-2300N | Quick Start Guide - Page 29
down. Ready to scan for copy. Full Color Color Mode Job Detail Settings Auto Exposure 100% Copy Ratio (1) Copy Ratio 11x17 81/2x11 64% 81 [Copy Ratio] key. (2) Change the ratio menu. (3) Touch the [50%] key. (4) Set the copy ratio to 55% with the key. The ratio can be adjusted in increments of - Sharp MX-2300N | Quick Start Guide - Page 30
3 Set the number of copies and then press the [COLOR START] key or the [BLACK or & WHITE START] key. Correct sets Cancel scanning Cancel copying 28 - Sharp MX-2300N | Quick Start Guide - Page 31
while the machine is printing. 2 Place the original. When using the document glass, place the original with the side to be scanned face down. 3 Set the number of copies and then press the [COLOR START] key or the [BLACK & WHITE START] key. or The interrupted copy job will resume when the copy - Sharp MX-2300N | Quick Start Guide - Page 32
settings, this saves you the trouble of manually selecting the settings each time you need to use them. Storing a job program 1 Press the [#/P] key ( ). Job Programs Press program number job program that you wish to store. (3) Select the copy settings that you wish to store. (4) Touch the [OK] key. - Sharp MX-2300N | Quick Start Guide - Page 33
Press the [#/P] key ( ). Place the original. Job Programs Press program number. 1 2 5 6 Recall Exit 1/6 3 4 7 8 Store/Delete Deleting a job program 2 Touch the numeric key of the desired job program. Set the number of copies and start copying. 1 Press the [#/P] key ( ). Job Programs - Sharp MX-2300N | Quick Start Guide - Page 34
A job program has been already stored in this location. Cancel Delete (3) Store Job Programs Press program number. 1 2 5 6 Recall Exit (4) 1/6 3 4 7 8 Store/Delete Delete the job program in the touch panel. (Continued) (3) Read the displayed message and touch the [Delete] key. (4) - Sharp MX-2300N | Quick Start Guide - Page 35
specific procedures for selecting each of the special modes, see "2. CONVENIENT COPY FUNCTIONS" in the Copier Guide. Special modes Ready to scan for copy. Full Color Color Mode Job Detail Settings Auto Exposure 100% Copy Ratio 1. 81/2Ax411 2. 81/2Bx511R 3. 81/2Bx414 4. 11Ax317 Plain 81/A2x411 - Sharp MX-2300N | Quick Start Guide - Page 36
for the reverse side using the keys. (4) Touch the [OK] key. The margin shift position is initially set to "Right". To change the position to "Left" or "Down", touch the corresponding key. 3 Set the number of copies and then press the [COLOR START] key or the [BLACK & WHITE START] key. Correct - Sharp MX-2300N | Quick Start Guide - Page 37
CONVENIENT COPY FUNCTIONS Adding margins (Margin Shift) Use this function to shift the image on the copy to create binding margins. This function is convenient when you will be binding the copies with a string or placing them in a binder. Erasing peripheral shadows (Erase) Use this function to - Sharp MX-2300N | Quick Start Guide - Page 38
automatic document feeder at once. The job build function lets you divide the stack of originals into sets, feed each set, and copy the sets as a single job. Using two machines to copy a large number of originals (Tandem Copy) You can divide a copy job between two machines connected to the same - Sharp MX-2300N | Quick Start Guide - Page 39
Copying multiple pages onto one sheet of paper (Multi Shot) Use this function to copy two or four original pages onto one sheet of paper. 1234 12 34 Copying a pamphlet (Book Copy) Use this function to copy a book, pamphlet, or other bound original. The copies will be arranged in the same - Sharp MX-2300N | Quick Start Guide - Page 40
. or text on copies. A color can be selected to print a stamp or text in color. Date print 08/01/2005 Stamp CONFIDENTIAL Page number 1 2 3 Text Planning Meeting Repeating photos on a copy (Photo Repeat) Use this function to print up to 24 copies of one photo on one sheet of - Sharp MX-2300N | Quick Start Guide - Page 41
white and black in a copy (B/W Reverse) This function reverses black and white in a copy to create a negative image. Use this function to save toner when copying an original with large black areas. Adjusting red/green/blue in copies (RGB Adjust) Use this function to strengthen or weaken red, green - Sharp MX-2300N | Quick Start Guide - Page 42
) Use this function to sharpen or soften a copied image. Soft Sharp Whitening faint colors in copies (Suppress Background) Use this function to suppress light background areas of the copied image. This is convenient for making a copy - Sharp MX-2300N | Quick Start Guide - Page 43
(Proof Copy) When this function is used, only one set of copies is made, regardless of the number of sets specified. After the first set is checked for errors, the remaining sets can be printed. 5 sets Check 1 set 4 sets Copying originals that are different sizes (Mixed Size Original) Even - Sharp MX-2300N | Quick Start Guide - Page 44
- Sharp MX-2300N | Quick Start Guide - Page 45
procedures are primarily for Windows® XP in Windows® environments, and Mac OS X v10.3.9 in Macintosh environments. X PRINTING 44 X CANCELING A PRINT JOB 46 X USING PRINTER DRIVER HELP 47 X PRINTER DRIVERS 48 X SELECTING PRINTER DRIVER SETTINGS 49 X CONVENIENT PRINTER FUNCTIONS 50 X PRINTING - Sharp MX-2300N | Quick Start Guide - Page 46
. (1) Select the printer driver of the machine. (2) Click the [Preferences] button. (1) In Windows 98/Me/NT 4.0, click the [Properties] button. (2) In Windows 2000, the [Preferences] button does not appear. Click each tab in the "Print" dialog box to adjust the settings on that tab. 44 - Sharp MX-2300N | Quick Start Guide - Page 47
(1) (2) (3) 3 Select print settings. (1) Click the [Paper] tab. (2) Select the paper size. (3) Click the [OK] button. 4 Click the [Print] button. Printing begins. In Windows 98/Me/NT 4.0, click the [OK] button. 45 - Sharp MX-2300N | Quick Start Guide - Page 48
Queue 1 Copy 2 Copy 3 Computer01 4 0312345678 Sets / Progress Status 020 / 001 Copying 020 / 000 Waiting 020 / 000 (3) 002 / 000 Waiting Waiting Spool 1/1 Job Queue Complete (2) Detail Priority Stop/Delete Print Job (1) Scan to Fax Job (4) Internet Fax Delete the job? Computer01 No Yes - Sharp MX-2300N | Quick Start Guide - Page 49
USING PRINTER DRIVER HELP When selecting settings in the printer driver properties window, you can display Help to view explanations of the settings. 1 Open the printer driver properties window. (1) Select the printer driver of the machine. (2) Click the [Preferences] button. (1) In Windows - Sharp MX-2300N | Quick Start Guide - Page 50
window. This section introduces the types of printer drivers and the printer driver settings. Printer driver types PCL printer driver*1 The machine supports the Hewlett-Packard PCL6 and PCL5c printer control languages. It is recommended that you use the PCL6 printer driver. If you have a problem - Sharp MX-2300N | Quick Start Guide - Page 51
paper. The procedures for configuring printer driver settings vary by setting. For more information on each of the settings, see "2. CONVENIENT PRINTING FUNCTIONS IN WINDOWS" in the Printer Guide. 1 Open the printer driver properties window. (1) Select the printer driver of the machine. (2) Click - Sharp MX-2300N | Quick Start Guide - Page 52
CONVENIENT PRINTER FUNCTIONS 2-sided printing (Document Style) Use this function to print on both sides of the paper. You can use 2-sided printing to reduce the number of printed sheets when you are printing a large number of pages or when you wish to conserve paper. 1234 13 Fitting the print - Sharp MX-2300N | Quick Start Guide - Page 53
toner when color printing is not necessary, such as when you only need to check the contents of a document. The machine also has these functions See "2. CONVENIENT PRINTING FUNCTIONS IN WINDOWS" in the Printer Guide Black/Vector To Black) • Selecting color settings to match the image type (Image Type - Sharp MX-2300N | Quick Start Guide - Page 54
TextEdit", which is a standard accessory program in Mac OS X. To print from a Macintosh, the the Software Setup Guide. Setting the paper size The following example explains how to set the paper size . The window varies depending on the operating system version, the printer driver version, and - Sharp MX-2300N | Quick Start Guide - Page 55
] in Mac OS 9.0 to 9.2.2) and select the settings that you wish to configure from the pull-down menu. The corresponding setting screen will appear. (3) Click the [Print] button. Printing begins. The print window varies depending on the operating system version, the printer driver version, and - Sharp MX-2300N | Quick Start Guide - Page 56
- Sharp MX-2300N | Quick Start Guide - Page 57
using scan mode. In addition, special modes that can be used with the network scanner function are introduced. The Internet fax expansion kit is required to use the Internet fax function. X NETWORK SCANNER FUNCTION 56 X SCANNING AN ORIGINAL 57 X CHANGING THE RESOLUTION 59 X SELECTING THE EXPOSURE - Sharp MX-2300N | Quick Start Guide - Page 58
software, see the Sharpdesk Installation Guide.) Internet Fax mode A fax can be sent via the Internet. This function requires the expense of an Internet connection, however, if you already have Internet service or frequently send faxes, this function can help reduce communication costs. USB Memory - Sharp MX-2300N | Quick Start Guide - Page 59
file by e-mail. DOCUMENT FILING IMAGE SEND PRINT READY DATA LINE DATA COPY SYSTEM JOB STATUS SETTINGS Ready to send. Scan Mode Switch Image Settings Send Settings LOGOUT Resend Address Book Address Entry Special Modes File Quick File The side to be scanned must be face up! Scan transmission - Sharp MX-2300N | Quick Start Guide - Page 60
4 Press the [COLOR START] key or the [BLACK & WHITE START] key. or Cancel scanning 58 - Sharp MX-2300N | Quick Start Guide - Page 61
type. This section explains how to set the resolution to "300X300dpi", which creates a clearer image than the default resolution. The side to be scanned must Address Book Address Entry Special Modes File Quick File OK (4) 2 Select the resolution in the touch panel. (1) Touch the [Image Settings] - Sharp MX-2300N | Quick Start Guide - Page 62
/JPEG File Format Special Modes Address Book Address Entry Special Modes File Quick File When Fax/I-Fax address is included, exposure setting shared among Fax/ I-Fax/ Scanner mode is selected. OK (3) Scan Exposure (4) 1 Moiré Reduction Auto Manual 3 5 (5) Text/ Prtd.Photo Text (6) Printed - Sharp MX-2300N | Quick Start Guide - Page 63
the [High] key. This sets the compression to high. A higher compression ratio creates a smaller file size. (7) Touch the [OK] key. 3 Select the destination and press the [COLOR START] key. If the file type is set to [Encrypt PDF], you will be prompted to enter a password when you start transmission - Sharp MX-2300N | Quick Start Guide - Page 64
Scanner Guide. Storing a individual key DOCUMENT FILING IMAGE SEND PRINT READY DATA LINE DATA COPY SYSTEM JOB STATUS SETTINGS 1 Press the [SYSTEM SETTINGS] key. LOGOUT System Settings Total Count Paper Tray Settings Printer Condition Settings Admin Password Exit Default Settings Address - Sharp MX-2300N | Quick Start Guide - Page 65
Total Count Paper Tray Settings Printer Condition Settings Admin Password Exit Default Settings Address Control (1) Document Filing Control List Print (User) Fax Data Receive/Forward USB-Device Check System Settings Address Control OK Direct Address / Program (2) F-Code Memory Box Custom - Sharp MX-2300N | Quick Start Guide - Page 66
D Index User 1 Key Name Address (10) Next Exit Direct Address / Group Select address. AAA AAA CCC CCC BBB BBB (11) OK 1/1 (12) Direct Entry Address Review * 2 Frequent Use ABCD EFGHI JKLMN OPQRST UVWXYZ Sort Address Direct Address / Group Search Number 004 Group Name DDD DDD - Sharp MX-2300N | Quick Start Guide - Page 67
operation. The destinations can also include fax and Internet fax destinations. The procedure for selecting multiple DDD (3) FFF FFF Condition Settings 1/1 Address Review (4) Global Address Search Frequent Use ABCD EFGHI JKLMN OPQRST UVWXYZ Sort Address Address Review 001 AAA AAA 002 DDD - Sharp MX-2300N | Quick Start Guide - Page 68
using a one-touch key for a group. Ready to send. (1) Touch the [Resend] key. Resend Scan Mode Switch Image Settings Scan 81/2x11 Send Settings Send Auto (1) Address Book Address Entry Special Modes File Quick File No.01 No.03 No.05 No.07 AAA AAA CCC CCC (2) EEE EEE GGG GGG No.02 No.04 - Sharp MX-2300N | Quick Start Guide - Page 69
the key. Scan Mode Switch Image Settings Scan 81/2x11 Send Settings Send Auto Address Book (1) Address Entry Special Modes File Quick File Enter search number.(001-999) Scan Mode Switch Image Settings Send Settings (2) Address Book Address Entry Special Modes File Quick File (2) Enter - Sharp MX-2300N | Quick Start Guide - Page 70
the specific procedures for using the special modes, see "7. CONVENIENT FUNCTIONS" in the Scanner Guide. Ready to send. Scan Mode Switch Image Settings Scan 81/2x11 Send Settings Send Auto Resend Address Book Address Entry Special Modes File Quick File To use a special mode, open the special - Sharp MX-2300N | Quick Start Guide - Page 71
procedure for selecting a special mode for the scanner function is explained below. The settings that must be selected vary for each Ready to send. Scan Mode Switch Image Settings Scan 81/2x11 Send Settings Send Auto Resend Address Book Address Entry Special Modes (F1ile) Quick File Scan - Sharp MX-2300N | Quick Start Guide - Page 72
3 Select the destination and press the [COLOR START] key. This function cannot be used when the color mode is set to [Mono2]. Cancel scanning 70 - Sharp MX-2300N | Quick Start Guide - Page 73
CONVENIENT SCANNER FUNCTIONS Erasing peripheral shadows (Erase) Use this function to erase peripheral shadows that occur when scanning books and other thick originals. Scan Without erase Scan - Sharp MX-2300N | Quick Start Guide - Page 74
the specific procedures for using the special modes, see "7. CONVENIENT FUNCTIONS" or "8. INTERNET FAX FUNCTIONS" in the Scanner Guide. • Sending an image at a specified time (Timer) • Using stored settings (Program) • Scanning thin originals (Slow Scan Mode) • Scanning different sizes of originals - Sharp MX-2300N | Quick Start Guide - Page 75
Document filing The document filing function is used to store the document or print image on the hard drive when performing a copy, print, or other job. A stored file can be called up and used whenever needed. This section introduces several of the document filing - Sharp MX-2300N | Quick Start Guide - Page 76
fax job, as a file on the machine's hard drive. The file can be called up as needed and printed or transmitted. Uses of the document filing function Copy Fax This lets you quickly save a file without the bother of configuring settings. Main Folder If a folder is not specified when using "File", - Sharp MX-2300N | Quick Start Guide - Page 77
prepared copies of a many-page handout for a meeting, but the number of participants suddenly increases and you need to quickly prepare more copies of all of the pages of the handout. And the copy settings must be selected again. In this situation, there is no trouble of selecting the folder. 75 - Sharp MX-2300N | Quick Start Guide - Page 78
the folder. OK (2) or 2 Select Quick File in the touch panel. Select settings in the same way as when making a regular copy. (1) Touch the [Quick File] key. (2) Touch the [OK] key. 3 Perform the copy operation. The file is stored on the hard drive at the same time as the copy is made. Correct - Sharp MX-2300N | Quick Start Guide - Page 79
Detail Settings Auto Exposure Password (5) (6) User Name File Name Stored to: Name 1 file-01 Main Folder Cancel OK (5) Touch the [File Name] key. A text entry screen appears. Enter the name of the destination (max. of 30 characters). To enter text, see "6. ENTERING TEXT" in the User's Guide - Sharp MX-2300N | Quick Start Guide - Page 80
) (7) Touch the [User 1] key. (8) Touch the [OK] key. (9) Touch the [OK] key. 3 Set the number of copies and then press the [COLOR START] key or the [BLACK & WHITE START] key. The file is stored on the hard drive at the same time as the copy is made. Correct sets Cancel scanning Cancel copying 78 - Sharp MX-2300N | Quick Start Guide - Page 81
be scanned face down. File Store Scan to HDD Ready to scan to HDD. Press [Start] to scan original. Mono2/Auto Color Mode Job Detail Settings Auto 81/2x11 Original or File Retrieve File Folder Quick File Folder External Data Access Back Special Modes File Information 3 Touch the [Scan to HDD - Sharp MX-2300N | Quick Start Guide - Page 82
the key of the file that you wish to call up. (3) Touch the [Print] key. Job Settings / Print Cancel file-01 Auto Paper Select Output 2-Sided Special Modes Name 1 81/2x11 F. Color Number of Prints (4) 1 (1~999) Print and Delete the Data B/W Print Print and Save the Data (4) Touch the - Sharp MX-2300N | Quick Start Guide - Page 83
System settings The system settings let you adjust the operation of the machine to suit the needs of your workplace. This section briefly introduces several of the system settings. For detailed explanations of the system settings, see the System Settings Guide. X SYSTEM SETTINGS 82 81 - Sharp MX-2300N | Quick Start Guide - Page 84
DATA COPY SYSTEM JOB STATUS SETTINGS LOGOUT Press the [SYSTEM SETTINGS] key. System Settings Total Count Paper Tray Settings Printer Condition Settings Admin Password Exit Default Settings Address Control Document Filing Control List Print (User) Fax Data Receive/Forward USB-Device Check - Sharp MX-2300N | Quick Start Guide - Page 85
- Sharp MX-2300N | Quick Start Guide - Page 86
- Sharp MX-2300N | Quick Start Guide - Page 87
indicated: MX-2300/2700 series: MX-2300N, MX-2700N MX-3500/4500 series: MX-3500N, MX-3501N, MX-4500N, MX-4501N • Considerable care has been taken in preparing this manual. If you have any comments or concerns about the manual, please contact your dealer or nearest SHARP Service Department. • This - Sharp MX-2300N | Quick Start Guide - Page 88
Quick Start Guide MODEL: MX-2300N MX-3500N MX-2700N MX-3501N MX-4500N MX-4501N SHARP ELECTRONICS CORPORATION Sharp Plaza, Mahwah, New Jersey 07430-1163. www.sharpusa.com SHARP ELECTRONICS OF CANADA LTD. 335 Britannia Road East, Mississauga, Ontario, L4Z 1W9 This manual has been printed using a
-
 1
1 -
 2
2 -
 3
3 -
 4
4 -
 5
5 -
 6
6 -
 7
7 -
8
-
9
-
10
-
11
-
12
-
13
-
14
-
15
-
16
-
17
-
18
-
19
-
20
-
21
-
22
-
23
-
24
-
25
-
26
-
27
-
28
-
29
-
30
-
31
-
32
-
33
-
34
-
35
-
36
-
37
-
38
-
39
-
40
-
41
-
42
-
43
-
44
-
45
-
46
-
47
-
48
-
49
-
50
-
51
-
52
-
53
-
54
-
55
-
56
-
57
-
58
-
59
-
60
-
61
-
62
-
63
-
64
-
65
-
66
-
67
-
68
-
69
-
70
-
71
-
72
-
73
-
74
-
75
-
76
-
77
-
78
-
79
-
80
-
81
-
82
-
83
-
84
-
85
-
86
-
87
-
88
 |
 |
DIGITAL FULL COLOR MULTIFUNCTIONAL SYSTEM
Quick Start Guide
Quick Start Guide
Quick Start Guide
General information
Functions of the machine and
procedures for placing originals and
loading paper.
Copying
Using the copy function.
Printing
Using the printer function.
Scanning
Using the scan function.
Document filing
Storing jobs as files on the hard
drive.
System settings
Configuring settings to make the
machine easier to use.
Keep this manual close at hand for reference
whenever needed.
MX-3500N
MX-3501N
MX-4500N
MX-4501N
MX-2300N
MX-2700N
MODEL: