Sharp MX-5001N MX-4100N MX-4101N MX-5001N Operation Manual Suite
Sharp MX-5001N Manual
 |
View all Sharp MX-5001N manuals
Add to My Manuals
Save this manual to your list of manuals |
Sharp MX-5001N manual content summary:
- Sharp MX-5001N | MX-4100N | MX-4101N | MX-5001N Operation Manual Suite - Page 1
PRINT A DOCUMENT SEND A FAX SCAN AN IMAGE / SEND AN INTERNET FAX SAVE A JOB AND REUSE IT LATER MAINTAIN THE MACHINE Search using the table of contents BEFORE USING THE MACHINE COPIER PRINTER FACSIMILE SCANNER / INTERNET FAX DOCUMENT FILING SYSTEM SETTINGS TROUBLESHOOTING About Operation Guide - Sharp MX-5001N | MX-4100N | MX-4101N | MX-5001N Operation Manual Suite - Page 2
MAKE A COPY Conserve Reduce copy mistakes Make a copy of this type of original Make a copy on this type of paper 2010/04/04 Add the date or page numbers Assemble output into a pamphlet Other convenient functions - Sharp MX-5001N | MX-4100N | MX-4101N | MX-5001N Operation Manual Suite - Page 3
Conserve Copy on both sides of the paper Copy on the front and back of a card Copy multiple pages on one side of one sheet of paper - Sharp MX-5001N | MX-4100N | MX-4101N | MX-5001N Operation Manual Suite - Page 4
Reduce copy mistakes Print one set of copies for proofing Check the number of scanned pages before making copies - Sharp MX-5001N | MX-4100N | MX-4101N | MX-5001N Operation Manual Suite - Page 5
Make a copy of this type of original Mixed color and black & white originals Mixed-size originals Bound original such as a book (one page at a time) More original pages than can be loaded at once Bulky original (shadows appear at edges) Book or pamphlet (make facing page copies) - Sharp MX-5001N | MX-4100N | MX-4101N | MX-5001N Operation Manual Suite - Page 6
Make a copy on this type of paper Envelopes and other special media Tab Paper 11" x 17" paper Transparency film - Sharp MX-5001N | MX-4100N | MX-4101N | MX-5001N Operation Manual Suite - Page 7
Add the date or page numbers 2010/04/04 Add the date 9 10 11 Add the page number Add a stamp ABCDEFG Add text - Sharp MX-5001N | MX-4100N | MX-4101N | MX-5001N Operation Manual Suite - Page 8
Assemble output into a pamphlet Create a stapled pamphlet Create a blank margin for punching Fold output in half Staple output Punch holes in output - Sharp MX-5001N | MX-4100N | MX-4101N | MX-5001N Operation Manual Suite - Page 9
two machines simultaneously z Give priority to a copy job z Check the status of a reserved job z Insert covers/inserts in copy output z Copy a thin original z Adjust the color - Sharp MX-5001N | MX-4100N | MX-4101N | MX-5001N Operation Manual Suite - Page 10
PRINT A DOCUMENT Conserve Print without a computer Print attractive output Assemble output into a pamphlet Print on this type of paper Add text or an image Other convenient functions - Sharp MX-5001N | MX-4100N | MX-4101N | MX-5001N Operation Manual Suite - Page 11
Conserve Print on both sides of the paper Print multiple pages on one side of the paper - Sharp MX-5001N | MX-4100N | MX-4101N | MX-5001N Operation Manual Suite - Page 12
Print without a computer FTP Print a file on an FTP Print a file in a network folder Print a file in a USB memory device Print a file stored in the machine - Sharp MX-5001N | MX-4100N | MX-4101N | MX-5001N Operation Manual Suite - Page 13
Print attractive output Print matching the size of the paper Print using color settings suitable for the data Select the print mode Adjust the brightness and contrast Bring out faint text and lines - Sharp MX-5001N | MX-4100N | MX-4101N | MX-5001N Operation Manual Suite - Page 14
Assemble output into a pamphlet Create a stapled pamphlet Create a blank margin for punching Print specific pages on the front side of the paper Staple output Punch holes in output - Sharp MX-5001N | MX-4100N | MX-4101N | MX-5001N Operation Manual Suite - Page 15
Print on this type of paper Envelopes Transparency film Rotate the image 180 degrees Tab Paper Print specific pages on different paper - Sharp MX-5001N | MX-4100N | MX-4101N | MX-5001N Operation Manual Suite - Page 16
Add text or an image Add a watermark to print data Overlay a fixed form on the print data Overlay an image on the print data - Sharp MX-5001N | MX-4100N | MX-4101N | MX-5001N Operation Manual Suite - Page 17
functions Correct the size or orientation of the print data z Enlarge or reduce the print image z Print a mirror-image Security is important z Print confidentially z Print an encrypted PDF file Functions used for specific purposes z Print an "invoice copy" z Create a large poster Convenient - Sharp MX-5001N | MX-4100N | MX-4101N | MX-5001N Operation Manual Suite - Page 18
SEND A FAX Conserve Send this type of document Prevent transmission to the wrong destination Send a clear document Save trouble Security is important Other convenient functions - Sharp MX-5001N | MX-4100N | MX-4101N | MX-5001N Operation Manual Suite - Page 19
Conserve Send when the rate is lowest Send two original pages as a single page Check received data before printing Relay a transmission through a branch office - Sharp MX-5001N | MX-4100N | MX-4101N | MX-5001N Operation Manual Suite - Page 20
Send this type of document Bulky original (shadows appear at edges) More original pages than can be loaded at once Original printed on both sides Bound original such as a book (one page at a time) Mixed-size originals ID card or other card - Sharp MX-5001N | MX-4100N | MX-4101N | MX-5001N Operation Manual Suite - Page 21
Prevent transmission to the wrong destination Check the destination once more before sending Check the log of previous transmissions Check the result of transmission Stamp scanned original pages - Sharp MX-5001N | MX-4100N | MX-4101N | MX-5001N Operation Manual Suite - Page 22
Send a clear document Adjust the exposure Specify the size before sending Adjust the image quality Send without shadows at the edges - Sharp MX-5001N | MX-4100N | MX-4101N | MX-5001N Operation Manual Suite - Page 23
Save trouble Store frequently used settings 1 2 3 XXXX-6789 XXXX-9874 XXXX-4567 XXXX-5432 XXXX-9999 View the transmission log Bound original such as a book (one page at a time) Send to multiple destinations XXXX-6789 XXXX-9874 XXXX-4567 XXXX-5432 XXXX-9999 Easily specify an address ( - Sharp MX-5001N | MX-4100N | MX-4101N | MX-5001N Operation Manual Suite - Page 24
Security is important Check the destination once more before sending Print protected reception data Send a document at the other machine's request Send confidentially Initiate reception of a document from a sending machine - Sharp MX-5001N | MX-4100N | MX-4101N | MX-5001N Operation Manual Suite - Page 25
Other convenient functions Convenient management functions z Forward a received fax to a network address z Print a list of addresses Convenient functions z Send a thin original z Select a transmission destination from a global address book z Give priority to a transmission z Use an extension phone - Sharp MX-5001N | MX-4100N | MX-4101N | MX-5001N Operation Manual Suite - Page 26
SCAN AN IMAGE / SEND AN INTERNET FAX Send a clear image Send this type of document Prevent transmission to the wrong destination Send a smaller file Save trouble Scan from my computer Other convenient functions - Sharp MX-5001N | MX-4100N | MX-4101N | MX-5001N Operation Manual Suite - Page 27
Send a clear image Adjust the contrast or image quality Send without shadows at the edges Adjust the resolution before sending Suppress the background of a transmitted document - Sharp MX-5001N | MX-4100N | MX-4101N | MX-5001N Operation Manual Suite - Page 28
Send this type of document Bulky original (shadows appear at edges) More original pages than can be loaded at once Original printed on both sides Bound original such as a book (one page at a time) Mixed-size originals Original with background - Sharp MX-5001N | MX-4100N | MX-4101N | MX-5001N Operation Manual Suite - Page 29
Prevent transmission to the wrong destination Check the result of transmission Stamp scanned original pages Check the log of previous transmissions - Sharp MX-5001N | MX-4100N | MX-4101N | MX-5001N Operation Manual Suite - Page 30
Send a smaller file Send at low resolution Reduce an image before sending Send two original pages as a single page Compress a file before sending Send an image in black & white ID or other card - Sharp MX-5001N | MX-4100N | MX-4101N | MX-5001N Operation Manual Suite - Page 31
Save trouble Store frequently used settings 1 2 3 [email protected] [email protected] [email protected] View the transmission log [email protected] [email protected] Send an Internet fax from a computer Send to multiple destinations [email protected] [email protected]. [email protected] [email protected]. [email protected] - Sharp MX-5001N | MX-4100N | MX-4101N | MX-5001N Operation Manual Suite - Page 32
functions z Forward a received fax to a network address z Print a list of transmission destinations Convenient functions z Scan a thin original z Select a transmission destination from a global address book z Send at a specified time z Give priority to a transmission z Send in USB memory mode - Sharp MX-5001N | MX-4100N | MX-4101N | MX-5001N Operation Manual Suite - Page 33
SAVE A JOB AND REUSE IT LATER Search for a file Organize my files Save an important document Print a batch of files - Sharp MX-5001N | MX-4100N | MX-4101N | MX-5001N Operation Manual Suite - Page 34
Search for a file abc Search for a file using a keyword Search by checking the contents of files - Sharp MX-5001N | MX-4100N | MX-4101N | MX-5001N Operation Manual Suite - Page 35
Organize my files Delete a file Periodically delete files Delete all files Change the folder - Sharp MX-5001N | MX-4100N | MX-4101N | MX-5001N Operation Manual Suite - Page 36
MAINTAIN THE MACHINE Clean the machine Replace a toner cartridge Replace the staple cartridge Replace the stamp cartridge Replace the waste toner box Dispose of punch waste - Sharp MX-5001N | MX-4100N | MX-4101N | MX-5001N Operation Manual Suite - Page 37
Clean the machine Clean the document glass and automatic document feeder Clean the original feed roller Clean the laser unit Clean the main charger of the photoconductive drum Clean the bypass feed roller - Sharp MX-5001N | MX-4100N | MX-4101N | MX-5001N Operation Manual Suite - Page 38
topic in this guide: you can use an "I want to..." menu, or you can use a regular table of contents. The following explanation assumes that Adobe Reader 8.0 is being used (Some buttons do not appear in the default state.). Return to top page ( ) Return to previously displayed page ( ) Search based - Sharp MX-5001N | MX-4100N | MX-4101N | MX-5001N Operation Manual Suite - Page 39
shows the contents of the printer chapter. • If a button does not appear, refer to Adobe Reader Help to display the button. • Caution when printing If all pages are printed, the menu pages of the "I want to..." menu will also be printed. To print only the pages that contain the explanation of - Sharp MX-5001N | MX-4100N | MX-4101N | MX-5001N Operation Manual Suite - Page 40
the operation of the machine in each mode. Refer to this manual when you have difficulty using the machine. Printed manuals Manual name Safety Guide Software Setup Guide Quick Start Guide Contents This manual contains instructions for using the machine safely and lists the specifications of the - Sharp MX-5001N | MX-4100N | MX-4101N | MX-5001N Operation Manual Suite - Page 41
ABOUT OPERATION MANUAL This manual explains how to use the MX-4100N/MX-4101N/5001N digital full color multifunctional system. Please note • For information on installing the drivers and software cited in this manual, please refer to the Software Setup Guide. • For information on your operating - Sharp MX-5001N | MX-4100N | MX-4101N | MX-5001N Operation Manual Suite - Page 42
1-46 • FINISHER (LARGE STACKER) MAINTENANCE 1-47 SADDLE STITCH FINISHER 1-49 • PART NAMES 1-49 • SUPPLIES 1-49 • SADDLE STITCH FINISHER MAINTENANCE 1-50 PUNCH MODULE 1-53 • DISCARDING PUNCH WASTE 1-53 SHARP OSA 1-56 • APPLICATION COMMUNICATION MODULE (MX-AMX2 1-56 • EXTERNAL ACCOUNT MODULE - Sharp MX-5001N | MX-4100N | MX-4101N | MX-5001N Operation Manual Suite - Page 43
CHARGER OF THE PHOTOCONDUCTIVE DRUM 1-62 • CLEANING THE BYPASS FEED ROLLER . . . 1-64 • CLEANING THE ORIGINAL FEED ROLLER 1-64 • CLEANING THE LASER UNIT 1-65 REPLACING THE TONER CARTRIDGES 1-69 REPLACING THE WASTE TONER BOX 1-72 REPLACING THE STAMP CARTRIDGE 1-75 ENTERING TEXT FUNCTIONS OF THE - Sharp MX-5001N | MX-4100N | MX-4101N | MX-5001N Operation Manual Suite - Page 44
using the MX-4101N/5001N When a finisher / saddle stitch finisher is not installed (7) When a finisher is installed (1) Automatic document feeder This automatically feeds and scans multiple originals. Both sides of 2-sided originals can be automatically scanned. ☞ PLACING THE ORIGINAL (page 1-37 - Sharp MX-5001N | MX-4100N | MX-4101N | MX-5001N Operation Manual Suite - Page 45
THE MACHINE (8) (9) (10) When a saddle stitch finisher is installed (11) (12) (13) (14) (15) (16) (17) (8) Punch module* This is used to punch holes in output. Requires a finisher (large stacker). ☞ PUNCH MODULE (page 1-53) (9) USB connector (A type) Supports USB 2.0 (Hi-Speed). This is used - Sharp MX-5001N | MX-4100N | MX-4101N | MX-5001N Operation Manual Suite - Page 46
machine. When using the fax or Internet fax functions, keep this switch in the "on" position. ☞ TURNING THE POWER ON AND OFF (page 1-15) (25) Waste toner box This collects excess toner that remains after printing. ☞ REPLACING THE WASTE TONER BOX (page 1-72) Your service technician will collect the - Sharp MX-5001N | MX-4100N | MX-4101N | MX-5001N Operation Manual Suite - Page 47
feeder (MX-4101N/5001N) (2) (3) (4) (5) (1) Paper feed roller This roller rotates to automatically feed the original. (2) Document feeding area cover Open this cover to remove an original misfeed or clean the paper feed roller. (3) Original guides These help ensure that the original is scanned - Sharp MX-5001N | MX-4100N | MX-4101N | MX-5001N Operation Manual Suite - Page 48
(A type) When the fax expansion kit is installed Supports USB 2.0 (Hi-Speed). This is used to connect a USB device such as USB memory to the machine. This connector is not initially available for use. If you wish to use the connector, contact your service technician. (6) (2) LAN connector - Sharp MX-5001N | MX-4100N | MX-4101N | MX-5001N Operation Manual Suite - Page 49
(page 1-22) (8) IMAGE SEND mode indicators • LINE indicator This lights up during transmission or reception of a fax or Internet fax. This also lights during transmission of an image in scan mode. • DATA indicator This blinks when a received fax or Internet fax cannot be printed because of a problem - Sharp MX-5001N | MX-4100N | MX-4101N | MX-5001N Operation Manual Suite - Page 50
scan an original in color. This key cannot be used for fax or Internet fax. (11) [LOGOUT] key ( ) Press this key to log out after you have logged in and used the machine. When using the fax function, this key can also be pressed to send tone signals on a pulse dial line. ☞ USER AUTHENTICATION (page - Sharp MX-5001N | MX-4100N | MX-4101N | MX-5001N Operation Manual Suite - Page 51
settings, see "Common Operation Methods" (page 7-4) in "7. SYSTEM SETTINGS". Using the touch panel Example 1 (1) (2) COPY IMAGE SEND Job status screen. DOCUMENT FILING Print Job Job Queue 1 Copy 2 Copy 3 Computer01 4 0312345678 Scan to Fax Job Sets / Progress 020 / 001 Status - Sharp MX-5001N | MX-4100N | MX-4101N | MX-5001N Operation Manual Suite - Page 52
Color Mode Full Color BEFORE USING THE MACHINE Function Review Margin Shift Shift:Right Front:1/ Sided/Back:Insert Covers/Inserts Insertion A:10 Page/B:10 Page OK 1 1 The key can be this manual is a descriptive image. The actual screen is slightly different. System Settings (Administrator): Keys - Sharp MX-5001N | MX-4100N | MX-4101N | MX-5001N Operation Manual Suite - Page 53
in progress from tray 1. Ready to scan for next copy job. Interrupt Color Mode Full Color Exposure Auto 1. 81/2x11 2.81/2x11R manual. (2) (3) (3) "MFP Status" display This shows machine system information. "Maintenance Information" This shows machine maintenance information by means of codes - Sharp MX-5001N | MX-4100N | MX-4101N | MX-5001N Operation Manual Suite - Page 54
canceled. Red A paper misfeed or other error condition has occurred. Gray The machine has no jobs. (2) Icon display This icon appears when data is being sent or received. This icon appears when fax, scan, or Internet fax data is stored in the machine's memory. When data to be transmitted is - Sharp MX-5001N | MX-4100N | MX-4101N | MX-5001N Operation Manual Suite - Page 55
This appears when the data security kit is being used. The icon appears when the machine is communicating with an external application. (3) Brightness adjustment key Touch this key to adjust the brightness of the touch panel. When touched, the following screen appears next to the key. Touch the [+] - Sharp MX-5001N | MX-4100N | MX-4101N | MX-5001N Operation Manual Suite - Page 56
switching off the main power switch, make sure that the DATA indicator for printing and the DATA and LINE indicators for image send are not lit or nearby, or when you are moving the machine. When using the fax or Internet fax function, always keep the main power switch in the "on" position - Sharp MX-5001N | MX-4100N | MX-4101N | MX-5001N Operation Manual Suite - Page 57
Preheat Mode Setting" in the system settings (administrator). This keeps the fusing unit at a lower temperature and reduces power consumption be disabled in the system settings (administrator). The machine automatically wakes up and resumes normal operation when a print job is received or when the - Sharp MX-5001N | MX-4100N | MX-4101N | MX-5001N Operation Manual Suite - Page 58
AUTHENTICATION BY LOGIN NAME / PASSWORD (page 1-19) AUTHENTICATION BY USER NUMBER The following procedure is used to log in using a user number received from the administrator of the machine. User Authentication OK Admin Login When controlled by user number Enter your user number (5 to 8 digits - Sharp MX-5001N | MX-4100N | MX-4101N | MX-5001N Operation Manual Suite - Page 59
321/12,345,678 2-color : 87,654,321/12,345,678 Single color: 87,654,321/12,345,678 Admin Login 2 When page limits have been set in "Pages Limit Group List" in the system settings (administrator), the number of pages remaining will appear. (The remaining number of pages that the user can use in - Sharp MX-5001N | MX-4100N | MX-4101N | MX-5001N Operation Manual Suite - Page 60
] key Back Use this key if you have not been stored in "User List" in 6 12 18 User 0001 User 0002 the system settings (administrator) and are only using 1 User 0003 User 0004 2 LDAP authentication. Admin Login User 0005 User 0006 A text entry screen will appear. Enter your login name - Sharp MX-5001N | MX-4100N | MX-4101N | MX-5001N Operation Manual Suite - Page 61
, touch the [OK] key. When authentication is by LDAP server and you have different passwords stored in "User List" in the system settings (administrator) and in the LDAP server, use the password stored in the LDAP server. • When an LDAP server has been stored, [Auth to:] can be changed. • If - Sharp MX-5001N | MX-4100N | MX-4101N | MX-5001N Operation Manual Suite - Page 62
to log out when a fax number is being entered in fax mode, as the key is used for fax number entry. • If a password that you should use with the administrator of the machine. • The administrator can clear the locked state. This is done from [User Control] and then [Default Settings] in the Web page - Sharp MX-5001N | MX-4100N | MX-4101N | MX-5001N Operation Manual Suite - Page 63
keys Use these keys to switch between copy, image send, document filing, and Sharp OSA modes. (3) Title This shows the title of the home screen. (4) Shortcut Screen Settings] in the Web page menu. • System Settings (Administrator): Home Screen List When user authentication is enabled, a home - Sharp MX-5001N | MX-4100N | MX-4101N | MX-5001N Operation Manual Suite - Page 64
Operation Settings" in the system settings (administrator). ☞ 7. SYSTEM SETTINGS "Remote Operation Settings" (page 7-63) To use the remote operation the chapters for each of the functions in this manual. System Settings (Administrator): Remote Operation Settings Set the operation authority for - Sharp MX-5001N | MX-4100N | MX-4101N | MX-5001N Operation Manual Suite - Page 65
is recorded. When a broadcast transmission is summarized, the total number of pages is recorded. For a scan to HDD job, the number of stored black & white pages is recorded. Full Color Total Count For a print job, the total count is recorded. For a send job, the total number of transmitted full - Sharp MX-5001N | MX-4100N | MX-4101N | MX-5001N Operation Manual Suite - Page 66
the error. 22 Print Job Related Item Output The output mode of a printed job. 23 Staple The status of stapling. 24 Staple Count The staple count. 25 Punch Count The punch count. 26 Fold Recorded in a job that uses the fold function. 27 Fold Count Number of folded pages. 28 Printer - Sharp MX-5001N | MX-4100N | MX-4101N | MX-5001N Operation Manual Suite - Page 67
: Disable Duplex Paper Property: Fixed Paper Side Paper Property: Disable Staple Paper Property: Disable Punch Duplex Setup Resolution Model Name Unit Serial Number Name Machine Location Description Size of scanned original. For a document filing print job, the paper size of the file. Original type - Sharp MX-5001N | MX-4100N | MX-4101N | MX-5001N Operation Manual Suite - Page 68
BEFORE USING THE MACHINE LOADING PAPER IMPORTANT POINTS ABOUT PAPER This section provides information that you should know before loading paper in the paper trays. Be sure to read this section before loading paper. NAMES AND LOCATIONS OF TRAYS The names of the trays are as follows. Tray 1 Tray 2 - Sharp MX-5001N | MX-4100N | MX-4101N | MX-5001N Operation Manual Suite - Page 69
the specifications in the Safety Guide. • Pain paper other than SHARP standard paper (16 lbs. to 28 lbs. (60 g/m2 to 105 g/m2)) Recycled paper, colored paper and pre-punched paper must meet the same specifications as plain paper. Contact your dealer or nearest SHARP Service Department for advice on - Sharp MX-5001N | MX-4100N | MX-4101N | MX-5001N Operation Manual Suite - Page 70
paper • Stapled paper • Damp paper • Curled paper • Paper on which either the print side or the reverse side has been printed on by another printer or multifunction dealer or nearest SHARP Service Department for advice on using these types of paper. • The image quality and toner fusibility of paper - Sharp MX-5001N | MX-4100N | MX-4101N | MX-5001N Operation Manual Suite - Page 71
B are slidable. Slide each guide plate while squeezing its lock lever. Fan the paper. Fan the paper well before loading it. If the paper is not fanned, multiple sheets may feed at once and cause a misfeed. Insert the paper into the tray. Load the paper with the print side face up. The - Sharp MX-5001N | MX-4100N | MX-4101N | MX-5001N Operation Manual Suite - Page 72
these settings are not configured correctly, automatic paper selection will not operate correctly and printing may take place on the wrong size or type of paper, or a the tray. System Settings: Paper Tray Settings (page 7-13) Change these settings when you change the size or type of paper loaded - Sharp MX-5001N | MX-4100N | MX-4101N | MX-5001N Operation Manual Suite - Page 73
tray 5 can only be changed by a SHARP service technician. If you need to change the paper size, consult your dealer or nearest SHARP Service Department. Pull out the paper tray. Gently paper table. Load the paper with the print side face down. The stack must not be higher than the indicator line - Sharp MX-5001N | MX-4100N | MX-4101N | MX-5001N Operation Manual Suite - Page 74
Tray Settings" in the system settings. Do not place heavy objects on the tray or press down on the tray. System Settings: Paper Tray Settings (page 7-13) Change these settings if you have loaded a different type of paper in the tray. 1-33 Contents - Sharp MX-5001N | MX-4100N | MX-4101N | MX-5001N Operation Manual Suite - Page 75
the way into the bypass tray until it stops. Load the paper with the print side face down. 3 • Do not force the paper in. • If the bypass tray guides are set wider than the paper, move the bypass tray guides in until they correctly fit the width of the paper. If the bypass - Sharp MX-5001N | MX-4100N | MX-4101N | MX-5001N Operation Manual Suite - Page 76
BEFORE USING THE MACHINE IMPORTANT POINTS WHEN USING THE BYPASS TRAY • When using plain paper other than SHARP standard paper or special media other than SHARP-recommended transparency film, or when printing on the reverse side of previously used paper, the paper must be loaded one sheet at a time. - Sharp MX-5001N | MX-4100N | MX-4101N | MX-5001N Operation Manual Suite - Page 77
envelope. This may result in misfeeds or poor print quality. • Restrictions apply to some types of envelopes. For more information, consult a qualified service technician. • Some operating environments may cause creasing, smudging, misfeeds, poor toner fusing, or machine failure. • Do not use the - Sharp MX-5001N | MX-4100N | MX-4101N | MX-5001N Operation Manual Suite - Page 78
used. Non-standard sizes (Maximum size that can be specified manually) Copy mode: 11-5/8" (height) x 17" (width) COPIER "SPECIFYING THE ORIGINAL SIZE" (page 2-29) ☞ 4. FACSIMILE "IMAGE SETTINGS" (page 4-45) ☞ 5. SCANNER / INTERNET FAX "IMAGE SETTINGS" (page 5-53) Allowed original weights MX-4101N - Sharp MX-5001N | MX-4100N | MX-4101N | MX-5001N Operation Manual Suite - Page 79
printed with thermal transfer ink ribbon should not be fed through the document feeder. Originals to be fed through the feeder should not be damaged, crumpled, folded, loosely pasted together, or have cut-out holes. Originals with multiple punched holes other than two-hole or three-hole punched - Sharp MX-5001N | MX-4100N | MX-4101N | MX-5001N Operation Manual Suite - Page 80
, see the appropriate explanation below for the mode you are using. ☞ 2. COPIER "SPECIFYING THE ORIGINAL SIZE" (page 2-29) ☞ 4. FACSIMILE "IMAGE SETTINGS" (page 4-45) ☞ 5. SCANNER / INTERNET FAX "IMAGE SETTINGS" (page 5-53) Open the automatic document feeder. 1 Original size detector Place the - Sharp MX-5001N | MX-4100N | MX-4101N | MX-5001N Operation Manual Suite - Page 81
be copied black, causing excessive use of toner. 3 Placing a thick book When scanning a thick book or other thick original, follow the steps below to press the book down. (1) Push up the far side of the automatic document feeder. The hinges supporting - Sharp MX-5001N | MX-4100N | MX-4101N | MX-5001N Operation Manual Suite - Page 82
installed. Punch module MX-PNX5B Punches holes in copies and other output. Requires a saddle stitch finisher. Barcode font kit AR-PF1 Adds barcode fonts to the machine. PS3 expansion kit MX-PKX1 Enables the machine to be used as a Postscript compatible printer. XPS expansion kit MX-PUX1 - Sharp MX-5001N | MX-4100N | MX-4101N | MX-5001N Operation Manual Suite - Page 83
unit MX-EBX3 MX-USX1 MX-USX5 MX-US10 MX-US50 MX-USA0 AR-SU1 Description This expands the memory that can be used on the machine. Enables Internet Fax. Adds a fax function. The application integration module can be combined with the network scanner function to append a metadata file to a scanned - Sharp MX-5001N | MX-4100N | MX-4101N | MX-5001N Operation Manual Suite - Page 84
large stacker) or a saddle stitch finisher. • Use caution when you turn on the power and when printing is taking place, as the tray may move up and down. SUPPLIES The finisher requires the following staple cartridge: Staple cartridge (approx. 5000 staples per cartridge x 3 cartridges) MX-SCX1 1-43 - Sharp MX-5001N | MX-4100N | MX-4101N | MX-5001N Operation Manual Suite - Page 85
until it stops. Lower the staple case release lever and remove the staple case. 3 Pull the staple case out to the right. Remove the empty staple cartridge from the staple case. 4 Insert a new staple cartridge into the staple case as shown. 5 Push the staple cartridge in until it clicks into - Sharp MX-5001N | MX-4100N | MX-4101N | MX-5001N Operation Manual Suite - Page 86
USING THE MACHINE Replace the staple case. Push the staple case in until it clicks into place. 6 Slide the finisher back to the right. Gently slide the finisher back to the right until it locks into its original position. 7 Close the cover. 8 Make a test print or copy in staple sort mode to verify - Sharp MX-5001N | MX-4100N | MX-4101N | MX-5001N Operation Manual Suite - Page 87
power and when printing is taking place, as the output tray may move up and down. • A finisher (large stacker) cannot be installed simultaneously with a saddle stitch finisher or a finisher. SUPPLIES The finisher (large stacker) require the following staple cartridge: Staple cartridge (approx. 5000 - Sharp MX-5001N | MX-4100N | MX-4101N | MX-5001N Operation Manual Suite - Page 88
cartridge. Press the lock button to release the staple case cover and then remove the staple cartridge. 3 When staples remain, the staple cartridge cannot be removed. Insert a new staple cartridge into the staple case. Push the staple cartridge in until it clicks into place. 4 Do not remove the - Sharp MX-5001N | MX-4100N | MX-4101N | MX-5001N Operation Manual Suite - Page 89
USING THE MACHINE Pull the seal that holds the staples straight out. 5 Push the staple case firmly back in. Push the staple case in until it clicks into place. 6 Close the front cover. 7 Make a test print or copy in staple sort mode to verify that stapling takes place correctly. 1-48 Contents - Sharp MX-5001N | MX-4100N | MX-4101N | MX-5001N Operation Manual Suite - Page 90
output from the previous set, the staple sort function that staples each set of output, the saddle stitch function that automatically staples and folds output, and the fold function that folds output in half. An optional hole punching unit can also be installed to punch holes in output. PART NAMES - Sharp MX-5001N | MX-4100N | MX-4101N | MX-5001N Operation Manual Suite - Page 91
below to replace the staple cartridge. Replacing the staple cartridge (finisher unit) Open the front cover. 1 While pulling the lever, slide the saddle stitch finisher to the left until it stops. 2 Lower the staple case release lever and remove the staple case. 3 Pull the staple case out to the - Sharp MX-5001N | MX-4100N | MX-4101N | MX-5001N Operation Manual Suite - Page 92
USING THE MACHINE Replace the staple case. Push the staple case in until it clicks into place. 6 Push the saddle stitch finisher back and latch it to the machine. 7 Close the front cover. 8 Make a test print or copy in staple sort mode to verify that stapling takes place correctly. 1-51 Contents - Sharp MX-5001N | MX-4100N | MX-4101N | MX-5001N Operation Manual Suite - Page 93
USING THE MACHINE Replacing the staple cartridge (saddle stitch unit) Before starting this procedure, remove all output from the output tray of the saddle stitch finisher. Do not replace removed output in the output tray. Open the side cover. 1 Remove the empty staple cartridge. 2 Load the new - Sharp MX-5001N | MX-4100N | MX-4101N | MX-5001N Operation Manual Suite - Page 94
BEFORE USING THE MACHINE PUNCH MODULE A punch module can be installed to punch holes in output. To install a punch module, a finisher or saddle stitch finisher is required. DISCARDING PUNCH WASTE Punch waste from punched holes is collected in the punch waste box. Follow the steps below to discard - Sharp MX-5001N | MX-4100N | MX-4101N | MX-5001N Operation Manual Suite - Page 95
waste box and discard the punch waste. Discard the punch waste in a plastic bag or other container, taking care not to let the waste scatter. Replace the punch waste box. If the punch waste box is not replaced properly, printing will not be possible using the punch function. 3 Close the cover of - Sharp MX-5001N | MX-4100N | MX-4101N | MX-5001N Operation Manual Suite - Page 96
Saddle stitch finisher 1 2 3 4 BEFORE USING THE MACHINE Open the front cover. Pull out the punch waste box and discard the punch waste. Discard the punch waste in a plastic bag or other container, taking care not to let the waste scatter. Return the punch waste box to its original position. Close - Sharp MX-5001N | MX-4100N | MX-4101N | MX-5001N Operation Manual Suite - Page 97
supports Sharp OSA is used, the operation panel controls and functions of the machine such as scan MODULE (MX-AMX2) The pages of the machine is explained below. COPY IMAGE SEND Ready to scan for copy. DOCUMENT FILING Touch the [Sharp OSA] key in the mode 0 select keys. Color Mode Full Color - Sharp MX-5001N | MX-4100N | MX-4101N | MX-5001N Operation Manual Suite - Page 98
in "External Account Setting" of "Sharp OSA Settings" in the system settings (administrator), the machine enters external authentication mode. However, "User Registration", "User Count Display", "User Count Reset", "User Information Print", and "The Number of User Name Displayed Setting" can - Sharp MX-5001N | MX-4100N | MX-4101N | MX-5001N Operation Manual Suite - Page 99
(page 1-15). External count mode When only the [External Account Control] setting is enabled in "External Account Setting" of "Sharp OSA Settings" in the system settings (administrator), can be used together with the user control function of the machine. (External count mode can also be used when the - Sharp MX-5001N | MX-4100N | MX-4101N | MX-5001N Operation Manual Suite - Page 100
AND AUTOMATIC DOCUMENT FEEDER If the document glass or document backplate sheet becomes dirty, the dirt will appear as dirty spots, colored lines, or white lines in the scanned image. Always keep these parts clean. Wipe the parts with a clean, soft cloth. If necessary, moisten the cloth with water - Sharp MX-5001N | MX-4100N | MX-4101N | MX-5001N Operation Manual Suite - Page 101
MX-4101N/5001N 1 2 3 4 BEFORE USING THE MACHINE Open the automatic document feeder and remove the glass cleaner. Clean the document scanning area on the document glass with the glass cleaner. One scanning area is on the document glass and the other is inside the automatic document feeder. Clean the - Sharp MX-5001N | MX-4100N | MX-4101N | MX-5001N Operation Manual Suite - Page 102
MX-4100N 1 2 3 BEFORE USING THE MACHINE Open the automatic document feeder and remove the glass cleaner. Clean the document scanning area on the document glass with the glass cleaner. Replace the glass cleaner. 1-61 Contents - Sharp MX-5001N | MX-4100N | MX-4101N | MX-5001N Operation Manual Suite - Page 103
CHARGER OF THE PHOTOCONDUCTIVE DRUM If black lines or colored lines appear even after you have cleaned the document front cover. 1 Release the waste toner box. Press the waste toner box release button. 2 The waste toner box will fall forward as shown. Gently support the box with your hands as - Sharp MX-5001N | MX-4100N | MX-4101N | MX-5001N Operation Manual Suite - Page 104
as shown. Replace the charger cleaner in its original position. Push the waste toner box into the machine. Push the waste toner box firmly in until it clicks into place. Close the front cover. • If this does not solve the problem, pull the knob out and push it back in 3 more times. • When - Sharp MX-5001N | MX-4100N | MX-4101N | MX-5001N Operation Manual Suite - Page 105
THE ORIGINAL FEED ROLLER If lines or other dirt appear on the scanned original when the automatic document feeder is used, wipe the surface of the roller with a clean soft cloth moistened with water or a neutral detergent. On the MX-4101N/5001N, this cleaning is not necessary. 1-64 Contents - Sharp MX-5001N | MX-4100N | MX-4101N | MX-5001N Operation Manual Suite - Page 106
are parallel to the direction of paper feeding. • Colored lines appear not only on copies but also on print jobs from a computer. (The same lines appear on both copies and print jobs.) If the above problems occur, follow the steps below to clean the laser unit. Open the front cover. 1 Take out the - Sharp MX-5001N | MX-4100N | MX-4101N | MX-5001N Operation Manual Suite - Page 107
replacing the cleaner, be sure to close the inner cover. Attach the new cleaner to the cleaning tool. (1) Align the cleaner hook with the attachment hole in the cleaning tool. 6 (2) Hold the cleaner firmly and push the cleaning tool in. 1-66 Contents - Sharp MX-5001N | MX-4100N | MX-4101N | MX-5001N Operation Manual Suite - Page 108
surface of the laser unit. (3) Repeat step (2) two or three times and then remove the cleaning tool. Repeat step 7 to clean all holes in the laser unit (4 holes). There are a total of 4 holes to be cleaned in the laser unit, including the hole cleaned in step 7. Clean all holes. 1-67 Contents - Sharp MX-5001N | MX-4100N | MX-4101N | MX-5001N Operation Manual Suite - Page 109
(the end without the cleaner) onto the holder on the right. (2) Align the holder with the hole in the center of the cleaning tool and slowly press up from below. 9 (3) Fit the holder into the hole in the tip (the end with the cleaner) of the cleaning tool. Close the front cover - Sharp MX-5001N | MX-4100N | MX-4101N | MX-5001N Operation Manual Suite - Page 110
." appears. In copy mode Ready to scan for copy. ( ) Ready to scan for copy. ( Toner supply is low.) Ready to scan for copy. ( Change the toner cartridge.) When the message appears in the message display, replace the toner cartridge for the indicated color. If you continue to use the - Sharp MX-5001N | MX-4100N | MX-4101N | MX-5001N Operation Manual Suite - Page 111
front cover. Locations of color toner cartridges (A) (B) (C) (D) 1 2 Example: Replacing the yellow toner cartridge (A): Yellow (B): Magenta (C): Cyan (D): Black Pull the toner cartridge toward you. Raise the toner cartridge lever and gently pull the toner cartridge horizontally toward you. When - Sharp MX-5001N | MX-4100N | MX-4101N | MX-5001N Operation Manual Suite - Page 112
. Be sure to use a SHARP-recommended toner cartridge. • Keep the used toner cartridge in a plastic bag (do not discard it). Your service technician will collect the used toner cartridge. • To view the approximate amount of toner remaining, continually touch the [COPY] key during printing or when the - Sharp MX-5001N | MX-4100N | MX-4101N | MX-5001N Operation Manual Suite - Page 113
USING THE MACHINE REPLACING THE WASTE TONER BOX The waste toner box collects excess toner that is produced during printing. When the waste toner box becomes full, "Replace used toner container." will appear. Follow the procedure below to replace the waste toner box. Open the front cover. 1 Release - Sharp MX-5001N | MX-4100N | MX-4101N | MX-5001N Operation Manual Suite - Page 114
• There are 4 seals. Plug all of the holes. • Do not discard the waste toner box. Place it in a plastic bag and keep it until your service technician comes to perform maintenance. Your service technician will collect the waste toner box. Install the new waste toner box. Insert the box from above at - Sharp MX-5001N | MX-4100N | MX-4101N | MX-5001N Operation Manual Suite - Page 115
into place. Close the front cover. 9 Caution • Do not throw the waste toner box into a fire. Toner may fly and cause burns. • Store the waste toner box out of the reach of small children. When replacing the waste toner box, be aware that it may soil your clothes or the immediate surroundings - Sharp MX-5001N | MX-4100N | MX-4101N | MX-5001N Operation Manual Suite - Page 116
USING THE MACHINE REPLACING THE STAMP CARTRIDGE If a stamp unit (AR-SU1) is installed on the automatic document feeder and the stamp has become faint, replace the stamp cartridge (AR-SV1). Supplies Stamp cartridge (2 in package) AR-SV1 MX-4101N/5001N Open the automatic document feeder. 1 Remove the - Sharp MX-5001N | MX-4100N | MX-4101N | MX-5001N Operation Manual Suite - Page 117
BEFORE USING THE MACHINE Install a new stamp cartridge. 5 Push the stamp unit back in. Push the stamp unit in until it clicks into place. 6 Close the automatic document feeder to attach the document backplate sheet. When the automatic document feeder is closed, the - Sharp MX-5001N | MX-4100N | MX-4101N | MX-5001N Operation Manual Suite - Page 118
MX-4100N 1 2 3 Tab 4 (A) 5 BEFORE USING THE MACHINE Open the automatic document feeder. Open the holders on the automatic document feeder that hold the original pressure sheet. Open the holders (two) on the left and right sides. Grasp the tab on the stamp unit and pull the unit out. Remove the - Sharp MX-5001N | MX-4100N | MX-4101N | MX-5001N Operation Manual Suite - Page 119
BEFORE USING THE MACHINE Push the stamp unit back in. Push the stamp unit in until it clicks into place. 6 Replace the original pressure sheet. Push the holders in until they click into place. 7 Close the automatic document feeder. 8 1-78 Contents - Sharp MX-5001N | MX-4100N | MX-4101N | MX-5001N Operation Manual Suite - Page 120
BEFORE USING THE MACHINE ENTERING TEXT This section explains the text entry screen. FUNCTIONS OF THE MAIN KEYS Key Caps Shift Enter Other Language Space AltGr Characters Symbols Pre-Set Select Description This changes the text entry screen from the lower case screen to the upper case screen. The - Sharp MX-5001N | MX-4100N | MX-4101N | MX-5001N Operation Manual Suite - Page 121
the system settings. ☞ 7. SYSTEM SETTINGS "Soft Keyboard Template Setting" (page 7-63) Cancel Touch this key to return to the previous setting screen selected in "MFP Display Language Setting" in the system settings (administrator). • The following symbols cannot be used when entering a file - Sharp MX-5001N | MX-4100N | MX-4101N | MX-5001N Operation Manual Suite - Page 122
MACHINE AS A COPIER BASE SCREEN OF DOCUMENT GLASS 2-18 COPY COLOR MODES 2-21 CHANGING THE MANUALLY ADJUSTING THE EXPOSURE 2-23 REDUCTION/ENLARGEMENT/ZOOM 2-25 • AUTOMATIC RATIO SELECTION (Auto Image 2-25 • MANUALLY 48 COPYING EACH FACING PAGE OF A BOUND DOCUMENT (Dual Page Copy 2-50 MAKING - Sharp MX-5001N | MX-4100N | MX-4101N | MX-5001N Operation Manual Suite - Page 123
Background 2-122 • ADJUSTING THE COLOR (Color Balance) . . 2-124 • ADJUSTING THE BRIGHTNESS OF A COPY (Brightness 2-126 • ADJUSTING THE INTENSITY OF A COPY (Intensity 2-127 CHECKING COPIES BEFORE PRINTING (Proof Copy 2-128 CHECKING THE NUMBER OF SCANNED ORIGINAL SHEETS BEFORE COPYING (Original - Sharp MX-5001N | MX-4100N | MX-4101N | MX-5001N Operation Manual Suite - Page 124
wish to switch to copy mode, touch the [COPY] key. (2) [Color Mode] key Touch this to change the color mode. ☞ COPY COLOR MODES (page 2-21) (3) Output display When one or more output functions such as sort, group, staple sort, or saddle stitch have been selected, this shows the icons of the selected - Sharp MX-5001N | MX-4100N | MX-4101N | MX-5001N Operation Manual Suite - Page 125
staple sort, saddle stitch, punch, or fold. ☞ OUTPUT (page 2-33) COPIER printing the copy. ☞ CHECKING A PREVIEW IMAGE OF A COPY (Preview) (page 2-140) The screen explained in this section appears when a saddle stitch finisher, punch module, paper pass unit Base screen Color Mode Full Color Exposure - Sharp MX-5001N | MX-4100N | MX-4101N | MX-5001N Operation Manual Suite - Page 126
Brightness Preview These 3 keys can be changed as desired. System Settings (Administrator): Customize Key Setting Registration is performed in [System Settings] - [Operation Settings] - "Customize Key Setting" in the Web page menu. Checking what special modes are selected The key appears in the - Sharp MX-5001N | MX-4100N | MX-4101N | MX-5001N Operation Manual Suite - Page 127
COPIER before the original is placed. 1 Color Mode Full Color Exposure Auto Copy Ratio 100% page 2-25) • Original size ☞ORIGINAL SIZES (page 2-29) • Paper Settings ☞PAPER TRAYS (page 2-11) 2-Sided Copy 2-sided copy settings Select settings as needed for 2-sided copying and 2-sided OK scanning - Sharp MX-5001N | MX-4100N | MX-4101N | MX-5001N Operation Manual Suite - Page 128
Offset mode ☞Offset function (page 2-35) • Staple sort mode ☞Staple sort function / Saddle stitch function (page 2-36) Saddle Punch • Pamphlet staple function Stitch ☞Staple sort function / Saddle stitch function (page 2-36) Fold • Punch function ☞Punch function (page 2-39) • Fold function - Sharp MX-5001N | MX-4100N | MX-4101N | MX-5001N Operation Manual Suite - Page 129
COPIER • When one or more special modes are selected, the key appears in the base screen. Touch the key to display a list of the selected special modes. This lets you check what special modes are selected and the settings of each mode. ☞ Checking what special modes are selected (page stop scanning of - Sharp MX-5001N | MX-4100N | MX-4101N | MX-5001N Operation Manual Suite - Page 130
COPIER of base screen The original size is displayed. Color Mode Full Color Exposure Auto Copy Ratio 100% 1. 8½x11 in the system settings (administrator). The factory default setting is "Inch-1". In this event, manually set the correct original size. ☞SPECIFYING THE ORIGINAL SIZE (page 2-29) • When - Sharp MX-5001N | MX-4100N | MX-4101N | MX-5001N Operation Manual Suite - Page 131
oriented correctly and a function such as stapling is selected, the staple positions may not be correct. For more information on placing the original, see "ORIGINALS" (page 1-37) in "1. BEFORE USING THE disabled using "Rotation Copy Setting" in the System Settings (Administrator). 2-10 Contents - Sharp MX-5001N | MX-4100N | MX-4101N | MX-5001N Operation Manual Suite - Page 132
COPIER PAPER TRAYS The machine is set to automatically select a tray that has the same size of paper as the size of the placed original (automatic paper tray selection). If the correct paper size is not selected or you wish to change the paper size, you can select the paper tray manually. Color - Sharp MX-5001N | MX-4100N | MX-4101N | MX-5001N Operation Manual Suite - Page 133
COPIER BASIC Color Mode] key. 100% Auto Auto ☞ COPY COLOR MODES (page 2-21) 8½x11 8½x11 Plain Preview Depending on the size of the placed original, there may be cases where the same size of paper as the original is not selected automatically. In this event, change the paper size manually - Sharp MX-5001N | MX-4100N | MX-4101N | MX-5001N Operation Manual Suite - Page 134
COPIER 7 Special Modes Set the number of copies (number of sets) with the numeric Press the [COLOR START] key or the [BLACK & WHITE START] key. 4 Even if a color mode is selected, copying will take place in black and white if the [BLACK & WHITE START] key is pressed. To cancel scanning of the - Sharp MX-5001N | MX-4100N | MX-4101N | MX-5001N Operation Manual Suite - Page 135
the [Color Mode] key. 100% Auto Auto ☞ COPY COLOR MODES (page 2-21) 8½x11 8½x11 Plain Preview Depending on the size of the placed original, there may be cases where the same size of paper as the original is not selected automatically. In this event, change the paper size manually. 2-14 - Sharp MX-5001N | MX-4100N | MX-4101N | MX-5001N Operation Manual Suite - Page 136
COPIER 7 Special Modes Set the number of copies (number of sets) with the numeric keys. (2-sided copying, etc.), copying may not begin until all originals have been scanned. In this 4 case, go to the next step. Even if a color mode is selected, copying will take place in black and white if the - Sharp MX-5001N | MX-4100N | MX-4101N | MX-5001N Operation Manual Suite - Page 137
COPIER AUTOMATIC 2-SIDED COPYING USING THE . The stack of originals must not be higher than the indicator line on the tray. Color Mode Full Color Exposure 2 Auto 1. 8½x11 2. 8½x11R 3. 8½x14 4. 11x17 Plain 8½x11 Special ] key. ☞ Using the [Binding Change] key (page 2-17) 2-16 Contents - Sharp MX-5001N | MX-4100N | MX-4101N | MX-5001N Operation Manual Suite - Page 138
100% Auto Auto 8½x11 ☞ COPY COLOR MODES (page 2-21) 8½x11 Plain Preview Depending on the size of the placed original, there may be cases where the same size of paper as the original is not selected automatically. In this event, change the paper size manually. 7 Special Modes Set the number - Sharp MX-5001N | MX-4100N | MX-4101N | MX-5001N Operation Manual Suite - Page 139
GLASS Originals Copies COPIER Automatic 2-sided the original will be copied black, causing excessive use of toner. Do not place any objects under the original size detector plate and prevent correct detection of the document size. Color Mode Full Color Exposure 2 Auto 1. 8½x11 2. 8½x11R 3. - Sharp MX-5001N | MX-4100N | MX-4101N | MX-5001N Operation Manual Suite - Page 140
key. 100% Auto Auto ☞ COPY COLOR MODES (page 2-21) 8½x11 8½x11 Plain Preview Depending on the size of the placed original, there may be cases where the same size of paper as the original is not selected automatically. In this event, change the paper size manually. 7 Special Modes Set the - Sharp MX-5001N | MX-4100N | MX-4101N | MX-5001N Operation Manual Suite - Page 141
COPIER Place next original. Press [Start]. When finished, press [Read-End]. Touch the [Read-End] key. Read-End 8 To cancel scanning of the original and copying... Press the [STOP] key ( ). System Settings (Administrator): Initial Status Settings (2-Sided Copy) The default 2-sided copy mode can be - Sharp MX-5001N | MX-4100N | MX-4101N | MX-5001N Operation Manual Suite - Page 142
COPIER COPY COLOR MODES The color mode of the [COLOR START] key is normally set to [Full Color] so that copying takes place in full color mode when the [COLOR START] key is pressed. If color originals are mixed together with black & white originals, set the color mode to [Auto] to have the color - Sharp MX-5001N | MX-4100N | MX-4101N | MX-5001N Operation Manual Suite - Page 143
to manually switch between color and black & white. • Copying takes place in black & white when the [BLACK & WHITE START] key is pressed, regardless of the color mode setting. System Settings (Administrator): Initial Status Settings (Color Mode) This is used to change the default color mode - Sharp MX-5001N | MX-4100N | MX-4101N | MX-5001N Operation Manual Suite - Page 144
in the base screen of copy mode and follow the steps below. Exposure OK Auto Manual 1 3 5 Original Image Type Text Text/ Prtd.Photo Printed Photo Photo Light Original Text/Photo Map Scan Resolution Select the original image type. Touch the appropriate original image type key for the - Sharp MX-5001N | MX-4100N | MX-4101N | MX-5001N Operation Manual Suite - Page 145
COPIER Exposure Auto Manual 1 3 5 Copy of Copy Original Image Type Text Text/ Prtd.Photo Printed Photo Photo Light Original Color Tone Enhancement OK Text/Photo Map Scan Resolution 2 Adjust the exposure level. Touch the key to make the copy darker. Touch the key to make the copy - Sharp MX-5001N | MX-4100N | MX-4101N | MX-5001N Operation Manual Suite - Page 146
%... To return the ratio setting to 100%, touch the [Copy Ratio] key to display the ratio menu and then touch the [100%] key. System Settings (Administrator): Initial Status Settings (Copy Ratio) This is used to change the default copy ratio. 2-25 Contents - Sharp MX-5001N | MX-4100N | MX-4101N | MX-5001N Operation Manual Suite - Page 147
COPIER MANUALLY ratio from 25% to 400% in increments of 1%. Copy Ratio OK 11x17 8½x11 64% 8½x11 5½x8½ 11x17 8½x14 77% 8½x14 8½x11 100 % Zoom 100% 121 be set to show any ratio using "Add or Change Extra Preset Ratios" in the system settings (administrator). • To quickly select a ratio, touch - Sharp MX-5001N | MX-4100N | MX-4101N | MX-5001N Operation Manual Suite - Page 148
COPIER 2 Copy Ratio OK 11x17 8½x11 64% 8½x11 5½x8½ 11x17 8½x14 77% 8½x14 8½x11 75 % Zoom 100 ] key to display the ratio menu and then touch the [100%] key. System Settings (Administrator): Add or Change Extra Preset Ratios Two enlargement preset ratios (101% to 400%) and two reduction preset - Sharp MX-5001N | MX-4100N | MX-4101N | MX-5001N Operation Manual Suite - Page 149
COPIER ENLARGING/REDUCING THE LENGTH AND WIDTH SEPARATELY (XY Zoom) The 50% is selected for the horizontal ratio and 70% is selected for the vertical ratio Original Copy 1 Copy Ratio OK 11x17 8½x11 64% 8½x11 5½x8½ 11x17 8½x14 77% 8½x14 8½x11 100 % Zoom 100% 121% 8½x14 11x17 1 8½x11 11x17 2 - Sharp MX-5001N | MX-4100N | MX-4101N | MX-5001N Operation Manual Suite - Page 150
COPIER ORIGINAL SIZES SPECIFYING THE ORIGINAL SIZE When the original size is a non-standard size or is not detected correctly, manually . (3) Touch the [OK] key. Specifying a non-standard original size 1 Original Auto Manual 5½x8½ 5½x8½R 8½x11 Size Input 8½x14 8½x11R 8½x13 8½x14 11x17 8½x13 - Sharp MX-5001N | MX-4100N | MX-4101N | MX-5001N Operation Manual Suite - Page 151
Original Size Input 2 COPIER (1), (2) (3) OK Cancel OK X 17 (1~17) inch Y 11 (1~11 5/8) inch Enter key in the base screen of copy mode and then follow the steps below. 1 Original Auto Manual 5½x8½ 5½x8½R 8½x11 Size Input 8½x14 8½x11R 8½x13 8½x14 11x17 8½x13 Custom Size OK AB - Sharp MX-5001N | MX-4100N | MX-4101N | MX-5001N Operation Manual Suite - Page 152
COPIER Original Custom Size X15½ Y 8½ Store the original size. OK OK (1) Touch the [Store/Delete] tab. (2) Touch a key for storing a custom original size. Touch a key that - Sharp MX-5001N | MX-4100N | MX-4101N | MX-5001N Operation Manual Suite - Page 153
COPIER Retrieving a stored original size To retrieve a stored original size, touch the [Original] key in the base screen of copy mode and perform the steps below. 1 Original Auto Manual 5½x8½ 5½x8½R 8½x11 Size Input 8½x14 8½x11R 8½x13 8½x14 11x17 8½x13 Custom Size OK AB Inch Touch the [Custom - Sharp MX-5001N | MX-4100N | MX-4101N | MX-5001N Operation Manual Suite - Page 154
☞ Staple sort function / Saddle stitch function (page 2-36) When this key is touched, the saddle stitch setting screen appears. (Only when "Automatic Saddle Stitch" is enabled in the system settings (administrator).) (10) [Punch] key This is used to punch holes in the output. ☞ Punch function (page - Sharp MX-5001N | MX-4100N | MX-4101N | MX-5001N Operation Manual Suite - Page 155
COPIER The above screen shows the keys that appear when a saddle stitch finisher is installed. The keys that appear screen is different from the screen of previous page, see the screens that follow. Example The screen when a finisher or saddle stitch finisher is not installed. Output Offset Tray - Sharp MX-5001N | MX-4100N | MX-4101N | MX-5001N Operation Manual Suite - Page 156
Output COPIER Group mode This function groups copies by page. Example: Groups of 5 copies of each page Originals the [Group] key. Press the [COLOR START] key or the [BLACK & WHITE START] key. Press the [COLOR START] key or the [BLACK & staple sort function is selected. 2-35 Contents - Sharp MX-5001N | MX-4100N | MX-4101N | MX-5001N Operation Manual Suite - Page 157
, see "Original placement orientation (for the staple sort and punch functions)" (page 2-39). Staple sort 4 5 Saddle stitch Stapling positions 1 staple at top left corner*1 Vertically-oriented paper 1 staple at bottom left corner*1 2 staples at left edge Applicable paper sizes 8-1/2" x 11 - Sharp MX-5001N | MX-4100N | MX-4101N | MX-5001N Operation Manual Suite - Page 158
COPIER • The number of sheets that can be stapled at once includes any covers and/or inserts that are inserted. • When Mixed Size Original in the special modes is used with the "Same Width" setting, the maximum number of sheets that can be stapled is 25 for a saddle stitch finisher or 30 for a - Sharp MX-5001N | MX-4100N | MX-4101N | MX-5001N Operation Manual Suite - Page 159
COPIER Paper folding function When a saddle stitch finisher is installed, the fold function can be used to fold printed output in half. Paper sizes that can the staple or hole punch function cannot be used. • When two-sided printing is disabled in the machine's system settings (administrator), the - Sharp MX-5001N | MX-4100N | MX-4101N | MX-5001N Operation Manual Suite - Page 160
Original 1] [Punch positions] [Original 2] [Punch positions] The hole punch function cannot be used with the saddle stitch or paper folding function together. Original placement orientation (for the staple sort and punch functions) When using the staple sort function or the punch function, the - Sharp MX-5001N | MX-4100N | MX-4101N | MX-5001N Operation Manual Suite - Page 161
excessive use of toner. Place paper in the bypass tray. Insert the paper with print side face down. However, if the paper type is "Letter Head" or "Pre-Printed", load the paper with the print side face up*. * If "Disabling of Duplex" is enabled in the system settings (administrator), load the paper - Sharp MX-5001N | MX-4100N | MX-4101N | MX-5001N Operation Manual Suite - Page 162
COPIER 4 Paper Select Select the paper type. Plain Pre-Printed Recycled Cancel 1 Letter Head 2 Pre-Punched Color Thin Paper Labels Heavy Paper 1 the loaded paper. ☞ Enter the paper size of the bypass tray (page 2-42) [Manual] key This key can be touched to display the [16K], [16KR - Sharp MX-5001N | MX-4100N | MX-4101N | MX-5001N Operation Manual Suite - Page 163
tray. (2) Touch the [OK] key. Press the [COLOR START] key or the [BLACK & WHITE START] key. Scanning begins. • If the originals were placed in the document feeder the system settings. For details, see "Paper Tray Settings" (page 7-13) in "7. SYSTEM SETTINGS". If the key for the size that you - Sharp MX-5001N | MX-4100N | MX-4101N | MX-5001N Operation Manual Suite - Page 164
Full Color Exposure Auto Copy Ratio 100% 1. 8½x11 2. 8½x11R 3. 8½x14 4. 11x17 Plain 8½x11 Original Auto 8½x11 Paper Select Auto 8½x11 Plain Special Modes 2-Sided Copy Output File Quick File Preview (1) [Margin Shift] key ☞ ADDING MARGINS (Margin Shift) (page 2-46) (2) [Erase] key ☞ ERASING - Sharp MX-5001N | MX-4100N | MX-4101N | MX-5001N Operation Manual Suite - Page 165
2 (7) (8) Original Mixed Size (9) Slow Scan Count Original Mode COPIER (1) [Stamp] key ☞ PRINTING THE DATE AND A STAMP ON COPIES (Stamp) (page 2-86) (2) [Image Edit] key ☞ [Image Edit] KEY (page 2-106) (3) [Color Adjustments] key ☞ [Color Adjustments] KEY (page 2-119) (4) [File] key This - Sharp MX-5001N | MX-4100N | MX-4101N | MX-5001N Operation Manual Suite - Page 166
COPIER [OK] key and [Cancel] key In some cases two [OK] keys and one [Cancel] key will appear in the special mode screens. The keys are - Sharp MX-5001N | MX-4100N | MX-4101N | MX-5001N Operation Manual Suite - Page 167
COPIER positions Left edge 1 The punch holes cut off part of the image 1 The image is moved to allow space for the string holes so the image is not Touch the [Margin Shift] key. ☞ Special modes menu (1st screen) (page 2-43) (1) (2) (3) Special Modes Margin Shift OK Cancel OK 3 Right Left - Sharp MX-5001N | MX-4100N | MX-4101N | MX-5001N Operation Manual Suite - Page 168
COPIER Press the [COLOR START] key or the [BLACK & WHITE START] key. Copying will begin. If you are using the document glass to copy multiple original pages, copying will take place as you scan System Settings (Administrator): Initial Margin Shift Setting The default margin shift setting can be - Sharp MX-5001N | MX-4100N | MX-4101N | MX-5001N Operation Manual Suite - Page 169
COPIER ERASING PERIPHERAL SHADOWS (Erase) The erase function is used to erase shadows around the edges of copies that occur when document glass. Select the special modes. 2 (1) Touch the [Special Modes] key. (2) Touch the [Erase] key. ☞ Special modes menu (1st screen) (page 2-43) 2-48 Contents - Sharp MX-5001N | MX-4100N | MX-4101N | MX-5001N Operation Manual Suite - Page 170
COPIER COLOR START] key or the [BLACK & WHITE START] key. Copying will begin. If you are using the document glass to copy multiple original pages, copying will take place as you scan System Settings (Administrator): Erase Width Adjustment The default erase width can be set from 0" to 1" (0 mm to - Sharp MX-5001N | MX-4100N | MX-4101N | MX-5001N Operation Manual Suite - Page 171
size mark . Size mark Centerline of A3 original Centerline of 11" x 17" original The page on this side is copied first. Centerline of original 11" x 17" (A3) Color Mode Full Color Exposure Auto 2 1. 8½x11 2. 8½x11R 3. 8½x14 4. 11x17 Plain 8½x11 Special Modes 2-Sided Copy Output File - Sharp MX-5001N | MX-4100N | MX-4101N | MX-5001N Operation Manual Suite - Page 172
will return to the base screen of copy mode. Press the [COLOR START] key or the [BLACK & WHITE START] key. Copying will begin. If you have selected sort mode, change originals and press the [START] key. Repeat until all pages have been scanned and 4 then touch the [Read-End] key. (For the second - Sharp MX-5001N | MX-4100N | MX-4101N | MX-5001N Operation Manual Suite - Page 173
COPIER MAKING COPIES IN PAMPHLET FORMAT (Pamphlet Copy) This function copies 2 original pages onto the front side and 2 original pages onto the reverse side of each sheet of paper so that the copies can be folded at the centerline to form a pamphlet. This function is - Sharp MX-5001N | MX-4100N | MX-4101N | MX-5001N Operation Manual Suite - Page 174
COPIER Special Modes Pamphlet Copy OK Cancel OK 3 Original 1-Sided 2-Sided Left key. If you do not want to add a cover, go to step 5. (2) (1) (3) Pamphlet Copy Cover Setting Paper Tray Bypass Tray 11x17 Plain (A) (B) Cancel OK Print on Cover(2-Sided) Yes No 4 Select cover - Sharp MX-5001N | MX-4100N | MX-4101N | MX-5001N Operation Manual Suite - Page 175
"Divide". You can either continue pamphlet copying without stapling, or cancel the job. To cancel pamphlet copy... Touch the [Cancel] key in the screen of step 3. System Settings (Administrator): Automatic Saddle Stitch When a saddle stitch finisher is installed, this setting can be enabled to - Sharp MX-5001N | MX-4100N | MX-4101N | MX-5001N Operation Manual Suite - Page 176
SPECIAL MODES (page 2-43) (2) Touch the [Job Build] key so that it is highlighted. (3) Touch the [OK] key. You will return to the base screen of copy mode. Press the [COLOR START] key or the [BLACK & WHITE START] key to scan the first set of originals. 3 Scanning begins. To cancel scanning... Press - Sharp MX-5001N | MX-4100N | MX-4101N | MX-5001N Operation Manual Suite - Page 177
COPIER Insert the next set of originals and press the [COLOR START] key or the [BLACK & WHITE START] key. Repeat this step until all originals have been scanned. 4 The copy settings (Exposure, Paper Select, and Copy Ratio only) can be changed for each set of originals. If you need to change the - Sharp MX-5001N | MX-4100N | MX-4101N | MX-5001N Operation Manual Suite - Page 178
8½x11 Plain scanning the new originals, touch the [Read-End] key. • The color mode cannot be changed with the [Color Mode] key. • The original size cannot be changed manually with the covers/inserts, transparency inserts, multi-shot, book copy, tab copy, staple sort, saddle stitch 2-57 Contents - Sharp MX-5001N | MX-4100N | MX-4101N | MX-5001N Operation Manual Suite - Page 179
COPIER USING TWO MACHINES TO MAKE A LARGE NUMBER OF COPIES (Tandem Copy) Two machines connected to the same network can be used to run a large copy job in parallel. Each machine prints helps print the copies; it is not used to scan the Book Copy Tab Copy Dual Page Copy Tandem Copy Multi Shot - Sharp MX-5001N | MX-4100N | MX-4101N | MX-5001N Operation Manual Suite - Page 180
] key ( ) and then enter the correct number. Press the [COLOR START] key or the [BLACK & WHITE START] key. Copying will begin. If you are using the document glass, change originals and press the [START] key. Repeat until all pages have been scanned and then touch the [Read-End] key. (For the second - Sharp MX-5001N | MX-4100N | MX-4101N | MX-5001N Operation Manual Suite - Page 181
COPIER In this situation... A punch module is installed on the master machine but not on the slave machine. •Copying without punching: tandem copy is possible. •Copying with punching so that it is not highlighted. System Settings (Administrator): Tandem Connection Setting This must be configured to - Sharp MX-5001N | MX-4100N | MX-4101N | MX-5001N Operation Manual Suite - Page 182
COPIER the procedure to select covers/inserts. • The originals must be scanned using the automatic document feeder. The document glass cannot be used Note that two insert sheets cannot be inserted between the same two pages. • When performing 2-sided copying of 2-sided originals, an insert cannot - Sharp MX-5001N | MX-4100N | MX-4101N | MX-5001N Operation Manual Suite - Page 183
COPIER INSERTING COVERS IN COPIES (Cover Settings) A different type of paper can [Special Modes] key. (2) Touch the [Covers/Inserts] key. ☞ Special modes menu (1st screen) (page 2-43) 3 Special Modes Covers/Inserts Cover Setting Front Cover Back Cover OK Cancel OK Inserts Setting Insertion - Sharp MX-5001N | MX-4100N | MX-4101N | MX-5001N Operation Manual Suite - Page 184
COPIER (3) (2) (1) (4) Covers/Inserts Front Cover Setting Cancel OK Paper Tray Bypass Tray 8½x11 Plain (A) (B) Print on Front Cover Yes No Inserts Setting Insertion Type A Insertion Type B Insertion Settings Tray Settings Page Layout If you wish to insert a back cover, touch the [ - Sharp MX-5001N | MX-4100N | MX-4101N | MX-5001N Operation Manual Suite - Page 185
SETTINGS (Page Layout) (page 2-69) Press the [COLOR START] key or the [BLACK & WHITE START] key. Copying of the originals in the document feeder tray begins. 7 To cancel scanning and copying... Press the [STOP] key ( ). • This function cannot be used in combination with the saddle stitch function - Sharp MX-5001N | MX-4100N | MX-4101N | MX-5001N Operation Manual Suite - Page 186
COPIER INSERTING INSERT SHEETS IN COPIES (Insert Settings) You can have different paper automatically inserted as inserts at specified pages of Touch the [Covers/Inserts] key. ☞ Special modes menu (1st screen) (page 2-43) 3 Special Modes Covers/Inserts Cover Setting Front Cover Back Cover OK - Sharp MX-5001N | MX-4100N | MX-4101N | MX-5001N Operation Manual Suite - Page 187
COPIER (3) (2) (1) (4) Covers/Inserts Insertion Type A Settings Cancel OK Paper Tray Bypass Tray 8½x11 Plain (A) (B) Print on Insert Sheets Yes No Setting Insertion Type A Insertion Type B Insertion Settings Tray Settings Page Layout If you wish to insert a different type of insert - Sharp MX-5001N | MX-4100N | MX-4101N | MX-5001N Operation Manual Suite - Page 188
(copying of 1-sided originals)" (page 2-157) and "Inserts (copying of 2-sided originals)" (page 2-157). The [CLEAR] key ( ) can be pressed to return the setting of the selected item to the default value. If you make a mistake be used. If not copied on, tab paper can be inserted. 2-67 Contents - Sharp MX-5001N | MX-4100N | MX-4101N | MX-5001N Operation Manual Suite - Page 189
front and reverse sides of an original page. • This function cannot be used in combination with the saddle stitch function. • Cover/insert settings cannot be selected if insertion of covers and inserts is disabled in the system settings (administrator). To cancel cover sheet insertion... Touch the - Sharp MX-5001N | MX-4100N | MX-4101N | MX-5001N Operation Manual Suite - Page 190
COPIER CHANGING COVER/INSERT SETTINGS (Page Layout) Cover settings and insert settings can be combined. This section explains how to check completed cover and insert insertion page settings, and change or delete insertion pages. Changing insert A from page 4 to page 5 1 2 3 4 5 6 7 8 9 10 11 12 - Sharp MX-5001N | MX-4100N | MX-4101N | MX-5001N Operation Manual Suite - Page 191
COPIER Example: Touch insert A at page 4 Covers/Inserts Page Layout OK Insertion Type A 4/- Insertion Type B 7/- Insertion Type B 9/- 1 Insertion Type A 1 12/- Touch the key of the page step 6. • Each key shows a print image icon and the insertion page. • If there are multiple screens, - Sharp MX-5001N | MX-4100N | MX-4101N | MX-5001N Operation Manual Suite - Page 192
COPIER 5 Covers/Inserts Insertion Modify Insertion Type A Tray 1 8½x11 Plain Insertion Type B Bypass Tray 8½x11 Plain OK Insertion Page 5 Enter Insertion Total:4 Change the settings for insert type A/B. The settings are changed in the same way as they are initially configured. See step 7 of - Sharp MX-5001N | MX-4100N | MX-4101N | MX-5001N Operation Manual Suite - Page 193
COPIER ADDING INSERTS WHEN COPYING ON TRANSPARENCY FILM (Transparency Inserts) When the transparency film, configure the bypass tray settings as explained in "MAKING COPIES USING THE BYPASS TRAY" (page 2-40). 2 Place the original. Place the original face up in the document feeder tray, or face - Sharp MX-5001N | MX-4100N | MX-4101N | MX-5001N Operation Manual Suite - Page 194
COPIER (1) (2) Special Modes Transparency Inserts OK Cancel OK 4 Paper Tray Tray1 8½x11 Plain Print on Insert Sheets Yes No (A) type are indicated here. Press the [COLOR START] key or the [BLACK & WHITE START] key. Copying will begin. 5 To cancel scanning and copying... Press the [STOP] - Sharp MX-5001N | MX-4100N | MX-4101N | MX-5001N Operation Manual Suite - Page 195
COPIER COPYING MULTIPLE ORIGINALS ONTO ONE SHEET (Multi Shot) Multiple original pages can be copied onto a single sheet of paper in a uniform layout. Select 2in1 to copy two original pages onto one sheet, or 4in1 to copy four original pages onto one sheet. This function is convenient when you wish - Sharp MX-5001N | MX-4100N | MX-4101N | MX-5001N Operation Manual Suite - Page 196
COPIER (1) Special Modes Multi Shot 2in1 4in1 (3) (2) (4) OK Cancel OK . Press the [COLOR START] key or the [BLACK & WHITE START] key. Copying will begin. If you are using the document glass, change originals and press the [START] key. Repeat until all pages have been scanned 4 and then - Sharp MX-5001N | MX-4100N | MX-4101N | MX-5001N Operation Manual Suite - Page 197
COPIER COPYING A PAMPHLET (Book Copy) This function is used to make a copy of the two facing pages of an open book Originals A BC D Back cover Cover Place the original 1 Inside of 1st page cover 2 3 2nd page 3rd page 4 4th page Inside of back cover D BC A 4 2 3 1 Select the special - Sharp MX-5001N | MX-4100N | MX-4101N | MX-5001N Operation Manual Suite - Page 198
COPIER (1) Special Modes Book Copy (2) OK Cancel OK 2 Left Right Binding Binding and inserts is disabled in the system settings (administrator). (2) (1) (3) Book Copy Cover Setting Paper Tray Bypass Tray 11x17 Plain (A) (B) Cancel OK Print on Cover (2-sided) Yes No 3 Select - Sharp MX-5001N | MX-4100N | MX-4101N | MX-5001N Operation Manual Suite - Page 199
the following order: Opened inside of front cover and 1st page 6 Opened 2nd and 3rd page · · · Opened last page and inside of back cover To cancel scanning... Press the [STOP] key ( ). Place the next pair of opened pages and press the [COLOR START] key or the [BLACK & WHITE START] key. Repeat this - Sharp MX-5001N | MX-4100N | MX-4101N | MX-5001N Operation Manual Suite - Page 200
the [STOP] key ( ). COPIER Touch the [Read-End] key. Copying will begin. • Four original pages will be copied onto each sheet of paper. Blank pages will be automatically added at the end if the total number of original pages is not a multiple of four. • If a saddle stitch finisher is installed - Sharp MX-5001N | MX-4100N | MX-4101N | MX-5001N Operation Manual Suite - Page 201
COPIER COPYING CAPTIONS ONTO TAB PAPER (Tab Copy) Captions can be copied onto the tabs of tab paper. Prepare appropriate originals for the tab captions. Tab - Sharp MX-5001N | MX-4100N | MX-4101N | MX-5001N Operation Manual Suite - Page 202
COPIER Tab copying with a right binding Originals Originals Placing the originals • the [Special Modes] key. (2) Touch the [Tab Copy] key. ☞ Special modes menu (1st screen) (page 2-43) Special Modes Tab Copy (1) (2) OK Cancel OK 3 Original Copy Image Shift 1/2 (0~5/8) inch Set the - Sharp MX-5001N | MX-4100N | MX-4101N | MX-5001N Operation Manual Suite - Page 203
COPIER Load the tab paper. Reverse side When using the bypass tray, place the paper with the print side down. [COLOR START] key or the [BLACK & WHITE START] key. Copying will begin. If you are using the document glass to copy multiple original pages, copying will take place as you scan each - Sharp MX-5001N | MX-4100N | MX-4101N | MX-5001N Operation Manual Suite - Page 204
COPIER COPYING BOTH SIDES OF A CARD ON ONE SHEET OF PAPER (Card Shot) When Color Exposure Auto 1 1. 8½x11 2. 8½x11R 3. 8½x14 4. 11x17 Plain 8½x11 Special Modes 2-Sided Copy Output File Quick File Select the paper to be used for card shot. Select the paper as explained in "PAPER TRAYS" (page - Sharp MX-5001N | MX-4100N | MX-4101N | MX-5001N Operation Manual Suite - Page 205
COPIER (1) Special Modes Card Shot (2) OK Cancel OK X 3 3 8 (1~8 1/2) inch Y 2 1 8 (1~8 1/2) inch Fit to Page COLOR START] key or the [BLACK & WHITE START] key to scan the front side of the card. 5 To cancel scanning... Press the [STOP] key ( ). Turn the card over and press the [COLOR - Sharp MX-5001N | MX-4100N | MX-4101N | MX-5001N Operation Manual Suite - Page 206
COPIER shot... Touch the [Cancel] key in the screen of step 4. System Settings (Administrator): Card Shot Settings This is used to set the values to which the size the horizontal and vertical dimensions. The factory default settings are 3-3/8" (86 mm) for X (the width) and 2-1/8" (54 mm) for - Sharp MX-5001N | MX-4100N | MX-4101N | MX-5001N Operation Manual Suite - Page 207
COPIER PRINTING THE DATE AND A STAMP ON COPIES (Stamp) Use this function to print the date, a stamp, the page number, and text on copies. In addition, specific text can be added to a copy as a watermark (Watermark). Six printing positions are available: top left, top center, top right, bottom left, - Sharp MX-5001N | MX-4100N | MX-4101N | MX-5001N Operation Manual Suite - Page 208
COPIER GENERAL PROCEDURE FOR USING STAMP To select stamp settings, follow the directly to the next step. In this case, the stamp items will be printed in the following positions: Date: Top right Stamp: Top left Page number: Bottom center Text: Top left The position of a watermark cannot be - Sharp MX-5001N | MX-4100N | MX-4101N | MX-5001N Operation Manual Suite - Page 209
COPIER 4 Special Modes Stamp Date Page Numbering Stamp Text Watermark Special Modes Stamp 5 Date Stamp Page page 2-90) Stamp: STAMPING COPIES (Stamp) (page 2-92) Page numbering: PRINTING PAGE NUMBERS ON COPIES (Page Numbering) (page 2-94) Text: PRINTING TEXT ON COPIES (Text) (page - Sharp MX-5001N | MX-4100N | MX-4101N | MX-5001N Operation Manual Suite - Page 210
key. Repeat until all pages have been scanned and then touch the [Read-End] key. (For the second original and following originals, use the same [START] key as you did for the first original. 7 • If you selected printing in color, press the [COLOR START] key. Even if a color is selected, pressing the - Sharp MX-5001N | MX-4100N | MX-4101N | MX-5001N Operation Manual Suite - Page 211
COPIER ADDING THE DATE TO COPIES (Date) The date can be printed on copies. The position of the date, color, format, and page (first page only or all pages) can be selected. Example: Printing APRIL 4, 2010 in the top right corner of the paper. APR/04/2010 1 Touch the [Date] key in the stamp - Sharp MX-5001N | MX-4100N | MX-4101N | MX-5001N Operation Manual Suite - Page 212
Stamp Date YYYY/MM/DD MM/DD/YYYY DD/MM/YYYY MM DD, YYYY 4 COPIER Cancel OK Print Color Bk(Black) APR/04/2010 Date Change First Page All Pages Check the displayed date. If you need to change the date, touch the [Date Change] key. Set the date that you wish to use and - Sharp MX-5001N | MX-4100N | MX-4101N | MX-5001N Operation Manual Suite - Page 213
COPIER STAMPING COPIES (Stamp) Text such as "CONFIDENTIAL" can be printed in white on a dark background as a "stamp" on copies. The position, color, size, density, and pages (first page only or all pages) can be selected for a stamp. Printing "CONFIDENTIAL" in the top left corner of a copy - Sharp MX-5001N | MX-4100N | MX-4101N | MX-5001N Operation Manual Suite - Page 214
COPIER Stamp Stamp CONFIDENTIAL FOR YOUR INFO. URGENT PRELIMINARY IMPORTANT TOP SECRET PRIORITY DO NOT COPY DRAFT FINAL COPY PLEASE REPLY Cancel OK Print Color Bk 1 2 3 Size Larger Smaller First Page All Pages 3 Touch the [Print Color] key and set the color and density. Touch the color - Sharp MX-5001N | MX-4100N | MX-4101N | MX-5001N Operation Manual Suite - Page 215
OK Print Color Bk(Black) Total Page Auto Manual 1 Page Page Number 2 Select a format for the page number. If the [1/5, 2/5, 3/5] key is selected, "Page number / total pages" will be printed. "Auto" is initially selected for the total pages, which means that the number of scanned original pages - Sharp MX-5001N | MX-4100N | MX-4101N | MX-5001N Operation Manual Suite - Page 216
COPIER 3 Stamp Page Numbering Page Numbering Format 1,2,3.. (1),(2),(3).. -1-,-2-,-3-.. P.1,P.2,P.3.. ,,.. 1/5,2/5,3/5.. Cancel OK Print Color Bk(Black) Total Page Auto Manual 1 Page Page Number Touch the [Print Color] key. Touch the color that you wish to use. When you have - Sharp MX-5001N | MX-4100N | MX-4101N | MX-5001N Operation Manual Suite - Page 217
1 Covers/Inserts Counting Touch the [OK] key. 9 Stamp Page Numbering Page Numbering Format 1,2,3.. (1),(2),(3).. -1-,-2-,-3-.. P.1,P.2,P.3.. ,,.. 1/5,2/5,3/5.. Cancel OK Print Color Bk(Black) Total Page Auto Manual 1 Page Page Number Touch the [OK] key. After touching the [OK - Sharp MX-5001N | MX-4100N | MX-4101N | MX-5001N Operation Manual Suite - Page 218
COPIER • When Page Numbering is selected, copying in group mode is not possible. The mode automatically changes to sort mode. • When the page number printing position is set to the right side or left side and pamphlet copy or book copy is used, the print position is changed so that the page numbers - Sharp MX-5001N | MX-4100N | MX-4101N | MX-5001N Operation Manual Suite - Page 219
COPIER 1 Touch the [Text] key in the stamp selection screen. See steps 1 to 4 of "GENERAL PROCEDURE FOR USING STAMP" (page 2-87). 2 Stamp Text Pre-Set Recall Store/Delete Cancel OK First Page Print Color Bk(Black) Direct Entry All Pages (page 2-100) 3 Stamp Text 5 10 Recall No.01 AAA - Sharp MX-5001N | MX-4100N | MX-4101N | MX-5001N Operation Manual Suite - Page 220
COPIER 4 Stamp Text AAA AAA Pre-Set Recall Store/Delete Cancel OK First Page Print Color Bk(Black) Direct Entry All Pages Touch the [Print Color] key. Touch the color that you wish to use. When you have finished selecting the settings, touch the [OK] key. Stamp Print Color OK Bk(Black - Sharp MX-5001N | MX-4100N | MX-4101N | MX-5001N Operation Manual Suite - Page 221
page 2-87). 2 Stamp Text Pre-Set Recall Store/Delete Cancel OK First Page Print Color Bk(Black) Direct Entry All Pages Touch the [Store/Delete] key. Stamp Text 5 10 Store/Delete No.01 To edit or delete a text string, follow the instructions below. To edit or delete a text string... - Sharp MX-5001N | MX-4100N | MX-4101N | MX-5001N Operation Manual Suite - Page 222
CCC CCC No.05 No.07 No.09 No.02 BBB BBB No.04 No.06 No.08 No.10 COPIER Touch the [Back] key. Back You will return to the screen of step 2. To copy using a stored text string, continue from step 2 of 1 "PRINTING TEXT ON COPIES (Text)" (page 2-98). 3 2-101 Contents - Sharp MX-5001N | MX-4100N | MX-4101N | MX-5001N Operation Manual Suite - Page 223
COPIER CHECKING THE STAMP LAYOUT (Layout) After stamp items have been selected, you can check the print layout, change the print position, and delete stamp items. 1 Special Modes Special Modes Date Page Numbering Stamp Text Watermark Cancel OK OK 1 2 Touch the [Layout] key. Layout The [ - Sharp MX-5001N | MX-4100N | MX-4101N | MX-5001N Operation Manual Suite - Page 224
COPIER Stamp Move Select the location to move the selected item. 4 Touch the key of the desired destination OK position. The touched position key is highlighted and the print position changes. The keys that show the print positions will appear as follows depending on the state of the settings. - Sharp MX-5001N | MX-4100N | MX-4101N | MX-5001N Operation Manual Suite - Page 225
COPIER ADDING A WATERMARK TO A COPY (Watermark) When making a copy, specific text can be added to the copy as a watermark. The color, density, angle, and pages (first page only or all pages) can be selected for a watermark. The watermark is printed at the center of the paper. Printing "CONFIDENTIAL" - Sharp MX-5001N | MX-4100N | MX-4101N | MX-5001N Operation Manual Suite - Page 226
COPIER Stamp Watermark CONFIDENTIAL FOR YOUR INFO. URGENT PRELIMINARY IMPORTANT TOP SECRET PRIORITY DO NOT COPY DRAFT FINAL COPY PLEASE REPLY Cancel Print Color Bk 1 2 3 Angle (+90 ~ -90) 45 OK First Page All Pages 3 Touch the [Print Color] key and set the color and density. Touch the color - Sharp MX-5001N | MX-4100N | MX-4101N | MX-5001N Operation Manual Suite - Page 227
edit menu screen Special Modes OK Stamp File Image Edit Color Adjustments 2 Quick File Proof Copy 2 Original Count Mixed Size Original Slow Scan Mode Special Modes OK Image Edit OK (1) (2) Multi-Page (3) Photo Repeat Enlargement (4) 11x17 (5) (6) Centering Full Bleed Mirror - Sharp MX-5001N | MX-4100N | MX-4101N | MX-5001N Operation Manual Suite - Page 228
COPIER REPEATING PHOTOS ON A COPY (Photo Repeat) Photo Repeat is used to create repeated images of a photo-size original (3" x 5" size, 5" x 7" size, 2-1/2" x 4" size, 2-1/2" x 2-1/2" size or 2-1/8" x 3-5/8" size (130 - Sharp MX-5001N | MX-4100N | MX-4101N | MX-5001N Operation Manual Suite - Page 229
x 11" (A4) can be selected for the paper size. Press the [COLOR START] key or the [BLACK & WHITE START] key. Copying will begin. If you have selected sort mode, change originals and press the [START] key. Repeat until all pages have been scanned and 4 then touch the [Read-End] key. (For the second - Sharp MX-5001N | MX-4100N | MX-4101N | MX-5001N Operation Manual Suite - Page 230
COPIER CREATING A LARGE POSTER (Multi-Page Enlargement) This function is used to enlarge an image of an original and print it as a composite image using multiple sheets of paper. Original (8-1/2" x 11" (A4) size) Copy (enlarged image on 8 sheets of 11" x 17" (A3) paper) Select the - Sharp MX-5001N | MX-4100N | MX-4101N | MX-5001N Operation Manual Suite - Page 231
COPIER (B) Ready to scan for copy. Copies will be delivered in 2 parts. Image Edit OK Multi-Page Enlargement Border Print Cancel OK Enlargement Size (Inch) 22x17 22x34 Original Size Original Orientation 1 11x17 3 8½x14 34x44 8½x11 44x68 Set the enlargement size and the original - Sharp MX-5001N | MX-4100N | MX-4101N | MX-5001N Operation Manual Suite - Page 232
COPIER 4 Image Edit Multi-Page Enlargement Enlargement Size (Inch) 22x17 22x34 34x44 44x68 OK Border Print COLOR START] key or the [BLACK & WHITE START] key. Copying will begin. If you have selected sort mode, change originals and press the [START] key. Repeat until all pages have been scanned - Sharp MX-5001N | MX-4100N | MX-4101N | MX-5001N Operation Manual Suite - Page 233
make a copy that is a mirror image of the original. COPIER Original Mirror image copy 1 Place the original. Place the COLOR START] key or the [BLACK & WHITE START] key. Copying will begin. If you are using the document glass to copy multiple original pages, copying will take place as you scan - Sharp MX-5001N | MX-4100N | MX-4101N | MX-5001N Operation Manual Suite - Page 234
COPIER COPYING 11" x 17" ORIGINALS WITH NO EDGE CUT-OFF (11" x 17" Full Bleed) Touch the [Image Edit] key. ☞ [Image Edit] KEY (page 2-106) (1) 3 Special Modes Image Edit Photo Repeat 11x17 Full Bleed Multi-Page Enlargement Centering (2) OK OK Mirror Image B/W Reverse Select 11x17 Full Bleed - Sharp MX-5001N | MX-4100N | MX-4101N | MX-5001N Operation Manual Suite - Page 235
explained in "MAKING COPIES USING THE BYPASS TRAY" (page 2-40). Press the [COLOR START] key or the [BLACK & WHITE START] key. Copying will begin. If you have selected sort mode, change originals and press the [START] key. Repeat until all pages have been scanned and 5 then touch the [Read-End] key - Sharp MX-5001N | MX-4100N | MX-4101N | MX-5001N Operation Manual Suite - Page 236
COPIER COPYING IN THE CENTER OF THE PAPER (Centering) This is used to of copy mode. Press the [COLOR START] key or the [BLACK & WHITE START] key. Copying will begin. If you are using the document glass to copy multiple original pages, copying will take place as you scan each original. If you have - Sharp MX-5001N | MX-4100N | MX-4101N | MX-5001N Operation Manual Suite - Page 237
COPIER • The image can be reduced when using the centering function, but not enlarged. • When the original size or the paper size is displayed as a special - Sharp MX-5001N | MX-4100N | MX-4101N | MX-5001N Operation Manual Suite - Page 238
selected sort mode, change originals and press the [BLACK & WHITE START] key. Repeat until all pages have been scanned and then touch the [Read-End] key. 4 When using this function, the [COLOR START] key cannot be used. To cancel scanning and copying... Press the [STOP] key ( ). 2-117 Contents - Sharp MX-5001N | MX-4100N | MX-4101N | MX-5001N Operation Manual Suite - Page 239
COPIER When this function is selected, the "Original Image Type" setting for exposure adjustment automatically changes to "Text". To cancel B/W reverse... Touch the [B/W Reverse] key in the screen of step 3 so that it is not highlighted. 2-118 Contents - Sharp MX-5001N | MX-4100N | MX-4101N | MX-5001N Operation Manual Suite - Page 240
Slow Scan Mode Special Modes OK Color Adjustments OK (1) (2) RGB Adjust Sharpness (4) (5) Color Balance Brightness (3) Suppress Background (6) Intensity (1) [RGB Adjust] key ☞ ADJUSTING RED/GREEN/BLUE IN COPIES (RGB Adjust) (page 2-120) (2) [Sharpness] key ☞ ADJUSTING THE SHARPNESS OF - Sharp MX-5001N | MX-4100N | MX-4101N | MX-5001N Operation Manual Suite - Page 241
COPIER ADJUSTING RED/GREEN/BLUE IN COPIES (RGB Adjust) This feature is used to strengthen or weaken any one of the three color components R (red), G ( and press the [COLOR START] key. Repeat until all pages have been scanned and then touch the [Read-End] key. To cancel scanning and copying... Press - Sharp MX-5001N | MX-4100N | MX-4101N | MX-5001N Operation Manual Suite - Page 242
COPIER ADJUSTING THE SHARPNESS OF AN IMAGE (Sharpness) This is used to sharpen an image or make it softer. Soft Sharp 1 COLOR START] key. Repeat until all pages have been scanned and then touch the [Read-End] key. To cancel scanning and copying... Press the [STOP] key ( ). To cancel the sharpness - Sharp MX-5001N | MX-4100N | MX-4101N | MX-5001N Operation Manual Suite - Page 243
COPIER WHITENING FAINT COLORS IN COPIES (Suppress Background) This feature is used to through the screens. (3) Touch the [Color Adjustments] key. (4) Touch the [Suppress Background] key. ☞ [Color Adjustments] KEY (page 2-119) 3 Color Adjustments OK Suppress Background Cancel OK Light - Sharp MX-5001N | MX-4100N | MX-4101N | MX-5001N Operation Manual Suite - Page 244
COPIER Press the [COLOR START] key. Copying will begin. If you are using the document glass to copy multiple original pages, copying will take place as you scan each original. If you 4 have selected sort mode, change originals and press the [COLOR START] key. Repeat until all pages have been scanned - Sharp MX-5001N | MX-4100N | MX-4101N | MX-5001N Operation Manual Suite - Page 245
COPIER ADJUSTING THE COLOR (Color Balance) The color, tone, and density of color copies can be adjusted. Light Dark 12345678 Each of the colors yellow, screens. (3) Touch the [Color Adjustments] key. (4) Touch the [Color Balance] key. ☞ [Color Adjustments] KEY (page 2-119) 2-124 Contents - Sharp MX-5001N | MX-4100N | MX-4101N | MX-5001N Operation Manual Suite - Page 246
values. The default color balance values are set in "Initial Color Balance Setting" in the system settings (administrator). Press the [COLOR START] key. Copying will begin. If you are using the document glass to copy multiple original pages, copying will take place as you scan each original. If - Sharp MX-5001N | MX-4100N | MX-4101N | MX-5001N Operation Manual Suite - Page 247
COPIER ADJUSTING THE BRIGHTNESS OF A COPY (Brightness) The brightness of color images can be adjusted. sort mode, change originals and press the [COLOR START] key. Repeat until all pages have been scanned and then touch the [Read-End] key. To cancel scanning and copying... Press the [STOP] key - Sharp MX-5001N | MX-4100N | MX-4101N | MX-5001N Operation Manual Suite - Page 248
COPIER ADJUSTING THE INTENSITY OF A COPY (Intensity) This is used to adjust the intensity (saturation) of color images. mode. Press the [COLOR START] key. Copying will begin. If you are using the document glass to copy multiple original pages, copying will take place as you scan each original. If - Sharp MX-5001N | MX-4100N | MX-4101N | MX-5001N Operation Manual Suite - Page 249
COPIER CHECKING COPIES BEFORE PRINTING (Proof Copy) This feature prints only one set of copies, regardless of how many sets have been specified. After the first set is checked for errors, the remaining sets can be printed. Previously it was necessary to re-scan the original each time changes to - Sharp MX-5001N | MX-4100N | MX-4101N | MX-5001N Operation Manual Suite - Page 250
enter the correct number. Press the [COLOR START] key or the [BLACK & WHITE START] key. One set of copies is printed. If you are using the document glass to copy multiple originals, change originals and press the [START] key. Repeat until all 5 pages have been scanned and then touch the [Read-End - Sharp MX-5001N | MX-4100N | MX-4101N | MX-5001N Operation Manual Suite - Page 251
COPIER (1) (2) Proof Copy OK 7 Color Mode Paper Select 2-Sided Copy Output Special Modes Change the base screen of copy mode and the remaining sets will be printed. 9 Change End To cancel scanning and copying... Press the [STOP] key ( ). If Proof Copy is executed while the machine is - Sharp MX-5001N | MX-4100N | MX-4101N | MX-5001N Operation Manual Suite - Page 252
. (3) (2) (4) 2 Special Modes OK Stamp File Image Edit Color Adjustments 2 Quick File Proof Copy 2 Original Count Mixed Size Original Slow Scan Mode Select Original Count. (1) Touch the [Special Modes] key. ☞ SPECIAL MODES (page 2-43) (2) Touch the screens. keys to switch through - Sharp MX-5001N | MX-4100N | MX-4101N | MX-5001N Operation Manual Suite - Page 253
COPIER 4 130 pages of original have been scanned. Copy the scanned data? Cancel OK After scanning is finished, check the number of sheets that were scanned and touch the [OK] key. Copying will begin. • When job build mode is used, the number of scanned sheets appears when the [Read-End] key is - Sharp MX-5001N | MX-4100N | MX-4101N | MX-5001N Operation Manual Suite - Page 254
COPIER COPYING ORIGINALS OF DIFFERENT SIZES (Mixed Size Original) Even when 8-1/2" x 14" (B4) originals are mixed in with 11" x 17" (A3) originals, all originals can be copied at once. When scanning the originals, the machine automatically detects the size of each original and uses paper - Sharp MX-5001N | MX-4100N | MX-4101N | MX-5001N Operation Manual Suite - Page 255
COPIER 11" x 17" (A3) Insert the originals face up in the document feeder tray switch through the screens. (3) Touch the [Mixed Size Original] key. ☞ Special modes menu (2nd screen) (page 2-44) (1) Special Modes Mixed Size Original 3 Same Width Different Width (2) OK Cancel OK Place the same - Sharp MX-5001N | MX-4100N | MX-4101N | MX-5001N Operation Manual Suite - Page 256
COPIER Press the [COLOR START] key or the [BLACK & WHITE START] key. Copying will begin. 4 To cancel scanning and copying... Press the [STOP] key ( ). • When [Different Width] is selected on the MX-4101N/5001N, "2-Sided to 2-Sided" and "2-Sided to 1-Sided" of automatic two-sided copying can be used. - Sharp MX-5001N | MX-4100N | MX-4101N | MX-5001N Operation Manual Suite - Page 257
COPIER COPYING THIN ORIGINALS (Slow Scan Mode) Use this function when you wish to scan thin originals using the Color Adjustments 2 Quick File Proof Copy 2 Original Count Mixed Size Original Slow Scan Mode Select Slow Scan Mode. (1) Touch the [Special Modes] key. ☞ SPECIAL MODES (page - Sharp MX-5001N | MX-4100N | MX-4101N | MX-5001N Operation Manual Suite - Page 258
COPIER The "2-Sided to 2-Sided" and "2-Sided to 1-Sided" modes of automatic 2-sided copying cannot be used. To cancel the slow scan mode setting... Touch the [Slow Scan Mode] key in the screen of step 2 so that it is not highlighted. System Settings (Administrator): Original Feeding Mode This is - Sharp MX-5001N | MX-4100N | MX-4101N | MX-5001N Operation Manual Suite - Page 259
COPIER CONVENIENT COPY FUNCTIONS This section explains convenient copy functions such as copy job first. Copies in progress from tray 4. Ready to scan for next copy job. Interrupt 7 Touch the [Interrupt] key. Color Mode Full Color Special Modes 2-Sided Copy The [Interrupt] key does not appear - Sharp MX-5001N | MX-4100N | MX-4101N | MX-5001N Operation Manual Suite - Page 260
COPIER • If user authentication is enabled, the login screen will appear when the [Interrupt] key is pressed. Enter your user name and password to log in. The number of copies made will be added to the count of the user Copy, Card Shot, Multi-Page Enlargement, Original Count • If the document glass - Sharp MX-5001N | MX-4100N | MX-4101N | MX-5001N Operation Manual Suite - Page 261
Paper Select Auto 8½x11 Plain Preview Select copy settings and press the [COLOR START] key or the [BLACK & WHITE 3 START] key. After the original is scanned, a preview image of the copy appears in the touch panel. The copy is not printed until the [Start Copy] key is touched in the preview screen - Sharp MX-5001N | MX-4100N | MX-4101N | MX-5001N Operation Manual Suite - Page 262
COPIER To cancel the operation... Press the [CLEAR ALL] key ( ). System Settings (Administrator): Default Preview You can set the default state of the [Preview] key to always selected (highlighted). Enable this setting if you wish to check a preview image each time you make a copy. 2-141 Contents - Sharp MX-5001N | MX-4100N | MX-4101N | MX-5001N Operation Manual Suite - Page 263
Book copy • Staple (including saddle stitch) function • Punch function • Stamp menu page copy, pamphlet copy, covers/inserts, transparency film, 2 in 1/4 in 1, book copy, card shot, image edit menu, color adjustment (excluding sharpness and color balance) • Fine lines (such as borderlines printed - Sharp MX-5001N | MX-4100N | MX-4101N | MX-5001N Operation Manual Suite - Page 264
COPIER copy mode JOB STATUS Print Job Job Queue 1 Copy 2 Copy 3 Computer01 4 0312345678 Scan to Fax Job Internet Fax Sets / Progress 020 the print queue (the job in progress and reserved jobs) can be checked in the job status display (B). Ready to scan for copy. Color Mode Full Color - Sharp MX-5001N | MX-4100N | MX-4101N | MX-5001N Operation Manual Suite - Page 265
Detail Priority Stop/Delete (3) (4) (5) (6) Print Job Scan to Fax Job Internet Fax Jobs Completed Set Time Sets Status 1 Computer02 11:00 04/01 001/001 OK 2 Computer03 10:33 04/01 010/010 OK 1 3 Computer04 10:31 04/01 013/013 OK 2 4 file-01 10:30 04/01 010/010 OK 5 Copy 10:13 - Sharp MX-5001N | MX-4100N | MX-4101N | MX-5001N Operation Manual Suite - Page 266
toner cartridge is out of toner. Replace the toner cartridge with a new cartridge. "Paper Empty" The paper used for the job has run out. Add paper or change to a different paper tray. "Limit" The copy page limit has been exceeded. Check with the administrator of the machine. "Error" An error - Sharp MX-5001N | MX-4100N | MX-4101N | MX-5001N Operation Manual Suite - Page 267
COPIER CANCELING A JOB THAT IS WAITING IN THE QUEUE A copy job that is waiting to be printed can be canceled. JOB STATUS Press the [JOB STATUS] key. 1 (1) (2) Cancel the job. Print Job Job Queue 1 Computer01 2 Copy 3 Computer02 4 0312345678 Scan to Fax Job Internet Fax Sets / - Sharp MX-5001N | MX-4100N | MX-4101N | MX-5001N Operation Manual Suite - Page 268
COPIER GIVING PRIORITY TO A JOB IN THE QUEUE If a copy job is STATUS Press the [JOB STATUS] key. 1 (1) (2) Give the desired job priority. Print Job Scan to Fax Job Internet Fax (1) Touch the [Print Job] tab. 2 Job Queue 1 Computer01 2 Copy 3 Computer02 4 0312345678 Sets / - Sharp MX-5001N | MX-4100N | MX-4101N | MX-5001N Operation Manual Suite - Page 269
COPIER CHECKING INFORMATION ON A COPY JOB WAITING IN THE QUEUE Detailed information can be displayed on a copy job waiting in the queue. JOB STATUS Press the [JOB STATUS] key. 1 (1) (2) Print Job Job Queue 1 Copy 2 Copy 3 Computer01 4 0312345678 Scan to Fax Job Internet Fax (page - Sharp MX-5001N | MX-4100N | MX-4101N | MX-5001N Operation Manual Suite - Page 270
COPIER 2-sided copying is used. (4) Margin shift is used so that holes can be punched for filing. When a job program is not stored Set 11 the settings, so some copies must be redone. Press the [COLOR START] key or the [BLACK & WHITE START] key. pages. Click [Job program] and then [Copy] in the Web - Sharp MX-5001N | MX-4100N | MX-4101N | MX-5001N Operation Manual Suite - Page 271
COPIER STORING (EDITING/DELETING) A JOB PROGRAM The procedures for storing copy settings in a job program and deleting a job program are explained below. 1 LOGOUT Job Programs Press - Sharp MX-5001N | MX-4100N | MX-4101N | MX-5001N Operation Manual Suite - Page 272
COPIER To store, make selections and press [OK], to delete, press [Cancel]. Cancel OK Select the copy settings that you wish to Color Mode Special Modes store in the job program and touch the Full Color 2-Sided Copy [OK] key. Exposure Auto 4 1. 8½x11 2. 8½x11R 3. 8½x14 4. 11x17 Plain 8½ - Sharp MX-5001N | MX-4100N | MX-4101N | MX-5001N Operation Manual Suite - Page 273
COPIER APPENDIX Examples of covers and inserts The relations between the originals and finished copies when covers or inserts are inserted are shown on the following pages 3 original is copied on one side of the insert. (One page is not copied.) 3 Insert when both sides are copied on. - Sharp MX-5001N | MX-4100N | MX-4101N | MX-5001N Operation Manual Suite - Page 274
following 1-sided originals. 1st page 2nd page 3rd page 4th page 5th page 1 2 3 4 5 6th page 6 Cover copying condition Front 1 2 3 4 5 copying 6 2-sided copying 1-sided 1 2 3 4 5 copying 6 2-sided copying 2-sided 1 2 3 4 5 copying 6 6 COPIER 2-153 Contents - Sharp MX-5001N | MX-4100N | MX-4101N | MX-5001N Operation Manual Suite - Page 275
following 1-sided originals. 1st page 2nd page 3rd page 4th page 5th page 1 2 3 4 5 6th page 6 6 6 Cover copying condition 2 3 4 5 copying 2-sided copying 1-sided 1 2 3 4 5 copying 6 2-sided copying 2-sided 1 2 3 4 5 copying 6 6 6 6 COPIER 2-154 Contents - Sharp MX-5001N | MX-4100N | MX-4101N | MX-5001N Operation Manual Suite - Page 276
sided copies are made of the following 2-sided originals. 1st page 2nd page 3rd page 1 3 5 6 4 2 Cover copying condition Front 1 2 3 4 5 copying 6 2-sided copying 1-sided 1 2 3 4 5 copying 6 2-sided copying 2-sided 1 2 3 4 5 copying 6 6 COPIER 2-155 Contents - Sharp MX-5001N | MX-4100N | MX-4101N | MX-5001N Operation Manual Suite - Page 277
2-sided copies are made of the following 2-sided originals. 1st page 2nd page 3rd page 1 3 5 6 4 2 6 6 Cover copying condition Front sided 1 3 4 5 copying 6 4 2-sided copying 1-sided 1 2 3 copying 6 2-sided copying 2-sided 1 2 3 4 5 copying 6 2-156 COPIER Contents - Sharp MX-5001N | MX-4100N | MX-4101N | MX-5001N Operation Manual Suite - Page 278
COPIER Inserts (copying of 1-sided originals) 1-sided and 2-sided copying of the following 1-sided originals. The example of adding an insert at the 3rd sheet is shown. (when "Insertion Page" is set to "3" in the insertion settings of the insert settings in the special modes) 1st page 2nd page - Sharp MX-5001N | MX-4100N | MX-4101N | MX-5001N Operation Manual Suite - Page 279
THE USER AUTHENTICATION FUNCTION IS ENABLED . . . 3-21 FREQUENTLY USED FUNCTIONS SELECTING THE COLOR MODE 3-23 SELECTING A PRINT MODE SETTING 3-25 TWO-SIDED PRINTING 3-26 FITTING THE PRINT IMAGE TO THE PAPER . . . 3-28 PRINTING MULTIPLE PAGES ON ONE PAGE 3-29 STAPLING OUTPUT/PUNCHING HOLES IN - Sharp MX-5001N | MX-4100N | MX-4101N | MX-5001N Operation Manual Suite - Page 280
THE PRINTER DRIVER DIRECTLY PRINTING FROM THE MACHINE. . . . 3-60 • DIRECTLY PRINTING A FILE ON AN FTP SERVER 3-61 • DIRECTLY PRINTING A FILE IN USB MEMORY 3-62 • DIRECTLY PRINTING A FILE IN A NETWORK FOLDER 3-64 DIRECTLY PRINTING FROM A COMPUTER . . . . 3-67 • SUBMIT PRINT JOB 3-67 • FTP PRINT - Sharp MX-5001N | MX-4100N | MX-4101N | MX-5001N Operation Manual Suite - Page 281
It is recommended that you use the PCL6 printer driver. If you have a problem printing from older software using the PCL6 printer driver, use the PCL5c printer driver. Macintosh PS This printer driver supports the PostScript 3 page description language developed by Adobe Systems Incorporated, and - Sharp MX-5001N | MX-4100N | MX-4101N | MX-5001N Operation Manual Suite - Page 282
used to execute printing may vary depending on the software application. Open the printer driver properties window. (1) Select the printer driver of the machine. • If the printer drivers appear as icons, click the icon of the printer driver to be used. • If the printer drivers appear as a list - Sharp MX-5001N | MX-4100N | MX-4101N | MX-5001N Operation Manual Suite - Page 283
(1) (2) PRINTER Select print settings. (1) Click the [Paper] tab. (2) Select the paper size. To select settings on [User1] to [User7] from the pull-down menu and click the [Custom] button. Click the [Print] button. Printing begins. In Windows 98/Me/NT 4.0, click the [OK] button. 4 3-5 Contents - Sharp MX-5001N | MX-4100N | MX-4101N | MX-5001N Operation Manual Suite - Page 284
Selection" setting on the [Paper] tab of the printer driver properties window. Before printing, check the paper sizes, paper types, and paper default) is enabled in the system settings (administrator), printing will not take place if the paper size or paper type specified in the printer driver - Sharp MX-5001N | MX-4100N | MX-4101N | MX-5001N Operation Manual Suite - Page 285
on special media such as envelopes. The procedure for printing on an envelope from the printer driver properties screen is described below. For the types of paper that can be used in the bypass tray, see "IMPORTANT POINTS ABOUT PAPER" (page 1-27) in "BEFORE USING THE MACHINE". For the procedure - Sharp MX-5001N | MX-4100N | MX-4101N | MX-5001N Operation Manual Suite - Page 286
authentication function is enabled in the machine's system settings (administrator), your user information (login name, password, etc.) must be entered in the printer driver properties window before you can print. The information that must be entered varies depending on the authentication method - Sharp MX-5001N | MX-4100N | MX-4101N | MX-5001N Operation Manual Suite - Page 287
number of pages printed is added to the "Other User" count. In this case, other print functions may be restricted. For more information, ask your administrator. • The machine's user authentication function cannot be used when the PPD file* is installed and the Windows standard PS printer driver is - Sharp MX-5001N | MX-4100N | MX-4101N | MX-5001N Operation Manual Suite - Page 288
by clicking the setting and pressing the [F1] key. * To view Help for a setting in Windows 98/Me/NT 4.0/2000/XP/Server 2003, click the button in the upper right-hand corner of the printer driver properties window and then click the setting. You can also view the same Help by right-clicking the - Sharp MX-5001N | MX-4100N | MX-4101N | MX-5001N Operation Manual Suite - Page 289
as user settings. Saving frequently used settings or complex color settings under an assigned name makes it easy to select those settings the next time you need to use them. SAVING SETTINGS AT THE TIME OF PRINTING Settings can be saved from any tab of the printer driver properties window. Settings - Sharp MX-5001N | MX-4100N | MX-4101N | MX-5001N Operation Manual Suite - Page 290
can be saved. • The following items cannot be saved in user settings. - A watermark that you created - Paper insertion settings - Overlay file - [Tab Paper Print] settings on the [Special Modes] tab (PCL6 only) - The login name, password, user name, and job name entered in the [Job Handling] tab - Sharp MX-5001N | MX-4100N | MX-4101N | MX-5001N Operation Manual Suite - Page 291
] button. 1 (1) (2) The button that is used to open the printer driver properties window (usually [Properties] or [Printing Preferences]) may vary depending on the software application. Select the print settings. (1) Select the user settings that you wish to use. (2) Click the [OK] button - Sharp MX-5001N | MX-4100N | MX-4101N | MX-5001N Operation Manual Suite - Page 292
[Printers and Faxes]. (2) (1) 2 Open the printer properties window. (1) Click the icon of the printer driver of the machine. (2) Click the [Organize] menu. In Windows 98/Me/NT 4.0/2000/XP/Server 2003, click the [File] menu. (3) Select [Properties]. In Windows NT 4.0, select [Document Defaults - Sharp MX-5001N | MX-4100N | MX-4101N | MX-5001N Operation Manual Suite - Page 293
PRINTER Configure the settings and click the [OK] button. For explanations of the settings, see printer driver Help. 4 3-15 Contents - Sharp MX-5001N | MX-4100N | MX-4101N | MX-5001N Operation Manual Suite - Page 294
install the PPD file and configure printer driver settings, see "3. SETUP IN A MACINTOSH ENVIRONMENT" in the Software Setup Guide. SELECTING PAPER SETTINGS Select paper settings in the printer driver before selecting the print command. Select [Page Setup] from the [File] menu of TextEdit. In Mac OS - Sharp MX-5001N | MX-4100N | MX-4101N | MX-5001N Operation Manual Suite - Page 295
is selected. 2 The machine name that appears in the "Printer" menu is normally [SCxxxxxx]. ("xxxxxx" is a sequence of characters that varies depending on the machine model.) Select print settings. • In Mac OS X, click next to [Copies & Pages] and select the settings that you wish to configure - Sharp MX-5001N | MX-4100N | MX-4101N | MX-5001N Operation Manual Suite - Page 296
PRINTER Click the [Print] button. Printing begins. 4 3-18 Contents - Sharp MX-5001N | MX-4100N | MX-4101N | MX-5001N Operation Manual Suite - Page 297
PRINTER SELECTING THE PAPER This section explains the [Paper Feed] settings ("Paper Source" setting in [General] in Mac OS 9) in the print settings window. • When [Auto Select] is selected A tray with plain paper or recycled paper (the factory default setting is plain paper only) of the size - Sharp MX-5001N | MX-4100N | MX-4101N | MX-5001N Operation Manual Suite - Page 298
(1) Select the bypass tray. (1) Select [Paper Feed] on the print screen. In Mac OS 9, select [General]. (2) Select [Bypass Tray(Envelope)] from the "All pages from" menu. • In Mac OS 9, select [Bypass Tray(Envelope)] from 2 the "All pages from" menu of "Paper Source". • Set the paper type of - Sharp MX-5001N | MX-4100N | MX-4101N | MX-5001N Operation Manual Suite - Page 299
select [Job Handling] and then click the [Authentication] tab in the screen 2 that appears. • In Mac OS 9, select [User Authentication]. (2) The machine name that appears in the "Printer" menu is normally [SCxxxxxx]. ("xxxxxx" is a sequence of characters that varies depending on the machine - Sharp MX-5001N | MX-4100N | MX-4101N | MX-5001N Operation Manual Suite - Page 300
Print] button. In Mac OS X, you can click the (lock) button after entering your login name and password, or user number, to simplify operation the next time you wish to print based on the same user authentication. When user authentication is enabled in the system settings (administrator), printing - Sharp MX-5001N | MX-4100N | MX-4101N | MX-5001N Operation Manual Suite - Page 301
PRINTING MULTIPLE PAGES ON ONE PAGE (page 3-29) • STAPLING OUTPUT/PUNCHING HOLES IN OUTPUT (page 3-31) The explanations assume that the paper size and other basic settings have already been selected. For the basic procedure for printing and the steps for opening the printer driver properties window - Sharp MX-5001N | MX-4100N | MX-4101N | MX-5001N Operation Manual Suite - Page 302
PRINTER BLACK AND WHITE PRINTING [Black and White] can be selected on the [Main] tab as well as on the [Color] tab. Click the [Black and White Print] checkbox on the [Main] tab so that a checkmark appears. The [Black and White Print] checkbox on the [Main] tab and the "Color Mode" setting on the [ - Sharp MX-5001N | MX-4100N | MX-4101N | MX-5001N Operation Manual Suite - Page 303
to a print color photo with greater clarity or print graphics with gradations, etc. (This mode cannot be selected when using the PCL5c printer driver.) Windows (1) (2) (1) Click the [Advanced] tab. (2) Select the "Print Mode". Macintosh (2) (1) (1) Select [Color]. (2) Select the "Print Mode - Sharp MX-5001N | MX-4100N | MX-4101N | MX-5001N Operation Manual Suite - Page 304
2-Sided(Tablet) Macintosh Long-edged binding (Flip on long edge) The pages are printed so that they can be bound at the side. The pages are printed so that they can be bound at the top. Windows (1) (2) (1) Configure the settings on the [Main] tab. (2) Select [2-Sided(Book)] or [2-Sided - Sharp MX-5001N | MX-4100N | MX-4101N | MX-5001N Operation Manual Suite - Page 305
Macintosh (1) PRINTER (2) (1) Select [Layout]. (2) Select [Long-edged binding] or [Short-edged binding]. • In Mac OS X v10.2.8, select the settings in [Advanced]. • In Mac OS 9, select [Output/Document Style] and then select [Flip on long edge] or [Flip on short edge]. 3-27 Contents - Sharp MX-5001N | MX-4100N | MX-4101N | MX-5001N Operation Manual Suite - Page 306
size paper. Windows (1) (3) (2) (4) (1) Click the [Paper] tab. (2) Select the size of the print image (for example: Letter). (3) Select [Fit To Paper Size]. (4) Select the actual paper size to be used for printing (for example: Ledger). Macintosh (This function can only be used in Mac OS X v10 - Sharp MX-5001N | MX-4100N | MX-4101N | MX-5001N Operation Manual Suite - Page 307
orders for 6-Up, 8-Up, 9-Up, and 16-Up are the same as for 4-Up. • In a Windows environment, the page order can be viewed in the print image in the printer driver properties window. In a Macintosh environment, the page orders are displayed as selections. • In a Macintosh environment, the number of - Sharp MX-5001N | MX-4100N | MX-4101N | MX-5001N Operation Manual Suite - Page 308
Windows (1) PRINTER (1) Configure the settings on the [Main] tab. (2) Select the number of pages per sheet. (3) If you wish to print borderlines, click the [Border] checkbox so that a checkmark appears. (4) Select the order of the pages. (2) (3) (4) Macintosh (1) (2) (1) Select [Layout]. (2) - Sharp MX-5001N | MX-4100N | MX-4101N | MX-5001N Operation Manual Suite - Page 309
and punch function cannot be used. • When the staple function or the punch function is disabled in the machine's system settings (administrator), stapling or punching is not possible. • For information on the saddle stitch function, see "CREATING A PAMPHLET (Pamphlet/Pamphlet Staple)" (page 3-33 - Sharp MX-5001N | MX-4100N | MX-4101N | MX-5001N Operation Manual Suite - Page 310
. (1) Select [Printer Features]. (2) Select the "Binding Edge". (3) Select the staple function or the punch function. • For the staple function, select the number of staples in the "Staple" menu. • For the punch function, click the [Punch] checkbox so that a checkmark appears. • In Mac OS X v10 - Sharp MX-5001N | MX-4100N | MX-4101N | MX-5001N Operation Manual Suite - Page 311
: BASIC PRINTING PROCEDURE (page 3-4) ☞ Macintosh: BASIC PRINTING PROCEDURE (page 3-16) In Windows, view printer driver Help for details on printer driver settings for each printing function. CONVENIENT FUNCTIONS FOR CREATING PAMPHLETS AND POSTERS CREATING A PAMPHLET (Pamphlet/Pamphlet Staple) The - Sharp MX-5001N | MX-4100N | MX-4101N | MX-5001N Operation Manual Suite - Page 312
Macintosh (1) (3) PRINTER (2) (1) Select [Printer Features]. (2) Select the "Binding Edge". [2 Staples] can be selected in the "Staple" menu when a saddle stitch finisher is installed. (3) Select [Tiled Pamphlet] or [2-Up Pamphlet]. • In Mac OS X v10.2.8, select from the "2-Side Printing" and - Sharp MX-5001N | MX-4100N | MX-4101N | MX-5001N Operation Manual Suite - Page 313
finisher or saddle stitch finisher is installed, the staple function or the punch function can be used with this function. PRINTER Windows (1) (2) (3) (2) (3) (1) Select [Printer Features]. (2) Select the "Binding Edge". (3) Select the "Margin Shift". • In Mac OS X v10.2.8, select from the - Sharp MX-5001N | MX-4100N | MX-4101N | MX-5001N Operation Manual Suite - Page 314
PRINTER CREATING A LARGE POSTER (Poster Printing) (This function is only available in Windows.) One page of print data can be enlarged and printed using multiple printed and overlapping edges can be created (overlap function). Windows (This function can be used when the PCL6 or PS printer driver - Sharp MX-5001N | MX-4100N | MX-4101N | MX-5001N Operation Manual Suite - Page 315
image 180 degrees so that it can be printed correctly on paper that can only be loaded in one orientation (such as envelopes or paper with punch holes). (In Mac OS X, a portrait image cannot be rotated 180 degrees.) ABCD ABCD Windows (1) (2) (1) Select the setting on the [Main] tab. (2) Select - Sharp MX-5001N | MX-4100N | MX-4101N | MX-5001N Operation Manual Suite - Page 316
ENLARGING/REDUCING THE PRINT IMAGE (Zoom/XY-Zoom) This function is used to enlarge or reduce the image to a selected percentage. This allows you to enlarge a small image or add margins to the paper by slightly reducing an image. When using the PS printer driver (Windows), you can set the width and - Sharp MX-5001N | MX-4100N | MX-4101N | MX-5001N Operation Manual Suite - Page 317
the minimum width. (Only for black and white printing.) Windows (This function can be used when the PCL6 printer driver is used.) (1) (2) (1) Click the [Advanced] tab. (2) Adjust the line width. Select a number from the pull-down menu. • The units of line-width adjustment can be set to "Fixed - Sharp MX-5001N | MX-4100N | MX-4101N | MX-5001N Operation Manual Suite - Page 318
when the PS printer driver is used.) (1) (2) (1) Click the [Advanced] tab. (2) Select a mirror image setting. If you wish to reverse the image horizontally, select [Horizontal]. If you wish to reverse the image vertically, select [Vertical]. Macintosh (This function can only be used in Mac OS - Sharp MX-5001N | MX-4100N | MX-4101N | MX-5001N Operation Manual Suite - Page 319
installed on your computer. Windows (1) (1) Click the [Color] tab. (2) Click the [Color Adjustment] button. (3) Adjust the color settings. To adjust a setting, drag the slide bar or button. or click the (2) (3) Macintosh (This function can only be used in Mac OS X v10.3.9 and v10.4.11 - Sharp MX-5001N | MX-4100N | MX-4101N | MX-5001N Operation Manual Suite - Page 320
PRINTER PRINTING FAINT TEXT AND LINES IN BLACK (Text To Black/Vector To Black) (This function is only available in Windows.) When printing a color image in grayscale, color text and lines that are faint can be printed in black. (Raster data such as bitmap images cannot be adjusted.) This allows - Sharp MX-5001N | MX-4100N | MX-4101N | MX-5001N Operation Manual Suite - Page 321
engineering drawing data) • Scan (for data scanned by a scanner) • Custom (for data to be printed with special settings) (3) Select advanced color settings. If you wish to select advanced settings, click the [Advanced Color] button. If you wish to perform color management using Windows ICM* in your - Sharp MX-5001N | MX-4100N | MX-4101N | MX-5001N Operation Manual Suite - Page 322
printing presses. • Simulation Profile*4: Selecting a process color *1 Cannot be selected when using the PS printer driver on Windows Vista/Server 2008. *2 Cannot be selected in Mac OS X v10.2.8. In Mac OS 9, can be selected in the "Color Matching" menu. *3 Can only be used when using the PCL6 - Sharp MX-5001N | MX-4100N | MX-4101N | MX-5001N Operation Manual Suite - Page 323
PRINTER FUNCTIONS THAT COMBINE TEXT AND IMAGES ADDING A WATERMARK TO PRINTED PAGES (Watermark) Faint shadow-like text can be added to the background of the printed image as a watermark. The size, color font and color. Adjust the size and angle of the text by dragging the slide bar . In Mac OS 9, - Sharp MX-5001N | MX-4100N | MX-4101N | MX-5001N Operation Manual Suite - Page 324
can be adjusted. This feature can be used to "stamp" the print data with a frequently used image or an icon of your own creation. MEMO MEMO Windows (This function can be used when the PCL6 or PS printer driver is used.) (1) (2) (1) Click the [Watermarks] tab. (2) Select the image stamp setting - Sharp MX-5001N | MX-4100N | MX-4101N | MX-5001N Operation Manual Suite - Page 325
120 10 250 XXXX XXX XXXX XXX XXXX 1 100 10 150 0 120 10 250 Windows Create an overlay file. (1) (2) (3) Printing with an overlay file (1) (2) Overlay file (1) Click the [Advanced] tab. Configure the printer driver settings from the software application that you wish to use to create the - Sharp MX-5001N | MX-4100N | MX-4101N | MX-5001N Operation Manual Suite - Page 326
PRINTER PRINT FUNCTIONS FOR SPECIAL PURPOSES PRINTING SPECIFIED PAGES ON DIFFERENT PAPER (Different Paper) • Using this function in a Windows environment The front and back cover and specified pages of a document can be printed on paper that is different from the other pages. Use this function - Sharp MX-5001N | MX-4100N | MX-4101N | MX-5001N Operation Manual Suite - Page 327
be used in Mac OS 9, Mac OS X v10.4.11 and v10.5 to 10.5.1.) (1) (2) (3) (1) Select [Printer Features]. (2) Select [Different Paper]. (3) Select cover insertion settings. Select the print setting, paper tray, and paper type for the cover page and last page. In Mac OS 9, select [Different Paper - Sharp MX-5001N | MX-4100N | MX-4101N | MX-5001N Operation Manual Suite - Page 328
the same content on the insert as is printed on the sheet of transparency film, select [Print] in "Transparency Inserts". Select the paper source and type if needed. • Set [Transparency] for the "Paper Type" of the bypass tray. • In Mac OS X v10.2.8, select the [Transparency Inserts] checkbox in - Sharp MX-5001N | MX-4100N | MX-4101N | MX-5001N Operation Manual Suite - Page 329
This function is only available in Windows.) This function is used to print an additional copy of the print image on paper that is the same size but from a different paper tray. For example, if carbon copy print is selected when standard paper is loaded in tray 1 and colored paper is loaded in tray - Sharp MX-5001N | MX-4100N | MX-4101N | MX-5001N Operation Manual Suite - Page 330
of tab paper. Tab Paper Print (PCL6 only) You can print on each sheet of tab paper that you insert in the desired page position. Text to be printed on tabs can be entered in [Tab Paper Print] on the [Special Modes] tab of the printer driver properties window, and detailed settings can be configured - Sharp MX-5001N | MX-4100N | MX-4101N | MX-5001N Operation Manual Suite - Page 331
PRINTER Windows Tab Paper Print (PCL6 only) Open the data that you wish to print on the tab paper and then select the settings. (1) (2) (1) Click the [Special Modes] tab. (2) Select [Tab Paper Print] and click the [Settings] button. (3) Select the tab position settings. For commercially - Sharp MX-5001N | MX-4100N | MX-4101N | MX-5001N Operation Manual Suite - Page 332
PRINTER Tab Paper Settings When you have finished preparing the data to be printed on the tabs in the software application, select the following settings: (4) (1) (1) Click the [Advanced] tab. (2) Click the [Tab Paper Settings] button. (3) Select the tab paper - Sharp MX-5001N | MX-4100N | MX-4101N | MX-5001N Operation Manual Suite - Page 333
side will be left blank and the page will be printed on the front side of the next sheet of paper). Example: When pages 4 and 8 are specified as page settings. Back is blank Windows (This function can be used when the PCL6 printer driver is used.) (1) (2) (3) (1) Click the [Special Modes] tab - Sharp MX-5001N | MX-4100N | MX-4101N | MX-5001N Operation Manual Suite - Page 334
" function is available in the PCL6 printer driver. When two-sided printing is disabled in the machine's system settings (administrator), the paper folding function cannot be used. Half Fold - Inside Half Fold - Outside Mult-Sheet Fold - Staple (PCL6 only) Windows (1) (1) Click the [Special Modes - Sharp MX-5001N | MX-4100N | MX-4101N | MX-5001N Operation Manual Suite - Page 335
]. (2) Select the [Tandem Print] checkbox . To use the tandem print function, the protocol to be used must be selected in accordance with the message that appears in the left screen when adding the printer driver with the "Printer Setup Utility" ("Print Center" in Mac OS X v10.2.8). 3-57 Contents - Sharp MX-5001N | MX-4100N | MX-4101N | MX-5001N Operation Manual Suite - Page 336
's hard drive, see "PRINTING A STORED FILE" (page 6-31) in "6. DOCUMENT FILING". Windows (1) (2) (3) (1) Click the [Job Handling] tab. (2) Select the retention setting. Click the [Retention] checkbox . Select the retention method in "Retention Settings". To enter a password (5 to 8 digit number - Sharp MX-5001N | MX-4100N | MX-4101N | MX-5001N Operation Manual Suite - Page 337
(administrator) of the machine. • At the time of retention print, in addition to user authentication information, the user name stored in the machine must be entered in "User Name" of the job ID in the printer driver. ☞ Windows: PRINTING WHEN THE USER AUTHENTICATION FUNCTION IS ENABLED (page - Sharp MX-5001N | MX-4100N | MX-4101N | MX-5001N Operation Manual Suite - Page 338
the machine without using the printer driver. The file types (and corresponding extensions) that can be printed directly are shown below. PDF/ File Type TIFF JPEG PCL Encrypted PS XPS PDF Extension tiff, tif jpeg, jpg, jpe, jfif pcl pdf ps xps • Even if the print result is black and - Sharp MX-5001N | MX-4100N | MX-4101N | MX-5001N Operation Manual Suite - Page 339
you the trouble of downloading the file and printing it from a computer. For the procedure for accessing the Web pages, see the Quick Start Guide. To configure FTP server settings, click [Application Settings] and then [Setting for Print from the MFP(FTP)] in the Web page menu. (Administrator rights - Sharp MX-5001N | MX-4100N | MX-4101N | MX-5001N Operation Manual Suite - Page 340
status screen to begin printing. ☞ PRINTING AN ENCRYPTED PDF FILE (page 3-72) DIRECTLY PRINTING A FILE IN USB MEMORY A file in a USB memory device connected to the machine can be printed from the operation panel of the machine without using the printer driver. When the printer driver of the machine - Sharp MX-5001N | MX-4100N | MX-4101N | MX-5001N Operation Manual Suite - Page 341
[Cancel] key in the message screen that appears in the touch panel. Remove the USB memory device from the machine. 5 When you select a PDF file that has a password, you must enter the password in the job status screen to begin printing. ☞ PRINTING AN ENCRYPTED PDF FILE (page 3-72) 3-63 Contents - Sharp MX-5001N | MX-4100N | MX-4101N | MX-5001N Operation Manual Suite - Page 342
panel to select and print a file on a server or in a shared folder of an individual's computer on the same network as the machine. (1) (2) (3) COPY IMAGE SEND DOCUMENT FILING 1 File Retrieve Scan to HDD External Data Access HDD Status Ex Data Access FTP USB Memory Network Folder Access the - Sharp MX-5001N | MX-4100N | MX-4101N | MX-5001N Operation Manual Suite - Page 343
server administrator and enter the appropriate user name and password. (3) Touch the key of the network folder. Search 1 17 • You can touch the [Search] key and enter a keyword to search for a workgroup, server, or network folder. For the procedure for entering text, see "ENTERING TEXT" (page 1-79 - Sharp MX-5001N | MX-4100N | MX-4101N | MX-5001N Operation Manual Suite - Page 344
the key. 4 Print File-01.tiff Paper Select Auto Output 2-Sided Quick File Number of Prints 1 (1 999) (1) Cancel B/W Print Fit To Page Print (2) Print the selected file. (1) Select print conditions. If you selected a file (PCL, PS, or XPS) in step 3 that includes print settings, the settings - Sharp MX-5001N | MX-4100N | MX-4101N | MX-5001N Operation Manual Suite - Page 345
begin printing. • If you printed a file (PCL, PS, or XPS) that includes print settings, the settings will be applied. • When user authentication is enabled in the system settings (administrator) of the machine, the print function may be restricted. For more information, ask your administrator. 3-67 - Sharp MX-5001N | MX-4100N | MX-4101N | MX-5001N Operation Manual Suite - Page 346
printing B/W PRINT OFF, ON Fit to page FITIMAGETOPAGE OFF, ON *1 Only effective when a finisher or saddle stitch finisher is installed. *2 Only effective when a punch module is installed on a finisher or saddle stitch finisher. *3 Can be omitted except when authentication is by user number - Sharp MX-5001N | MX-4100N | MX-4101N | MX-5001N Operation Manual Suite - Page 347
Print Job Job Queue 1 Computer01 2 Copy 3 Copy 4 0312345678 Scan to Fax Job Internet Fax Sets / Progress 002 / 001 Status Printing four print jobs in the print queue (the job in progress and reserved jobs) in the job status display (B). Ready to scan for copy. Color Mode Full Color - Sharp MX-5001N | MX-4100N | MX-4101N | MX-5001N Operation Manual Suite - Page 348
that have been completed, and the spool screen that shows print jobs that have been spooled and encrypted PDF jobs that are waiting for a password to be entered. (1) (3) Print Job Scan to Fax Job Internet Fax Job Queue Computer01 Computer02 Computer03 Computer04 Computer05 Sets / Progress - Sharp MX-5001N | MX-4100N | MX-4101N | MX-5001N Operation Manual Suite - Page 349
out of toner. Replace the toner cartridge with a new cartridge. "Paper Empty" The paper used for the job has run out. Add paper or change to a different paper tray. "Limit" The printing page limit has been exceeded. Check with the administrator of the machine. "Error" An error occurred while - Sharp MX-5001N | MX-4100N | MX-4101N | MX-5001N Operation Manual Suite - Page 350
in a USB memory device, etc. connected to the machine, follow the steps below to enter the password and begin printing. The PS3 expansion kit is required to use this function. JOB STATUS Press the [JOB STATUS] key. 1 (1) (3) (2) Select the encrypted PDF print job. Print Job Scan to Fax Job - Sharp MX-5001N | MX-4100N | MX-4101N | MX-5001N Operation Manual Suite - Page 351
, you can give priority to a print job that is waiting to be printed and print it ahead of the other jobs. JOB STATUS Press the [JOB STATUS] key. 1 (1) (2) Give the desired job priority. Print Job Scan to Fax Job Internet Fax (1) Touch the [Print Job] tab. Job Queue Computer01 Computer02 - Sharp MX-5001N | MX-4100N | MX-4101N | MX-5001N Operation Manual Suite - Page 352
PRINTER CANCELING A PRINT JOB A job being printed, a job waiting to be printed, or a spooled job can be canceled. JOB STATUS Press the [JOB STATUS] key. 1 (1) (2) Cancel the job. Print Job Scan to Fax Job Internet Fax (1) Touch the [Print Job] tab. Job Queue Computer01 Computer02 - Sharp MX-5001N | MX-4100N | MX-4101N | MX-5001N Operation Manual Suite - Page 353
Press the [JOB STATUS] key. 1 Print Job Scan to Fax Job Internet Fax Display details on the print job for which Job Queue Computer01 Sets / /Delete (1) (2) 3 Detail Computer01 Data : File-01.tiff 020 / 000 Color / B/W : Full Color 11x17 Paper : Plain Paper Select OK Paper Empty - Sharp MX-5001N | MX-4100N | MX-4101N | MX-5001N Operation Manual Suite - Page 354
APPENDIX PRINTER DRIVER SPECIFICATION LIST Function PCL6 PCL5c Frequently used Copies functions Orientation 1-999 Yes N-Up Number of pages 2,4,6,8,9,16 Order Selectable Border On/Off 2-Sided Print Yes Fit To Page Yes Binding Edge Selectable Black and White Print Yes Staple - Sharp MX-5001N | MX-4100N | MX-4101N | MX-5001N Operation Manual Suite - Page 355
and 4-Up printing can be used in Windows 98. *4 Only Mac OS X v10.4.11 and v10.5 to 10.5.1 can be used. *5 Can be used when a finisher or saddle stitch finisher is installed. (To use the punch function, a punch module must be also installed.) *6 Can be used when a saddle stitch finisher is installed - Sharp MX-5001N | MX-4100N | MX-4101N | MX-5001N Operation Manual Suite - Page 356
LINE IS BUSY 4-29 • WHEN A COMMUNICATION ERROR OCCURS 4-29 • FAX DESTINATION CONFIRMATION MODE 4-30 USING THE AUTOMATIC DOCUMENT FAX TO MULTIPLE DESTINATIONS (Broadcast Transmission) . . . . 4-39 SENDING A FAX DIRECTLY FROM A COMPUTER (PC-Fax 4-44 IMAGE SETTINGS 4-45 • AUTOMATICALLY SCANNING - Sharp MX-5001N | MX-4100N | MX-4101N | MX-5001N Operation Manual Suite - Page 357
FAXES 4-58 • RECEIVING A FAX 4-59 • RECEIVING A FAX MANUALLY 4-60 PRINTING A PASSWORD-PROTECTED FAX (Hold Setting For Received Data Print 4-61 CHECKING THE IMAGE BEFORE PRINTING . . . 4-62 • IMAGE CHECK SCREEN 4-63 FORWARDING RECEIVED FAXES (Fax Data Forward 4-64 FORWARDING RECEIVED FAXES - Sharp MX-5001N | MX-4100N | MX-4101N | MX-5001N Operation Manual Suite - Page 358
COMPLETED 4-129 • CHECKING A RESERVED JOB OR THE JOB IN PROGRESS 4-130 • CHECKING COMPLETED JOBS 4-131 CANCELING A FAX IN PROGRESS OR A RESERVED FAX 4-132 GIVING PRIORITY TO A RESERVED FAX JOB 4-133 CHECKING THE ACTIVITY LOG (Image Sending Activity Report 4-134 • IMAGE SENDING ACTIVITY REPORT - Sharp MX-5001N | MX-4100N | MX-4101N | MX-5001N Operation Manual Suite - Page 359
section provides information that you should know before using the machine as a fax machine. PREPARATIONS FOR FAX To use the machine as a fax, the telephone line must be connected and the type of line set. CONNECTION TO THE TELEPHONE LINE Be sure to use the provided telephone line - Sharp MX-5001N | MX-4100N | MX-4101N | MX-5001N Operation Manual Suite - Page 360
"Dial Mode Setting" in the system settings (administrator). The machine will automatically set the dial mode to can also set the "Dial Mode Setting" manually. After setting the dial mode, do not ] key ( ) on the operation panel. If the fax function will be used, and in particular if reception or - Sharp MX-5001N | MX-4100N | MX-4101N | MX-5001N Operation Manual Suite - Page 361
. Select [Default Settings], [Clock], and [Clock Adjust], and set the year, month, day, hour, and minute. If "Disabling of Clock Adjustment" has been enabled in the system settings (administrator), the date and time cannot be set. STORING THE SENDER FAX NUMBER Store the user name and fax number in - Sharp MX-5001N | MX-4100N | MX-4101N | MX-5001N Operation Manual Suite - Page 362
Base screen of fax mode Address book screen Scan Internet Fax Address Book Original Fax Scan: USB Mem. Scan PC Scan Auto Send: Auto Direct TX Sub Address Exposure Auto Resolution Standard Address Review Special Modes File Quick File Preview Auto Reception Fax Memory:100% 5 10 15 - Sharp MX-5001N | MX-4100N | MX-4101N | MX-5001N Operation Manual Suite - Page 363
DOCUMENT FILING Speaker Resend Scan Internet Fax Fax USB Mem. Scan PC Scan Address Book Original Scan: Auto Send: Auto Direct TX Sub Address Exposure Auto Resolution Standard Address Review Special Modes File Quick File Preview Auto Reception Fax Memory:100% (9) (10) (11) (12 - Sharp MX-5001N | MX-4100N | MX-4101N | MX-5001N Operation Manual Suite - Page 364
the [OK] key. Scan Internet Fax Fax USB Mem. Scan PC Scan Address Book Original Scan: Auto Send: Auto Direct TX Sub Address Exposure Auto Resolution Standard Address Review Special Modes File Quick File Preview Auto Reception Fax Memory:100% Function Review Erase : Edge:½inch - Sharp MX-5001N | MX-4100N | MX-4101N | MX-5001N Operation Manual Suite - Page 365
OF FAX MODE (page 4-8) (4) [Address Review] key page, a fax number can be obtained from a global address book. ☞ RETRIEVING A DESTINATION FROM A GLOBAL ADDRESS BOOK (page 4-21) (7) [Sub Address] key Touch this key to enter a sub-address and passcode for F-code transmission. ☞ F-CODE DIALING (page - Sharp MX-5001N | MX-4100N | MX-4101N | MX-5001N Operation Manual Suite - Page 366
page 4-17) • System Settings: Address Book (page 7-16) This is used to store fax numbers in one-touch keys. • System Settings (Administrator): The Number of Direct Address Keys Displayed Setting This is used to change the default 10 15 Condition Settings Address Review Address Entry Global Address - Sharp MX-5001N | MX-4100N | MX-4101N | MX-5001N Operation Manual Suite - Page 367
Condition Settings AAA AAA BBB BBB 1 Address Review 2 CCC CCC DDD DDD Address Entry Global Address Search EEE EEE GGG GGG FFF FFF HHH HHH III III JJJ JJJ Sort Address Preview Freq. ABCD EFGH IJKL MNOP QRSTU VWXYZ etc. Auto Reception Fax Memory:100% Index tabs The destinations can be - Sharp MX-5001N | MX-4100N | MX-4101N | MX-5001N Operation Manual Suite - Page 368
to send. Speaker Resend Scan Internet Fax Fax USB Mem. Scan PC Scan Address Book Original Scan: Auto 8½x11 Send: Auto Direct TX Sub Address Exposure Auto Resolution Standard Address Review Special Modes File Quick File Preview Auto Reception Fax Memory:100% or • [Address Book - Sharp MX-5001N | MX-4100N | MX-4101N | MX-5001N Operation Manual Suite - Page 369
THE RESOLUTION (page 4-55) Special mode settings Scan Internet Fax Fax USB Mem. Scan PC Scan Address Book Original Scan: Auto 8½x11 Send: Auto Direct TX Exposure Auto Sub Address Resolution Standard Address Review Special Modes File Quick File Preview Auto Reception Fax Memory:100 - Sharp MX-5001N | MX-4100N | MX-4101N | MX-5001N Operation Manual Suite - Page 370
to start scanning and transmission: When sending a fax normally (memory transmission) (1) Press the [BLACK & WHITE START] key. (2) When scanning is finished settings are cleared. To cancel scanning... Press the [STOP] key ( ). System Settings (Administrator): Default Display Settings The settings can - Sharp MX-5001N | MX-4100N | MX-4101N | MX-5001N Operation Manual Suite - Page 371
number. 1234567890- Scan Internet Fax Address Book Original Fax Scan: Pause Next Address USB Mem. Scan PC Scan Auto 8½x11 Send: Auto Direct TX Exposure Auto Sub Address Resolution Standard Address Review Special Modes File Quick File Preview Auto Reception Fax Memory:100% Touch - Sharp MX-5001N | MX-4100N | MX-4101N | MX-5001N Operation Manual Suite - Page 372
AAA AAA BBB BBB 1 Address Review 2 CCC CCC DDD DDD Address Entry Global Address Search EEE EEE GGG GGG FFF FFF HHH HHH III III JJJ JJJ Sort Address Preview Freq. ABCD EFGH IJKL MNOP QRSTU VWXYZ etc. Auto Reception Fax Memory:100% When destinations of other scan modes are stored in - Sharp MX-5001N | MX-4100N | MX-4101N | MX-5001N Operation Manual Suite - Page 373
key of that destination. 1 Scan Internet Fax Fax USB Mem. Scan PC Scan Address Book Original Scan: Auto 8½x11 Send: Auto Direct TX Exposure Auto Sub Address Resolution Standard Address Review Special Modes File Quick File Preview Auto Reception Fax Memory:100% Touch the [Address - Sharp MX-5001N | MX-4100N | MX-4101N | MX-5001N Operation Manual Suite - Page 374
been entered, you can display and check the destinations. You can also delete a destination (cancel selection of the destination). 1 5 10 15 Condition Settings Address Review Address Entry Global Address Search Sub Address To AAA AAA CCC CCC EEE EEE GGG GGG III III Cc BBB BBB DDD DDD FFF FFF - Sharp MX-5001N | MX-4100N | MX-4101N | MX-5001N Operation Manual Suite - Page 375
Scan Internet Fax Fax USB Mem. Scan PC Scan Address Book Original Scan: Auto 8½x11 Send: Auto Direct TX Exposure Auto Sub Address Resolution Standard Address Review Special Modes File Quick File Preview Auto Reception Fax Memory know the search number, print the one-touch address - Sharp MX-5001N | MX-4100N | MX-4101N | MX-5001N Operation Manual Suite - Page 376
pages, you can look up a destination fax number in a global address book. (2) Open the global address search screen. 1 5 10 15 Condition Settings Address Review appears, enter your user name and password. (2) Touch page 1-79) in "1. BEFORE USING THE MACHINE". How to search Enter a maximum of 64 - Sharp MX-5001N | MX-4100N | MX-4101N | MX-5001N Operation Manual Suite - Page 377
Review add more Fax User 1 Exit The information stored in the global address book is automatically entered. (The settings can be changed if needed. For detailed information on each item, see "Address Control" (page 7-16) in "7. SYSTEM SETTINGS".) However, configure the items below manually errors - Sharp MX-5001N | MX-4100N | MX-4101N | MX-5001N Operation Manual Suite - Page 378
Resend Scan Internet Fax Fax USB Mem. Scan PC Scan Address Book Original Scan: Auto 8½x11 Send: Auto Direct TX Exposure Auto Sub Address Resolution Standard Address Review Special Modes File Quick File Preview Auto Reception Fax Memory:100% Touch the [Resend] key. 2 Resend No.01 - Sharp MX-5001N | MX-4100N | MX-4101N | MX-5001N Operation Manual Suite - Page 379
telephone service Number to be dialed XXX Entry Using the numeric keys XXX Pause 010 010 Country code Area code Number of other party 00 CCC CCC XX XXXX Using a one-touch key System Settings (Administrator): Pause Time Setting This is used to set the length of pauses. The default - Sharp MX-5001N | MX-4100N | MX-4101N | MX-5001N Operation Manual Suite - Page 380
ERROR OCCURS (page 4-29) - The machine is already using the line to send or receive a fax. - Another fax transmission was reserved ahead of your fax. - One of the following functions is being used for transmission. Broadcast transmission, F-code transmission, timer transmission, Dual Page Scan - Sharp MX-5001N | MX-4100N | MX-4101N | MX-5001N Operation Manual Suite - Page 381
☞ USING THE DOCUMENT GLASS TO SEND A FAX IN DIRECT TRANSMISSION MODE (page 4-36) 1 Scan Address Book Direct TX Sub Address Address Review Transmission • When transmission in direct transmission mode ends, the mode automatically changes back to memory transmission mode. • When the document glass - Sharp MX-5001N | MX-4100N | MX-4101N | MX-5001N Operation Manual Suite - Page 382
11" (A4) B4 A4 Reduced size B4 8-1/2" x 14", 8-1/2" x 11"R (A4R) A4R Ratio 1 : 0.84 1 : 0.71 1 : 0.84 System Settings (Administrator): Auto Reduction Sending Setting The factory default setting is automatic reduction enabled. If this setting is disabled, the image will be sent at full size and - Sharp MX-5001N | MX-4100N | MX-4101N | MX-5001N Operation Manual Suite - Page 383
be displayed or the original size may not appear. In this event, manually set the correct original size. ☞ Specifying the original scan size (by paper size) (page 4-48) ☞ Specifying the original scan size (by numerical values) (page 4-50) STANDARD SIZES Standard sizes are sizes that the machine can - Sharp MX-5001N | MX-4100N | MX-4101N | MX-5001N Operation Manual Suite - Page 384
interval. This function only operates in memory transmission mode. To cancel transmission... Cancel the transmission from the job status screen. ☞ CANCELING A FAX IN PROGRESS OR A RESERVED FAX (page 4-132) System Settings (Administrator): Recall in Case of Communication Error This is used to set the - Sharp MX-5001N | MX-4100N | MX-4101N | MX-5001N Operation Manual Suite - Page 385
the [Global Address Search] key cannot be touched. • Transmission using the speaker key A destination cannot be specified after the [Speaker] key is pressed. System Settings (Administrator): Fax Dest. Confirmation Mode This setting is used to have a destination confirmation message appear when - Sharp MX-5001N | MX-4100N | MX-4101N | MX-5001N Operation Manual Suite - Page 386
cannot both be used to scan the original pages. (2) Enter the destination fax number. 2 5 10 15 Condition Settings Address Review Address Entry Global Address Search fax reception is completed. • If the memory becomes full while the originals are being scanned, a message will appear and scanning - Sharp MX-5001N | MX-4100N | MX-4101N | MX-5001N Operation Manual Suite - Page 387
"ENTERING DESTINATIONS" (page 4-16). 3 Scan Internet Fax Address Book Original Fax USB Mem. Scan PC Scan Scan: Auto 8½x11 Send: Auto Direct TX Sub Address Exposure Auto Resolution Standard Address Review Special Modes File Quick File Preview Auto Reception Fax Memory:100% Touch - Sharp MX-5001N | MX-4100N | MX-4101N | MX-5001N Operation Manual Suite - Page 388
Memory, Original Count, File, Quick File, Memory Box, 2-Sided Original Scanning, Global Address Search • Resending will not take place when a direct transmission is not successful due to a communication error or other reason. • If a fax . ☞CHECKING THE STATUS OF FAX JOBS (page 4-125) 4-33 Contents - Sharp MX-5001N | MX-4100N | MX-4101N | MX-5001N Operation Manual Suite - Page 389
, the automatic document feeder and the document glass cannot both be used to scan the original pages. (2) Enter the destination fax number. 2 5 10 15 Condition Settings Address Review Address Entry Global Address Search Sub Address To AAA AAA CCC CCC EEE EEE GGG GGG III III Cc BBB BBB DDD DDD - Sharp MX-5001N | MX-4100N | MX-4101N | MX-5001N Operation Manual Suite - Page 390
key can be touched to change the exposure, resolution, scan size, and send size for each original page scanned. However, when "2in1" or "Card Shot" is selected will take place after fax reception is completed. • If the memory becomes full while the originals are being scanned, a message will appear - Sharp MX-5001N | MX-4100N | MX-4101N | MX-5001N Operation Manual Suite - Page 391
TO SEND A FAX IN DIRECT TRANSMISSION MODE When sending a fax from the document glass in direct transmission mode, only one page can be detection of the document size. (3) (2) Enter the destination fax number. 5 10 15 Condition Settings Address Review To AAA AAA CCC CCC Cc BBB BBB DDD DDD - Sharp MX-5001N | MX-4100N | MX-4101N | MX-5001N Operation Manual Suite - Page 392
FACSIMILE 3 Scan Internet Fax Address Book Original Fax USB Mem. Scan PC Scan Scan: Auto 8½x11 Send: Auto Direct TX Sub Address Exposure Auto Resolution Standard Address Review Special Modes File Quick File Preview Auto Reception Fax Memory:100% Touch the [Direct TX] key. Press - Sharp MX-5001N | MX-4100N | MX-4101N | MX-5001N Operation Manual Suite - Page 393
place without scanning the original into memory. • A destination that includes an F-code (sub-address and passcode) cannot be used. • A one-touch key that has multiple destinations or has a non-fax destination cannot be used. System Settings (Administrator): Speaker Settings The default volume level - Sharp MX-5001N | MX-4100N | MX-4101N | MX-5001N Operation Manual Suite - Page 394
group keys, see "Address Control" (page 7-16) in "7. SYSTEM SETTINGS". When a group key is used to dial, the number of fax numbers that are dialed is the group key. When a group key that has 10 destinations is used, 10 fax numbers are dialed. Place the original. Place the original face up in the - Sharp MX-5001N | MX-4100N | MX-4101N | MX-5001N Operation Manual Suite - Page 395
in a global address book. For more information, see "ENTERING DESTINATIONS" (page 4-16). • It is convenient to use a group key to enter the administrator), the [Next Address] key must be touched before entering the next destination. Fax number entered [Next Address] with the numeric keys key Fax - Sharp MX-5001N | MX-4100N | MX-4101N | MX-5001N Operation Manual Suite - Page 396
START] key. Repeat until all pages have been scanned and then touch the [Read-End] key. A beep will sound to indicate that scanning is finished. To cancel scanning... Press the [STOP] key ( ). • A broadcast transmission takes place by memory transmission only. • A broadcast transmission can - Sharp MX-5001N | MX-4100N | MX-4101N | MX-5001N Operation Manual Suite - Page 397
transmission key will appear in each of those modes. (1) (2) Display details on the broadcast Print Job Scan to Fax Job transmission. Address Broadcast0001 Start Time Pages Status 10:00 04/01 010/003 NG000000 Job Queue (1) Touch the key of the completed broadcast Broadcast0002 10:05 04 - Sharp MX-5001N | MX-4100N | MX-4101N | MX-5001N Operation Manual Suite - Page 398
002 DDD DDD 010 EEE EEE Start Time Status 10:01 04/01 NG00000 10:10 04/01 NG00000 Resend to unsuccessful destinations. OK (1) Touch the or was stored as confidential file, a password entry screen will appear after you touch the [Retry] key. Enter the password. • If the [All Destinations] key - Sharp MX-5001N | MX-4100N | MX-4101N | MX-5001N Operation Manual Suite - Page 399
in a computer can be transmitted via the machine as a fax. Faxes are sent using the PC-Fax function in the same way as documents are printed. Select the PC-Fax driver as the printer driver on your computer and then select the Print command in the software application. Image data for transmission - Sharp MX-5001N | MX-4100N | MX-4101N | MX-5001N Operation Manual Suite - Page 400
select the setting. Scan Internet Fax Fax USB Mem. Scan PC Scan Address Book Original Scan: Auto Send: Auto Direct TX Exposure Auto Sub Address Resolution Standard Address Review Special Modes File Quick File Preview Auto Reception Fax Memory:100% (1) (2) (3) (1) [Original] key - Sharp MX-5001N | MX-4100N | MX-4101N | MX-5001N Operation Manual Suite - Page 401
both sides of the document. Transmission 2-sided original Front and back are sent as two pages 1 Touch the [Original] key. ☞ IMAGE SETTINGS (page 4-45) Fax/Original OK Scan Size Auto 8½x11 100% Send Size Auto 2-Sided Booklet 2-Sided Tablet Image Orientation Specify the binding style of - Sharp MX-5001N | MX-4100N | MX-4101N | MX-5001N Operation Manual Suite - Page 402
indicated as the send size. Scan Internet Fax Address Book Original Fax Scan: USB Mem. Scan PC Scan Auto 8½x11 Send: Auto Direct TX Exposure Auto Sub Address Resolution Standard Address Review Special Modes File Quick File Preview Auto Reception Fax Memory:100% In the above screen - Sharp MX-5001N | MX-4100N | MX-4101N | MX-5001N Operation Manual Suite - Page 403
of the [Original] key. ☞ IMAGE SETTINGS (page 4-45) 2 Fax/Original OK Scan Size Auto 8½x11 100% Send Size Auto 2-Sided Booklet 2-Sided Tablet Image Orientation Touch the [Scan Size] key. 3 Fax/Original Auto Manual 5½x8½ 5½x8½R 8½x11 (1) Manual 8½x11R 8½x13(213x330) 8½x14 11x17 Long - Sharp MX-5001N | MX-4100N | MX-4101N | MX-5001N Operation Manual Suite - Page 404
4 Fax/Original OK Scan Size 5½x8½ 100% Send Size Auto 2-Sided Booklet 2-Sided Tablet Image Orientation Touch the [OK] key. FACSIMILE When [Long Size] is selected, the 2-sided scanning setting and send size cannot be changed. 4-49 Contents - Sharp MX-5001N | MX-4100N | MX-4101N | MX-5001N Operation Manual Suite - Page 405
of the [Original] key. ☞ IMAGE SETTINGS (page 4-45) 2 Fax/Original OK Scan Size Auto 8½x11 100% Send Size Auto 2-Sided Booklet 2-Sided Tablet Image Orientation Touch the [Scan Size] key. Fax/Original Auto 8½x11 Touch the [Size Input] key. OK 3 Manual 5½x8½ 5½x8½R 8½x11 8½x11R 8½x13 - Sharp MX-5001N | MX-4100N | MX-4101N | MX-5001N Operation Manual Suite - Page 406
Fax/Original Scan Size X17 Y11 2-Sided Booklet 2-Sided Tablet OK Send Size Auto Image Orientation Touch the [OK] key. The specified size appears in the [Scan Size] key. • When the scan longer that 17" (432 mm) can be scanned (maximum width 39-3/8" (1000 mm)). In this case, touch - Sharp MX-5001N | MX-4100N | MX-4101N | MX-5001N Operation Manual Suite - Page 407
. 1 Touch the [Original] key. ☞ IMAGE SETTINGS (page 4-45) 2 Fax/Original OK Scan Size Auto 8½x11 100% Send Size Auto 2-Sided Booklet 2-Sided Tablet Image Orientation Touch the [Send Size] key. (1) 3 Fax/Original Auto Manual 5½x8½ 5½x8½R 8½x11 Manual 8½x11R 8½x13(213x330) 8½x14 11x17 - Sharp MX-5001N | MX-4100N | MX-4101N | MX-5001N Operation Manual Suite - Page 408
FACSIMILE Fax/Original (1) Scan Size Auto 8½x11 129% Send Size 11x17 (2) OK 4 2-Sided Booklet 2-Sided Tablet Image Orientation Specify the [OK] key. The ratio used for reduction or enlargement of the original will appear between the "Scan Size" and the "Send Size". 4-53 Contents - Sharp MX-5001N | MX-4100N | MX-4101N | MX-5001N Operation Manual Suite - Page 409
] key. 1 The current exposure setting appears to the right of the [Exposure] key. ☞ IMAGE SETTINGS (page 4-45) Fax/Exposure 2 (1) (2) Auto Manual 1 3 5 (3) Select the exposure. OK (1) Touch the [Manual] key. (2) Adjust the exposure with the keys. When the exposure is set to [Auto], the - Sharp MX-5001N | MX-4100N | MX-4101N | MX-5001N Operation Manual Suite - Page 410
is inserted.) • When a fax is sent at [Ultra Fine], [Super Fine], or [Fine] resolution, a lower resolution will be used if the receiving machine does not have that resolution. System Settings (Administrator): Initial Resolution Setting This is used to change the default resolution setting. 4-55 - Sharp MX-5001N | MX-4100N | MX-4101N | MX-5001N Operation Manual Suite - Page 411
Scan Internet Fax Fax USB Mem. Scan PC Scan Address Book Original Scan: Auto 8½x11 Send: Auto Direct TX Exposure Auto Sub Address Resolution Standard Address Review Special Modes File Quick File Preview Auto Reception Fax Memory (page 4-57). System settings (administrator): Default - Sharp MX-5001N | MX-4100N | MX-4101N | MX-5001N Operation Manual Suite - Page 412
page or the next page. • Page number display: This shows the total number of pages and the current page number. You can touch the current page number key and enter a number with the numeric keys to go to that page number. (3) [Function Rev.] key Touch to check special mode settings or scan - Sharp MX-5001N | MX-4100N | MX-4101N | MX-5001N Operation Manual Suite - Page 413
displayed in the base screen. Scan Internet Fax Address Book Original Fax Scan: USB Mem. Scan PC Scan Auto Send: Auto Direct TX Sub Address Exposure Auto Resolution Standard Address Review Special Modes File Quick File Preview Auto Reception Fax Memory:100% This shows the current - Sharp MX-5001N | MX-4100N | MX-4101N | MX-5001N Operation Manual Suite - Page 414
after loading paper. • When received faxes cannot be printed, the faxes can be forwarded to another fax machine. ☞FORWARDING RECEIVED FAXES (Fax Data Forward) (page 4-64) • System Settings (Administrator): Duplex Reception Setting This is used to have received faxes printed on both sides of the - Sharp MX-5001N | MX-4100N | MX-4101N | MX-5001N Operation Manual Suite - Page 415
appears. Telephone mode. Speaker Resend Scan Internet Fax Address Book Original Fax Scan: USB Mem. Scan PC Scan Auto Send: Auto Speaker Volume Exposure Auto Resolution Standard Address Review Special Modes File Quick File Fax Memory:100% Fax Manual Reception • When a call is - Sharp MX-5001N | MX-4100N | MX-4101N | MX-5001N Operation Manual Suite - Page 416
(administrator), a password can be entered to display the received data list screen. If you wish to check an image before printing it, continue from step 2 on the next page. • The received faxes will be retained in memory regardless of whether they were received automatically or manually. • If "Fax - Sharp MX-5001N | MX-4100N | MX-4101N | MX-5001N Operation Manual Suite - Page 417
Image Check Setting" is enabled* in the system settings (administrator), you can check a received image in the touch panel before printing it out. When this function is enabled, follow the steps below to print a received image. * The factory default setting is disabled. Depending on the size of the - Sharp MX-5001N | MX-4100N | MX-4101N | MX-5001N Operation Manual Suite - Page 418
(4) "Display Rotation" key This rotates the image right or left by 90 degrees. The rotation applies to all pages in the file, not just the displayed page. (5) [Print] key Touch to start printing. (6) Display zoom key Use this to set the zoom ratio of the displayed image. Changes from the left in - Sharp MX-5001N | MX-4100N | MX-4101N | MX-5001N Operation Manual Suite - Page 419
because the transmission was canceled or an error occurred, the fax will be held in memory until it can be printed. • All faxes received are forwarded. Note, however, that faxes received to an F-code confidential memory box cannot be forwarded. • If a password entry screen appears after touching the - Sharp MX-5001N | MX-4100N | MX-4101N | MX-5001N Operation Manual Suite - Page 420
of reception cannot be printed on the faxes. ("Receiving Date & Time Print" is disabled.) CONFIGURING INBOUND ROUTING SETTINGS All inbound routing settings are configured in the Web pages. For the procedure for accessing the Web pages, see the Quick Start Guide. The following explanation assumes - Sharp MX-5001N | MX-4100N | MX-4101N | MX-5001N Operation Manual Suite - Page 421
. (1) Click [Sender Number/Address Registration] in the [Inbound Routing Settings] menu in the Web page. (2) Enter the sender address in "Internet Fax Address" or "Fax Number" as appropriate, and click the [Add to List] button. 2 The entered address will be added to the "Address to be Entered - Sharp MX-5001N | MX-4100N | MX-4101N | MX-5001N Operation Manual Suite - Page 422
page menu and click the [Add] button. (2) Enter a "Table Name". (3) Select the line used for reception. (4) Select the sender whose faxes will be forwarded. • To forward all received faxes list and click the [Add] button. (5) Select event, change the file format to PDF. • Up to three forwarding day - Sharp MX-5001N | MX-4100N | MX-4101N | MX-5001N Operation Manual Suite - Page 423
function, enable the forwarding tables that you wish to use from among the stored tables. (1) Click [Inbound Routing Settings] in the Web page menu. (2) Select [Always Forward] or [Forward on Selected Day & Time] from the forwarding table. The forwarding permission settings that appear here are - Sharp MX-5001N | MX-4100N | MX-4101N | MX-5001N Operation Manual Suite - Page 424
) (17) 2 Select Memory Box Polling 2 (1) [Program] key ☞ STORING FAX OPERATIONS (Program) (page 4-71) (2) [Erase] key ☞ ERASING PERIPHERAL SHADOWS ON THE IMAGE (Erase) (page 4-73) (3) [Dual Page Scan] key ☞ TRANSMITTING AN ORIGINAL AS TWO SEPARATE PAGES (Dual Page Scan) (page 4-75) (4) [Timer - Sharp MX-5001N | MX-4100N | MX-4101N | MX-5001N Operation Manual Suite - Page 425
☞ CHANGING THE PRINT SETTINGS FOR THE TRANSACTION REPORT (Transaction Report) (page 4-95) (15) [Own Name Select] key ☞ TEMPORARILY CHANGING THE SENDER INFORMATION (Own Name Select) (page 4-98) (16) [Memory Box] key ☞ SENDING A FAX WHEN ANOTHER MACHINE POLLS YOUR MACHINE (Polling Memory) (page 4-102 - Sharp MX-5001N | MX-4100N | MX-4101N | MX-5001N Operation Manual Suite - Page 426
program, the settings can be retrieved and used for a fax job by means of a simple operation. For example, Page Scan, Job Build, Mixed Size Original, Slow Scan Mode, Original Count, Verif. Stamp, 2in1 F-code communication: A destination that includes an F-code can be stored to perform an F-code - Sharp MX-5001N | MX-4100N | MX-4101N | MX-5001N Operation Manual Suite - Page 427
the [OK] key. 1 2 4 Program : Program C 0123456789 Scan Internet Fax Original Exposure Fax Scan: Auto USB Mem. Scan PC Scan Auto 8½x11 Send: Auto Resolution Standard Address Review Special Modes File Quick File Preview Auto Reception Fax Memory:100% Select additional settings. When - Sharp MX-5001N | MX-4100N | MX-4101N | MX-5001N Operation Manual Suite - Page 428
The function does not detect shadows and erase only the shadows.) Scanning a thick book Not using the erase function Using the erase , or face down on the document glass. 2 Enter the destination fax number. ☞ ENTERING DESTINATIONS (page 4-16) Select the special modes. 3 (1) Touch the [Special - Sharp MX-5001N | MX-4100N | MX-4101N | MX-5001N Operation Manual Suite - Page 429
Fax pages in the document feeder tray, all pages are scanned. A beep will sound to indicate that scanning is finished. • If you are scanning the original on the document glass, scan each page one page at a time. 5 When scanning Settings (Administrator): Erase Width Adjustment The default erase - Sharp MX-5001N | MX-4100N | MX-4101N | MX-5001N Operation Manual Suite - Page 430
document as separate pages. Example: Faxing the left and right pages of a book Book or bound document The left and right pages are sent as two pages. Example: Original scan size 11" x 17" (A3) x 1 page Transmitted image 8-1/2" x 11" (A4) x 2 pages • When using dual page scan, the original must - Sharp MX-5001N | MX-4100N | MX-4101N | MX-5001N Operation Manual Suite - Page 431
FACSIMILE 3 Fax/Special Modes Program Timer Job Build Original Count (2) Erase 2in1 Mixed Size Original File Dual Page Scan Card Shot Slow Scan Mode Quick File (3) OK 1 2 Select Dual Page Scan. (1) Touch the [Special Modes] key. ☞ SPECIAL MODES (page 4-69) (2) Touch the [Dual Page Scan] key - Sharp MX-5001N | MX-4100N | MX-4101N | MX-5001N Operation Manual Suite - Page 432
you must scan the original into memory when you scanned original and settings are stored on the built-in hard drive.) 1 Place the original. Place the original face up in the document feeder tray, or face down on the document glass. 2 Enter the destination fax number. ☞ ENTERING DESTINATIONS (page - Sharp MX-5001N | MX-4100N | MX-4101N | MX-5001N Operation Manual Suite - Page 433
pages in the document feeder tray, all pages are scanned. 5 A beep will sound to indicate that scanning is finished. • If you are scanning the original on the document glass, scan each page one page at a time. When scanning PRIORITY TO A RESERVED FAX JOB (page 4-133) To cancel timer transmission... Touch the - Sharp MX-5001N | MX-4100N | MX-4101N | MX-5001N Operation Manual Suite - Page 434
shown below. Originals Document feeder tray Place the originals face up. Portrait orientation 1 1 1 2 Landscape orientation 1 2 1 1 1 Document glass Place the originals face down. 2 Enter the destination fax number. ☞ ENTERING DESTINATIONS (page 4-16) 4-79 Contents - Sharp MX-5001N | MX-4100N | MX-4101N | MX-5001N Operation Manual Suite - Page 435
key. 4 Scan Internet Fax Fax USB Mem. Scan PC Scan Address Book Original Scan: Auto 8½x11 Send: Auto Direct TX Exposure Auto Sub Address Resolution Standard Address Review Special Modes File Quick File Preview Auto Reception Fax Memory:100% (1) (2) Fax/Original OK 5 Scan Size - Sharp MX-5001N | MX-4100N | MX-4101N | MX-5001N Operation Manual Suite - Page 436
is used to dial. • The 2in1 function cannot be used when the original is other than 8-1/2" x 11" (A4) or 5-1/2" x 8-1/2" (B5 or A5) size. • When the scan size of the original is specified by numerical values, this function cannot be used. To cancel 2in1... Touch the [2in1] key in the screen of - Sharp MX-5001N | MX-4100N | MX-4101N | MX-5001N Operation Manual Suite - Page 437
transmission When using card shot, the original must be scanned on the document glass. Place the original face down on the document glass. 1 2 Enter the destination fax number. ☞ ENTERING DESTINATIONS (page 4-16) Select the special modes. 3 (1) Touch the [Special Modes] key. (2) Touch the [Card - Sharp MX-5001N | MX-4100N | MX-4101N | MX-5001N Operation Manual Suite - Page 438
FACSIMILE Fax/Special Modes Card Shot (1) (A) (B) (2) OK Cancel the keys. (A) To return the original size to the default size, touch the [Size Reset] key. (B) To original" (page 4-52). Press the [BLACK & WHITE START] key to scan the front of the card. 5 To cancel scanning... Press the - Sharp MX-5001N | MX-4100N | MX-4101N | MX-5001N Operation Manual Suite - Page 439
[Read-End]. Touch the [Read-End] key. 7 Configure Read-End If you will continue by scanning the front of the card, you can touch the [Configure] key to change the exposure, resolution, scan size, and send size. • The ratio cannot be specified and "Rotation Sending Setting" cannot be selected - Sharp MX-5001N | MX-4100N | MX-4101N | MX-5001N Operation Manual Suite - Page 440
sets. 1 101 Transmission 1 Up to 999 pages can be scanned. Note that when the memory is being used for other jobs, fewer pages can be scanned. Indicator 1 line 1 2 Enter the destination fax number. ☞ ENTERING DESTINATIONS (page 4-16) 3 (2) Fax/Special Modes Program Timer Job Build - Sharp MX-5001N | MX-4100N | MX-4101N | MX-5001N Operation Manual Suite - Page 441
is used in combination with 2in1 in the special modes, only the exposure can be changed when scanning each even-numbered page of the original pages. • If the memory becomes full during scanning, a message will appear and the transmission will be canceled. • This function cannot be used in direct - Sharp MX-5001N | MX-4100N | MX-4101N | MX-5001N Operation Manual Suite - Page 442
(B4) (B4) 11" x 17" (A3) 2 Enter the destination fax number. ☞ ENTERING DESTINATIONS (page 4-16) 3 Fax/Special Modes Program Timer Job Build Original Count (2) Erase 2in1 Mixed Size Original File Dual Page Scan Card Shot Slow Scan Mode Quick File (3) OK 1 2 Select the mixed size original - Sharp MX-5001N | MX-4100N | MX-4101N | MX-5001N Operation Manual Suite - Page 443
[STOP] key ( ). FACSIMILE • Once mixed size originals has been selected, an original scan size cannot be specified. • When mixed size originals are set, automatic duplex scanning cannot be used (except MX-4101N/5001N). • When the mixed size original setting is selected, rotation sending does not - Sharp MX-5001N | MX-4100N | MX-4101N | MX-5001N Operation Manual Suite - Page 444
the document guides slowly. 1 1 If the originals are inserted with too much force, they may crumple and misfeed. 2 Enter the destination fax number. ☞ ENTERING DESTINATIONS (page 4-16) 3 Fax/Special Modes Program Timer Job Build Original Count (2) (3) OK Erase 2in1 Dual Page Scan 1 Card - Sharp MX-5001N | MX-4100N | MX-4101N | MX-5001N Operation Manual Suite - Page 445
[BLACK & WHITE START] key. Scanning begins. A beep will sound to indicate that scanning is finished. 4 To cancel scanning... Press the [STOP] key ( ). When this function is selected, automatic 2-sided scanning is not possible. To cancel slow scan mode... Touch the [Slow Scan Mode] key in the screen - Sharp MX-5001N | MX-4100N | MX-4101N | MX-5001N Operation Manual Suite - Page 446
the indicator line on the tray. 2 Enter the destination fax number. ☞ ENTERING DESTINATIONS (page 4-16) 3 (2) Fax/Special Modes Program Timer Job Build Original Count Erase 2in1 Mixed Size Original File Dual Page Scan Card Shot Slow Scan Mode Quick File (3) OK 1 2 Select the original count - Sharp MX-5001N | MX-4100N | MX-4101N | MX-5001N Operation Manual Suite - Page 447
[Read-End] key is touched. • The message on the screen shows the number of sheets scanned in (A), and the number of pages (sheet sides) scanned in (B). For example, if both sides of one original sheet are scanned, "1" will appear in (A) and "2" will appear in (B). If this step is not performed for - Sharp MX-5001N | MX-4100N | MX-4101N | MX-5001N Operation Manual Suite - Page 448
scanned using the automatic document feeder, allowing you to verify that all originals were correctly scanned. Originals Position of stamp Originals are scanned fax number. ☞ ENTERING DESTINATIONS (page 4-16) (3) Fax/Special Modes 3 Verif. Stamp Own Name Select Transaction Report Memory - Sharp MX-5001N | MX-4100N | MX-4101N | MX-5001N Operation Manual Suite - Page 449
. • If an error occurs during scanning, an original that was not scanned may be stamped. page 1-75) in "1. BEFORE USING THE MACHINE". To cancel the stamp function... Touch the [Verif. Stamp] key in the screen of step 3 so that it is no longer highlighted. System Settings (Administrator): Default - Sharp MX-5001N | MX-4100N | MX-4101N | MX-5001N Operation Manual Suite - Page 450
] key. ☞ SPECIAL MODES (page 4-69) Fax/Special Modes Transaction Report (1) (2) OK Cancel OK Select print conditions. (1) Select the print conditions. (2) Touch the [OK] key. 4 Always Print Print at Error Print Original Image Do not Print • The print conditions for a transaction report - Sharp MX-5001N | MX-4100N | MX-4101N | MX-5001N Operation Manual Suite - Page 451
Out All Report /Print Out Error Report Only/No Printed Report Receiving: Print Out All Report/Print Out Error Report Only/ No Printed Report Confidential Reception (fax mode): Print Out Notice Page /No Printed Report • System Settings (Administrator): Original Print on Transaction Report This - Sharp MX-5001N | MX-4100N | MX-4101N | MX-5001N Operation Manual Suite - Page 452
(factory default setting) Inside scanned image Sender information Originals Sender information Originals The transmitted image length will be: length of sender information + length of original image. When the fax is printed by the receiving machine, it may be reduced or divided onto two pages - Sharp MX-5001N | MX-4100N | MX-4101N | MX-5001N Operation Manual Suite - Page 453
(Own Name Select) You can select the sender information printed on a transmitted fax from a list of stored senders. Select the special modes 3 Fax/Special Modes Verif. Stamp Own Name Select Transaction Report Memory Box OK 2 Polling 2 Touch the [OK] key. System Settings (Administrator): - Sharp MX-5001N | MX-4100N | MX-4101N | MX-5001N Operation Manual Suite - Page 454
Report Memory Box OK 2 Polling 2 Select polling reception. (1) Touch the [Special Modes] key. ☞ SPECIAL MODES (page 4-69) (2) Touch the screens. keys to switch through the (3) Touch the [Polling] key so that it is highlighted. (4) Touch the [OK] key. Enter the destination fax number - Sharp MX-5001N | MX-4100N | MX-4101N | MX-5001N Operation Manual Suite - Page 455
3 Press the [BLACK & WHITE START] key. Your machine will call the other machine and initiate reception of the fax. FACSIMILE • Polling reception can be used in combination with the timer function to poll at any specified time, such as at night or when you - Sharp MX-5001N | MX-4100N | MX-4101N | MX-5001N Operation Manual Suite - Page 456
key is touched. Adjust the volume to the desired level. (3) (2) Fax/Special Modes OK 2 Verif. Stamp Own Name Select Transaction Report Memory Box 2 Polling 2 Receive the fax. (1) Touch the [Special Modes] key. ☞ SPECIAL MODES (page 4-69) (2) Touch the screens. keys to switch through the - Sharp MX-5001N | MX-4100N | MX-4101N | MX-5001N Operation Manual Suite - Page 457
MACHINE POLLS YOUR MACHINE (Polling Memory) Sending a document that has been scanned into memory when another machine polls your machine is called "Polling Memory". Prior to polling, the document that will be faxed to the other machine must be scanned into a polling memory box. This function can - Sharp MX-5001N | MX-4100N | MX-4101N | MX-5001N Operation Manual Suite - Page 458
A DOCUMENT INTO POLLING MEMORY Follow these steps to scan a document into the memory box for polling transmission ( to switch through the screens. (3) Touch the [Memory Box] key. ☞ SPECIAL MODES (page 4-69) Memory Box Polling Memory 3 Data Store Data Check Delete Data Exit Confidential - Sharp MX-5001N | MX-4100N | MX-4101N | MX-5001N Operation Manual Suite - Page 459
screen of step 4, touch the [Memory Box List] key. Press the [BLACK & WHITE START] key. Scanning begins. • If you inserted the original pages in the document feeder tray, all pages are scanned. • If you are scanning the original on the document glass, scan each page one page at a time. 7 When - Sharp MX-5001N | MX-4100N | MX-4101N | MX-5001N Operation Manual Suite - Page 460
through the screens. (3) Touch the [Memory Box] key. ☞ SPECIAL MODES (page 4-69) Memory Box Polling Memory 2 Data Store Data Check Delete the [Image Check] key. 4 Press [Image Check] to check data. Press [Print] to output data. The content of the document can be viewed in the image check - Sharp MX-5001N | MX-4100N | MX-4101N | MX-5001N Operation Manual Suite - Page 461
modes. (1) Touch the [Special Modes] key. 1 (2) Touch the keys to switch through the screens. (3) Touch the [Memory Box] key. ☞ SPECIAL MODES (page 4-69) Memory Box Polling Memory 2 Data Store Data Check Delete Data Exit Confidential Reception Data Check Touch the [Delete Data] key - Sharp MX-5001N | MX-4100N | MX-4101N | MX-5001N Operation Manual Suite - Page 462
a United Nations organization that establishes communications standards. It is a department of the International Telecommunication Union (ITU), which coordinates global telecommunications networks and services. HOW F-CODES WORK A fax that is transmitted with an F-code is received to the memory box - Sharp MX-5001N | MX-4100N | MX-4101N | MX-5001N Operation Manual Suite - Page 463
and passcode cannot be longer than 20 digits. F-CODE DIALING When performing an F-code operation, the F-code (sub-address and passcode) is appended to the fax number that is dialed. Check the F-code (sub-address and passcode) programmed in the memory box in the other machine before you perform an - Sharp MX-5001N | MX-4100N | MX-4101N | MX-5001N Operation Manual Suite - Page 464
Passcode: XXXXXXXX Reception in F-code Memory Box Print passcode: Enter BBBB The fax is printed. The F-code (sub-address and passcode) of the memory box to be used should be verified by the sender and the recipient before the fax is sent. System Settings: F-Code Memory Box (page 7-101) This is - Sharp MX-5001N | MX-4100N | MX-4101N | MX-5001N Operation Manual Suite - Page 465
has been omitted in the memory box of the other machine, (5) and (6) are not necessary. Press the [BLACK & WHITE START] key. Scanning begins. • If you inserted the original pages in the document feeder tray, all pages are scanned. 3 A beep will sound to indicate that scanning is finished. • If you - Sharp MX-5001N | MX-4100N | MX-4101N | MX-5001N Operation Manual Suite - Page 466
FACSIMILE CHECKING FAXES RECEIVED BY F-CODE CONFIDENTIAL RECEPTION When an F-code confidential fax is sent to your machine, the fax is received to the memory box specified by the F-code. To check received faxes, enter the print passcode. The machine rings and the fax is Beep received. 1 A beep - Sharp MX-5001N | MX-4100N | MX-4101N | MX-5001N Operation Manual Suite - Page 467
or need to verify the passcode, contact your dealer or nearest SHARP Service Department. System Settings (Administrator): Transaction Report Print Select Setting This setting can be used to have a transaction report printed automatically when an F-code confidential fax is received. 4-112 Contents - Sharp MX-5001N | MX-4100N | MX-4101N | MX-5001N Operation Manual Suite - Page 468
enables your machine to call another machine and initiate reception of a fax stored in an F-code memory box (polling memory) in the other machine. During the polling operation, your machine must correctly specify the F-code (sub-address and passcode) configured in the other machine or polling - Sharp MX-5001N | MX-4100N | MX-4101N | MX-5001N Operation Manual Suite - Page 469
has been omitted in the memory box of the other machine, (5) and (6) are not necessary. 3 Press the [BLACK & WHITE START] key. Your machine will call the other machine and initiate reception of the fax. • Polling multiple machines (serial polling) is not possible. • F-code polling reception can be - Sharp MX-5001N | MX-4100N | MX-4101N | MX-5001N Operation Manual Suite - Page 470
sends a fax stored in an F-code memory box (polling memory) in your machine to that machine. The other machine must correctly specify the F-code configured in your machine or transmission will not take place. The document to be transmitted must be scanned into an F-code polling memory box. The - Sharp MX-5001N | MX-4100N | MX-4101N | MX-5001N Operation Manual Suite - Page 471
Public Box Back 1 2 Touch the key of the F-code memory polling box. (1) Memory Box - Data Store 5 Once Unlimited (2) Specify the Memory Box - Data Store Memory Box List Original Exposure Scan: Auto Auto 8½x11 Send: Resolution Standard Special Modes Auto Auto Reception Fax Memory - Sharp MX-5001N | MX-4100N | MX-4101N | MX-5001N Operation Manual Suite - Page 472
all pages have been scanned and then touch the [Read-End] key. To cancel scanning... Press the [STOP] key ( ) while the original is being scanned. • If other documents have already been stored in the memory box, the document is added to the previously stored documents. • The factory default setting - Sharp MX-5001N | MX-4100N | MX-4101N | MX-5001N Operation Manual Suite - Page 473
F-code memory polling box. A document in a memory box cannot be printed while the document is being transmitted. Select the special modes. (1) Touch the [Special Modes] key. 1 (2) Touch the keys to switch through the screens. (3) Touch the [Memory Box] key. ☞ SPECIAL MODES (page 4-69) Memory - Sharp MX-5001N | MX-4100N | MX-4101N | MX-5001N Operation Manual Suite - Page 474
the screens. (3) Touch the [Memory Box] key. ☞ SPECIAL MODES (page 4-69) Memory Box Polling Memory 2 Data Store Data Check key of the F-code memory polling box that has the document you wish to delete. appears in keys that have documents stored. 4 Delete the data in the memory box? Press - Sharp MX-5001N | MX-4100N | MX-4101N | MX-5001N Operation Manual Suite - Page 475
cost of sending the fax to each of the end receiving machines. • When faxes forwarded using this function are printed at the forwarding destination, the date and time of reception cannot be printed on the faxes. ("Receiving Date & Time Print" is disabled.) System Settings: F-Code Memory Box (page - Sharp MX-5001N | MX-4100N | MX-4101N | MX-5001N Operation Manual Suite - Page 476
key. Repeat until all pages have been scanned and then touch the [Read-End] key. A beep will sound to indicate that scanning is finished. When the relay machine receives the fax, it will automatically transmit the fax to each of the end receiving machines programmed in the memory box. To cancel - Sharp MX-5001N | MX-4100N | MX-4101N | MX-5001N Operation Manual Suite - Page 477
the box in your machine. ☞ CREATING MEMORY BOXES IN THE MACHINE FOR F-CODE COMMUNICATION (page 4-108) • The end receiving machines do not need to support F-code communication. • The machine that requests a relay broadcast transmission only bears the cost of sending the fax to your machine (the relay - Sharp MX-5001N | MX-4100N | MX-4101N | MX-5001N Operation Manual Suite - Page 478
an existing extension phone to the machine. The phone can be used for voice calls and to start fax reception on the machine. As an example, you can make a phone call using the existing phone, jack on your extension phone, contact your dealer or nearest SHARP Service Department. 4-123 Contents - Sharp MX-5001N | MX-4100N | MX-4101N | MX-5001N Operation Manual Suite - Page 479
. 3 • System Settings: Receive Setting (page 7-103) To use remote fax reception, set this setting to "Manual Reception". • System Settings (Administrator): Remote Reception Number Setting This is used to change the number used for remote fax reception. The factory default setting is "5". MAKING AND - Sharp MX-5001N | MX-4100N | MX-4101N | MX-5001N Operation Manual Suite - Page 480
the job status screen. Scan Internet Fax Fax USB Mem. Scan PC Scan Address Book Original Scan: Auto Send: Auto Direct TX Exposure Auto Sub Address Resolution Standard Address Review Special Modes File Quick File Preview Sending Auto Reception Fax Memory:100% 4-125 Contents - Sharp MX-5001N | MX-4100N | MX-4101N | MX-5001N Operation Manual Suite - Page 481
stop or delete a selected job. ☞ CANCELING A FAX IN PROGRESS OR A RESERVED FAX (page 4-132) Completed job screen (1) Print Job Scan to Fax Job Internet Fax Address Broadcast0001 Start Time Pages Status 10:00 04/01 010/003 NG000000 Broadcast0002 10:05 04/01 001/001 Send OK 1 CCC CCC 1 10 - Sharp MX-5001N | MX-4100N | MX-4101N | MX-5001N Operation Manual Suite - Page 482
/01 color bar icon does not appear in the key of a job that used document filing or in the key of a transmission/reception job that was canceled.) Icon Job type Fax transmission Fax pages Shows the number of pages transmitted / total number of original pages error or other problem. The day - Sharp MX-5001N | MX-4100N | MX-4101N | MX-5001N Operation Manual Suite - Page 483
was sent from a party that has been blocked by the anti junk fax function. "NGxxxxxx" Transmission/reception was not successful because a communication error occurred (a 6-digit error code appears in xxxxxx.) "Error" An error occurred while the job was being executed. FACSIMILE 4-128 Contents - Sharp MX-5001N | MX-4100N | MX-4101N | MX-5001N Operation Manual Suite - Page 484
, the job moves to the job queue of the job status screen of scan mode. • Received fax is printed When reception is completed, the job moves to the completed jobs screen and "In Memory" appears. After the fax is printed, "Printed" appears. In addition, the job is added to the job queue of the - Sharp MX-5001N | MX-4100N | MX-4101N | MX-5001N Operation Manual Suite - Page 485
number of the destination. Name: The name of the destination. Number: The broadcast control number (3-digits). Pages: Number of pages completed / total number of pages Fax Waiting This shows information on the destinations that are waiting. A broadcast control number (3-digits) appears in front - Sharp MX-5001N | MX-4100N | MX-4101N | MX-5001N Operation Manual Suite - Page 486
010 EEE EEE Start Time Status 10:01 04/01 NG000000 10:10 04/01 NG000000 OK Retry 1 1 File Failed All fax number of each destination. Start time: Time at which communication began. Status: Description of failure (error Scan to FTP address, Scan to Network Folder address, or Scan to Desktop - Sharp MX-5001N | MX-4100N | MX-4101N | MX-5001N Operation Manual Suite - Page 487
the steps below to cancel a fax transmission that is in progress or a reserved fax job. JOB STATUS Press the [JOB STATUS] key. 1 Print Job Scan to Fax Job Internet Fax Select the fax job that you wish to Address 1 Broadcast Set Time Pages Status 10:00 04/01 020/003 Connecting Job Queue - Sharp MX-5001N | MX-4100N | MX-4101N | MX-5001N Operation Manual Suite - Page 488
of the other jobs, follow the steps below. JOB STATUS Press the [JOB STATUS] key. 1 Print Job Scan to Fax Job Internet Fax Select the fax job to which you wish to Address Broadcast Set Time Pages Status 10:00 04/01 020/003 Connecting Job Queue give priority. 0123456789 AAA AAA 10:05 04 - Sharp MX-5001N | MX-4100N | MX-4101N | MX-5001N Operation Manual Suite - Page 489
Report are erased when the report is printed, and thus it cannot be reprinted. System Settings (Administrator): Activity Report Print Select Setting This is used to set the conditions for printing activity reports. The factory default setting is not to print. The Image Sending Activity Report can be - Sharp MX-5001N | MX-4100N | MX-4101N | MX-5001N Operation Manual Suite - Page 490
in . FAIL xx (xxxx) The transaction failed due to a communication error. First 2 digits of communication error number: Error code from 00 to 99. Last 4 digits of communication error number: Code for use by service technicians. REJECTED A fax was sent from a party from which reception is blocked - Sharp MX-5001N | MX-4100N | MX-4101N | MX-5001N Operation Manual Suite - Page 491
SENDING AN IMAGE IN SCAN MODE 5-28 • CHANGING THE SUBJECT, FILE NAME, REPLY-TO, AND BODY TEXT 5-32 SENDING AN IMAGE IN USB MEMORY MODE 5-35 • SPECIFY THE FOLDER IN WHICH THE FILE WILL BE STORED 5-39 • ENTERING A FILE NAME 5-40 SENDING A FAX IN INTERNET FAX MODE. . . . . 5-41 • CHANGING THE - Sharp MX-5001N | MX-4100N | MX-4101N | MX-5001N Operation Manual Suite - Page 492
IN THE RESULT COLUMN 5-111 INTERNET FAX RECEPTION FUNCTIONS RECEIVING AN INTERNET FAX 5-112 • MANUALLY RECEIVING INTERNET FAXES 5-113 PRINTING A PASSWORD-PROTECTED FAX (Hold Setting For Received Data Print 5-114 CHECKING THE IMAGE BEFORE PRINTING . . 5-115 • IMAGE CHECK SCREEN 5-116 FORWARDING - Sharp MX-5001N | MX-4100N | MX-4101N | MX-5001N Operation Manual Suite - Page 493
requirements of the software, see the manual (PDF format) or the Readme file on the CD-ROM. For the procedures for installing the software, see the "Sharpdesk Installation Guide". Scan to Network Folder The scanned file is sent to a Network Folder on a Windows computer on the same network as the - Sharp MX-5001N | MX-4100N | MX-4101N | MX-5001N Operation Manual Suite - Page 494
FAX USB memory mode USB Memory Scan ☞ SENDING AN IMAGE IN USB MEMORY MODE (page 5-35) The scanned file is sent to and stored in a USB memory device connected to the machine. Internet fax mode To use the Internet fax function, the Internet fax expansion kit must be installed. ☞ SENDING A FAX - Sharp MX-5001N | MX-4100N | MX-4101N | MX-5001N Operation Manual Suite - Page 495
): Default Sender Set This is used to store the sender name and e-mail address that is used when a sender is not selected. Before using Internet fax Store a sender name in "Sender Name" and a sender Internet fax address in "Own Address". System Settings (Administrator): Sender Data Registration - Sharp MX-5001N | MX-4100N | MX-4101N | MX-5001N Operation Manual Suite - Page 496
stored. Among these, a combined maximum of 200 Scan to Network Folder, Scan to FTP, and Scan to Desktop addresses can be stored. Transmission in Internet fax mode: Click [Address Book] in the Web page menu and then click the [Add] button. Select [Internet Fax] or [Direct SMTP] for the [Address Type - Sharp MX-5001N | MX-4100N | MX-4101N | MX-5001N Operation Manual Suite - Page 497
key. (A) (B) Scan Internet Fax Address Book Original Fax Scan: USB Mem. Scan PC Scan Auto Send: Auto Address Entry Exposure Auto Text Send Settings Resolution 200X200dpi Address Review File Format File Color Mode Quick File Special Modes PDF Auto/Grayscale PDF Mono2 Preview - Sharp MX-5001N | MX-4100N | MX-4101N | MX-5001N Operation Manual Suite - Page 498
The machine supports Direct SMTP, which lets you directly send Internet faxes within your company without using a mail server. For the procedure for storing a Direct SMTP address in the address book, see "STORING DESTINATION ADDRESSES FOR EACH SCAN MODE IN THE ADDRESS BOOK" (page 5-6). Stored Direct - Sharp MX-5001N | MX-4100N | MX-4101N | MX-5001N Operation Manual Suite - Page 499
Address Review File Format PDF PDF (9) (10) (7) File Quick File Color Mode Special Modes Auto/Grayscale Mono2 (11) (8) Preview (12) (13) Base screen of USB memory mode Base screen of Internet fax mode (1) (2) (3) (14) (15) (8) COPY Ready to send. IMAGE SEND DOCUMENT FILING Scan - Sharp MX-5001N | MX-4100N | MX-4101N | MX-5001N Operation Manual Suite - Page 500
base screen. Base screen of scan mode Scan Internet Fax Address Book Original Address Entry Exposure Fax Scan: Auto USB Mem. Scan PC Scan Auto Send: Auto Text Send Settings Resolution 200X200dpi Address Review File Format PDF PDF File Quick File Color Mode Special Modes Auto - Sharp MX-5001N | MX-4100N | MX-4101N | MX-5001N Operation Manual Suite - Page 501
the screen, touch the [OK] key. Scan Internet Fax Address Book Original Address Entry Exposure Fax Scan: Auto USB Mem. Scan PC Scan Auto Send: Auto Text Send Settings Resolution 200X200dpi Address Review File Format PDF PDF File Quick File Color Mode Special Modes Auto/Grayscale - Sharp MX-5001N | MX-4100N | MX-4101N | MX-5001N Operation Manual Suite - Page 502
Review] key Touch this key to view a list of the selected destinations. Destination selections can be changed. ☞ CHECKING AND DELETING THE SELECTED DESTINATIONS (page 5-20) (5) [Address Entry] key Touch this key to manually Setting" in the system settings (administrator). (12) One-touch key display - Sharp MX-5001N | MX-4100N | MX-4101N | MX-5001N Operation Manual Suite - Page 503
SCAN TO DESKTOP" (page 5-7). • System Settings: Address Book (page 7-16) This is used to store Scan to E-mail and Internet fax addresses in one-touch keys. • System Settings (Administrator): The Number of Direct Address Keys Displayed Setting This is used to change the default Address Review 2 - Sharp MX-5001N | MX-4100N | MX-4101N | MX-5001N Operation Manual Suite - Page 504
FAX in the following order: search numbers (page 5-21), ascending names, descending names. also changes. Ordered by search number (default) Ascending names Descending names Freq. ABCD etc.] tab, or on a user index tab. 5 10 15 Condition Settings Address Review Address Entry Global Address Search - Sharp MX-5001N | MX-4100N | MX-4101N | MX-5001N Operation Manual Suite - Page 505
RESEND FUNCTION (page 5-27) Select settings Scan Internet Fax Address Book Original Address Entry Exposure Fax Scan: Auto USB Mem. Scan PC Scan Auto 8½x11 Send: Auto Text Send Settings Resolution 200X200dpi Address Review File Format PDF PDF File Quick File Color Mode Special - Sharp MX-5001N | MX-4100N | MX-4101N | MX-5001N Operation Manual Suite - Page 506
Fax Scan: Auto USB Mem. Scan PC Scan Auto 8½x11 Send: Auto Text Send Settings Resolution 200X200dpi Address Review File Format PDF PDF File Color Mode Auto/Grayscale Mono2 Quick File Special Modes Preview Special modes can be selected. ☞ SPECIAL MODES (page 5-71) Start scanning - Sharp MX-5001N | MX-4100N | MX-4101N | MX-5001N Operation Manual Suite - Page 507
displayed or the original size may not appear. In this event, manually set the correct original size. ☞ Specifying the original scan size (by paper size) (page 5-56) ☞ Specifying the original scan size (by numerical values) (page 5-57) STANDARD SIZES Standard sizes are sizes that the machine can - Sharp MX-5001N | MX-4100N | MX-4101N | MX-5001N Operation Manual Suite - Page 508
BBB 1 Address Review 2 CCC CCC SCAN MODE IN THE ADDRESS BOOK" (page 5-6). • For information on storing destinations for Scan to Desktop, see "STORING A DESTINATION FOR SCAN TO DESKTOP" (page 5-7). System Settings: Address Book (page 7-16) This is used to store Scan to E-mail and Internet fax - Sharp MX-5001N | MX-4100N | MX-4101N | MX-5001N Operation Manual Suite - Page 509
its one-touch key. 1 Scan Internet Fax Address Book Original Address Entry Exposure Fax Scan: Auto USB Mem. Scan PC Scan Auto 8½x11 Send: Auto Text Send Settings Resolution 200X200dpi Address Review File Format PDF PDF File Quick File Color Mode Special Modes Auto/Grayscale - Sharp MX-5001N | MX-4100N | MX-4101N | MX-5001N Operation Manual Suite - Page 510
/INTERNET FAX CHECKING AND DELETING THE SELECTED DESTINATIONS When multiple destinations have been selected, you can display and check the destinations. You can also delete a destination from the list (cancel selection of the destination). 1 5 10 15 Condition Settings Address Review Address - Sharp MX-5001N | MX-4100N | MX-4101N | MX-5001N Operation Manual Suite - Page 511
Scan Internet Fax Address Book Original Address Entry Exposure Fax Scan: Auto USB Mem. Scan PC Scan Auto 8½x11 Send: Auto Text Send Settings Resolution 200X200dpi Address Review File Format PDF PDF File Quick File Color not know the search number, print the one-touch address list - Sharp MX-5001N | MX-4100N | MX-4101N | MX-5001N Operation Manual Suite - Page 512
FAX ENTERING AN ADDRESS MANUALLY Scan to E-mail, Internet fax, Network Folder and data entry mode addresses can be manually entered. (2) Display the address input screen. 1 5 10 15 Condition Settings Address Review folder, see "SPECIFYING A NETWORK FOLDER" (page 5-23). • If you touched the [ - Sharp MX-5001N | MX-4100N | MX-4101N | MX-5001N Operation Manual Suite - Page 513
the [Folder Path] key. A text entry screen will appear. • If a user name and password are required, check with the administrator of the server and enter the user name and password. For the procedure for entering text, see "ENTERING TEXT" (page 1-79) in "1. BEFORE USING THE MACHINE". 5-23 Contents - Sharp MX-5001N | MX-4100N | MX-4101N | MX-5001N Operation Manual Suite - Page 514
you to enter a user name and password, check with your server administrator and enter the appropriate user name and password. Cancel (4) Search OK or network folder. For the procedure for entering text, see "ENTERING TEXT" (page 1-79) in "1. BEFORE USING THE MACHINE". • Up to 100 workgroups, - Sharp MX-5001N | MX-4100N | MX-4101N | MX-5001N Operation Manual Suite - Page 515
Scan to E-mail or Internet fax transmission (excluding Direct SMTP addresses). (2) Open the global address search screen. 1 5 10 15 Condition Settings Address Review your user name and password. page 1-79) in "1. BEFORE USING THE MACHINE". How to search Enter the search characters (maximum of 64 - Sharp MX-5001N | MX-4100N | MX-4101N | MX-5001N Operation Manual Suite - Page 516
File Format Color/Grayscale :PDF/Medium B/W :PDF/MMR(G4) Fax User 1 Exit Direct Address / Individual E-mail Internet Fax Search Number Scan to E-mail. Default format settings have already been configured; however, selecting format settings when you store a destination saves you the trouble - Sharp MX-5001N | MX-4100N | MX-4101N | MX-5001N Operation Manual Suite - Page 517
Address Entry Exposure Fax Scan: Auto USB Mem. Scan PC Scan Auto 8½x11 Send: Auto Text Send Settings Resolution 200X200dpi Address Review File Format PDF PDF File Quick File Color Mode Special Modes Auto/Grayscale Mono2 Preview Touch the [Resend] key. 2 Resend No.01 AAA AAA No - Sharp MX-5001N | MX-4100N | MX-4101N | MX-5001N Operation Manual Suite - Page 518
FAX TRANSMITTING AN IMAGE SENDING AN IMAGE IN SCAN MODE This section explains the basic procedure for transmission in scan mode (Scan to E-mail, Scan to FTP, Scan to Desktop, and Scan to Network Folder). When a default address is configured in "Default size manually. • Originals cannot be scanned - Sharp MX-5001N | MX-4100N | MX-4101N | MX-5001N Operation Manual Suite - Page 519
(1) (2) Scan Internet Fax Address Book Original Fax Scan: USB Mem. Scan PC Scan Auto 8½x11 Send: Auto Address Entry Exposure Auto Text Send Settings Resolution 200X200dpi Address Review File Format File Color Mode Quick File Special Modes PDF Auto/Grayscale PDF Mono2 Preview - Sharp MX-5001N | MX-4100N | MX-4101N | MX-5001N Operation Manual Suite - Page 520
will be detected automatically and scanning in full color, grayscale or Mono2 will take place. 5 • If Encrypt PDF is selected for the file format ([PDF] is selected in the format settings screen and the [Encry.] checkbox is set to ), you will be prompted to enter a password when you press the - Sharp MX-5001N | MX-4100N | MX-4101N | MX-5001N Operation Manual Suite - Page 521
If the memory becomes full while the originals are being scanned, a message will appear and scanning will stop. • When performing Scan to Administrator): Image Send Settings Use this to configure scanner transmission settings, including the default resolution and exposure settings, the default color - Sharp MX-5001N | MX-4100N | MX-4101N | MX-5001N Operation Manual Suite - Page 522
name is not changed, the name set in "Default Sender Set" in the system settings is used. If this is not configured, the reply address in [Network Settings] - [Services Settings] - [SMTP Settings] in the Web pages is used. (Administrator rights are required.) • Selections for the subject, file - Sharp MX-5001N | MX-4100N | MX-4101N | MX-5001N Operation Manual Suite - Page 523
, or Scan to Network Folder destination, go to step 9. Body Text Add 'Reply to' to Cc Send Settings OK To change "Reply-To", touch the [Reply-To] key. Subject Sub: Schedule coordination meeting File Name Material for planning meeting Reply-To 5 Body Text Add 'Reply to' to Cc If user - Sharp MX-5001N | MX-4100N | MX-4101N | MX-5001N Operation Manual Suite - Page 524
continuous support. We have attached sca Add 'Reply to' to Cc The [Add 'Reply to' to Cc] checkbox can be selected to send a Cc copy to the sender. When storing pre-set text for the subject and file name in the Web pages, up to 80 characters can be entered. • System Settings (Administrator): The - Sharp MX-5001N | MX-4100N | MX-4101N | MX-5001N Operation Manual Suite - Page 525
FAX SENDING AN IMAGE IN USB MEMORY MODE Follow the steps below to send a scanned image to a commercially available USB memory device that has been connected to the machine. This stores the file in the USB device. • Use a FAT32 USB memory with a capacity of no more than 32 GB. • When a default - Sharp MX-5001N | MX-4100N | MX-4101N | MX-5001N Operation Manual Suite - Page 526
Fax Original Fax Scan: USB Mem. Scan PC Scan Auto 8½x11 Send: Auto Exposure Auto Text Resolution 200X200dpi File Format PDF PDF Color Mode Auto/Grayscale Mono2 Switch to USB memory mode and display the image settings screen. (1) Touch the [USB Mem. Scan] tab If the [USB Mem. Scan - Sharp MX-5001N | MX-4100N | MX-4101N | MX-5001N Operation Manual Suite - Page 527
. Go to step 8. Do not disconnect the USB memory until "Sending data has been completed." appears in the touch panel. • To scan in full color, press the [COLOR START] key. To scan in black and white, press the [BLACK & WHITE START] key. If the color mode of the [COLOR START] key is set to [Auto - Sharp MX-5001N | MX-4100N | MX-4101N | MX-5001N Operation Manual Suite - Page 528
Check (page 7-25) This is used to check the connection of a USB device to the machine. • System Settings (Administrator): Scan Settings This is used to set the default color mode and file format. • System Settings (Administrator): Disable Scan Function The use of PC scan mode and USB memory mode - Sharp MX-5001N | MX-4100N | MX-4101N | MX-5001N Operation Manual Suite - Page 529
USB memory. 1 Scan Stored to File Name Internet Fax Original Fax Scan: USB Mem. Scan PC Scan Auto Send: Auto Exposure Auto Text Resolution 200X200dpi File Format PDF PDF Color For the procedure for entering text, see "ENTERING TEXT" (page 1-79) in "1. BEFORE USING THE MACHINE". • To - Sharp MX-5001N | MX-4100N | MX-4101N | MX-5001N Operation Manual Suite - Page 530
for entering text, see "ENTERING TEXT" (page 1-79) in "1. BEFORE USING THE MACHINE". Scan Stored to File Name Internet Fax Original Fax Scan: USB Mem. Scan PC Scan Auto Send: Auto Exposure Auto Text Resolution 200X200dpi File Format PDF PDF Color Mode Auto/Grayscale Mono2 Special - Sharp MX-5001N | MX-4100N | MX-4101N | MX-5001N Operation Manual Suite - Page 531
fax in Internet fax mode is explained below. This procedure can also be used to perform direct transmission by Direct SMTP. When a default address is configured in "Default Address Setting" in the system settings (administrator original, enter the original size manually. • Image rotation 8-1/2" x - Sharp MX-5001N | MX-4100N | MX-4101N | MX-5001N Operation Manual Suite - Page 532
/INTERNET FAX 3 (1) (2) Scan Internet Fax Address Book Original Address Entry Exposure Fax Scan: Auto USB Mem. Scan PC Scan Auto 8½x11 Send: Auto Send Settings Resolution 200X100dpi Address Review File Format TIFF-F File Special Modes Quick File Preview I-Fax Manual Reception - Sharp MX-5001N | MX-4100N | MX-4101N | MX-5001N Operation Manual Suite - Page 533
the result. • If the memory becomes full while the originals are being scanned, a message will appear and scanning will stop. • Storing a mail scanning... Press the [STOP] key ( ) to cancel the operation. • System Settings (Administrator): I-Fax Send Settings This is used to select Internet fax - Sharp MX-5001N | MX-4100N | MX-4101N | MX-5001N Operation Manual Suite - Page 534
, file name, and body text can be changed when performing an Internet fax transmission. Preset items can be selected or text can be directly entered. • If the subject and file name are not changed, the settings in the Web page are used. • Selections for the subject, file name, and body text are - Sharp MX-5001N | MX-4100N | MX-4101N | MX-5001N Operation Manual Suite - Page 535
FAX Entry Clear All OK Thank you for your continuous support. We have attached scanned data, which you have requested. Enter the body text and touch the [OK] key. • To select a pre-set message previously stored in the Web page, - Sharp MX-5001N | MX-4100N | MX-4101N | MX-5001N Operation Manual Suite - Page 536
for planning meeting Body Text Thank you for your continuous support. We have attached sca When storing pre-set text for the subject and file name in the Web pages, up to 80 characters can be entered. System Settings (Administrator): The Number of File Name/Subject/Body Keys Displayed Setting - Sharp MX-5001N | MX-4100N | MX-4101N | MX-5001N Operation Manual Suite - Page 537
SENDING THE SAME IMAGE TO MULTIPLE DESTINATIONS (Broadcast Transmission) The same scanned image can be sent to multiple scan modes, Internet fax mode, and fax mode destinations in a single operation. Up to 500 destinations can be selected in one broadcast operation. Transmission Originals If you - Sharp MX-5001N | MX-4100N | MX-4101N | MX-5001N Operation Manual Suite - Page 538
(2) and (3) until all destinations are selected. • To add Cc or Bcc recipients, select a recipient and touch the [Cc] key or the [Bcc] key. • If "Must Input Next Address Key at Broadcast Setting" is enabled in the system settings (administrator), touch the [Next Address] key before specifying the - Sharp MX-5001N | MX-4100N | MX-4101N | MX-5001N Operation Manual Suite - Page 539
replace it with the next page and press the [COLOR START] key or the [BLACK & 5 WHITE START] key. Repeat until all pages have been scanned and then touch the [Read-End] key. A beep will sound to indicate that scanning is finished. If Internet fax or fax destinations are included in the broadcast - Sharp MX-5001N | MX-4100N | MX-4101N | MX-5001N Operation Manual Suite - Page 540
STATUS] key. 1 (1) (1) (2) Display the jobs completed screen. Print Job Scan to Fax Job Internet Fax Address Broadcast0001 Set Time Pages Status 10:00 04/01 020/003 Connecting AAA AAA BBB BBB 10:05 04/01 000/001 Waiting 1 1 10:22 04/01 000/004 Waiting Job Queue Complete (1) Touch - Sharp MX-5001N | MX-4100N | MX-4101N | MX-5001N Operation Manual Suite - Page 541
(2) Display details on the broadcast Print Job Scan to Fax Job Internet Fax transmission. Address Start Time Pages Status (1) Touch the key of the completed broadcast Broadcast0001 Broadcast0002 10:00 04/01 010/003 NG000000 10:05 04/01 001/001 Send OK Job Queue 1 Complete transmission - Sharp MX-5001N | MX-4100N | MX-4101N | MX-5001N Operation Manual Suite - Page 542
PC-Fax driver Help. • To send an Internet fax using the PC-I-Fax function, the PC-Fax driver must be installed and then updated using the CD-ROM that accompanies the Internet fax expansion kit. For more information, see the Software Setup Guide. • This function can only be used on a Windows computer - Sharp MX-5001N | MX-4100N | MX-4101N | MX-5001N Operation Manual Suite - Page 543
the setting. Scan Internet Fax Address Book Original Fax Scan: USB Mem. Scan PC Scan Auto Send: Auto Address Entry Exposure Auto Text Send Settings Resolution 200X200dpi Address Review File Format File Color Mode Quick File Special Modes PDF Auto/Grayscale PDF Mono2 Preview - Sharp MX-5001N | MX-4100N | MX-4101N | MX-5001N Operation Manual Suite - Page 544
FAX AUTOMATICALLY SCANNING BOTH SIDES OF AN ORIGINAL (2-Sided Original) The automatic document feeder can be used to automatically scan both sides of an original. Scan transmission 2-sided original Front and reverse sides are scanned ☞ IMAGE SETTINGS (page 5-53) Scan/Original Scan Size 100% Send - Sharp MX-5001N | MX-4100N | MX-4101N | MX-5001N Operation Manual Suite - Page 545
as the send size. Scan Internet Fax Address Book Original Fax Scan: USB Mem. Scan PC Scan Auto 8½x11 Send: Auto Address Entry Exposure Auto Text Send Settings Resolution 200X200dpi Address Review File Format PDF PDF File Quick File Color Mode Special Modes Auto/Grayscale - Sharp MX-5001N | MX-4100N | MX-4101N | MX-5001N Operation Manual Suite - Page 546
of the [Original] key. ☞ IMAGE SETTINGS (page 5-53) 2 Scan/Original OK Scan Size Auto 8½x11 100% Send Size Auto 2-Sided Booklet 2-Sided Tablet Image Orientation Touch the [Scan Size] key. 3 (1) Scan/Original Auto Manual 5½x8½ 5½x8½R 8½x11 Manual 8½x11R 8½x13(216x330) 8½x14 11x17 Long - Sharp MX-5001N | MX-4100N | MX-4101N | MX-5001N Operation Manual Suite - Page 547
FAX Specifying the original scan size (by numerical values) When scanning page 5-53) 2 Scan/Original OK Scan Size Auto 8½x11 100% Send Size Auto 2-Sided Booklet 2-Sided Tablet Image Orientation Touch the [Scan Size] key. Scan/Original Auto 8½x11 OK Touch the [Size Input] key. 3 Manual - Sharp MX-5001N | MX-4100N | MX-4101N | MX-5001N Operation Manual Suite - Page 548
FAX 5 Scan/Original Scan Size X17 Y11 2-Sided Booklet 2-Sided Tablet OK Send Size Auto Image Orientation Touch the [OK] key. The specified size appears in the [Scan Size] key. • When the scan longer than 17" (432 mm) can be scanned (maximum width 39-3/8" (1000 mm)). In this case, touch - Sharp MX-5001N | MX-4100N | MX-4101N | MX-5001N Operation Manual Suite - Page 549
the format in Internet fax mode. (The send size is fixed at 8-1/2" x 11"R (A4R).) Select the mode and display the image settings screen. 1 (1) Touch the tab of the mode that you wish to use. (2) Touch the [Original] key. ☞ IMAGE SETTINGS (page 5-53) 2 Scan/Original OK Scan Size 100% Send Size - Sharp MX-5001N | MX-4100N | MX-4101N | MX-5001N Operation Manual Suite - Page 550
SCANNER/INTERNET FAX Scan/Original Scan Size 129% Send Size Auto 8½x11 11x17 (2) OK 4 2-Sided 2-Sided Booklet Tablet Image Orientation [OK] key. (1) The ratio used for reduction or enlargement of the original will appear between the "Scan Size" and the "Send Size". 5-60 Contents - Sharp MX-5001N | MX-4100N | MX-4101N | MX-5001N Operation Manual Suite - Page 551
when the original consists of faint text. How to select the original image type (Scan mode, USB memory mode and Data entry mode) Auto Setting Text/Prtd. Photo Manual Text/Photo Text Photo Printed Photo Map Description The original image type is automatically selected to match the original - Sharp MX-5001N | MX-4100N | MX-4101N | MX-5001N Operation Manual Suite - Page 552
SCANNER/INTERNET FAX Scan mode, USB memory mode, Data entry mode (2) (1) (3) Scan/Exposure Auto Manual 1 3 5 Original Image Type Text Text/ Prtd.Photo Printed Photo Photo OK Text/Photo Map Moiré Reduction Internet fax mode 3 (1) (2) (3) Internet Fax/Exposure OK Auto Manual 1 - Sharp MX-5001N | MX-4100N | MX-4101N | MX-5001N Operation Manual Suite - Page 553
SCANNER/INTERNET FAX CHANGING THE RESOLUTION The resolution setting can be selected. Select the mode and display the image settings screen. 1 (1) Touch the tab of the mode that you wish to use. (2) Touch the [Resolution] key. ☞ IMAGE SETTINGS (page 5-53) Scan mode, USB memory mode, Data entry - Sharp MX-5001N | MX-4100N | MX-4101N | MX-5001N Operation Manual Suite - Page 554
for the format in Internet fax mode, only [200X100dpi] or [200X200dpi] can be selected. System Settings (Administrator): Initial Resolution Setting This is used to change the default resolution setting. CHANGING THE FILE FORMAT Changing the format (Scan mode, USB memory mode and Data entry mode - Sharp MX-5001N | MX-4100N | MX-4101N | MX-5001N Operation Manual Suite - Page 555
SCANNER/INTERNET FAX (1) (2) Scan/File Format File Type PDF TIFF XPS Encry. Programmed Specified Pages per File Compression Mode Low MH (G3) MMR (G4) OK B/W Color/Gray (1-99) Set the format. ● Scanning in Mono2 (1) Select the file type. To send a file using Encrypt PDF, touch the [Encry.] - Sharp MX-5001N | MX-4100N | MX-4101N | MX-5001N Operation Manual Suite - Page 556
SCANNER/INTERNET FAX 4 (3) Scan/File Format File Type Compression Ratio PDF Encry. Low TIFF XPS JPEG High U-Fine Medium High Programmed 1 Specified Pages per File (1-99) OK B/W Color/Gray (1) (2) To change the number of pages per file, enter the number of pages and exit the format - Sharp MX-5001N | MX-4100N | MX-4101N | MX-5001N Operation Manual Suite - Page 557
modes: When a ratio setting is selected and the original size is entered, Dual Page Scan, Card Shot, 2in1, and Mixed Size Original cannot be used. System Settings (Administrator): Compression Setting This is used to set the default compression mode for Internet fax transmission. 5-67 Contents - Sharp MX-5001N | MX-4100N | MX-4101N | MX-5001N Operation Manual Suite - Page 558
Color Mode] key. ☞ IMAGE SETTINGS (page 5-53) Scan/Color Mode OK Color Mode Full Color Auto Mono2 2 B/W Mode Mono2 Grayscale Grayscale (1) (2) (3) Select the color (Administrator): Default Color Mode Settings The default color mode can be changed. • System Settings (Administrator): - Sharp MX-5001N | MX-4100N | MX-4101N | MX-5001N Operation Manual Suite - Page 559
Scan Internet Fax Address Book Original Fax Scan: USB Mem. Scan PC Scan Auto 8½x11 Send: Auto Address Entry Exposure Auto Text Send Settings Resolution 200X200dpi Address Review File Format PDF PDF File Color SCREEN" (page 5-70). System settings (administrator): Default Preview - Sharp MX-5001N | MX-4100N | MX-4101N | MX-5001N Operation Manual Suite - Page 560
SCANNER/INTERNET FAX PREVIEW CHECK SCREEN This section explains the preview check screen. Preview (1) 0001 /0010 Color Function Rev. (3) Display Rotation Start Sending (4) (5) (6) (2) (1) Preview image A preview of the scanned original appears. If the image is cut off, use the scroll - Sharp MX-5001N | MX-4100N | MX-4101N | MX-5001N Operation Manual Suite - Page 561
are entered and the base screen reappears. ☞ Internet fax mode (page 5-72) Scan mode, USB memory mode, Data entry mode 1st screen 2nd screen Scan/Special Modes OK Scan/Special Modes OK (1) (2) Program Erase (3) Dual Page Scan (4) (5) Suppress (6) 1 Timer Background Card Shot - Sharp MX-5001N | MX-4100N | MX-4101N | MX-5001N Operation Manual Suite - Page 562
keys are the same as those explained in "Scan mode, USB memory mode, Data entry mode" (page 5-71). 1st screen 2nd screen Internet Fax/Special Modes OK Internet Fax/Special Modes OK Program Timer (1) Erase 2in1 Dual Page Scan 1 Card Shot 2 Verif. Stamp (2) Transaction Report 2 2 Job - Sharp MX-5001N | MX-4100N | MX-4101N | MX-5001N Operation Manual Suite - Page 563
Background, Job Build, Mixed Size Original, Slow Scan Mode, Original Count, Verif. Stamp, Blank Page Skip, 2in1 • Up to 48 programs can be stored. • Up to 500 destinations can be stored in one program. • This function cannot be used in USB memory mode or data entry mode. 1 Place the original - Sharp MX-5001N | MX-4100N | MX-4101N | MX-5001N Operation Manual Suite - Page 564
. 4 Program:Program 1 [email protected] Scan Internet Fax Original Fax Scan: USB Mem. Scan PC Scan Auto 8½x11 Send: Auto Exposure Auto Text Send Settings Resolution 200X200dpi Address Review File Format PDF PDF File Quick File Color Mode Special Modes Auto/Grayscale Mono2 Preview - Sharp MX-5001N | MX-4100N | MX-4101N | MX-5001N Operation Manual Suite - Page 565
FAX ERASING PERIPHERAL SHADOWS ON THE IMAGE (Erase) The erase function is used to erase shadows on images produced when scanning on the document glass. Specify the destination. ☞ ENTERING DESTINATIONS (page 5-18) 2 When scanning to USB memory, there is no need to specify the destination. Go to - Sharp MX-5001N | MX-4100N | MX-4101N | MX-5001N Operation Manual Suite - Page 566
page and press the [COLOR START] key or the [BLACK & 5 WHITE START] key. Repeat until all pages have been scanned and then press the [Read-End] key. A beep will sound to indicate that scanning is finished. If the destination is an Internet fax (Administrator): Erase Width Adjustment The default - Sharp MX-5001N | MX-4100N | MX-4101N | MX-5001N Operation Manual Suite - Page 567
mark 1 Centerline of A3 original Centerline of 11" x 17" original The page on this side is scanned first. 11" x 17" (A3) Centerline of original Specify the destination. ☞ ENTERING DESTINATIONS (page 5-18) 2 When scanning to USB memory, there is no need to specify the destination. Go to step - Sharp MX-5001N | MX-4100N | MX-4101N | MX-5001N Operation Manual Suite - Page 568
the next original and press the [COLOR START] key or the [BLACK & WHITE START] key. Repeat until all pages have been scanned and then touch the [Read-End] key. A beep will sound to indicate that scanning is finished. 5 If the destination is an Internet fax destination, press the [BLACK & WHITE START - Sharp MX-5001N | MX-4100N | MX-4101N | MX-5001N Operation Manual Suite - Page 569
cleared after the transmission is finished. (However, when the document filing function is used, the scanned original and settings are stored on the built-in hard drive.) • This function cannot be used in USB memory mode. 1 Place the original. Place the original face up in the document feeder tray - Sharp MX-5001N | MX-4100N | MX-4101N | MX-5001N Operation Manual Suite - Page 570
] key. 5 Repeat until all pages have been scanned and then touch the [Read-End] key. A beep will sound to indicate that scanning is finished. • If the destination is an Internet fax destination, press the [BLACK & WHITE START] key. • The original is scanned into memory. The original cannot be - Sharp MX-5001N | MX-4100N | MX-4101N | MX-5001N Operation Manual Suite - Page 571
. Place the original face up in the document feeder tray, or face down on the document glass. Specify the destination. ☞ ENTERING DESTINATIONS (page 5-18) 2 When scanning to USB memory, there is no need to specify the destination. Go to step 3. Select the special modes. (1) Touch the tab of the mode - Sharp MX-5001N | MX-4100N | MX-4101N | MX-5001N Operation Manual Suite - Page 572
SCANNER/INTERNET FAX (1) (2) 4 Scan/Special Modes OK pages are scanned. A beep will sound to indicate that scanning is finished. • If you are scanning the original on the document glass, scan each page one page at a time. When scanning finishes, place the next original and press the [COLOR - Sharp MX-5001N | MX-4100N | MX-4101N | MX-5001N Operation Manual Suite - Page 573
FAX SCANNING BOTH SIDES OF A CARD ONTO A SINGLE PAGE (Card Shot) This function lets you send the front and reverse sides of a card as a single page, without the need to send each side separately. Scanned . ☞ ENTERING DESTINATIONS (page 5-18) 2 When scanning to USB memory, there is no need - Sharp MX-5001N | MX-4100N | MX-4101N | MX-5001N Operation Manual Suite - Page 574
the procedure for setting the send size, see "Specifying the send size of the image" (page 5-59). Press the [COLOR START] key or the [BLACK & WHITE START] key to scan the front side of the card. 5 If the destination is an Internet fax destination, press the [BLACK & WHITE START] key. To cancel - Sharp MX-5001N | MX-4100N | MX-4101N | MX-5001N Operation Manual Suite - Page 575
SCANNER/INTERNET FAX Place next original. (Pg.No.x) Press [Start]. When finished, press [Read-End]. Touch the [Read-End] key. 7 Configure Read-End If you will continue by scanning the front of the card, you can touch the [Configure] key to change the exposure, resolution, scan size, and - Sharp MX-5001N | MX-4100N | MX-4101N | MX-5001N Operation Manual Suite - Page 576
FAX SCANNING MANY ORIGINALS AT ONCE (Job Build) This function lets you separate an original consisting of numerous pages into sets, scan each set using the automatic document feeder, and transmit the pages . ☞ ENTERING DESTINATIONS (page 5-18) 2 When scanning to USB memory, there is no need - Sharp MX-5001N | MX-4100N | MX-4101N | MX-5001N Operation Manual Suite - Page 577
fax destination, press the [BLACK & WHITE START] key. To cancel scanning... Press the [STOP] key ( ) to cancel the operation. Insert the next set of originals and press the [COLOR changed when scanning each even-numbered page of the original pages. If the memory becomes full during scanning, a - Sharp MX-5001N | MX-4100N | MX-4101N | MX-5001N Operation Manual Suite - Page 578
FAX SCANNING ORIGINALS OF DIFFERENT SIZES (Mixed Size Original) This feature lets you scan originals of different sizes at the same time; for example, 8-1/2" x 14" (B4) size originals mixed together with 11" x 17" (A3) size originals. When scanning (page 5-18) 2 When scanning to USB memory, there - Sharp MX-5001N | MX-4100N | MX-4101N | MX-5001N Operation Manual Suite - Page 579
COLOR START] key or the [BLACK & WHITE START] key. Scanning begins. A beep will sound to indicate that scanning is finished. 5 If the destination is an Internet fax scan size cannot be specified. • When mixed size originals are set, automatic duplex scanning cannot be used (except MX-4101N/ - Sharp MX-5001N | MX-4100N | MX-4101N | MX-5001N Operation Manual Suite - Page 580
face up in the document feeder tray. Adjust the original guides slowly. 1 If the originals are inserted with too much force, they may crumple and misfeed. Specify the destination. ☞ ENTERING DESTINATIONS (page 5-18) 2 When scanning to USB memory, there is no need to specify the destination. Go to - Sharp MX-5001N | MX-4100N | MX-4101N | MX-5001N Operation Manual Suite - Page 581
Mode] key so that it is highlighted. (2) Touch the [OK] key. Press the [COLOR START] key or the [BLACK & WHITE START] key. Scanning begins. A beep will sound to indicate that scanning is finished. 5 If the destination is an Internet fax destination, press the [BLACK & WHITE START] key. To cancel - Sharp MX-5001N | MX-4100N | MX-4101N | MX-5001N Operation Manual Suite - Page 582
of scanned original sheets before transmission helps prevent transmission mistakes. • This function cannot be used in USB memory mode. Build Original Count Erase Suppress Background Mixed Size Original File Dual Page Scan Card Shot Slow Scan Mode Quick File (2) OK 1 2 Select the original count - Sharp MX-5001N | MX-4100N | MX-4101N | MX-5001N Operation Manual Suite - Page 583
SCANNER/INTERNET FAX Press the [COLOR START] key or the [BLACK & WHITE START] key. Scanning begins. 5 To cancel scanning... Press the [STOP] key ( ) to cancel the operation. All scanned data will be cleared. (A) (B) XX pages of original have been scanned. Send the scanned data? (P.x) Cancel - Sharp MX-5001N | MX-4100N | MX-4101N | MX-5001N Operation Manual Suite - Page 584
FAX STAMPING SCANNED ORIGINALS (Verif. Stamp) This function stamps each original that is scanned using the automatic document feeder, allowing you to verify that all originals were correctly scanned. Originals Position of stamp Originals are scanned (page 5-18) 2 When scanning to USB memory, - Sharp MX-5001N | MX-4100N | MX-4101N | MX-5001N Operation Manual Suite - Page 585
Stamp Blank Page Skip 4 SCANNER/INTERNET FAX (1) (3) OK Select "Verif. Stamp". (1) Touch the screens. keys to switch through the (2) Touch the [Verif. Stamp] key so that it is highlighted. (3) Touch the [OK] key. Press the [COLOR START] key or the [BLACK & WHITE START] key. Scanning begins - Sharp MX-5001N | MX-4100N | MX-4101N | MX-5001N Operation Manual Suite - Page 586
the document feeder tray. 1 1 This function cannot be used when the document glass is used for scan send. Specify the destination. ☞ ENTERING DESTINATIONS (page 5-18) 2 When scanning to USB memory, there is no need to specify the destination. Go to step 3. Select the special modes. (1) Touch - Sharp MX-5001N | MX-4100N | MX-4101N | MX-5001N Operation Manual Suite - Page 587
the image will not be reserved for transmission. When "Default Preview" is enabled in the system settings (administrator) and the skip blank pages function is used to scan original pages, you can check the pages, including the blank pages, in the preview screen. For more information, see "PREVIEW - Sharp MX-5001N | MX-4100N | MX-4101N | MX-5001N Operation Manual Suite - Page 588
reduced to half their original size and sent together as a single page. Portrait-oriented originals Transmission 1 2 1 2 Landscape-oriented originals Transmission 1 1 2 2 This function cannot be used in scan mode, USB memory mode, or data entry mode. Place the original. When placing the - Sharp MX-5001N | MX-4100N | MX-4101N | MX-5001N Operation Manual Suite - Page 589
the [OK] key. 5 Scan Internet Fax Address Book Original Fax Scan: USB Mem. Scan PC Scan Auto 8½x11 Send: Auto Address Entry Exposure Auto Send Settings Resolution 200X100dpi Address Review File Format TIFF-F File Special Modes Quick File Preview I-Fax Manual Reception Touch the - Sharp MX-5001N | MX-4100N | MX-4101N | MX-5001N Operation Manual Suite - Page 590
/INTERNET FAX Press the [BLACK & WHITE START] key. Scanning begins. • If you inserted the original pages in the document feeder tray, all pages are scanned. A beep will sound to indicate that scanning is finished. • If you are scanning the original on the document glass, scan each page one page - Sharp MX-5001N | MX-4100N | MX-4101N | MX-5001N Operation Manual Suite - Page 591
time, name of other party, time required, number of pages, result, etc.). ☞ INFORMATION APPEARING IN THE RESULT COLUMN (page 5-111) This function cannot be used in scan mode, USB memory mode, or data entry mode. Transaction reports are printed based on conditions set in the system settings; however - Sharp MX-5001N | MX-4100N | MX-4101N | MX-5001N Operation Manual Suite - Page 592
(Administrator): Transaction Report Print Select Setting This is used to set the conditions for printing transaction reports. The factory default setting is . Single Sending: Print Out All Report/ Print Out Error Report Only /No Printed Report Broadcasting: Print Out All Report /Print Out Error - Sharp MX-5001N | MX-4100N | MX-4101N | MX-5001N Operation Manual Suite - Page 593
to display the job status screen. Scan Internet Fax Address Book Original Fax Scan: USB Mem. Scan PC Scan Auto Send: Auto Address Entry Exposure Auto Text Send Settings Resolution 200X200dpi Address Review File Format PDF PDF File Color Mode Auto/Grayscale Mono2 Quick File - Sharp MX-5001N | MX-4100N | MX-4101N | MX-5001N Operation Manual Suite - Page 594
job status screen selector key ((2) below). Job queue screen (1) Print Job Scan to Fax Job Internet Fax Address Set Time Pages Status 1 Broadcast0001 10:00 04/01 020/003 Connecting 2 AAA AAA 3 BBB BBB 10:05 04/01 000/001 Waiting 1 1 10:22 04/01 000/004 Waiting 4 CCC CCC 10:30 04 - Sharp MX-5001N | MX-4100N | MX-4101N | MX-5001N Operation Manual Suite - Page 595
Status "Waiting" The job is waiting to be executed. "Retry Mode" The job is being re-attempted due to a communication error or other problem. "Report Wait" An Internet fax has been sent for which a receive report was requested, and the machine is waiting for the receive report. A day and - Sharp MX-5001N | MX-4100N | MX-4101N | MX-5001N Operation Manual Suite - Page 596
attached file, and thus printing was not possible. "Rejected" An Internet fax was sent from a party that is blocked. "NGxxxxxx" Transmission/reception was not successful because a communication error occurred (a 6-digit error code appears in xxxxxx.) "Error" An error occurred while the job was - Sharp MX-5001N | MX-4100N | MX-4101N | MX-5001N Operation Manual Suite - Page 597
job moves to the job queue of the job status screen of scan mode. • Received Internet fax is printed When reception is completed, the job moves to the completed jobs screen and "In Memory" appears. When printing ends, the status changes to "Printed" and the job is completed. In addition, the job is - Sharp MX-5001N | MX-4100N | MX-4101N | MX-5001N Operation Manual Suite - Page 598
transmission jobs, and received Internet fax forwarding jobs. Touch the FFF FFF Start Time Status 10:01 04/01 NG000000 10:10 04/01 NG000000 OK Retry 1 1 File . Status: Description of failure (error) The [Retry] key can Scan to FTP address, Scan to Network Folder address, or Scan to Desktop address - Sharp MX-5001N | MX-4100N | MX-4101N | MX-5001N Operation Manual Suite - Page 599
the [JOB STATUS] key. 1 2 (1) (1) Print Job Address 1 Broadcast 2 AAA AAA 3 BBB BBB 4 CCC CCC Scan to Fax Job Internet Fax Set Time Pages Status 10:00 04/01 020/003 Connecting 10:05 04/01 000/001 Waiting 1 1 10:22 04/01 000/004 Waiting 10:30 04/01 000/010 Waiting Job Queue - Sharp MX-5001N | MX-4100N | MX-4101N | MX-5001N Operation Manual Suite - Page 600
[JOB STATUS] key. 1 (1) (1) Select the job to which you wish to give Print Job Scan to Fax Job Internet Fax priority. Address 1 Broadcast 2 AAA AAA Set Time Pages Status 10:00 04/01 020/003 Connecting 10:05 04/01 000/001 Waiting Job Queue 1 Complete (1) Touch the mode tab of the - Sharp MX-5001N | MX-4100N | MX-4101N | MX-5001N Operation Manual Suite - Page 601
memory became full during reception. REJECTED An Internet fax printing was not possible. FAIL xx (xxxx) The transaction failed due to a communication error. First 2 digits of communication error number: Error code from 00 to 99. Last 4 digits of communication error number: Code for use by service - Sharp MX-5001N | MX-4100N | MX-4101N | MX-5001N Operation Manual Suite - Page 602
Data Receive/Forward (page 7-20) When printing is not possible because the machine has run out of paper or toner, received Internet faxes can be forwarded to and printed by another previously stored Internet fax machine. • System Settings (Administrator): I-Fax Default Settings These settings are - Sharp MX-5001N | MX-4100N | MX-4101N | MX-5001N Operation Manual Suite - Page 603
Exposure Fax Scan: Auto USB Mem. Scan PC Scan Auto Send: Auto Send Settings Resolution 200X100dpi Address Review File Format TIFF-F File Special Modes Quick File Preview I-Fax Manual Reception If POP3 server settings are not configured in the Web pages, the [I-Fax Manual Reception - Sharp MX-5001N | MX-4100N | MX-4101N | MX-5001N Operation Manual Suite - Page 604
(administrator), a password can be entered to display the received data list screen. If you wish to check an image before printing it, continue from step 2 on the next page. • The received faxes will be retained in memory regardless of whether they were received automatically or manually. • If "Fax - Sharp MX-5001N | MX-4100N | MX-4101N | MX-5001N Operation Manual Suite - Page 605
Image Check Setting" is enabled* in the system settings (administrator), you can check a received image in the touch panel before printing it out. When this function is enabled, follow the steps below to print a received image. * The factory default setting is disabled. Depending on the size of the - Sharp MX-5001N | MX-4100N | MX-4101N | MX-5001N Operation Manual Suite - Page 606
screen. Image Check AAA AAA 04/04/2010 10:28 SCANNER/INTERNET FAX Back 1 / 3 Display Rotation 0001 0010 (1) (2) (3) (1) 90 degrees. The rotation applies to all pages in the file, not just the displayed page. (5) [Print] key Touch to start printing. (6) Display zoom key Use this to - Sharp MX-5001N | MX-4100N | MX-4101N | MX-5001N Operation Manual Suite - Page 607
of reception cannot be printed on the faxes. ("Receiving Date & Time Print" is disabled.) CONFIGURING INBOUND ROUTING SETTINGS All inbound routing settings are configured in the Web pages. For the procedure for accessing the Web pages, see the Quick Start Guide. The following explanation assumes - Sharp MX-5001N | MX-4100N | MX-4101N | MX-5001N Operation Manual Suite - Page 608
. (1) Click [Sender Number/Address Registration] in the [Inbound Routing Settings] menu in the Web page. (2) Enter the sender address in "Internet Fax Address" or "Fax Number" as appropriate, and click the [Add to List] button. 2 The entered address will be added to the "Address to be Entered - Sharp MX-5001N | MX-4100N | MX-4101N | MX-5001N Operation Manual Suite - Page 609
page menu and click the [Add] button. (2) Enter a "Table Name". (3) Select the line used for reception. (4) Select the sender whose faxes will be forwarded. • To forward all received faxes environments. In this event, change the file format to PDF. • Up to three forwarding day and time settings can - Sharp MX-5001N | MX-4100N | MX-4101N | MX-5001N Operation Manual Suite - Page 610
SCANNER/INTERNET FAX (2) Specifying forwarding tables to be used. To use the inbound routing function, enable the forwarding tables that you wish to use from among the stored tables. (1) Click [Inbound Routing Settings] in the Web page menu. (2) Select [Always Forward] or [Forward on Selected - Sharp MX-5001N | MX-4100N | MX-4101N | MX-5001N Operation Manual Suite - Page 611
Setup Guide. • This function cannot be used when it has been disabled using "Disable Scan Function" in the system settings (administrator). • The procedures for selecting the scanner driver and starting scanning vary depending on the TWAIN-compliant application. For more information, see the manual - Sharp MX-5001N | MX-4100N | MX-4101N | MX-5001N Operation Manual Suite - Page 612
[At your computer] 3 SCANNER/INTERNET FAX Start the TWAIN-compliant application on your computer and select [Select Scanner] from the [File] menu. 4 (1) 5 Select the scanner driver of the machine. (1) Select [SHARP MFP TWAIN K]. (2) Click the [Select] button. (2) Select [Acquire Image] from the [ - Sharp MX-5001N | MX-4100N | MX-4101N | MX-5001N Operation Manual Suite - Page 613
"Preset" screen, select "Web Pages", "Photo", "FAX" or "OCR" depending on the original type and your scanning purpose. If you wish to scanned. You can also set the scanning area in the preview window with your mouse. (3) Click the [Preview] button. The preview image will appear in the scanner driver - Sharp MX-5001N | MX-4100N | MX-4101N | MX-5001N Operation Manual Suite - Page 614
area to the entire preview image. • For further information on the scan settings, click the button to open scanner driver Help. • If the originals are placed in the document feeder tray, only the top page will be previewed. The top page will be delivered to the original exit tray. Be sure to return - Sharp MX-5001N | MX-4100N | MX-4101N | MX-5001N Operation Manual Suite - Page 615
[At the machine] 9 This machine is in the PC scan mode. Do not remove the original. Scanner IP address:250.160.102.106 Exit 10 PC scan in progress. Finish PC scan mode? No Yes SCANNER/INTERNET FAX Touch the [Exit] key in the touch panel. Touch the [Yes] key. 5-125 Contents - Sharp MX-5001N | MX-4100N | MX-4101N | MX-5001N Operation Manual Suite - Page 616
to Desktop Client PC that uses Network Scanner Tool Image file Server Scan to E-mail Scan to FTP Scan to Network Folder Fax server, document management software, workflow application, encryption server, etc. Using the application integration module kit, information on a generated image file - Sharp MX-5001N | MX-4100N | MX-4101N | MX-5001N Operation Manual Suite - Page 617
name that is unique.) • It is recommended that you use Network Scanner Tool to receive metadata. For more information, see the Network Scanner Tool User's Guide (PDF format) on the "Sharpdesk/Network Scanner Utilities" CD-ROM. • For information on the license agreement and how to use the CD-ROM that - Sharp MX-5001N | MX-4100N | MX-4101N | MX-5001N Operation Manual Suite - Page 618
Original Fax Scan: Data Entry Auto 8½x11 Send: Address Entry Exposure Auto Text Send Settings Resolution 200X200dpi Auto Switch to data entry mode and display the metadata set screen. (1) Touch the [Data Entry] tab. (2) Touch the [Metadata Entry] key. Address Review File Format PDF PDF - Sharp MX-5001N | MX-4100N | MX-4101N | MX-5001N Operation Manual Suite - Page 619
Fax Fax Data Entry Select image settings and any other Address Book Original Scan: Auto 8½x11 Send: Auto settings, and perform the scan send Address Entry Exposure Auto Text procedure. 6 Send Settings Resolution 200X200dpi Address Review File Format PDF File Quick File Color - Sharp MX-5001N | MX-4100N | MX-4101N | MX-5001N Operation Manual Suite - Page 620
be included in the XML file if enabled in the Web pages. • User defined fields: Custom fields can be added to the XML file. These fields name appearing in the e-mail "Subject" line, or job name on the fax cover sheet. When the user enters a [Subject] in the send settings screen in the touch panel, - Sharp MX-5001N | MX-4100N | MX-4101N | MX-5001N Operation Manual Suite - Page 621
allows you to save the document data of a copy or fax job, or the data of a print job, as a file on the machine's hard drive. • FILE INFORMATION 6-15 SAVING A DOCUMENT FILE ONLY (Scan to HDD 6-18 • "Scan to HDD" SCREEN 6-18 • PERFORMING "Scan to HDD 6-23 USING STORED FILES SEQUENCE FOR USING A - Sharp MX-5001N | MX-4100N | MX-4101N | MX-5001N Operation Manual Suite - Page 622
printed or transmitted as needed. Saving a file Scan Internet Fax Retrieving and using a stored file Print Send Fax Print Copy Hard drive Scan file management. A password can also be established to prevent the file from being retrieved up by others. This function scans a document and stores - Sharp MX-5001N | MX-4100N | MX-4101N | MX-5001N Operation Manual Suite - Page 623
color mode, and special mode settings must be reselected. The numerous original pages must all be rescanned. The stored file is simply retrieved and printed trip forms? File Retrieve Scan to HDD Main Folder forms Daily report forms Switch Display All Files User Name Name 1 Name 1 Name 1 Name - Sharp MX-5001N | MX-4100N | MX-4101N | MX-5001N Operation Manual Suite - Page 624
be selected as the destination of "File" and "Scan to HDD". • System Settings: Document Filing Control (page 7-24) This is used to create custom folders for document filing. A password can also be established for a custom folder. • System Settings (Administrator): User List This is used to store - Sharp MX-5001N | MX-4100N | MX-4101N | MX-5001N Operation Manual Suite - Page 625
Size: 8-1/2" x 11" (A4) Max. 1700 * The indicated numbers are guidelines for the number of pages that can be stored when all pages are full color, and when all pages are black & white. Copying in sort mode uses the same memory area as the Quick File folder. For this reason, when too much data has - Sharp MX-5001N | MX-4100N | MX-4101N | MX-5001N Operation Manual Suite - Page 626
: Print the "Administrator Settings List" in the system settings (administrator). To check information on the folders selected for file deletion: Print the Filing Control (page 7-24) This shows a list of the folder names for document filing. • System Settings (Administrator): Automatic Deletion - Sharp MX-5001N | MX-4100N | MX-4101N | MX-5001N Operation Manual Suite - Page 627
password (5 to 8 digits) can be established to prevent others from using the file. The above information cannot be specified when a file is saved with Quick File. System Settings (Administrator): User List This is used to store user provided for by law, SHARP Corporation bears no responsibility for - Sharp MX-5001N | MX-4100N | MX-4101N | MX-5001N Operation Manual Suite - Page 628
. IMAGE SEND DOCUMENT FILING Resend Scan Internet Fax Address Book Original Fax Scan: USB Mem. Scan PC Scan Auto Send: Auto Address Entry Exposure Auto Send Settings Resolution 200X200dpi Address Review File Format PDF PDF File Color Mode Auto/Grayscale Mono2 Quick File - Sharp MX-5001N | MX-4100N | MX-4101N | MX-5001N Operation Manual Suite - Page 629
PRINTER FUNCTIONS" (page 3-57) in "3. PRINTER". Using document filing in PC-Fax/PC-I-Fax mode To use document filing in PC-Fax or PC-I-Fax mode, select document filing settings in the PC-Fax driver. For more information, see Help in the PC-Fax driver. System Settings (Administrator): Customize - Sharp MX-5001N | MX-4100N | MX-4101N | MX-5001N Operation Manual Suite - Page 630
HDD Status (5) [External Data Access] tab This can be selected when an FTP server is stored or a USB memory device is connected to the machine. ☞ "DIRECTLY PRINTING FROM THE MACHINE" (page 3-60) in "3. PRINTER" (6) [Search] key Touch this key to search for a file stored in a folder. You can search - Sharp MX-5001N | MX-4100N | MX-4101N | MX-5001N Operation Manual Suite - Page 631
"Quick File" When copying, printing or transmitting a document in copy mode, print mode, or image send mode (excluding USB memory scan mode), "Quick File" can document feeder tray, or face down on the document glass. 1 1 Color Mode Full Color Exposure 2 Auto 1. 81/2x11 2.81/2x11R 3. 81/2x14 4. - Sharp MX-5001N | MX-4100N | MX-4101N | MX-5001N Operation Manual Suite - Page 632
document, the message "The scanned data is stored in the quick file folder." appears for 6 seconds (default setting) after the [START] pages have been scanned and then press the [Read-End] key. To cancel scanning... Press the [STOP] key ( ). When a file is stored using Quick File, the following user - Sharp MX-5001N | MX-4100N | MX-4101N | MX-5001N Operation Manual Suite - Page 633
DOCUMENT FILING SAVING A FILE WITH "File" When copying, printing or transmitting a document in copy mode, print mode, or image send mode (excluding USB memory scan mode), "File" can be selected to save an image of the document to the Main folder or a previously created custom folder. The image can - Sharp MX-5001N | MX-4100N | MX-4101N | MX-5001N Operation Manual Suite - Page 634
press the [COLOR START] key or the [BLACK & WHITE START] key. • Copying begins and the scanned document image of "SAVING A FILE WITH "Quick File"" (page 6-11). To cancel scanning... Press the [STOP] key ( ). When a to: Main Folder When user authentication is used, the user name that was used for - Sharp MX-5001N | MX-4100N | MX-4101N | MX-5001N Operation Manual Suite - Page 635
is automatically selected. In this case, this step is not needed. The user name must be previously stored in "User List" in the system settings (administrator). (B) (A) (2) 2 User Name 6 12 18 ABC User Cancel OK Name 1 Name 2 Name 3 Name 4 1 2 Name 5 Name 6 Name 7 Name 8 Name - Sharp MX-5001N | MX-4100N | MX-4101N | MX-5001N Operation Manual Suite - Page 636
Password User Name Name 1 File Name Stored to file-01 Main Folder Cancel OK Touch the [Stored to:] key. If a user name with a "My Folder" setting is selected, "My Folder" of that user will automatically be selected. (1) (2) 2 Stored to: Main Folder User 1 User 3 User 5 User 7 User - Sharp MX-5001N | MX-4100N | MX-4101N | MX-5001N Operation Manual Suite - Page 637
set for the file to prevent others from viewing it. Set a password (5 to 8 digits) with the numeric keys. File Information (1) (2) 1 Confidential Password User Name Name 1 File Name Stored to file-01 User 1 Cancel OK Enable the confidential property. (1) Select the [Confidential] checkbox - Sharp MX-5001N | MX-4100N | MX-4101N | MX-5001N Operation Manual Suite - Page 638
ratio that will be used when the file is stored in color. (8) [Color Mode] key Use this key to select the color mode when storing a document. ☞ [Color Mode] key (page 6-20) (9) key This key appears when a special mode or 2-sided scanning is selected. Touch the key to display the selected special - Sharp MX-5001N | MX-4100N | MX-4101N | MX-5001N Operation Manual Suite - Page 639
or key to adjust the exposure level. When finished, touch the [OK] key. (3) Exposure Scan to HDD/Exposure Auto Manual 1 3 5 Original Image Type Text Text/ Prtd.Photo Printed Photo Photo OK Text/Photo Map Moiré Reduction (2) (A) (1) (1) Select the appropriate original type for - Sharp MX-5001N | MX-4100N | MX-4101N | MX-5001N Operation Manual Suite - Page 640
FILING [Color Mode] key Touch the [Color Mode] key to open the color mode setting screen for Scan to HDD. Scan to HDD/Color Mode OK Color Mode Full Color Color Mode Auto 2 Color B/W Mode Mono2 Grayscale The following settings can be selected for the scanning color when the [COLOR START - Sharp MX-5001N | MX-4100N | MX-4101N | MX-5001N Operation Manual Suite - Page 641
on each setting, see "SPECIAL MODES" (page 5-71) in "5. SCANNER / INTERNET FAX". (1) (2) (3) Scan to HDD/Special Modes OK Special Modes Erase Job Build Original Count Dual Page Scan Mixed Size Original Card Shot Slow Scan Mode (4) (5) (6) (7) (1) [Erase] key The erase function - Sharp MX-5001N | MX-4100N | MX-4101N | MX-5001N Operation Manual Suite - Page 642
scanned data is stored, you can check a preview of the scanned image in this screen and return to the Scan to HDD settings screen to change settings Preview Color The rotation applies to all pages in the file, not just the displayed page. (4) [Start Storing] key This starts Scan to HDD. (5) Display - Sharp MX-5001N | MX-4100N | MX-4101N | MX-5001N Operation Manual Suite - Page 643
exposure, resolution, compression ratio, color mode, and special modes. See ""Scan to HDD" SCREEN" (page 6-18). (4) Touch the [ User Name: User Unknown File Name: Mode_Month-Day-Year_Hour-Minute-Second (Example: HDD_04042010_112030AM) Stored to: Main Folder When user authentication is used, the user - Sharp MX-5001N | MX-4100N | MX-4101N | MX-5001N Operation Manual Suite - Page 644
by document filing and print or transmit the pages. Change the mode. COPY IMAGE SEND DOCUMENT FILING File Retrieve Scan to HDD Folder Select HDD Status Ex Data Access Main Folder Quick File Folder User 1 User 3 User 5 User 7 User 9 All Folders ABCD EFGHI User 2 User 4 User 6 User 8 User - Sharp MX-5001N | MX-4100N | MX-4101N | MX-5001N Operation Manual Suite - Page 645
Retrieve Scan to HDD Main Folder HDD Status Ex Data Access Search Back File Name file-01 file-02 file-03.tiff file-04 file-05.tiff Switch Display All Files User Name FILE (page 6-47) Job Settings file-01 Select the job. Print Move Select the operation. Name 1 8½x11 Cancel F. Color Send - Sharp MX-5001N | MX-4100N | MX-4101N | MX-5001N Operation Manual Suite - Page 646
folder keys The custom folders that have been created using "Document Filing Control" (page 7-24) in system settings are displayed. Touch a key to display the files in that folder. If a password has been set for a custom folder, a password entry screen will appear when the folder is touched. The - Sharp MX-5001N | MX-4100N | MX-4101N | MX-5001N Operation Manual Suite - Page 647
Scan to Desktop PC-I-Fax transmission Print Scan to HDD Scan to Network Folder Thumbnail screen The first page of thumbnail images of the stored files appears. The confidential icon ( ) will appear instead of a thumbnail image for files stored as confidential files. (2) [File Name] key, [User - Sharp MX-5001N | MX-4100N | MX-4101N | MX-5001N Operation Manual Suite - Page 648
in a folder for printing. ☞ MULTI-FILE PRINTING (page 6-33) (7) Sort Order / Display Items This can be used in the thumbnail screen. The order of display of the file thumbnails can be changed in "Sort Order". Select "Date ", "Date ", "File Name ", "File Name ", "User Name ", or "User Name ". The - Sharp MX-5001N | MX-4100N | MX-4101N | MX-5001N Operation Manual Suite - Page 649
file-01 file-02 file-03.tiff file-04 file-05.tiff Switch Display All Files Search Back User Name Name 1 Name 2 Name 3 Name 4 Name 5 Date 1 04/04/2010 2 04/04/2010 04/04/2010 04/04/2010 04/04/2010 Multi-File Print Touch the key of the desired file. If a password is - Sharp MX-5001N | MX-4100N | MX-4101N | MX-5001N Operation Manual Suite - Page 650
this key to print the selected file. ☞ PRINTING A STORED FILE (page 6-31) (4) [Move] key Use this procedure to change the location of a file (move a file to a different folder). ☞ MOVING A STORED FILE (page 6-41) (5) [Send] key This is used to send a stored file by fax, Internet fax, scan send, or - Sharp MX-5001N | MX-4100N | MX-4101N | MX-5001N Operation Manual Suite - Page 651
see "PRINT SETTINGS SCREEN" (page 6-32). • A file saved in black and white or grayscale cannot be printed in color. • When a long size document is stored from Scan to HDD or scan mode, the file cannot be printed. A file stored from scan mode that included fax mode or Internet fax mode destinations - Sharp MX-5001N | MX-4100N | MX-4101N | MX-5001N Operation Manual Suite - Page 652
SETTINGS SCREEN Job Settings / Print file-01 Name 1 8½x11 Cancel F. Color Paper Select (1) Auto (2) Output (3) 2-Sided (4) Special Modes Number of Prints (5) 1 (1 999) Print and Delete the Data (6) Print and Save the Data (7) B/W Print (8) (1) [Paper Select] key Use this key - Sharp MX-5001N | MX-4100N | MX-4101N | MX-5001N Operation Manual Suite - Page 653
, touch the [Select All] key. The [Batch Print] key can be used to print all files of a particular user in a folder or all files that have the same password in a folder. For more information, see "Batch printing" (page 6-35). • Multi-file printing of confidential files is not possible. • A file - Sharp MX-5001N | MX-4100N | MX-4101N | MX-5001N Operation Manual Suite - Page 654
and change the number with the numeric keys. (3) Touch the [Print and Delete the Data] key or the [Print and Save the Data] key. If the [Print and Delete the Data] key is touched, the files will be automatically deleted after printing. If the [Print and Save the Data] key is touched, the files will - Sharp MX-5001N | MX-4100N | MX-4101N | MX-5001N Operation Manual Suite - Page 655
Files User Name Password Delete the Data Cancel Print and Delete the Data Print and Save the Data Change PRT.No. Touch the [User Name] key. When user authentication is used, the user name that was used for login is automatically selected. (C) (B)(D) (A) 3 User Name 6 12 18 Default User Direct - Sharp MX-5001N | MX-4100N | MX-4101N | MX-5001N Operation Manual Suite - Page 656
Cancel Cancel OK 1 (1 999) Apply the Number from Stored Setting of Each Job. (1) (2) (3) 6 Batch Print User 1/ All Files User Name Password Name 1 Delete the Data Cancel Print and Delete the Data Print and Save the Data Change PRT.No. To set the number of copies, touch the [Change PRT.No - Sharp MX-5001N | MX-4100N | MX-4101N | MX-5001N Operation Manual Suite - Page 657
file-01 F. Color Send Settings Resolution 200X200dpi File Format PDF Special Modes Name 1 PDF Select transmission settings. For information on the settings, see "SEND SETTINGS SCREEN" (page 6-38). Press the [COLOR START] key or the [BLACK & WHITE START] key. 3 If you are sending a fax or - Sharp MX-5001N | MX-4100N | MX-4101N | MX-5001N Operation Manual Suite - Page 658
"BASE SCREEN" (page 5-9) in "5. SCANNER / INTERNET FAX". Example of scan mode (6) Ready to send. Cancel (7) (1) Scan Internet Fax Fax (2) Address Book file-01 Name 1 (8) (3) Address Entry F. Color (4) Send Settings Resolution 200X200dpi File Format PDF PDF (9) Special Modes - Sharp MX-5001N | MX-4100N | MX-4101N | MX-5001N Operation Manual Suite - Page 659
from being moved, or automatically or manually deleted. Three properties are available for saved To protect a "Confidential" file, a password is set. (The password must be entered to retrieve the file.) page 6-29) 1 Job Settings file-01 Select the job. Print Move Name 1 8½x11 Cancel F. Color - Sharp MX-5001N | MX-4100N | MX-4101N | MX-5001N Operation Manual Suite - Page 660
DOCUMENT FILING Restrictions on changing the property • A file that is set to "Sharing" can be changed to "Protect" or "Confidential". However, a "Sharing" file that is saved in the Quick File folder can only be changed to "Protect". • A file that is set to "Protect" can be changed to "Sharing" or " - Sharp MX-5001N | MX-4100N | MX-4101N | MX-5001N Operation Manual Suite - Page 661
to a different folder). After selecting the desired file, follow the steps below. ☞ SELECTING A FILE (page 6-29) 1 Job Settings file-01 Select the job. Print Move Name 1 8½x11 Cancel F. Color Send Delete Property Change Image Check Detail Touch the [Move] key. 2 Job Settings / Move file - Sharp MX-5001N | MX-4100N | MX-4101N | MX-5001N Operation Manual Suite - Page 662
DOCUMENT FILING 4 Job Settings / Move file-01 Name 1 Select the folder the file is moved to. File Name Move to: file-01 User 2 8½x11 Cancel F. Color Move Touch the [Move] key. A file whose property is "Protect" cannot be moved. To move a protected file, change its property to "Sharing" - Sharp MX-5001N | MX-4100N | MX-4101N | MX-5001N Operation Manual Suite - Page 663
be deleted. Select the file that you wish to delete and touch the [Delete] key. ☞ SELECTING A FILE (page 6-29) 1 Job Settings file-01 Select the job. Print Move Name 1 8½x11 Cancel F. Color Send Delete Property Change Image Check Detail Touch the [Delete] key. Delete the file data? Name - Sharp MX-5001N | MX-4100N | MX-4101N | MX-5001N Operation Manual Suite - Page 664
the job. Print Move Name 1 8½x11 Cancel F. Color Send Delete Property Change Image Check Detail Touch the [Image Check] key. Image Check file-01 2 Name 1 8½x11 F. Color Back Check the image of the file. For information on each of the items, see "IMAGE CHECK SCREEN" (page 6-45). Display - Sharp MX-5001N | MX-4100N | MX-4101N | MX-5001N Operation Manual Suite - Page 665
Check file-01 Name 1 8½x11 F. Color DOCUMENT FILING page or the next page. • Page number display: This shows the total number of pages and the current page number. You can touch the current page number key and enter a number with the numeric keys to go to that page number. For a print - Sharp MX-5001N | MX-4100N | MX-4101N | MX-5001N Operation Manual Suite - Page 666
/Delete Print Job Scan to Fax Job Internet Fax Select :03 04/04 001/001 OK 10:01 04/04 003/003 OK 10:00 page 6-30) ☞ PRINTING A STORED FILE (page 6-31) ☞ SENDING A STORED FILE (page 6-37) ☞ PROPERTIES OF STORED FILES (page 6-39) ☞ MOVING A STORED FILE (page 6-41) ☞ DELETING A STORED FILE (page - Sharp MX-5001N | MX-4100N | MX-4101N | MX-5001N Operation Manual Suite - Page 667
results] 1 (1) (2) COPY IMAGE SEND DOCUMENT FILING File Retrieve Scan to HDD Folder Select HDD Status Ex Data Access Main Folder User 1 User 3 User 5 User 7 User 9 All Folders ABCD Quick File Folder EFGHI User 2 User 4 User 6 User 8 User 10 JKLMN OPQRST UVWXYZ Search 1 2 Open the file - Sharp MX-5001N | MX-4100N | MX-4101N | MX-5001N Operation Manual Suite - Page 668
to search There are four ways to select the user name: (A) Touch the key of the user name. The touched user name is highlighted. If you accidentally select the wrong user name, touch the key of the correct name. (B) Touch the [Default User] key. The user name can be selected from the factory stored - Sharp MX-5001N | MX-4100N | MX-4101N | MX-5001N Operation Manual Suite - Page 669
DOCUMENT FILING Search User Name Name 1 File or Folder Name Password file-01 4 Cancel Start Search Touch the [Start Search] key. The search file in the list. • You can also use the Web pages to search for a file. Click [Document Operations], [Document Filing], and then [Search] in the Web - Sharp MX-5001N | MX-4100N | MX-4101N | MX-5001N Operation Manual Suite - Page 670
-01 file-02 file-03.tiff file-04 file-05.tiff Switch Display All Files Search Back User Name Name 1 Name 2 Name 3 Name 4 Name 5 Date 1 04/04/2010 2 04/04/2010 04/04/2010 04/04/2010 04/04/2010 Multi-File Print Touch the [Search] key. Search 3 User Name File or Folder Name Password - Sharp MX-5001N | MX-4100N | MX-4101N | MX-5001N Operation Manual Suite - Page 671
to search There are four ways to select the user name: (A) Touch the key of the user name. The touched user name is highlighted. If you accidentally select the wrong user name, touch the key of the correct name. (B) Touch the [Default User] key. The user name can be selected from the factory stored - Sharp MX-5001N | MX-4100N | MX-4101N | MX-5001N Operation Manual Suite - Page 672
DOCUMENT FILING Search (1) (2) Cancel Start Search User Name Name 1 File or Folder Name Password file-01 Search within Current Folder 5 Start searching. (1) Touch the [Search within Current Folder] checkbox so that it is selected . To search only files that are in - Sharp MX-5001N | MX-4100N | MX-4101N | MX-5001N Operation Manual Suite - Page 673
7-20 • I-Fax Settings 7-20 Printer Condition Settings 7-21 • Printer Default Settings 7-21 • PCL Settings 7-22 • PostScript Setting 7-23 Document Filing Control 7-24 USB-Device Check 7-25 User Control 7-25 • Modify User Information 7-25 SYSTEM SETTINGS (ADMINISTRATOR) Accessing the - Sharp MX-5001N | MX-4100N | MX-4101N | MX-5001N Operation Manual Suite - Page 674
7-91 Change Administrator Password 7-94 Product Key 7-94 Data Backup 7-95 Storing/Calling of System Settings 7-96 Sharp OSA Settings 7-97 SYSTEM SETTINGS FOR FAX System Settings for Fax (General) List 7-98 Address Control 7-99 • Address Book 7-99 • F-Code Memory Box 7-101 Fax Data Receive - Sharp MX-5001N | MX-4100N | MX-4101N | MX-5001N Operation Manual Suite - Page 675
of the machine should promptly change the password after the machine is purchased. (For the factory default administrator password, see "TO THE ADMINISTRATOR OF THE MACHINE" in the Safety Guide.) To change the password, see "Change Administrator Password" (page 7-94). *To ensure a high level of - Sharp MX-5001N | MX-4100N | MX-4101N | MX-5001N Operation Manual Suite - Page 676
some of the individual settings. Example: Address book screen Address Book Add New (1) Index Switch ABC Sorting Order Search Number Sort Address AAA box) To search for an address, touch and enter a search number. When a user is searched for, the icon changes to . (4) [Back] key Returns you to - Sharp MX-5001N | MX-4100N | MX-4101N | MX-5001N Operation Manual Suite - Page 677
Condition Settings Default Settings Address Control Document Filing Control Admin Password Exit List Print (User) Fax Data Receive/Forward USB-Device Check Touch the item in this screen that you wish to configure. For detailed explanations of each of the settings, see the following pages of - Sharp MX-5001N | MX-4100N | MX-4101N | MX-5001N Operation Manual Suite - Page 678
Time Setting X Date Format ● Keyboard Select Factory default setting Page 7-11 - - Disable Disable [MM/DD/YYYY], [/], [Last], [12-Hour] English (US) 7-11 7-12 List Print (User) Item ■ List Print (User) ● All Custom Setting List ● Printer Test Page ● Sending Address List ● Document Filing Folder - Sharp MX-5001N | MX-4100N | MX-4101N | MX-5001N Operation Manual Suite - Page 679
Index ● Program - User 1 - Fax Data Receive/Forward Item ■ Fax Data Receive/Forward ● I-Fax Settings* X Reception Start X Manual Reception Key in Initial Screen X Forward Received Data * When the Internet fax expansion kit is installed. Factory default setting - Enabled - Page 7-13 7-13 7-15 - Sharp MX-5001N | MX-4100N | MX-4101N | MX-5001N Operation Manual Suite - Page 680
X N-Up Print X Fit To Page X Output ‹ Print per Unit X Quick File ● PCL Settings X PCL Symbol Set Setting X PCL Font Setting X PCL Line Feed Code X Wide A4 ● PostScript Setting* X Print PS Errors X Binary Processing * When the PS3 expansion kit is installed. SYSTEM SETTINGS Factory default setting - Sharp MX-5001N | MX-4100N | MX-4101N | MX-5001N Operation Manual Suite - Page 681
- Page 7-25 User Control Item Factory default setting Page ■ User Control* 7-25 ● Modify User Information - 7-25 * When user authentication is enabled and the logged-in user does not have the authority to configure the system settings (administrator) (excluding factory default users - Sharp MX-5001N | MX-4100N | MX-4101N | MX-5001N Operation Manual Suite - Page 682
feeder Each sheet is counted as two pages when two-sided scanning is performed. • Stapler (when a finisher or saddle stitch finisher is installed) Two-position stapling and pamphlet stapling are counted as "2". • The items displayed (or printed) will vary depending on the machine specifications - Sharp MX-5001N | MX-4100N | MX-4101N | MX-5001N Operation Manual Suite - Page 683
be configured. Touch the [Default Settings] key and select when daylight saving time begins. Date Format The format used to print the date on lists and other output can be changed. Item (page 7-61) has been enabled in the system settings (administrator), the date and time cannot be set. 7- - Sharp MX-5001N | MX-4100N | MX-4101N | MX-5001N Operation Manual Suite - Page 684
PCL Internal Font List • PCL Extended Font List • PS Font List • PS Extended Font List • NIC Page Sending Address List Lists can be printed of various addresses stored in the machine. • Individual List • Group List • Program List • Memory Box List • All Sending Address List Document Filing Folder - Sharp MX-5001N | MX-4100N | MX-4101N | MX-5001N Operation Manual Suite - Page 685
colored paper, or a user type, [Fax] and [Internet Fax] cannot be selected. • If the paper size specified here is different from the size of paper that is loaded in a tray, a problem or misfeed may result when printing " (page 7-67) has been enabled in the system settings (administrator), the - Sharp MX-5001N | MX-4100N | MX-4101N | MX-5001N Operation Manual Suite - Page 686
4 (When a stand/2 x 500 sheet paper drawer is installed) Tray 5 (When a large capacity tray is installed) Bypass Plain, Pre-Printed, Recycled, Letter Head, Pre-Punched, Color, User Type In addition to the paper types of trays 1 to 4, Heavy Paper 2*1, Thin Paper, Glossy Paper 8-1/2" x 11", A4 Auto - Sharp MX-5001N | MX-4100N | MX-4101N | MX-5001N Operation Manual Suite - Page 687
Up to 7 paper types can be stored. Item Description Type Name Store any name. The factory default names are "User Type 1" - "User Type 7". Fixed Paper Side Disable Duplex Disable Staple Disable Punch Enable this setting when paper with a front and reverse side is used. Enable this setting when - Sharp MX-5001N | MX-4100N | MX-4101N | MX-5001N Operation Manual Suite - Page 688
The key is specified as a forwarding destination in the "Default Address Setting" (page 7-81) or "Inbound Routing Settings" / "Document Administration Function" (in the Web pages). - When "Disable Registering Destination from Operation Panel" (page 7-77) is enabled. If the key is used in a reserved - Sharp MX-5001N | MX-4100N | MX-4101N | MX-5001N Operation Manual Suite - Page 689
Fax: Store an Internet fax address in a one-touch key. • Direct SMTP:Store a Direct SMTP address in a one-touch key. • Fax: Store a fax an e-mail address (max. 64 characters). File Format Specify the format of compression mode for black & white mode and color mode. • File Type: Set the format - Sharp MX-5001N | MX-4100N | MX-4101N | MX-5001N Operation Manual Suite - Page 690
in the same way as when storing an address for a mode. Note that when an Internet fax address is directly entered, the compression mode and reception report cannot be selected. • Address Review: This displays a list of the selected addresses. Addresses can be deleted from this list if needed - Sharp MX-5001N | MX-4100N | MX-4101N | MX-5001N Operation Manual Suite - Page 691
program. Storing a program Touch the [Add New] key in the above screen to open more information, see "Settings" (page 7-19). Delete a program with change the number, enter a number from 01 to 48. A number that has in which the address is used (Internet fax, scan, etc.) When a mode is selected, - Sharp MX-5001N | MX-4100N | MX-4101N | MX-5001N Operation Manual Suite - Page 692
settings (administrator). • If forwarding was not successful because the transmission was canceled or a communication error occurred, the faxes that were to be forwarded will return to the print queue on the machine. • If the initial pages of a fax were successfully printed, only those pages that - Sharp MX-5001N | MX-4100N | MX-4101N | MX-5001N Operation Manual Suite - Page 693
printing using the printer driver, the printer driver settings take precedence over the printer condition settings. Settings Copies Orientation Item Default Paper Size Default Output Tray Default Paper Type Initial Resolution Setting Disable Blank Page Print Line Thickness*3 2-Sided Print Color - Sharp MX-5001N | MX-4100N | MX-4101N | MX-5001N Operation Manual Suite - Page 694
SYSTEM SETTINGS Item Selections Output • (Use Print per Unit) • (Do not use Print per Unit) • Staple Position*1: None, 1 Staple at Back, 2 Staples, 2 Staples (Top) • (Use Punch) • (Do not use Punch) Quick File • (Disabled) • (Enabled) *1 When a saddle stitch finisher or finisher is installed. - Sharp MX-5001N | MX-4100N | MX-4101N | MX-5001N Operation Manual Suite - Page 695
is received in binary format. Settings Item Print PS Error Binary Processing Description Selections When a PS (PostScript) error • (Enabled) occurs during PostScript printing, • (Disabled) this setting determines whether or not an error notice is printed. Receive PostScript data in binary - Sharp MX-5001N | MX-4100N | MX-4101N | MX-5001N Operation Manual Suite - Page 696
User 1 User 3 User 5 User 7 User 9 ABCD Back Add New EFGHI JKLMN User 2 User 4 User 6 User 8 User 10 OPQRST UVWXYZ 1 2 • [Add New] key Use this to add see "Settings" (page 7-24). Delete a folder with the [Delete] key. • If the folder has a password, the correct password must be entered before - Sharp MX-5001N | MX-4100N | MX-4101N | MX-5001N Operation Manual Suite - Page 697
Information The information of the currently logged in user can be edited. Settings Item User Name Initial Index Login Name Password My Folder E-mail Address Authentication Settings Pages Limit Group Authority Group Favorite Operation Group User Number Deleting an account Description Edit the name - Sharp MX-5001N | MX-4100N | MX-4101N | MX-5001N Operation Manual Suite - Page 698
Tray Settings Printer Condition Settings Default Settings Address Control Document Filing Control Admin Password Exit List Print (User) Fax Data Receive/Forward USB-Device Check Touch the [Admin Password] key. System Settings Admin Password Cancel OK Enter the administrator password. (From - Sharp MX-5001N | MX-4100N | MX-4101N | MX-5001N Operation Manual Suite - Page 699
method, the [E-mail Address] key will appear below the "User Name". • For the factory default administrator password, see "TO THE ADMINISTRATOR OF THE MACHINE" in the Safety Guide. • This completes the administrator login procedure. The system settings (administrator) can be used. 7-27 Contents - Sharp MX-5001N | MX-4100N | MX-4101N | MX-5001N Operation Manual Suite - Page 700
Login by user number User Authentication SYSTEM SETTINGS Touch the [Admin Login] key. OK Enter the administrator password in the administrator password entry screen. This completes the administrator login procedure. The system settings (administrator) can be used. Admin Login • In addition to - Sharp MX-5001N | MX-4100N | MX-4101N | MX-5001N Operation Manual Suite - Page 701
administrator login are shown below. The default FAX" (page 7-98). User Control Item Factory default setting ■ User Control ● User Authentication Setting X User Authentication X Authentication Method Setting X Device Account Mode Setting Disabled Authenticate a User by Login Name and Password - Sharp MX-5001N | MX-4100N | MX-4101N | MX-5001N Operation Manual Suite - Page 702
■ Energy Save ● Toner Save Mode X Print X Copy ● Auto Setting X Default Display Settings X Disabling of Job Priority Operation X Disabling of Bypass Printing X Key Operation Factory default setting Disabled Disabled Enabled 60 min. 15 min. Page 7-59 7-59 7-59 7-59 7-59 Factory default setting - Sharp MX-5001N | MX-4100N | MX-4101N | MX-5001N Operation Manual Suite - Page 703
‹ View Password Entry Screen SYSTEM SETTINGS Factory default setting Address Review File Quick File Page - - - - All Disabled Full Page Scan Send: Full Page Internet Fax Send: Full Page Fax Send: Full Page Data Entry: Full Page USB Memory: Full Page Reception Data: Twice Memory Box: Twice - Sharp MX-5001N | MX-4100N | MX-4101N | MX-5001N Operation Manual Suite - Page 704
in the Web pages. *2 When the Internet fax expansion kit is installed. *3 When the facsimile expansion kit is installed. *4 When the application integration module is installed. Device Control Item ■ Device Control ● Other Settings X Original Feeding Mode X Saddle Stitch Position Adjust*1 X Auto - Sharp MX-5001N | MX-4100N | MX-4101N | MX-5001N Operation Manual Suite - Page 705
/1 x 500 sheet paper drawer / stand/2 x 500 sheet paper drawer is installed. *5 When a saddle stitch finisher or finisher is installed. *6 When a punch module is installed. *7 When a color-related problem has occurred. Copy Function Settings Item ■ Copy Function Settings ● Initial Status Settings - Sharp MX-5001N | MX-4100N | MX-4101N | MX-5001N Operation Manual Suite - Page 706
Tray that is Supplied the Paper X B/W 600dpi x 600dpi Scanning Mode for Document Feeder X B/W Quick Scan from Document Glass ● Color Adjustments X Initial Color Balance Setting X Auto Color Calibration * When a saddle stitch finisher is installed. Network Settings ■ Network Settings ● IPv4 Settings - Sharp MX-5001N | MX-4100N | MX-4101N | MX-5001N Operation Manual Suite - Page 707
Settings Item ■ Printer Settings ● Default Settings X Prohibit Notice Page Printing X Prohibit Test Page Printing X A4/Letter Size Auto Change X Print Density Level ‹ Color ‹ Black & White X CMYK Exposure Adjustment X Bypass Tray Settings ‹ Enable Detected Paper Size in Bypass Tray ‹ Enable Selected - Sharp MX-5001N | MX-4100N | MX-4101N | MX-5001N Operation Manual Suite - Page 708
• Scan • Internet Fax*1 • Fax*2 ‹ Default Exposure Settings • Original Image Type • Moiré Reduction ‹ Must Input Next Address Key at Broadcast Setting ‹ Scan Complete Registering Destination on Web Page*3 ‹ Disable Registration of Program ‹ Disable Registration of Memory Box ‹ Disable Destination - Sharp MX-5001N | MX-4100N | MX-4101N | MX-5001N Operation Manual Suite - Page 709
Job Status Screen ‹ Disable Scan Function • USB Memory Scan • PC Scan ‹ Pre-Setting Mail Signature X Default Address Setting ● I-Fax Settings*1 X I-Fax Default Settings ‹ Auto Wake Up Print ‹ Compression Setting Factory default setting - - - - - Mono 2 Auto, Grayscale Disabled PDF MMR (G4) Medium - Sharp MX-5001N | MX-4100N | MX-4101N | MX-5001N Operation Manual Suite - Page 710
‹ Rotation Sending Setting ‹ Printing Page Number at Receiver ‹ Recall in Case of Line Busy ‹ Recall in Case of Communication Error X I-Fax Receive Settings ‹ Auto Receive Reduce Setting ‹ Duplex Reception Setting ‹ Set Address for Data Forwarding • Direct SMTP • Add Hostname or IP Address Too - Sharp MX-5001N | MX-4100N | MX-4101N | MX-5001N Operation Manual Suite - Page 711
‹ Moiré Reduction X Initial Resolution Settings X Color Data Compression Ratio Setting X Scan Complete Sound Setting X Default Output Tray*1 X Disable Stamp for Reprinting X Batch Print Settings ‹ Selection of [All Users] is not allowed. ‹ Selection of [User Unknown] is not allowed. X Erase Width - Sharp MX-5001N | MX-4100N | MX-4101N | MX-5001N Operation Manual Suite - Page 712
Fax Send (Incl. PC-I-Fax)*2 ‹ Fax Send (Incl. PC-Fax)*3 ‹ Scan to HDD ● Automatic Deletion of File Settings *1 When the exit tray unit is installed. *2 When the Internet fax expansion kit is installed. *3 When the facsimile expansion kit is installed. SYSTEM SETTINGS Factory default setting Page - Sharp MX-5001N | MX-4100N | MX-4101N | MX-5001N Operation Manual Suite - Page 713
List Print (Administrator) Item ■ List Print (Administrator) ● Administrator Settings List ● Image Sending Activity Report ● Data .1X Setting SYSTEM SETTINGS Factory default setting - - - - - Page 7-89 7-89 7-89 7-89 7-89 7-89 Factory default setting Page 7-90 Enabled Disabled Disabled Enabled - Sharp MX-5001N | MX-4100N | MX-4101N | MX-5001N Operation Manual Suite - Page 714
of Punch*4 X Disabling of Color Mode*5 X Disabling of Master Machine Mode X Disabling of Slave Machine Mode ● Copy Function Settings X Disabling Deletion of Job Programs X Disabling of Bypass-Tray in Duplex Copy X Disabling of Auto Paper Selection ● Printer Settings X Prohibit Notice Page Printing - Sharp MX-5001N | MX-4100N | MX-4101N | MX-5001N Operation Manual Suite - Page 715
*3 When a saddle stitch finisher or finisher is installed. *4 When a punch module is installed. *5 When a color-related problem has occurred. *6 When network connection is enabled. *7 When the Internet fax expansion kit is installed. *8 When the facsimile expansion kit is installed. Page 7-92 7-92 - Sharp MX-5001N | MX-4100N | MX-4101N | MX-5001N Operation Manual Suite - Page 716
Settings Item Factory default setting ■ Sharp OSA Settings ● External Account Setting*1 X External Account Control Disabled X Enable Authentication by External Server Disabled ● USB Driver Settings*2 X External Keyboard Internal driver X USB Memory Internal driver X Level of Encryption - Sharp MX-5001N | MX-4100N | MX-4101N | MX-5001N Operation Manual Suite - Page 717
authentication for color copying only". • If auto login fails for some reason when auto login is enabled, or the login user does not have administrator rights, all system settings or the system settings (administrator) will lock. In this event, the administrator should touch the [Admin Password] key - Sharp MX-5001N | MX-4100N | MX-4101N | MX-5001N Operation Manual Suite - Page 718
panel for 5 minutes can be canceled by clicking [User Control] - [Default Settings] - [Release the Lock on Machine Operation Panel] in the Web page menu. Automatically print stored jobs after login When retention is enabled in the printer driver and print data has been spooled to the machine, you - Sharp MX-5001N | MX-4100N | MX-4101N | MX-5001N Operation Manual Suite - Page 719
the machine. Admin: admin User: user Guest: guest user folder stored in the machine. Do not enter if the default folder is specified. The names of attributes that the machine obtains from the LDAP server can be changed in "Pages the administrator of the LDAP server. Users auto-registered When - Sharp MX-5001N | MX-4100N | MX-4101N | MX-5001N Operation Manual Suite - Page 720
the administrator of the machine. Display Usage Status after Login When user authentication is enabled, this setting specifies whether or not the page counts of a user appear when the user logs in. User Information Print The following lists can be printed. • User List • List of Number of Pages Used - Sharp MX-5001N | MX-4100N | MX-4101N | MX-5001N Operation Manual Suite - Page 721
a print job is executed using invalid user information. (This cannot be selected in the login user screen.) For settings related to each of the users, see the following table. User Name Administrator User Other User Login Name admin users Other Password (See the Safety Guide.)* 1 users - Sharp MX-5001N | MX-4100N | MX-4101N | MX-5001N Operation Manual Suite - Page 722
Unlimited*1 Authority Group*2 Admin User*1 Guest*1 Favorite Operation Group Following the System Settings*1 *1 Items that can be changed. *2 For detailed information of each of the settings, see "List of settings and factory default settings of template groups" (page 7-53). Settings Item - Sharp MX-5001N | MX-4100N | MX-4101N | MX-5001N Operation Manual Suite - Page 723
stored groups when the user is stored. When the [Page Limit Group List] key is touched, the following screen appears. System Settings Page Limit Group List Group 1 Group 3 Group 5 Group 7 Group 9 Group 11 Group 2 Group 4 Group 6 Group 8 Group 10 Group 12 Back Add New • [Add New] key Use this - Sharp MX-5001N | MX-4100N | MX-4101N | MX-5001N Operation Manual Suite - Page 724
edit/delete screen for that group. Storing an authority group Touch the [Add New] key in the above screen to open a registration screen. Up default settings of template groups" (page 7-53). To return a group to the factory default state, select [Return to Administrator Authority], [Return to User - Sharp MX-5001N | MX-4100N | MX-4101N | MX-5001N Operation Manual Suite - Page 725
Modes Usage Printer Color Mode Approval Setting FTP Pull Print USB Memory Direct Print Network Folder Pull Print Image Send Approval Settings for Each Mode • E-mail • FTP • Desktop • Network Folder • USB Memory • PC Scan • Internet Fax Send • PC-I-Fax Send • Fax Send • PC-Fax Send Color Scan Special - Sharp MX-5001N | MX-4100N | MX-4101N | MX-5001N Operation Manual Suite - Page 726
Backup Prohibited Custom Link Setting Prohibited Operation Manual Download Allowed *1 For information on each setting, see the system settings (general/administrator) lists. *2 All allowed except "Change Administrator Password". Only Black & White Allowed Prohibited Prohibited [1-Sided - Sharp MX-5001N | MX-4100N | MX-4101N | MX-5001N Operation Manual Suite - Page 727
language that appears on the keyboard. Select the color pattern used in the touch panel. When retention is enabled in the printer driver and print data has been spooled to the machine, you can have the spooled print data automatically print out when the user who enabled retention logs in. Select the - Sharp MX-5001N | MX-4100N | MX-4101N | MX-5001N Operation Manual Suite - Page 728
Screen to be the Registration Model Display Title Title Display the User Name Display the Date and Time Background Image Design Template Layout of a maximum of 70 characters for the title name. Show the currently logged-in user name on the home screen. Show the date and time on the home screen. - Sharp MX-5001N | MX-4100N | MX-4101N | MX-5001N Operation Manual Suite - Page 729
This displays the total number of pages printed by each user. When the [User Count] key is touched, the following screen appears. User Count Index Switch ABC Sorting Order Search Number Select All Users Administrator Other User *Name 2 *Name 4 Name 6 Show Delete User Name 1 Name 3 Name 5 Name - Sharp MX-5001N | MX-4100N | MX-4101N | MX-5001N Operation Manual Suite - Page 730
of the selected item to "0". Clear All Counts Reset all items of the selected user to "0". When multiple users are selected Item Description Show Counts The counts and the number of pages remaining of the selected users are shown by function. Clear Count Reset the count of the selected item - Sharp MX-5001N | MX-4100N | MX-4101N | MX-5001N Operation Manual Suite - Page 731
toner used for printing. Print data Print example when "Toner Save Mode" is enabled [Print] in Toner Save Mode is only effective when the machine's printer driver is not used. When the printer driver is used, the printer driver . This function reduces your power costs, and at the same time - Sharp MX-5001N | MX-4100N | MX-4101N | MX-5001N Operation Manual Suite - Page 732
base screen of fax, Internet fax, and network scanner modes Exposure adjustment screen for Scan to HDD in Default Display Settings Set the screen that appears after auto clear and login. You can select the base screen of copy, fax / image send, or document filing mode, the home screen, or the Sharp - Sharp MX-5001N | MX-4100N | MX-4101N | MX-5001N Operation Manual Suite - Page 733
function. Initial Original Count Setting This specifies whether or not "Original Count" in the special functions is enabled for each function. Copy • Copy Image Send • Scan • Internet Fax • Fax Job • Data Entry Document Filing • Scan to HDD SYSTEM SETTINGS 7-61 Contents - Sharp MX-5001N | MX-4100N | MX-4101N | MX-5001N Operation Manual Suite - Page 734
of six color patterns can be selected for the color pattern customized keys to their factory default state. This setting can only be configured in the Web pages. It cannot be configured for the title name. Display the User Name* Show the currently logged-in user name on the home screen. Display - Sharp MX-5001N | MX-4100N | MX-4101N | MX-5001N Operation Manual Suite - Page 735
Preview Set the selection state of the [Preview] key in each of the screens below. Copy Image Send • Scan Send • Internet Fax Send • Fax Send • Data Entry • USB Memory Scan • Address Book Document Filing • Scan to HDD Default Preview Display Set the display zoom ratio of the preview screen for copy - Sharp MX-5001N | MX-4100N | MX-4101N | MX-5001N Operation Manual Suite - Page 736
Width) • Slow Scan Mode • Blank Page Skip (image send*) * Excluding fax mode and Internet fax mode. Saddle Stitch Position Adjust (When a saddle stitch finisher is installed.) When a saddle stitch finisher is installed, this setting is used to adjust the stapling position (folding position - Sharp MX-5001N | MX-4100N | MX-4101N | MX-5001N Operation Manual Suite - Page 737
If the colors are out of place on the printed surface when color printing is performed, the print positions of the colors can be adjusted . During optimization, the following operations are not possible: • Web page access, reception of print data • Use of keys on the operation panel • Turning off - Sharp MX-5001N | MX-4100N | MX-4101N | MX-5001N Operation Manual Suite - Page 738
SYSTEM SETTINGS Original Size Detector Setting One of the 8 groups of standard original sizes shown below can be selected for detection by the original size detection function. Selections Inch-1 Inch-2 Inch-3 AB-1 AB-2 AB-3 AB-4 AB-5 Detectable original sizes Document glass Document feeder - Sharp MX-5001N | MX-4100N | MX-4101N | MX-5001N Operation Manual Suite - Page 739
is installed.) This setting is used to prohibit punching, such as when the punch module of the finisher or the saddle stitch finisher malfunctions. Disabling of Color Mode (When a color-related problem has occurred.) When a color-related problem has occurred and printing is not possible, the use of - Sharp MX-5001N | MX-4100N | MX-4101N | MX-5001N Operation Manual Suite - Page 740
functions of the machine (not just the copy function). Initial Status Settings The copier settings are reset when the [POWER] key ( ) is turned on, default settings for copy mode. The following settings can be changed: Item Description Color Mode Paper Tray Exposure Type Configure default color - Sharp MX-5001N | MX-4100N | MX-4101N | MX-5001N Operation Manual Suite - Page 741
Color Use this to set the copy exposure level in color (A5R) paper. Add or Change Extra Preset Page Enable this setting to have the [Fit to Page] key always appear in the card shot screen. Automatic Saddle Stitch (When a saddle stitch finisher is installed.) This is used to have saddle stitch stapling - Sharp MX-5001N | MX-4100N | MX-4101N | MX-5001N Operation Manual Suite - Page 742
media enters the reversing unit, a misfeed or damage to the unit may result. If special used, fine print and thin lines are reproduced with greater clarity, however, the scanning speed is copy in black and white with the [COLOR START] key. B/W Quick Scan from Document Glass The resolution for copying - Sharp MX-5001N | MX-4100N | MX-4101N | MX-5001N Operation Manual Suite - Page 743
to the factory default values (all color balance values are "0" for the 8 levels of each color). Auto Color Calibration This is used to perform automatic color correction when the color in color copies is off. The machine prints a test patch, the test patch is scanned, and the color is automatically - Sharp MX-5001N | MX-4100N | MX-4101N | MX-5001N Operation Manual Suite - Page 744
"TURNING THE POWER ON AND OFF" (page 1-15) in "1. BEFORE USING THE automatically. If the IP address changes, printing will not be possible. IPv6 Settings When manually enter an IP address. Manual Address Enter the IP address of the machine. Prefix Length Enter the prefix length (0 to 128). Default - Sharp MX-5001N | MX-4100N | MX-4101N | MX-5001N Operation Manual Suite - Page 745
] key to configure the settings. Default Settings Printer condition settings are described below. Prohibit Notice Page Printing This setting is used to disable printing of notice pages. Prohibit Test Page Printing This setting is used to disable printing of test pages. When this setting is enabled - Sharp MX-5001N | MX-4100N | MX-4101N | MX-5001N Operation Manual Suite - Page 746
corresponding ASCII text. This allows you to check whether or not print data from the computer is being transmitted to the machine correctly. as those of "USB Port Emulation Switching". • Unless printer errors occur frequently, it is recommended that you use the factory default setting "Auto". - Sharp MX-5001N | MX-4100N | MX-4101N | MX-5001N Operation Manual Suite - Page 747
patch is scanned, and the color is automatically corrected. After the [Execute] key is touched and a test patch is printed, a message appears prompting you to begin automatic calibration. Place the test patch on the document glass as shown below (so that the thin line at the edge of the page is to - Sharp MX-5001N | MX-4100N | MX-4101N | MX-5001N Operation Manual Suite - Page 748
] or [Manual]. When [Manual] is selected, the exposure can be set to one of 5 levels. Default Original Image Type Select the original type beforehand to enable transmission at a resolution suitable for the original (only in scan mode and USB memory mode). The settings are shown below. • Text/Printed - Sharp MX-5001N | MX-4100N | MX-4101N | MX-5001N Operation Manual Suite - Page 749
Setting for Received Data Print This function holds received faxes and Internet faxes in memory without printing them. The faxes can be printed by entering a password (factory default setting: 0000) with the numeric keys. Password When [Hold Setting for Received Data Print] is enabled, enter the - Sharp MX-5001N | MX-4100N | MX-4101N | MX-5001N Operation Manual Suite - Page 750
of the following items: • E-mail • FTP • Desktop • Network Folder • Internet Fax (Including Direct SMTP) • Fax Select All: Select all items. Clear Checked: Clear all selections. Disable Registration of Memory Box Disable all types of memory box registration. Configure the setting for each of the - Sharp MX-5001N | MX-4100N | MX-4101N | MX-5001N Operation Manual Suite - Page 751
and the name of the user. Sender Data Registration Use this to store the sender name for fax and Internet fax, the sender number for fax, and the sender address for Internet fax. The stored sender name and fax sender number or Internet sender address will be printed at the top of the received - Sharp MX-5001N | MX-4100N | MX-4101N | MX-5001N Operation Manual Suite - Page 752
the default file format for Scan to E-mail and USB memory mode when the e-mail address is entered manually by touching the [Address Entry] key. File Format PDF, TIFF, JPEG*1, Compact PDF*2,4, Compact PDF (Ultra Fine)*2,4, Encrypt PDF, Encry./Compact PDF*3,4, Encrypt/Compact PDF (Ultra Fine)*3,4, XPS - Sharp MX-5001N | MX-4100N | MX-4101N | MX-5001N Operation Manual Suite - Page 753
fax destinations, the limit set in "Maximum Size of E-mail Attachments (E-mail)" (page 7-81) is given priority. Default Address Setting A default address can be stored that makes it possible to transmit by simply pressing the [COLOR Scan Function This is used to disable PC scan and USB memory scan. - Sharp MX-5001N | MX-4100N | MX-4101N | MX-5001N Operation Manual Suite - Page 754
These settings can be configured when the Internet fax expansion kit is installed. SYSTEM SETTINGS I-Fax Default Settings These settings are used to configure the default settings for Internet fax. Auto Wake Up Print When the [POWER] key ( ) is "off" (but the main power switch is "on") and - Sharp MX-5001N | MX-4100N | MX-4101N | MX-5001N Operation Manual Suite - Page 755
). • The Image Sending Activity Report can also be printed manually. See "List Print (Administrator)" (page 7-89) in the system settings (administrator). Body Text Print Select Setting Image files attached to Internet faxes are normally printed. This setting can be enabled to also have the e-mail - Sharp MX-5001N | MX-4100N | MX-4101N | MX-5001N Operation Manual Suite - Page 756
unable to print a received fax, the fax can be forwarded to another machine. This setting is used to configure the address of the other machine. Forwarding to Enter the forwarding address (maximum of 64 characters). Direct SMTP Select this to enable forwarding when direct SMTP is used. Add Hostname - Sharp MX-5001N | MX-4100N | MX-4101N | MX-5001N Operation Manual Suite - Page 757
print setting when "Auto Receive Reduce Setting" (page 7-84) is not enabled. A3 RX Reduce When an A3 size fax is received, this function reduces the fax to add a new address or domain (maximum of 50) from which reception is to be rejected or allowed. Enter the address/domain (maximum of 64 characters - Sharp MX-5001N | MX-4100N | MX-4101N | MX-5001N Operation Manual Suite - Page 758
sets the default settings for black & white and color when Scan to HDD is used. The settings are shown below. Color Auto, Full Color, 2 Color Black & White Mono 2, Grayscale Default Exposure Settings Default exposure settings for document filing can be configured. Select [Auto] or [Manual]. If you - Sharp MX-5001N | MX-4100N | MX-4101N | MX-5001N Operation Manual Suite - Page 759
this setting to have the [Fit to Page] key always appear in the card shot screen. Default Output Tray (When the exit tray unit is installed.) This setting is used to select the default output tray for printing a file stored by Scan to HDD. The items that appear will vary depending the machine - Sharp MX-5001N | MX-4100N | MX-4101N | MX-5001N Operation Manual Suite - Page 760
The items that appear will vary depending on the functions that have been added to the machine. Item Print Scan Send Internet Fax Send (Incl. PC-I-Fax) Fax Send (Incl. PC-Fax) Description For each mode, select whether or not printing of stored files is allowed. For each mode, select whether or not - Sharp MX-5001N | MX-4100N | MX-4101N | MX-5001N Operation Manual Suite - Page 761
and forwarding settings can be printed. • Anti Junk Fax Number List • Anti Junk Mail/Domain Name List • Inbound Routing List • Document Admin List Web Settings List (When network connection is enabled.) This prints a list of the settings that are configured in the Web pages. Metadata Set List (When - Sharp MX-5001N | MX-4100N | MX-4101N | MX-5001N Operation Manual Suite - Page 762
. IEEE802.1X Setting IEEE802.1X can be used to authenticate a user to allow use of the machine. IEEE802.1X protocol defines port-based the settings may not allow printing, scanning, or Web page display. In this case, deselect this setting and change the Web page settings. IPsec Settings IPsec can - Sharp MX-5001N | MX-4100N | MX-4101N | MX-5001N Operation Manual Suite - Page 763
function. Disabling of Stapler (When a finisher or saddle stitch finisher is installed.) This setting is used to prohibit stapling, such as when the stapler unit of the finisher or the saddle stitch finisher malfunctions. Disabling of Punch (When a punch module is installed.) This setting is used to - Sharp MX-5001N | MX-4100N | MX-4101N | MX-5001N Operation Manual Suite - Page 764
SHARP service department to have a service technician cancel the setting and resolve the color-related problem. Disabling of Master Machine Mode This prohibits the use of the machine as a master machine for tandem printing Disable Scan Function This is used to disable PC scan and USB memory scan. - Sharp MX-5001N | MX-4100N | MX-4101N | MX-5001N Operation Manual Suite - Page 765
of the following items: • E-mail • FTP • Desktop • Network Folder • Internet Fax (Including Direct SMTP) • Fax Select All: Select all items. Clear Checked: Clear all selections. Disable Registration of Memory Box Disable all types of memory box registration. Configure the setting for each of the - Sharp MX-5001N | MX-4100N | MX-4101N | MX-5001N Operation Manual Suite - Page 766
the administrator password. Password Enter the new administrator password (5 to 32 characters). Password (confirmation) Enter the new password once again for confirmation purposes. For the factory default administrator password, see "TO THE ADMINISTRATOR OF THE MACHINE" in the Safety Guide. Product - Sharp MX-5001N | MX-4100N | MX-4101N | MX-5001N Operation Manual Suite - Page 767
to import data written to USB memory back into the machine. The following data is not copied when device cloning is performed: • List print and fax forwarding items. • Count and device status display items. • IP address of the machine, device name, administrator password, sender names for image send - Sharp MX-5001N | MX-4100N | MX-4101N | MX-5001N Operation Manual Suite - Page 768
you wish to create a record of the current settings before restoring the factory default settings, print the current settings using "List Print (Administrator)" (page 7-89) in the system settings (administrator). When settings are changed, the changes will take effect after the machine is restarted - Sharp MX-5001N | MX-4100N | MX-4101N | MX-5001N Operation Manual Suite - Page 769
module or application communication module, set the driver of the USB device to be connected. External Keyboard Select whether the internal or external driver for the external keyboard is used. USB Memory Select whether the internal or external USB memory driver is used. Level of Encryption Select - Sharp MX-5001N | MX-4100N | MX-4101N | MX-5001N Operation Manual Suite - Page 770
● Address Book ● F-Code Memory Box Item Fax Data Receive/Forward Item ■ Fax Data Receive/Forward ● Fax Settings X Receive Setting X Multiple Set Print X Staple* X Forward Received Data * When a saddle stitch finisher or finisher is installed. Factory default setting - - Page 7-99 7-99 7-101 - Sharp MX-5001N | MX-4100N | MX-4101N | MX-5001N Operation Manual Suite - Page 771
Book This section explains items specifically used for fax in "Address Control". For items that are also used for other functions, see "Address Control" (page 7-16). When the [Address Book] key is touched, the following screen appears. Address Book Add New Index Switch ABC Sorting Order Search - Sharp MX-5001N | MX-4100N | MX-4101N | MX-5001N Operation Manual Suite - Page 772
of the destination (maximum of 64 digits). Entering a pause between digits of the number Touch the [-] key at the place where you wish to enter a pause. To enter an F-code (sub-address and passcode)... (1) Enter the destination fax number. (2) Touch the [/] key. (3) Enter the sub address (maximum - Sharp MX-5001N | MX-4100N | MX-4101N | MX-5001N Operation Manual Suite - Page 773
the [Add New] key in the above screen to open a registration screen. A total of 100 F-code memory boxes for all functions (polling memory, confidential, and relay broadcast) can be stored. For information on the settings, see "Settings" (page 7-102). Editing and deleting a memory box A memory box - Sharp MX-5001N | MX-4100N | MX-4101N | MX-5001N Operation Manual Suite - Page 774
the other machine to poll your machine (request transmission) using F-code communication. • Confidential: Store a memory box for F-code confidential reception. In addition, store a "Print PIN" in the memory box to print faxes received by confidential reception. The sub-address and passcode that you - Sharp MX-5001N | MX-4100N | MX-4101N | MX-5001N Operation Manual Suite - Page 775
memory until it can be printed. • All faxes received are forwarded. Note, however, that faxes received to an F-code confidential memory box cannot be forwarded. • To store a forwarding fax number, see "Set the Telephone Number for Data Forwarding" (page 7-109) in the system settings (administrator - Sharp MX-5001N | MX-4100N | MX-4101N | MX-5001N Operation Manual Suite - Page 776
Settings (Administrator)" (page 7-26). • Depending on the machine specifications and peripheral devices installed, it may not be possible to use some settings. Image Send Settings Item ■ Image Send Settings ● Fax Settings X Fax Default Settings ‹ Dial Mode Setting ‹ Auto Wake Up Print ‹ Pause - Sharp MX-5001N | MX-4100N | MX-4101N | MX-5001N Operation Manual Suite - Page 777
‹ Receiving Date & Time Print ‹ A3 RX Reduce ‹ Fax Output Settings X Allow/Reject Number Setting X Fax Polling Security SYSTEM SETTINGS Factory default setting Page Print Out Error Report Only Print Out All Report No Printed Report Print Out Notice Page 7-107 Disabled Disabled Enabled Off - Sharp MX-5001N | MX-4100N | MX-4101N | MX-5001N Operation Manual Suite - Page 778
SYSTEM SETTINGS Image Send Settings Settings related to the image send function (scan, Internet fax, etc.) can be configured. Touch the [Image Send Settings] key to configure the settings. Fax Settings Fax Default Settings The fax settings can be enabled or disabled to suit the needs of your - Sharp MX-5001N | MX-4100N | MX-4101N | MX-5001N Operation Manual Suite - Page 779
Report can also be printed manually. See "List Print (Administrator)" (page 7-89). ECM Line conditions can sometimes distort a transmitted fax image. When ECM (Error Correction Mode) is turned on, pages that are distorted are automatically re-transmitted. If the other machine supports Super G3, ECM - Sharp MX-5001N | MX-4100N | MX-4101N | MX-5001N Operation Manual Suite - Page 780
pages have been scanned. Note that this setting does not apply to manual transmission. Printing Page Number at Receiver This setting is used to add the page number to the top of each fax page printed communication error occurs. Interval to Wait Between Recall Attempts (min.) in Case of Error The - Sharp MX-5001N | MX-4100N | MX-4101N | MX-5001N Operation Manual Suite - Page 781
setting is used to program the fax number of the destination fax machine. Only one forwarding fax number can be programmed (maximum of 64 digits). To insert a pause between digits of the number, touch the [-] key. If you wish to specify an F-code confidential memory box in the destination machine - Sharp MX-5001N | MX-4100N | MX-4101N | MX-5001N Operation Manual Suite - Page 782
faxes are stapled. Paper Size When a finisher is installed, select the paper used for printing of received faxes. • This setting can only be used when the [Multiple Set Print] and [Staple] checkboxes are selected in "Fax Settings" (page allow reception from all numbers. Add New Store a new number - Sharp MX-5001N | MX-4100N | MX-4101N | MX-5001N Operation Manual Suite - Page 783
settings are for regular polling memory using the Public Box. Set Fax Polling Security When the memory polling function is used, this setting determines whether any machine will be allowed to poll your machine, or only machines that have been stored in your machine. Add New When the Polling Security - Sharp MX-5001N | MX-4100N | MX-4101N | MX-5001N Operation Manual Suite - Page 784
8-3 REMOVING STAPLE JAMS • FINISHER 8-8 • FINISHER (LARGE STACKER 8-10 • SADDLE STITCH FINISHER 8-12 COPYING • PROBLEMS RELATED TO COPYING OPERATION 8-16 • PROBLEMS RELATED TO COPY RESULTS 8-18 PRINTING • PROBLEMS RELATED TO PRINTING OPERATION 8-19 • PROBLEMS RELATED TO PRINT RESULTS 8-22 - Sharp MX-5001N | MX-4100N | MX-4101N | MX-5001N Operation Manual Suite - Page 785
. Fusing unit Transfer belt REMOVING MISFEEDS When a paper misfeed occurs, the message "A misfeed has occurred." will appear in the touch panel and printing and scanning will stop. In this event, touch the [Information] key in the touch panel. When the key is touched, instructions for removing - Sharp MX-5001N | MX-4100N | MX-4101N | MX-5001N Operation Manual Suite - Page 786
TROUBLESHOOTING PAPER MISFEED ILLUSTRATIONS If you require more information when reading the instructions in the touch panel, see the paper misfeed illustrations below. Refer to the illustration below and then go to the appropriate illustration (1 to 16) for your situation. ☞ (1)-(2): page 8-3, - Sharp MX-5001N | MX-4100N | MX-4101N | MX-5001N Operation Manual Suite - Page 787
Pull out the paper pass unit and remove the misfed paper. Pull out the document feeder tray and remove the misfed paper. Open the automatic document feeder. Rotate the transfer roller in the direction of the arrow and remove the original. (When using the MX-4101N/5001N) Open the document feeder - Sharp MX-5001N | MX-4100N | MX-4101N | MX-5001N Operation Manual Suite - Page 788
4 (side) The misfeed may have occurred inside the machine. Check carefully and remove it. Caution The fusing unit area is hot. Take care not to burn yourself. (Do not touch any metal parts.) Unfused toner may remain on the paper that is removed. Take care that it does not soil your hands - Sharp MX-5001N | MX-4100N | MX-4101N | MX-5001N Operation Manual Suite - Page 789
in the finisher Open the front cover. TROUBLESHOOTING (14) Paper misfeed in the saddle stitch finisher (top) Open the top cover and remove the misfed paper. While pressing the lever over to the left, slide the finisher to the left until it stops. When a punch module is installed. Open the front - Sharp MX-5001N | MX-4100N | MX-4101N | MX-5001N Operation Manual Suite - Page 790
TROUBLESHOOTING (15) Paper misfeed in the large capacity tray While holding the tray release lever, carefully slide the large capacity tray away from the main unit until it stops. (16) Paper misfeed in the saddle stitch finisher (bottom) Open the front cover. Move lever (A) to the right (A) and - Sharp MX-5001N | MX-4100N | MX-4101N | MX-5001N Operation Manual Suite - Page 791
TROUBLESHOOTING REMOVING STAPLE JAMS Follow the steps below to remove a staple jam. ☞ FINISHER ☞ FINISHER (LARGE STACKER) (page 8-10) ☞ SADDLE STITCH FINISHER (page 8-12) FINISHER Open the cover. 1 While pressing the lever over to the left, slide the finisher to the left until it stops. 2 Gently - Sharp MX-5001N | MX-4100N | MX-4101N | MX-5001N Operation Manual Suite - Page 792
TROUBLESHOOTING Lower the lever at the front end of the staple case. 5 Replace the staple case. Push the staple case in until it clicks into place. 6 Slide the finisher back to the right. Gently slide the finisher back to the right until it locks - Sharp MX-5001N | MX-4100N | MX-4101N | MX-5001N Operation Manual Suite - Page 793
STACKER) TROUBLESHOOTING Open the front cover. 1 Squeeze the green parts of the staple case and pull the case up and then out. 2 Lower the lever at the front end of the staple case and remove the jammed staple. Remove the leading staple if it is bent. If bent staples remain, a staple jam will - Sharp MX-5001N | MX-4100N | MX-4101N | MX-5001N Operation Manual Suite - Page 794
TROUBLESHOOTING Push the staple case firmly back in. Push the staple case in until it clicks into place. 5 Close the front cover. 6 Make a test print or copy using the saddle stitch function to verify that stapling takes place correctly. 8-11 Contents - Sharp MX-5001N | MX-4100N | MX-4101N | MX-5001N Operation Manual Suite - Page 795
SADDLE STITCH FINISHER Finisher unit TROUBLESHOOTING Open the front cover. 1 While pulling the lever, slide the saddle stitch finisher to the left until it stops. 2 Lower the staple case release lever and remove the staple case. 3 Pull the staple case out to the right. Raise the lever at the - Sharp MX-5001N | MX-4100N | MX-4101N | MX-5001N Operation Manual Suite - Page 796
TROUBLESHOOTING Replace the staple case. Push the staple case in until it clicks into place. 6 Push the saddle stitch finisher back and latch it to the machine. 7 Close the front cover. 8 Make a test print or copy in staple sort mode to verify that stapling takes place correctly. 8-13 Contents - Sharp MX-5001N | MX-4100N | MX-4101N | MX-5001N Operation Manual Suite - Page 797
TROUBLESHOOTING Saddle stitch unit Before starting this procedure, remove all output from the output tray of the saddle stitch finisher. Do not replace removed output in the output tray. Open the side cover. 1 Remove the staple cartridge from the staple unit. 2 Lock the staple unit. Push the - Sharp MX-5001N | MX-4100N | MX-4101N | MX-5001N Operation Manual Suite - Page 798
TROUBLESHOOTING Push down knob (B). 6 (B) Load new staple cartridges. Remove the cover from each staple cartridge and then install the cartridge. 7 Close the side cover. 8 Make a test print or copy using the saddle stitch function to verify that stapling takes place correctly. 8-15 Contents - Sharp MX-5001N | MX-4100N | MX-4101N | MX-5001N Operation Manual Suite - Page 799
8-18 • Colors are off 8-18 • Part of the image is cut off 8-18 • Copies come out blank 8-18 • If you cannot find the item that you are looking for in the above table of contents, see "GENERAL PROBLEMS" (page 8-39). • If you are unable to solve a problem using the solutions in this manual, switch - Sharp MX-5001N | MX-4100N | MX-4101N | MX-5001N Operation Manual Suite - Page 800
TROUBLESHOOTING Problem Image rotation does not take place. Two-sided copying does not take place. The paper size of a tray cannot be set. Point to check Did you select the paper size or copy ratio manually two-sided printing. ➞ System Guide administrator). Check with your administrator. When user - Sharp MX-5001N | MX-4100N | MX-4101N | MX-5001N Operation Manual Suite - Page 801
TROUBLESHOOTING PROBLEMS RELATED TO COPY RESULTS Problem The image is too light or too dark. Colors are Administrator) > "Copy Function Settings" > "Color Adjustment" > "Auto Color Calibration" Select an appropriate ratio setting. When copying an AB size original, specify the original size manually - Sharp MX-5001N | MX-4100N | MX-4101N | MX-5001N Operation Manual Suite - Page 802
TROUBLESHOOTING PRINTING PROBLEMS RELATED TO PRINTING OPERATION • Printing does not take place 8-19 • Color printing does not take place 8-21 • Two-sided printing does not take place 8-21 • Direct printing of a file in a shared folder on a computer is not possible 8-21 • A tray, finisher, or - Sharp MX-5001N | MX-4100N | MX-4101N | MX-5001N Operation Manual Suite - Page 803
TROUBLESHOOTING Problem Printing does not take place. Point to check Is the IP address selected correctly? (Windows) Are you using a printer port created using Standard TCP/IP Port? (Windows 2000/XP/Server 2003/Vista/ Server 2008) Is "Connect via" set to [Ethernet] for AppleTalk? (Mac OS - Sharp MX-5001N | MX-4100N | MX-4101N | MX-5001N Operation Manual Suite - Page 804
your user settings. Check with your administrator. Select "Automatic" or "Color" for the color mode setting. The color mode setting is configured as follows: Windows: On the [Color] tab of the printer driver. Macintosh: In the [Color] menu of the print window. In Windows, [Black and White Print] can - Sharp MX-5001N | MX-4100N | MX-4101N | MX-5001N Operation Manual Suite - Page 805
PCL5c printer driver.) Windows: The resolution setting is selected in the [Advanced] tab of the printer driver properties window. Macintosh: Select the resolution in the [Advanced] menu of the print window. (In Mac OS v10.5, select the resolution on the [Color] menu in the print window.) Brightness - Sharp MX-5001N | MX-4100N | MX-4101N | MX-5001N Operation Manual Suite - Page 806
TROUBLESHOOTING Problem type of paper (tab paper, punch paper, etc.) that can only printing. The 180 degree rotation setting is selected as follows: Windows: On the [Main] tab of the printer driver. Macintosh (OS X v10.3.9 to 10.5.1): On the [Page Setup] menu. (Landscape orientation only.) (In Mac OS - Sharp MX-5001N | MX-4100N | MX-4101N | MX-5001N Operation Manual Suite - Page 807
TROUBLESHOOTING Problem Many nonsense characters are printed. Point to check Is your computer or the machine in an unstable state? Solution If little free space remains in the memory or hard drive of your computer, or many jobs have been spooled on the machine and it has little free memory - Sharp MX-5001N | MX-4100N | MX-4101N | MX-5001N Operation Manual Suite - Page 808
TROUBLESHOOTING FACSIMILE PROBLEMS RELATED TO TRANSMISSION • Transmission does not take place 8-26 • The transmitted fax prints out blank at the receiving side 8-27 • The transmitted fax is reduced by the receiving fax machine 8-27 • Transmission does not begin at the specified time 8-28 - Sharp MX-5001N | MX-4100N | MX-4101N | MX-5001N Operation Manual Suite - Page 809
] key. The machine supports error correction mode (ECM) and is configured to automatically resend any part of a fax that is distorted due to noise on the line. ➞ System Settings (Administrator) > "Image Send Settings" > "Fax Settings" > "Fax Default Settings" > "ECM" If the memory becomes full, the - Sharp MX-5001N | MX-4100N | MX-4101N | MX-5001N Operation Manual Suite - Page 810
TROUBLESHOOTING Problem Transmission does not take place. The transmitted fax prints out blank at the receiving side. The transmitted fax is reduced by the receiving fax passcode correct? (When using F-code communication) Have functions been disabled by the administrator? Is the original placed face - Sharp MX-5001N | MX-4100N | MX-4101N | MX-5001N Operation Manual Suite - Page 811
you to add toner or paper? (Printing is not possible when this screen appears.) Does a password entry screen appear? Has cut-off printing been disabled in the system settings (administrator)? Is forwarding (Inbound Routing function) selected in the Web page for a received fax? Is little free memory - Sharp MX-5001N | MX-4100N | MX-4101N | MX-5001N Operation Manual Suite - Page 812
TROUBLESHOOTING Problem The machine does not begin fax reception. Point to check Has the reception mode been set to "Manual Reception" in the system settings? Is little free memory remaining? Solution When the reception mode is set to "Manual Reception", the machine will not receive faxes - Sharp MX-5001N | MX-4100N | MX-4101N | MX-5001N Operation Manual Suite - Page 813
TROUBLESHOOTING PROBLEMS RELATED TO ONE-TOUCH INDIVIDUAL KEYS / GROUP KEYS Problem A one-touch individual key or group key cannot be stored. Point to check Has the maximum number of keys been stored? Have functions been disabled by the administrator? Solution Delete one-touch keys and group keys - Sharp MX-5001N | MX-4100N | MX-4101N | MX-5001N Operation Manual Suite - Page 814
TROUBLESHOOTING SCANNING / INTERNET FAX PROBLEMS RELATED TO SCANNING / INTERNET FAX OPERATION • Transmission does not take place 8-31 • An address cannot be specified 8-32 • Mode cannot be selected 8-32 • Auto selection of the color mode does not take place correctly 8-32 • The received image - Sharp MX-5001N | MX-4100N | MX-4101N | MX-5001N Operation Manual Suite - Page 815
TROUBLESHOOTING Problem Transmission does not take place. An address cannot be specified. Mode cannot be selected. Point to check Does the image file exceed the e-mail attachment limit set in the system settings (administrator)? Did the image file exceed the file attachment size limit of your mail - Sharp MX-5001N | MX-4100N | MX-4101N | MX-5001N Operation Manual Suite - Page 816
TROUBLESHOOTING Problem The received image file cannot be opened. Transmission takes a long time. A destination is pre-selected. Cannot write to USB memory. (When using USB Memory Scan.) Point to check Does the viewer program used by the recipient support the format of the received image data? - Sharp MX-5001N | MX-4100N | MX-4101N | MX-5001N Operation Manual Suite - Page 817
TROUBLESHOOTING PROBLEMS RELATED TO SCAN RESULTS Problem The scanned image is clipped. Point to check Is the original scan size setting smaller than the actual original size? The quality of the scanned image is poor. Is the original printed matter such as a book or magazine? When scanning a - Sharp MX-5001N | MX-4100N | MX-4101N | MX-5001N Operation Manual Suite - Page 818
To create the file as a JPEG file, change the color mode to [Full Color] and then press the [COLOR START] key. When scanning from the TWAIN driver with [Mono 2 gradation] selected from the [Color Mode] of the "Custom Settings" window, check the "B/W Threshold" setting. A large threshold value makes - Sharp MX-5001N | MX-4100N | MX-4101N | MX-5001N Operation Manual Suite - Page 819
TROUBLESHOOTING PROBLEMS RELATED TO ONE-TOUCH INDIVIDUAL KEYS / GROUP KEYS Problem A one-touch individual key or group key cannot be stored. Point to check Has the maximum number of keys been stored? Have functions been disabled by the administrator Settings > "List Print (User)" > "Sending - Sharp MX-5001N | MX-4100N | MX-4101N | MX-5001N Operation Manual Suite - Page 820
or received to be lost. PROBLEMS RELATED TO FILING Problem Document filing does not take place. Point to check Did you select document filing settings in the printer driver? Have functions been disabled by the administrator? A filed data can not be printed. Have functions been disabled by - Sharp MX-5001N | MX-4100N | MX-4101N | MX-5001N Operation Manual Suite - Page 821
TROUBLESHOOTING Problem A job cannot be stored in a custom folder. Point to check Do custom folders appear in "Folder Information"? (When printing) Does the custom folder have a password? Solution Click the [Get Folder Name] button in the document filing save screen of the printer driver to call - Sharp MX-5001N | MX-4100N | MX-4101N | MX-5001N Operation Manual Suite - Page 822
paper 8-45 PROBLEMS RELATED TO PERIPHERAL DEVICES • The connected USB device cannot be used 8-45 • The connected USB memory cannot be used 8-45 • The finisher / saddle stitch finisher does not operate 8-45 • Stapling does not take place (including pamphlet stapling 8-45 • Punching does not - Sharp MX-5001N | MX-4100N | MX-4101N | MX-5001N Operation Manual Suite - Page 823
information. (If you do not know your user information, contact your administrator.) Auto Login failed due to a problem on the network. Contact your administrator. If you are the administrator, touch the [Admin Password] key, log in as an administrator, and temporarily change the auto login settings - Sharp MX-5001N | MX-4100N | MX-4101N | MX-5001N Operation Manual Suite - Page 824
or nearest SHARP Service Department, inform them of the displayed error code.) Add paper as instructed by the message in the touch panel. When toner runs low, a message will appear to inform you that the toner cartridge must be replaced. To replace the toner cartridge, see "MAINTENANCE" (page 1-59 - Sharp MX-5001N | MX-4100N | MX-4101N | MX-5001N Operation Manual Suite - Page 825
TROUBLESHOOTING PROBLEMS RELATED TO PAPER FEEDING AND OUTPUT Problem The original SHARP-recommended paper. Using paper that is not supported may result in misfeeds, creases, or smudges. ☞ "SUPPLIES" in the Safety Guide For paper that is prohibited or not recommended, see "USEABLE PAPER" (page - Sharp MX-5001N | MX-4100N | MX-4101N | MX-5001N Operation Manual Suite - Page 826
the width of the paper. Adjust the original guides to the width of the paper. Some functions may have been disabled in the system settings (administrator). Check with your administrator. PROBLEMS RELATED TO QUALITY / PRINT RESULTS Problem Lines appear in the scanned image. Point to check Are the - Sharp MX-5001N | MX-4100N | MX-4101N | MX-5001N Operation Manual Suite - Page 827
, or on both sides following two-sided printing. Take care that the image does not overlap the punch holes. Does a message appear indicating the need for maintenance? Contact your dealer or nearest SHARP Service Department as soon as possible. Toner does not adhere well or creases appear in - Sharp MX-5001N | MX-4100N | MX-4101N | MX-5001N Operation Manual Suite - Page 828
Tray Settings" > "Tray Settings" PROBLEMS RELATED TO PERIPHERAL DEVICES Problem The connected USB device cannot be used. The connected USB memory cannot be used. The finisher / saddle stitch finisher does not operate. Stapling does not take place (including pamphlet stapling). Point to check Is - Sharp MX-5001N | MX-4100N | MX-4101N | MX-5001N Operation Manual Suite - Page 829
administrator? Does a message appear instructing you to check the punch module? Is a different size of paper mixed in? Is a paper size that cannot be punched included in the print job? Is the tray selected in the printer driver set to a paper type that cannot be punched? Solution Replace the staple - Sharp MX-5001N | MX-4100N | MX-4101N | MX-5001N Operation Manual Suite - Page 830
Settings" > "Other Settings" > "Auto Clear Setting" Contact your dealer or nearest SHARP Service Department. For the factory default administrator password, see "TO THE ADMINISTRATOR OF THE MACHINE" in the Safety Guide. After changing the password, take special care to remember it. 8-47 Contents - Sharp MX-5001N | MX-4100N | MX-4101N | MX-5001N Operation Manual Suite - Page 831
Operation Guide MODEL: MX-4100N MX-4101N MX-5001N SHARP ELECTRONICS CORPORATION 1 Sharp Plaza, Mahwah, New Jersey 07495-1163. www.sharpusa.com SHARP ELECTRONICS OF CANADA LTD. 335 Britannia Road East, Mississauga, Ontario, L4Z 1W9 MX5001-US-Z2 - Sharp MX-5001N | MX-4100N | MX-4101N | MX-5001N Operation Manual Suite - Page 832
MODEL: MX-4100N MX-4101N MX-5000N MX-5001N DIGITAL FULL COLOR MULTIFUNCTIONAL SYSTEM Software Setup Guide BEFORE INSTALLING THE SOFTWARE SETUP IN A WINDOWS ENVIRONMENT SETUP IN A MACINTOSH ENVIRONMENT TROUBLESHOOTING Keep this manual close at hand for reference whenever needed. - Sharp MX-5001N | MX-4100N | MX-4101N | MX-5001N Operation Manual Suite - Page 833
for Windows Vista® in Windows® environments, and Mac OS X v10.4 in Macintosh environments. The screens may vary depending on the version of the operating system. • Wherever "MX-xxxx" appears in this manual, please substitute your model name for "xxxx". • This manual contains references to the fax - Sharp MX-5001N | MX-4100N | MX-4101N | MX-5001N Operation Manual Suite - Page 834
A MACINTOSH ENVIRONMENT MAC OS X 31 MAC OS 9.0 - 9.2.2 36 4 TROUBLESHOOTING WHEN INSTALLATION WAS NOT SUCCESSFUL. . 38 REMOVING THE SOFTWARE 41 2 SETUP IN A WINDOWS ENVIRONMENT OPENING THE SOFTWARE SELECTION SCREEN (FOR ALL SOFTWARE 8 INSTALLING THE PRINTER DRIVER / PC-FAX DRIVER 9 • WHEN THE - Sharp MX-5001N | MX-4100N | MX-4101N | MX-5001N Operation Manual Suite - Page 835
the PCL6 printer driver. If you have a problem printing from older software using the PCL6 printer driver, use the PCL5c printer driver. - PS printer driver The PS printer driver supports the PostScript 3 page description language developed by Adobe Systems Incorporated. - PPD driver The PPD driver - Sharp MX-5001N | MX-4100N | MX-4101N | MX-5001N Operation Manual Suite - Page 836
environment. ☞ MAC OS X (page 31) ☞ MAC OS 9.0 - 9.2.2 (page 36) • The PS3 expansion kit is required to use the machine as a printer in a Macintosh environment. In addition, the machine must be connected to a network. A USB connection cannot be used. • The scanner driver and PC-Fax driver cannot be - Sharp MX-5001N | MX-4100N | MX-4101N | MX-5001N Operation Manual Suite - Page 837
with the PS printer driver. (Install the PS printer driver and Macintosh PPD file from the "Software CD-ROM".) ☞ INSTALLING THE PS DISPLAY FONTS (page 28) X "PRINTER UTILITIES" CD-ROM that accompanies the Internet fax expansion kit (for Windows) This CD-ROM is used to update the PC-Fax driver on the - Sharp MX-5001N | MX-4100N | MX-4101N | MX-5001N Operation Manual Suite - Page 838
PC-Fax driver and scanner driver cannot be used. • For users of Windows 98/Me/NT 4.0 The CD-ROM does not include software for Windows 98/Me/NT 4.0. Contact your dealer or nearest authorized service representative if you want software for Windows 98/Me/NT 4.0. • For users of Windows NT 4.0/2000/XP - Sharp MX-5001N | MX-4100N | MX-4101N | MX-5001N Operation Manual Suite - Page 839
the software described in this manual. Operating system environment*1 Windows Macintosh Software PCL6 printer driver, PCL5c printer driver PS printer driver, PPD driver PC-Fax driver*2 Scanner driver Printer Status Monitor Printer Administration Utility Macintosh PPD file Required expansion kits - Sharp MX-5001N | MX-4100N | MX-4101N | MX-5001N Operation Manual Suite - Page 840
computer is a Windows computer. (The USB interface on the machine cannot be used in a Macintosh environment.) The machine and computer should be connected while the printer driver is being installed. If a USB cable is connected before the printer driver is installed, the printer driver will not be - Sharp MX-5001N | MX-4100N | MX-4101N | MX-5001N Operation Manual Suite - Page 841
THE PRINTER DRIVER / PC-FAX DRIVER • WHEN THE MACHINE IS CONNECTED TO A NETWORK - Standard installation: page 9 - Installation by specifying the machine's address: page 12 - Printing using the IPP function and the SSL function: page 14 • WHEN THE MACHINE WILL BE CONNECTED WITH A USB CABLE: page 16 - Sharp MX-5001N | MX-4100N | MX-4101N | MX-5001N Operation Manual Suite - Page 842
2008* * Administrator's rights are required to install the software. • The PS3 expansion kit is required to use the PS printer driver or the PPD driver. • To install the PPD driver when Windows 98/Me/NT 4.0 is used, see "USING THE STANDARD WINDOWS PS PRINTER DRIVER (Windows 98/Me/NT 4.0)" (page 21 - Sharp MX-5001N | MX-4100N | MX-4101N | MX-5001N Operation Manual Suite - Page 843
[Next] button. • When the PC-Fax driver is being installed, this screen does not appear. Go to the next step. • The PS3 expansion kit is required to use the PS printer driver or the PPD driver. • The [PPD] checkbox only appears if you are using Windows 2000/XP/Server 2003/Vista/Server 2008. • If - Sharp MX-5001N | MX-4100N | MX-4101N | MX-5001N Operation Manual Suite - Page 844
. • When the PC-Fax driver is being installed, this screen does not appear. Go to the next step. • If you are not installing the PCL printer driver (you are installing the PS printer driver or the PPD driver), select [No] and click the [Next] button. 9 Click the [Close] button in the window of step - Sharp MX-5001N | MX-4100N | MX-4101N | MX-5001N Operation Manual Suite - Page 845
the software selection screen appears in step 6 of "OPENING THE SOFTWARE SELECTION SCREEN (FOR ALL SOFTWARE)" (page 8), perform the steps below. 1 Click the [Printer Driver] button. To install the PC-Fax driver, click the [PC-Fax Driver] button on the "Disc 2" CD-ROM. 3 When you are asked how the - Sharp MX-5001N | MX-4100N | MX-4101N | MX-5001N Operation Manual Suite - Page 846
step. • The PS3 expansion kit is required to use the PS printer driver or the PPD driver. • The [PPD] checkbox only appears if you are using Windows 2000/XP/Server 2003/Vista/Server 2008. 7 Select whether or not you wish the printer to be your default printer and click the [Next] button. If you are - Sharp MX-5001N | MX-4100N | MX-4101N | MX-5001N Operation Manual Suite - Page 847
SETTINGS" in the Operation Guide. When the software selection screen appears in step 6 of "OPENING THE SOFTWARE SELECTION SCREEN (FOR ALL SOFTWARE)" (page 8), perform the steps below. 1 Click the [Printer Driver] button. To install the PC-Fax driver, click the [PC-Fax Driver] button on the "Disc - Sharp MX-5001N | MX-4100N | MX-4101N | MX-5001N Operation Manual Suite - Page 848
INSTALLING THE PRINTER DRIVER / PC-FAX DRIVER 5 Enter the machine's URL and PRINTER DRIVER FOR THE OPTIONS INSTALLED ON THE MACHINE" (page 22) to configure the printer driver settings. • If you installed the PS printer driver or the PPD driver, the PS display fonts can be installed from the "PRINTER - Sharp MX-5001N | MX-4100N | MX-4101N | MX-5001N Operation Manual Suite - Page 849
PS printer driver or the PPD driver. • To install the PPD driver when Windows 98/Me is used, see "USING THE STANDARD WINDOWS PS PRINTER DRIVER (Windows 98/Me/NT 4.0)" (page 21) and install the driver using the Add Printer Wizard. • To use the port created when the printer driver is installed for fax - Sharp MX-5001N | MX-4100N | MX-4101N | MX-5001N Operation Manual Suite - Page 850
purchase a shielded USB cable. 8 Installation of the PCL6 printer driver begins. When the "Found New Hardware Wizard" appears, select [Install the software automatically (Recommended)], click the [Next] button, and follow the on-screen instructions. • If you are using Windows Vista/Server 2008 - Sharp MX-5001N | MX-4100N | MX-4101N | MX-5001N Operation Manual Suite - Page 851
/ PC-FAX DRIVER When installing the PCL5c printer driver, PS printer driver, PPD driver, or PC-Fax driver Installation is possible even after the USB cable has been connected. When the software selection screen appears in step 6 of "OPENING THE SOFTWARE SELECTION SCREEN (FOR ALL SOFTWARE)" (page - Sharp MX-5001N | MX-4100N | MX-4101N | MX-5001N Operation Manual Suite - Page 852
on the [Ports] tab of the printer driver properties window. (In Windows 98/Me, this is the port selected in [Print to the following port] on the [Details] tab.) ☞ CHANGING THE PORT (page 29) • If you installed the PS printer driver or the PPD driver, the PS display fonts can be installed from the - Sharp MX-5001N | MX-4100N | MX-4101N | MX-5001N Operation Manual Suite - Page 853
is installed on the print server. • If the PPD driver is installed on the print server and the client computers are running Windows 98/Me/NT 4.0, see "USING THE STANDARD WINDOWS PS PRINTER DRIVER (Windows 98/Me/NT 4.0)" (page 21) to install the printer driver using the Add Printer Wizard. When the - Sharp MX-5001N | MX-4100N | MX-4101N | MX-5001N Operation Manual Suite - Page 854
THE PRINTER DRIVER / PC-FAX DRIVER USING THE STANDARD WINDOWS PS PRINTER DRIVER (Windows 98/Me/NT 4.0) If the PS3 expansion kit is installed on the machine and you wish to use the standard Windows 98/Me/NT 4.0 PS printer driver, follow the steps below to install the PPD driver using the Add Printer - Sharp MX-5001N | MX-4100N | MX-4101N | MX-5001N Operation Manual Suite - Page 855
When the PPD driver is installed" (page 24). X When the PCL printer driver or PS printer driver is installed 1 Click the [Start] button ( ), click [Control Panel], and then click [Printer]. • In Windows XP/Server 2003, click the [start] button and then click [Printers and Faxes]. • In Windows 98/Me - Sharp MX-5001N | MX-4100N | MX-4101N | MX-5001N Operation Manual Suite - Page 856
/ PC-FAX DRIVER (1) (2) (1) Select the options that are installed on the machine. (2) Click the [OK] button. To cancel the image settings, click the [Cancel] button. 6 Click the [OK] button in the printer properties window. If automatic configuration fails, configure the settings manually - Sharp MX-5001N | MX-4100N | MX-4101N | MX-5001N Operation Manual Suite - Page 857
INSTALLING THE PRINTER DRIVER / PC-FAX DRIVER X When the PPD driver is installed 1 Click the [Start] button ( ), click [Control Panel], and then click [Printer]. • In Windows XP/Server 2003, click the [start] button and then click [Printers and Faxes]. • In Windows 98/Me/NT 4.0/2000, click the [ - Sharp MX-5001N | MX-4100N | MX-4101N | MX-5001N Operation Manual Suite - Page 858
. The Printer Status Monitor cannot be used in the following situations: • When the machine is connected by a USB cable. • When printing to the machine using the IPP function. Supported operating systems: Windows 98/Me/NT 4.0*/2000*/XP*/Server 2003*/Vista*/Server 2008* * Administrator's rights - Sharp MX-5001N | MX-4100N | MX-4101N | MX-5001N Operation Manual Suite - Page 859
: Windows 98/Me/2000*/XP*/Server 2003*/Vista*/Server 2008* * Administrator's rights are required to install the software. After performing step 1 through step 5 of "OPENING THE SOFTWARE SELECTION SCREEN (FOR ALL SOFTWARE)" (page 8), continue the steps below. 1 Click the [Scanner Driver (TWAIN - Sharp MX-5001N | MX-4100N | MX-4101N | MX-5001N Operation Manual Suite - Page 860
"Address" menu and click the [OK] button. • Be sure to ask your system administrator (network administrator) for the IP address of the machine. • The name (host name) or IP address be entered.) INSTALLING THE SCANNER DRIVER 8 Click the [OK] button. This completes the configuration of the scanner - Sharp MX-5001N | MX-4100N | MX-4101N | MX-5001N Operation Manual Suite - Page 861
for the PS printer driver. 1 Insert the "PRINTER UTILITIES" CD-ROM that accompanies the PS3 expansion kit into your computer's CD-ROM drive. 6 Click the [PS Display Font] button. 2 Click the [Start] button ( ), click [Computer], and then double-click the [CD-ROM] icon ( ). • In Windows XP/Server - Sharp MX-5001N | MX-4100N | MX-4101N | MX-5001N Operation Manual Suite - Page 862
or have installed the PC-Fax driver when the machine is connected with a USB cable. 1 Click the [Start] button ( ), click [Control Panel], and then click [Printer]. • In Windows XP/Server 2003, click the [start] button and then click [Printers and Faxes]. • In Windows 98/Me/NT 4.0/2000, click - Sharp MX-5001N | MX-4100N | MX-4101N | MX-5001N Operation Manual Suite - Page 863
next step. 7 Make sure the created printer port is selected in the printer properties window and then click the [Apply] button. X When using a port created with "Standard TCP/IP Port" When using a port created using "Standard TCP/IP Port" in Windows 2000/XP/Server 2003/Vista/Server 2008, in the - Sharp MX-5001N | MX-4100N | MX-4101N | MX-5001N Operation Manual Suite - Page 864
v10.4.11, v10.5 - 10.5.1) ☞ MAC OS 9.0 - 9.2.2: page 36 • The PS3 expansion kit is required to use the machine as a printer in a Macintosh environment. In addition, the machine must be connected to a network. A USB connection cannot be used. • The scanner driver and PC-Fax driver cannot be used in - Sharp MX-5001N | MX-4100N | MX-4101N | MX-5001N Operation Manual Suite - Page 865
( ). If you are using Mac OS X v10.2.8, double-click the [Utilities] folder and then double-click the [Print Center] icon. If this is the first time you are installing a printer driver on your computer, a confirmation message will appear. Click the [Add] button. 13 Click [Add]. If the "Authenticate - Sharp MX-5001N | MX-4100N | MX-4101N | MX-5001N Operation Manual Suite - Page 866
" (page 35) to configure the printer driver settings. v10.4.11, v10.5 - 10.5.1 v10.2.8, v10.3.9 (1) (1) (2) (2) (3) (4) (1) Click the [Default Browser] icon. • If multiple AppleTalk zones are displayed, select the zone that includes the printer from the menu. • If you are using Mac OS X v10 - Sharp MX-5001N | MX-4100N | MX-4101N | MX-5001N Operation Manual Suite - Page 867
Click the machine's name. If you are using Mac OS X v10.5 to 10.5.1, click the [Options & Supplies] button, click the [Driver] tab and go to step 16. (2) Click [Show Info]. If you are using Mac OS X v10.2.8, select [Show Info] from the [Printers] menu. 16 Select the machine configuration. If you - Sharp MX-5001N | MX-4100N | MX-4101N | MX-5001N Operation Manual Suite - Page 868
quality image than a fax. If you wish to use the IPP function, follow these steps to select the PPD file when configuring the printer driver (step 14 on page 33). v10.4.11, v10.5 - 10.5.1 v10.2.8, v10.3.9 (1) (1) (2) (2) (3) (4) (1) Click the [IP Printer] icon. If you are using Mac OS X v10.5 to - Sharp MX-5001N | MX-4100N | MX-4101N | MX-5001N Operation Manual Suite - Page 869
Mac OS . 6 The License Agreement window will appear. Make sure PPD file begins. After the installation, a message prompting you to restart your computer will appear. Click the [OK] button and restart your computer. This completes the installation of the software. Next, configure the printer driver - Sharp MX-5001N | MX-4100N | MX-4101N | MX-5001N Operation Manual Suite - Page 870
the [Print] key of "All Custom Setting List". 14 Click the [OK] button in the window of step 12 to close the window. 15 Click the close box ( ) to close the "Chooser". This completes the configuration of the printer driver. Installing the screen fonts The screen fonts for Mac OS 9.0 - 9.2.2 are - Sharp MX-5001N | MX-4100N | MX-4101N | MX-5001N Operation Manual Suite - Page 871
The plug and play screen does not appear (USB connection in Windows 39 • The printer driver is not installed correctly by plug and play (USB connection in Windows 40 • The printer driver cannot be installed (Windows 2000/XP/Server 2003 40 Problem The software cannot be installed. The machine is - Sharp MX-5001N | MX-4100N | MX-4101N | MX-5001N Operation Manual Suite - Page 872
If these two items appear, USB should be useable. If a yellow exclamation point appears next to "Universal Serial Bus controllers" or the two items do not appear, refer to your computer manual or check with the manufacturer of your computer to enable USB and then reinstall the printer driver. 39 - Sharp MX-5001N | MX-4100N | MX-4101N | MX-5001N Operation Manual Suite - Page 873
WHEN INSTALLATION WAS NOT SUCCESSFUL Problem The printer driver is not installed correctly by plug and play (USB connection in Windows). Point to check Did you connect the machine to your computer before installing the printer driver? Solution In Windows 2000/XP/Server 2003/Vista/Server 2008, if - Sharp MX-5001N | MX-4100N | MX-4101N | MX-5001N Operation Manual Suite - Page 874
or driver that you wish to delete. For more information, see the manual for the operating system or Help. 4 Restart your computer. 1 Delete the printer that uses the machine's PPD file from the printer list. To show the printer list, see step 11 and 12 of "MAC OS X" (page 31). 2 Delete the PPD file - Sharp MX-5001N | MX-4100N | MX-4101N | MX-5001N Operation Manual Suite - Page 875
This manual has been printed using a vegetable-based soy oil ink to help protect the environment. PRINTED IN CHINA 2008H KS1 TINSE4228FCZZ MX-4100N/4101N/5000N/5001N Software Setup Guide - Sharp MX-5001N | MX-4100N | MX-4101N | MX-5001N Operation Manual Suite - Page 876
MODEL: MX-4100N MX-4101N MX-5001N DIGITAL FULL COLOR MULTIFUNCTIONAL SYSTEM Safety Guide Before installing this product, be sure to read the "CAUTIONS" and "INSTALLATION REQUIREMENTS" sections. Keep this manual close at hand for reference whenever needed. CAUTIONS INSTALLATION REQUIREMENTS - Sharp MX-5001N | MX-4100N | MX-4101N | MX-5001N Operation Manual Suite - Page 877
instruction also covers the optional units Authorized Sharp Printer Service Department Number Notice for Users in accordance with the instruction manual, may cause harmful user will be required to correct the interference at his own expense. This machine contains the software having modules developed - Sharp MX-5001N | MX-4100N | MX-4101N | MX-5001N Operation Manual Suite - Page 878
Finisher (large stacker 13 Saddle stitch finisher specifications 14 Punch module specifications (for finisher 15 Punch module specifications (for saddle stitch finisher 15 Printer specifications 16 Network scanner / Internet Fax specifications . . . 17 Pull scan function (TWAIN) specifications - Sharp MX-5001N | MX-4100N | MX-4101N | MX-5001N Operation Manual Suite - Page 879
loss of stored document data. "BATTERY DISPOSAL" THIS PRODUCT CONTAINS A LITHIUM PRIMARY MEMORY BACK-UP BATTERY THAT MUST BE DISPOSED OF PROPERLY. PLEASE CONTACT YOUR LOCAL SHARP DEALER OR AUTHORIZED SERVICE REPRESENTATIVE FOR ASSISTANCE IN DISPOSING OF THIS BATTERY. This product utilizes a CR coin - Sharp MX-5001N | MX-4100N | MX-4101N | MX-5001N Operation Manual Suite - Page 880
America and Europe) Output power 790 nm ±10 nm MX-4100N/4101N: 3.5 µs ±3.5 ns /7 mm Heavy paper 3.2µs ±3.2 ns /7 mm MX-5001N: 2.8 µs ±2.8 ns /7 mm Heavy paper Edition 1.2-2001) For North America: SAFETY PRECAUTIONS This Digital Equipment is rated Class 1 and complies with 21 CFR 1040.10 and 1040.11 - Sharp MX-5001N | MX-4100N | MX-4101N | MX-5001N Operation Manual Suite - Page 881
to allow the required space around the machine for servicing and proper ventilation. 5. The machine includes a built 23/32" (45cm) A small amount of ozone is produced within the printer during operation. The emission level is insufficient to cause any health hazard. copier in a ventilated area. 4 - Sharp MX-5001N | MX-4100N | MX-4101N | MX-5001N Operation Manual Suite - Page 882
for this product that can replaced by the user include paper, toner cartridges, and staple cartridges for the finisher. Be sure to use only SHARP-specified products for the toner cartridges, finisher staple cartridge, saddle stitch finisher staple cartridge, and transparency film. For best copying - Sharp MX-5001N | MX-4100N | MX-4101N | MX-5001N Operation Manual Suite - Page 883
Digital Full Color Multifunctional System MX-4100N/MX-4101N/MX-5001N Type Desktop Photoconductive type OPC drum Printing method Electrophotographic system (laser) Developer system Dry-type two-component magnetic brush development Fusing system Heat rollers Scanning resolution Document - Sharp MX-5001N | MX-4100N | MX-4101N | MX-5001N Operation Manual Suite - Page 884
of USB memory Memory capacity : Max. 32 GB Disk Format : FAT32 only Type B connector supports USB 2.0 (Hi speed) Required power supply AC 120 V ±10% 60 Hz Power consumption MX-4100N/MX4101N: 1.44kW MX-5001N: 1.92kW Typical electricity consumption MX-4100N: 12.95 kWh/week MX-4101N: 13 - Sharp MX-5001N | MX-4100N | MX-4101N | MX-5001N Operation Manual Suite - Page 885
Model MX-4100N/MX-4101N MX-5001N Copy ratio 100% / Reduced / Enlarged Copy mode Color copying Black and white copying Color copying copy and following copies when performing continuous one-sided copying of the same page (excluding offset output) using plain one-sided paper from a tray - Sharp MX-5001N | MX-4100N | MX-4101N | MX-5001N Operation Manual Suite - Page 886
document feeder specifications Model MX-4100N MX-4101N/MX-5001N Original sizes 11" x 17" to 5-1/2" x 8-1/2", A3 to A5, long paper (max. width 11-5/8" (297 mm) x max. length 39-23/64"*1 (1000 mm), scanning in mono 2 mode of one side only is possible in fax and image scan modes) Original weight - Sharp MX-5001N | MX-4100N | MX-4101N | MX-5001N Operation Manual Suite - Page 887
unit (right tray) specifications Model MX-TRX2 Output method Face-down output Output capacity 100 sheets (using SHARP-recommended 8-1/2" x 11" or A4 paper) Dimensions When tray is folded up: 11-3/8" (W) x 15-61/64" (D) x 2-3/64 tray SHARP-recommended plain paper, recycled paper, and colored - Sharp MX-5001N | MX-4100N | MX-4101N | MX-5001N Operation Manual Suite - Page 888
MX-LCX1 Paper sizes 8-1/2" x 11", A4 (paper size change must be performed by a service technician) Paper weight Plain paper (16 lbs. to 28 lbs. (60 g/m2 to 105 g/m2)) Paper capacity 3500 sheets (21 lbs. (80 g/m2)) Paper types SHARP-recommended plain paper, recycled paper, and colored - Sharp MX-5001N | MX-4100N | MX-4101N | MX-5001N Operation Manual Suite - Page 889
to 10 envelopes can be output. *3 The height of the sheets must not exceed 2-51/64" (71 mm). *4 The height of the sheets must not exceed 1-13/32" (35.5 mm). *5 The maximum number of sheets for stapling assumes a paper weight of 24 lbs. (90 g/m2) and includes two cover sheets of 28 - Sharp MX-5001N | MX-4100N | MX-4101N | MX-5001N Operation Manual Suite - Page 890
MX- 64" (W) x 25-25/64" (D) x 43-19/64 stapling*5 50 sheets (8-1/2" x 11", A4, B5, 16K 30 sheets (11" x 17", 8-1/2" x 14", 8-1/2" x 13-1/2", 8-1/2" x 13-2/5", 8-1/2" x 13", 8-1/2" x 11" A3, B4, A4R, 8K) (30 sheets when the sheets are the same width but different lengths.) *1 Paper pass unit stapling - Sharp MX-5001N | MX-4100N | MX-4101N | MX-5001N Operation Manual Suite - Page 891
of 28 lbs. bond to 140 lbs. index (106 g/m2 to 256 g/m2). *7 Allowed paper weights for saddle stitch stapling of plain paper include heavy paper (28 lbs. bond to 140 lbs. index (106 g/m2 to 256 g/m2)). Note: Special media such as transparency film and label sheets cannot be stapled or punched. 14 - Sharp MX-5001N | MX-4100N | MX-4101N | MX-5001N Operation Manual Suite - Page 892
17/32" (W) x 23-5/8" (D) x 39-11/64" (H) (115 mm (W) x 600 mm (D) x 995 mm (H)) Weight Approx. 17.7 lbs. (8 kg) Punch module specifications (for saddle stitch finisher) Model MX-PNX5B Hole punching 3 holes or 2 holes Allowed paper sizes for punching 3 holes: 11" x 17", 8-1/2" x 11", A3, A4 - Sharp MX-5001N | MX-4100N | MX-4101N | MX-5001N Operation Manual Suite - Page 893
10Base-T / 100Base-TX / 1000Base-T USB connectivity: Supports USB 2.0 (Hi speed)*3 Memory Standard system memory: 1 GB Expansion memory: 1 GB*5 Print area Entire page excluding margin of 11/64" (4.2 mm) at each edge. The actual print area may vary depending on the printer driver and the software - Sharp MX-5001N | MX-4100N | MX-4101N | MX-5001N Operation Manual Suite - Page 894
dpi. Scanning speed MX-4100N: Color (8-1/2" x 11" / A4) One-sided: 50 pages/min. (200 x 200 dpi), Two-sided: 16 pages/min. (200 x 200 dpi) Black and white (8-1/2" x 11" / A4) One-sided: 50 pages/min. (200 x 200 dpi), Two-sided: 16 pages/min. (200 x 200 dpi) MX-4101N/MX-5001N: Color (8-1/2" x 11 - Sharp MX-5001N | MX-4100N | MX-4101N | MX-5001N Operation Manual Suite - Page 895
the machine Dimensions 7-9/16" (W) x 2-3/64" (D) x 8-15/32" (H) (192 code transmission Supported (SUB/SEP (sub-address) and SID/PWD (passcode) signals can be transmitted / received) Image memory Scan to E-mail, Scan to FTP, Scan to Desktop, Scan to Network folder, Internet Fax, Fax and Group) - Sharp MX-5001N | MX-4100N | MX-4101N | MX-5001N Operation Manual Suite - Page 896
Contact at: ✂ Information that the administrator of the machine requires is printed on the back of this page. (Separate this page from the manual and keep it in a safe place. In addition, fill in the name of the administrator and the administrator's contact information in the left hand margin.) 19 - Sharp MX-5001N | MX-4100N | MX-4101N | MX-5001N Operation Manual Suite - Page 897
settings in the Web pages. In addition, an administrator can restrict access to other settings by enabling "User" accounts. The factory default passwords are shown below. User Administrator Factory default account users admin Factory default password users admin Forwarding all transmitted and - Sharp MX-5001N | MX-4100N | MX-4101N | MX-5001N Operation Manual Suite - Page 898
machine, you should complete the following steps: See "Own Name and Destination Set" on page 7-78 of Operation Guide. Important safety instructions • If any of your telephone equipment is not operating properly, you should immediately remove it from your telephone line, as it may cause harm to - Sharp MX-5001N | MX-4100N | MX-4101N | MX-5001N Operation Manual Suite - Page 899
service. If the equipment is causing harm to the telephone network, your telephone company may ask you to disconnect the equipment until the problem is resolved. If you have any questions or problems which cannot be solved by reading this manual, please contact. Sharp Electronics Corporation 1 Sharp - Sharp MX-5001N | MX-4100N | MX-4101N | MX-5001N Operation Manual Suite - Page 900
Full Color Multifunctional System MX-4101N Digital Full Color Multifunctional System MX-5001N Digital Full Color Multifunctional System In the event that this authorized dealer does not honor its warranty commitments, please contact the General Manager, Business Products Group, Sharp Electronics - Sharp MX-5001N | MX-4100N | MX-4101N | MX-5001N Operation Manual Suite - Page 901
TO THE ADMINISTRATOR OF THE MACHINE NOTICE FOR USERS IN CANADA "NOTICE : This product meets the applicable Industry Canada (IES) de cet équipement est indiqué sur le kit d'extension télécopieur. Sharp Electronics of Canada Ltd. 335 Britannia Road East, Mississauga, Ontario, L4Z 1W9 Canada 24 - Sharp MX-5001N | MX-4100N | MX-4101N | MX-5001N Operation Manual Suite - Page 902
and other countries. • Adobe, the Adobe logo, Acrobat, the Adobe PDF logo, and Reader are registered trademarks or trademarks of Adobe Systems Incorporated in the United States and other countries. • Macintosh, Mac OS, AppleTalk, EtherTalk and LaserWriter are trademarks of Apple Inc., registered in - Sharp MX-5001N | MX-4100N | MX-4101N | MX-5001N Operation Manual Suite - Page 903
MX-4100N/MX-4101N/MX-5001N Safety Guide SHARP ELECTRONICS CORPORATION 1 Sharp Plaza, Mahwah, New Jersey 07495-1163. www.sharpusa.com SHARP ELECTRONICS OF CANADA LTD. 335 Britannia Road East, Mississauga, Ontario, L4Z 1W9 This manual has been printed using a vegetable-based soy oil ink to help
-
 1
1 -
 2
2 -
 3
3 -
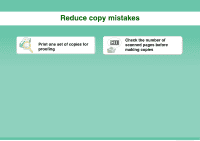 4
4 -
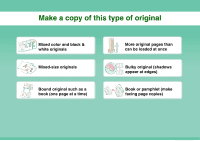 5
5 -
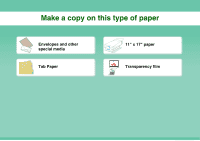 6
6 -
 7
7 -
8
-
9
-
10
-
11
-
12
-
13
-
14
-
15
-
16
-
17
-
18
-
19
-
20
-
21
-
22
-
23
-
24
-
25
-
26
-
27
-
28
-
29
-
30
-
31
-
32
-
33
-
34
-
35
-
36
-
37
-
38
-
39
-
40
-
41
-
42
-
43
-
44
-
45
-
46
-
47
-
48
-
49
-
50
-
51
-
52
-
53
-
54
-
55
-
56
-
57
-
58
-
59
-
60
-
61
-
62
-
63
-
64
-
65
-
66
-
67
-
68
-
69
-
70
-
71
-
72
-
73
-
74
-
75
-
76
-
77
-
78
-
79
-
80
-
81
-
82
-
83
-
84
-
85
-
86
-
87
-
88
-
89
-
90
-
91
-
92
-
93
-
94
-
95
-
96
-
97
-
98
-
99
-
100
-
101
-
102
-
103
-
104
-
105
-
106
-
107
-
108
-
109
-
110
-
111
-
112
-
113
-
114
-
115
-
116
-
117
-
118
-
119
-
120
-
121
-
122
-
123
-
124
-
125
-
126
-
127
-
128
-
129
-
130
-
131
-
132
-
133
-
134
-
135
-
136
-
137
-
138
-
139
-
140
-
141
-
142
-
143
-
144
-
145
-
146
-
147
-
148
-
149
-
150
-
151
-
152
-
153
-
154
-
155
-
156
-
157
-
158
-
159
-
160
-
161
-
162
-
163
-
164
-
165
-
166
-
167
-
168
-
169
-
170
-
171
-
172
-
173
-
174
-
175
-
176
-
177
-
178
-
179
-
180
-
181
-
182
-
183
-
184
-
185
-
186
-
187
-
188
-
189
-
190
-
191
-
192
-
193
-
194
-
195
-
196
-
197
-
198
-
199
-
200
-
201
-
202
-
203
-
204
-
205
-
206
-
207
-
208
-
209
-
210
-
211
-
212
-
213
-
214
-
215
-
216
-
217
-
218
-
219
-
220
-
221
-
222
-
223
-
224
-
225
-
226
-
227
-
228
-
229
-
230
-
231
-
232
-
233
-
234
-
235
-
236
-
237
-
238
-
239
-
240
-
241
-
242
-
243
-
244
-
245
-
246
-
247
-
248
-
249
-
250
-
251
-
252
-
253
-
254
-
255
-
256
-
257
-
258
-
259
-
260
-
261
-
262
-
263
-
264
-
265
-
266
-
267
-
268
-
269
-
270
-
271
-
272
-
273
-
274
-
275
-
276
-
277
-
278
-
279
-
280
-
281
-
282
-
283
-
284
-
285
-
286
-
287
-
288
-
289
-
290
-
291
-
292
-
293
-
294
-
295
-
296
-
297
-
298
-
299
-
300
-
301
-
302
-
303
-
304
-
305
-
306
-
307
-
308
-
309
-
310
-
311
-
312
-
313
-
314
-
315
-
316
-
317
-
318
-
319
-
320
-
321
-
322
-
323
-
324
-
325
-
326
-
327
-
328
-
329
-
330
-
331
-
332
-
333
-
334
-
335
-
336
-
337
-
338
-
339
-
340
-
341
-
342
-
343
-
344
-
345
-
346
-
347
-
348
-
349
-
350
-
351
-
352
-
353
-
354
-
355
-
356
-
357
-
358
-
359
-
360
-
361
-
362
-
363
-
364
-
365
-
366
-
367
-
368
-
369
-
370
-
371
-
372
-
373
-
374
-
375
-
376
-
377
-
378
-
379
-
380
-
381
-
382
-
383
-
384
-
385
-
386
-
387
-
388
-
389
-
390
-
391
-
392
-
393
-
394
-
395
-
396
-
397
-
398
-
399
-
400
-
401
-
402
-
403
-
404
-
405
-
406
-
407
-
408
-
409
-
410
-
411
-
412
-
413
-
414
-
415
-
416
-
417
-
418
-
419
-
420
-
421
-
422
-
423
-
424
-
425
-
426
-
427
-
428
-
429
-
430
-
431
-
432
-
433
-
434
-
435
-
436
-
437
-
438
-
439
-
440
-
441
-
442
-
443
-
444
-
445
-
446
-
447
-
448
-
449
-
450
-
451
-
452
-
453
-
454
-
455
-
456
-
457
-
458
-
459
-
460
-
461
-
462
-
463
-
464
-
465
-
466
-
467
-
468
-
469
-
470
-
471
-
472
-
473
-
474
-
475
-
476
-
477
-
478
-
479
-
480
-
481
-
482
-
483
-
484
-
485
-
486
-
487
-
488
-
489
-
490
-
491
-
492
-
493
-
494
-
495
-
496
-
497
-
498
-
499
-
500
-
501
-
502
-
503
-
504
-
505
-
506
-
507
-
508
-
509
-
510
-
511
-
512
-
513
-
514
-
515
-
516
-
517
-
518
-
519
-
520
-
521
-
522
-
523
-
524
-
525
-
526
-
527
-
528
-
529
-
530
-
531
-
532
-
533
-
534
-
535
-
536
-
537
-
538
-
539
-
540
-
541
-
542
-
543
-
544
-
545
-
546
-
547
-
548
-
549
-
550
-
551
-
552
-
553
-
554
-
555
-
556
-
557
-
558
-
559
-
560
-
561
-
562
-
563
-
564
-
565
-
566
-
567
-
568
-
569
-
570
-
571
-
572
-
573
-
574
-
575
-
576
-
577
-
578
-
579
-
580
-
581
-
582
-
583
-
584
-
585
-
586
-
587
-
588
-
589
-
590
-
591
-
592
-
593
-
594
-
595
-
596
-
597
-
598
-
599
-
600
-
601
-
602
-
603
-
604
-
605
-
606
-
607
-
608
-
609
-
610
-
611
-
612
-
613
-
614
-
615
-
616
-
617
-
618
-
619
-
620
-
621
-
622
-
623
-
624
-
625
-
626
-
627
-
628
-
629
-
630
-
631
-
632
-
633
-
634
-
635
-
636
-
637
-
638
-
639
-
640
-
641
-
642
-
643
-
644
-
645
-
646
-
647
-
648
-
649
-
650
-
651
-
652
-
653
-
654
-
655
-
656
-
657
-
658
-
659
-
660
-
661
-
662
-
663
-
664
-
665
-
666
-
667
-
668
-
669
-
670
-
671
-
672
-
673
-
674
-
675
-
676
-
677
-
678
-
679
-
680
-
681
-
682
-
683
-
684
-
685
-
686
-
687
-
688
-
689
-
690
-
691
-
692
-
693
-
694
-
695
-
696
-
697
-
698
-
699
-
700
-
701
-
702
-
703
-
704
-
705
-
706
-
707
-
708
-
709
-
710
-
711
-
712
-
713
-
714
-
715
-
716
-
717
-
718
-
719
-
720
-
721
-
722
-
723
-
724
-
725
-
726
-
727
-
728
-
729
-
730
-
731
-
732
-
733
-
734
-
735
-
736
-
737
-
738
-
739
-
740
-
741
-
742
-
743
-
744
-
745
-
746
-
747
-
748
-
749
-
750
-
751
-
752
-
753
-
754
-
755
-
756
-
757
-
758
-
759
-
760
-
761
-
762
-
763
-
764
-
765
-
766
-
767
-
768
-
769
-
770
-
771
-
772
-
773
-
774
-
775
-
776
-
777
-
778
-
779
-
780
-
781
-
782
-
783
-
784
-
785
-
786
-
787
-
788
-
789
-
790
-
791
-
792
-
793
-
794
-
795
-
796
-
797
-
798
-
799
-
800
-
801
-
802
-
803
-
804
-
805
-
806
-
807
-
808
-
809
-
810
-
811
-
812
-
813
-
814
-
815
-
816
-
817
-
818
-
819
-
820
-
821
-
822
-
823
-
824
-
825
-
826
-
827
-
828
-
829
-
830
-
831
-
832
-
833
-
834
-
835
-
836
-
837
-
838
-
839
-
840
-
841
-
842
-
843
-
844
-
845
-
846
-
847
-
848
-
849
-
850
-
851
-
852
-
853
-
854
-
855
-
856
-
857
-
858
-
859
-
860
-
861
-
862
-
863
-
864
-
865
-
866
-
867
-
868
-
869
-
870
-
871
-
872
-
873
-
874
-
875
-
876
-
877
-
878
-
879
-
880
-
881
-
882
-
883
-
884
-
885
-
886
-
887
-
888
-
889
-
890
-
891
-
892
-
893
-
894
-
895
-
896
-
897
-
898
-
899
-
900
-
901
-
902
-
903
 |
 |
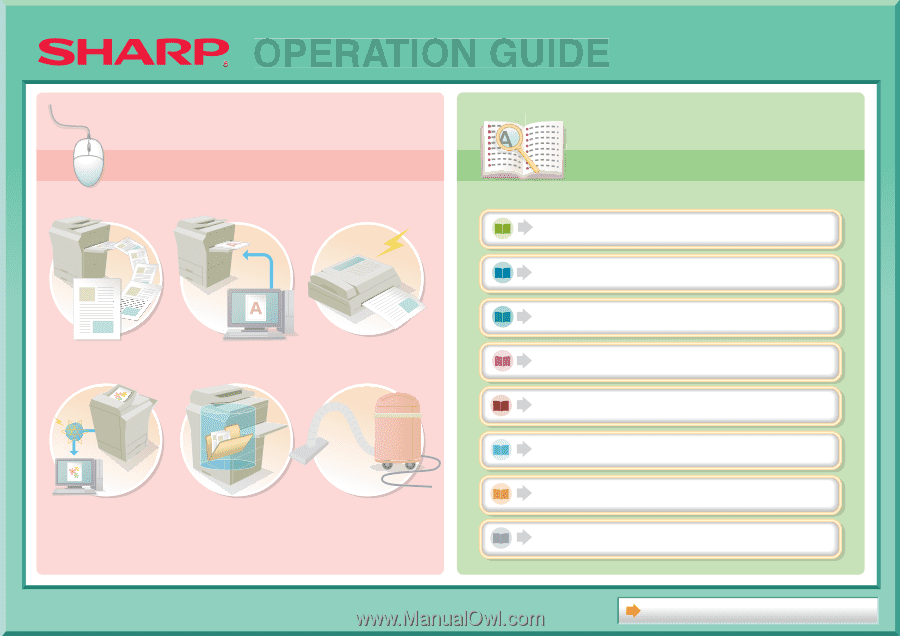
COPIER
PRINTER
FACSIMILE
SCANNER / INTERNET FAX
DOCUMENT FILING
TROUBLESHOOTING
BEFORE USING THE MACHINE
SYSTEM SETTINGS
About Operation Guide
MAKE A COPY
PRINT A DOCUMENT
SEND A FAX
SCAN AN IMAGE /
SEND AN INTERNET FAX
SAVE A JOB AND
REUSE IT LATER
MAINTAIN
THE MACHINE
Search based on
what you want to do
Search based on
what you want to do
Search using the
table of contents
Search using the
table of contents
OPERATION GUIDE