Sharp MX-C311 Quick Start Guide
Sharp MX-C311 Manual
 |
View all Sharp MX-C311 manuals
Add to My Manuals
Save this manual to your list of manuals |
Sharp MX-C311 manual content summary:
- Sharp MX-C311 | Quick Start Guide - Page 1
MODEL: MX-C311 DX-C311 MX-C401 DX-C401 DIGITAL FULL COLOR MULTIFUNCTIONAL SYSTEM Quick Start Guide Keep this manual close at hand for reference whenever needed. Before using the machine Functions of the machine and procedures for placing originals and loading paper. Copying Using the copy - Sharp MX-C311 | Quick Start Guide - Page 2
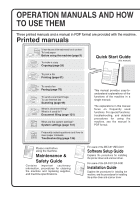
to use them To load paper Before using the machine (page 9) To make a copy Copying (page 29) Quick Start Guide (this manual) To print a file Printing (page 61) To send a fax Faxing (page 75) To send a scanned image To use Internet fax Scanning (page 99) What is document filing? What is it used - Sharp MX-C311 | Quick Start Guide - Page 3
based on what you want to know. The contents of the Operation Guide are as follows: BEFORE USING THE MACHINE COPIER PRINTER FACSIMILE SCANNER / INTERNET FAX DOCUMENT FILING SYSTEM SETTINGS TROUBLESHOOTING * To view the Operation Guide in PDF format, Adobe® ReaderTM or Acrobat® Reader of Adobe - Sharp MX-C311 | Quick Start Guide - Page 4
1 Press the [SYSTEM SETTINGS] key. System Settings Total Count Paper Tray Settings Printer Condition Settings Default Settings Address Control Document Filing Control Admin Password Exit List Print (User) Fax Data Receive/Forward (1) USB-Device Check 2 Select the all custom setting list in - Sharp MX-C311 | Quick Start Guide - Page 5
is connected to the same network as the machine and enter the IP address of the machine. Recommended Web browsers • Internet Explorer: 6.0 or higher (Windows®) • Netscape Navigator: 9 (Windows®) • Firefox: 2.0 or higher (Windows®) • Safari: 1.5 or higher (Macintosh) The Web page will appear. The - Sharp MX-C311 | Quick Start Guide - Page 6
Operation Guide, which is a more detailed manual, can be downloaded from the machine's Web pages. Downloading the Operation Guide. (1) Click [Operation Manual (1) Download] in the menu of the Web page. (2) (2) Select the desired language. (3) Click the [Download] button. The Operation Guide - Sharp MX-C311 | Quick Start Guide - Page 7
TABLE OF CONTENTS CHECKING THE IP ADDRESS 2 ACCESSING THE WEB SERVER IN THE MACHINE 3 Before using the machine PART NAMES AND FUNCTIONS 10 SUPPLIES 11 OPERATION PANEL 12 USING THE TOUCH PANEL 14 USER AUTHENTICATION 17 HOME SCREEN 19 IMAGE CHECK FUNCTION (PREVIEW 20 PLACING ORIGINALS 22 - Sharp MX-C311 | Quick Start Guide - Page 8
THE MACHINE 68 SELECTING PRINT SETTINGS 69 CONVENIENT PRINTER FUNCTIONS 71 Faxing BASE SCREEN OF FAX MODE 76 SENDING A FAX 78 CHANGING THE SIZE OF A FAX 79 CHANGING THE EXPOSURE 81 CHANGING THE RESOLUTION 82 STORING A FAX NUMBER 83 FORWARDING RECEIVED FAXES (Fax Data Forward 85 CONVENIENT - Sharp MX-C311 | Quick Start Guide - Page 9
Scanning NETWORK SCANNER FUNCTION 100 BASE SCREEN OF SCAN MODE 101 SCANNING AN ORIGINAL 102 CHANGING THE EXPOSURE File 125 SAVING A DOCUMENT ONLY (Scan to HDD 128 PRINTING A SAVED FILE 130 System settings SYSTEM SETTINGS 132 Troubleshooting FREQUENTLY ASKED QUESTIONS 136 REMOVING MISFEEDS - Sharp MX-C311 | Quick Start Guide - Page 10
- Sharp MX-C311 | Quick Start Guide - Page 11
the parts of the machine and its peripheral devices, and the procedures for placing originals and loading paper. XPART NAMES AND FUNCTIONS 10 XSUPPLIES 11 XOPERATION PANEL 12 XUSING THE TOUCH PANEL 14 XUSER AUTHENTICATION 17 XHOME SCREEN 19 XIMAGE CHECK FUNCTION (PREVIEW 20 XPLACING ORIGINALS - Sharp MX-C311 | Quick Start Guide - Page 12
be scanned using the automatic document feeder. (5) Finisher* This can be used to staple output. (6) Main power switch This is used to power on the machine. When using the fax or Internet fax functions, keep this switch in the "on" position. (7) Output tray (center tray) Copy jobs and print jobs - Sharp MX-C311 | Quick Start Guide - Page 13
is used on a network. (1) (2) (1) Drum cartridges This contains the photosensitive drum that is used to create images for copying and printing. (2) Developer cartridges This contains the developer that is necessary to transfer the toner to the paper. (3) (4) (3) Toner collection container This - Sharp MX-C311 | Quick Start Guide - Page 14
SEND Ready to scan for copy. DOCUMENT FILING Color Mode Full Color Exposure Auto 1. 8½x11 2. 5½x8½ 3. 8½x14 4. 8½x11 Plain 8½x11 Copy Ratio 100% Tray1 Original Paper Select Auto 8½x11 Plain 0 Special Modes 2-Sided Copy Output File Quick File Job Status MFP Status 020/015 Copying 005/000 - Sharp MX-C311 | Quick Start Guide - Page 15
can be pressed to send tone signals on a pulse dial line. [#/P] key ( ) Press this key to use a job program when using the copier function. When using the fax function, this key can be used when dialing. [CLEAR] key Press this key to return settings such as the number of copies to "0". Main power - Sharp MX-C311 | Quick Start Guide - Page 16
key to switch to copy mode. Keep your finger on the [COPY] key to view the machine's total page use count and amount of toner remaining. [IMAGE SEND] key To use the scan or fax function, touch this key to switch to image send mode. [DOCUMENT FILING] key When you wish to print or send a file stored - Sharp MX-C311 | Quick Start Guide - Page 17
Transparency Inserts Stamp Pamphlet Copy 2in1 Image Edit File Quick File 1 2 (1) Job Settings / Print file-01 Name 1 8½x11 Cancel F. Color Paper Select Auto Number of Prints (3) Output 1 (1~999) 2-Sided (2) Special Modes B/W Print Print and Delete the Data Print and Save the Data - Sharp MX-C311 | Quick Start Guide - Page 18
machine maintenance information by means of codes. Job status display The mode icon of the reserved job or job in progress, the tray being used to feed paper, and the job status appear. This can be touched to show the job status screen. Print Job Scan to Fax Job Internet Fax 1 Computer01 - Sharp MX-C311 | Quick Start Guide - Page 19
THE MACHINE" in the Operation Guide. Login by user number User Authentication This method requires that you log OK in by entering your user number (5 to 8 digits), which is stored in the system settings of the machine. Admin Login Login by login name and password User Authentication OK Login - Sharp MX-C311 | Quick Start Guide - Page 20
mode of the machine by pressing the [LOGOUT] key ( ). However, note that the [LOGOUT] key ( ) cannot be used to log out when a fax number is being entered in fax mode, as the [LOGOUT] key ( ) functions as a numeric key at this time. If a preset duration of time elapses after the machine is last - Sharp MX-C311 | Quick Start Guide - Page 21
Address Control Paper Tray Settings (3) (4) 04/04/2010 11:40 (5) (1) [My Menu] key Touch this to move to the second home screen. (2) Mode select keys Use these keys to switch between copy, image send, document filing, and Sharp "Favorite Operation Group Registration" and "Home Screen Settings" in "Chapter - Sharp MX-C311 | Quick Start Guide - Page 22
Printing only faxes that are needed" You can check a received fax before printing it. If you don't need the fax, you can delete it without printing it, allowing you to save paper and toner data: • Faxes received in fax mode • Faxes received in Internet fax mode • Faxes stored in a memory box • Files - Sharp MX-C311 | Quick Start Guide - Page 23
the display • Change pages • Change the display magnification Image Check 0123456789 2010/04/04 11:12 0001 0010 Back 1 / 3 Display Rotation Print Example: The image check screen for a received fax For details on the image check function, see each of the modes in the Operation Guide. * A preview - Sharp MX-C311 | Quick Start Guide - Page 24
scan many originals at once. This saves you the trouble of manually feeding each original. For originals that cannot be scanned document glass. Adjust the original guides to the width of the originals of the original will be copied black, causing excessive use of toner. Place the original face down - Sharp MX-C311 | Quick Start Guide - Page 25
5-1/2" x 8-1/2" (A5) B5 8-1/2" x 11" (A4) Portrait originals When using the below functions in copy mode, place the original so that the top of the image is to the right. • Staple sort • more information, see "ORIGINALS" in "Chapter 1 - BEFORE USING THE MACHINE" in the Operation Guide. 23 - Sharp MX-C311 | Quick Start Guide - Page 26
loaded in each tray, see the following manuals: • Operation Guide, "Paper Tray Settings" in "Chapter 7 - SYSTEM SETTINGS" • Maintenance & Safety Guide, "SPECIFICATIONS" (1) Tray 1 (5) (2) Tray 2 (3) Tray 3 (4) Tray 4 (1) (5) Bypass tray (2) (3) (4) Print side face up or face down Paper is - Sharp MX-C311 | Quick Start Guide - Page 27
guides on the tray. For example, move the guides from 8-1/2" x 11" (A4) to 5-1/2" x 8-1/2" (A5). Adjust the guides to match the paper being loaded. If the guides not go higher than these protrusions. Insert the paper with the print side face up. Fan the paper well before inserting it. Otherwise - Sharp MX-C311 | Quick Start Guide - Page 28
Default Settings Paper Tray Settings (1) Address Control Printer Condition Settings Document Filing Control Admin Password Exit List Print (User) Fax Disable Duplex Disable Staple Back Change (3) Copy Print Feeding Approved Job Fax I-Fax Doc. Filing (3) Touch the [Change] key - Sharp MX-C311 | Quick Start Guide - Page 29
Tray: Type: Size: Paper Property: Tray 1 Recycled Auto-Inch Print Copy I-Fax Fax Doc. Filing Cancel OK (6) (4) (5) Select settings in the see "Paper Tray Settings" in "Chapter 7 - SYSTEM SETTINGS" in the Operation Guide. (6) Touch the [OK] key. The above steps change the paper settings for - Sharp MX-C311 | Quick Start Guide - Page 30
paper in bypass tray The side to be copied on must be face down! Load the is 7-1/4" x 10-1/2" (A5) or smaller in the horizontal orientation. Only the address side of envelopes can be printed on. Place envelopes with the address side face down - BEFORE USING THE MACHINE" in the Operation Guide. 28 - Sharp MX-C311 | Quick Start Guide - Page 31
(Bypass Copy 36 XMAKING COLOR COPIES (Color Mode 39 XSELECTING THE EXPOSURE AND IMAGE TYPE . . . . . 41 XFITTING THE COPY IMAGE TO THE PAPER (Automatic Ratio Selection 43 XENLARGEMENT/REDUCTION (Preset Ratios / Zoom 45 XINTERRUPTING A COPY RUN (Interrupt Copy 47 XSTORING COPY OPERATIONS (Job - Sharp MX-C311 | Quick Start Guide - Page 32
(8) Ready to scan for copy. 0 (9) (1) (2) (3) (4) (5) Color Mode Full Color Exposure Auto Copy Ratio 100% 1. 8½x11 2. 5½x8½ 3. 8½x14 4. 8½x11 Plain 8½x11 Original Paper Select Auto 8½x11 Plain Special Modes 2-Sided Copy Output File Quick File (10) (11) (12) (13) (6) (1) [Color Mode] key - Sharp MX-C311 | Quick Start Guide - Page 33
paper is indicated in green. Do not pull out a tray while paper is being fed from the tray. This will cause a paper misfeed. (9) Number of copies display This shows the number of copies set. (10) [Special Modes] key Touch this key to select special modes such as Margin Shift, Erase, and Pamphlet - Sharp MX-C311 | Quick Start Guide - Page 34
. When using the document glass, place the original with the side to be scanned face down. COPY IMAGE SEND (1) Ready to scan for copy. DOCUMENT FILING Color Mode Full Color Exposure Auto Copy Ratio 100% Plain 8½x11 (2) 1. 8½x11 2. 5½x8½ 3. 8½x14 4. 8½x11 Original Paper Select Auto 8½x11 - Sharp MX-C311 | Quick Start Guide - Page 35
Special Modes 2-Sided Copy Output File Quick File Select settings in the touch panel. (Continued) (5) Make sure that the desired paper size is selected. 3 Set the number of copies and then press the [COLOR START] key or the [BLACK & WHITE START] key. Correct sets Cancel scanning Cancel copying 33 - Sharp MX-C311 | Quick Start Guide - Page 36
bother of manually turning the originals over and re-inserting them. This section explains how to copy 1-sided originals onto both sides of the paper. 1-sided original 2-sided copy 1 The side to be scanned must be face up! Place the originals. Color Mode Full Color Exposure Auto Copy Ratio 100 - Sharp MX-C311 | Quick Start Guide - Page 37
3 Set the number of copies and then press the [COLOR START] key or the [BLACK & WHITE START] key. Correct sets Cancel scanning Cancel copying 35 - Sharp MX-C311 | Quick Start Guide - Page 38
When using the document glass, place the original with the side to be scanned face down. The side to be copied on must be face down! 2 Insert paper in the bypass tray. Color Mode Full Color Exposure Auto Copy Ratio 100% 1. 8½x11 2. 5½x8½ 3. 8½x14 4. 8½x11 Plain 8½x11 Original 8½x11 (1) Paper - Sharp MX-C311 | Quick Start Guide - Page 39
paper type. Plain Pre-Printed Recycled Pre-Punched Color Thin Paper Heavy Paper Transparency x10½,5½x8½ A4,A5,B5 216x330(8½x13) X14 Y8½ Manual OK (6) Paper Select Paper Tray 1. 8½x11 Plain number of copies and then press the [COLOR START] key or the [BLACK & WHITE START] key. - Sharp MX-C311 | Quick Start Guide - Page 40
Color Mode Full Color Exposure Auto Copy Ratio 100% 1. 8½x11 2. 5½x8½ 3. 8½x14 4. 8½x11 Plain 8½x11 Original Paper Select Auto 8½x11 Plain Special Modes 2-Sided Copy Output File Quick File To select paper, touch the [Paper Select] key or the image of the machine in the base screen of copy - Sharp MX-C311 | Quick Start Guide - Page 41
glass, place the original with the side to be scanned face down. Color Mode Full Color (1) Exposure Auto 1. 8½x11 2. 5½x8½ 3. 8½x14 4. 8½x11 Plain 8½x11 Copy Ratio 100% Original Paper Select Auto 8½x11 Plain Special Modes 2-Sided Copy Output File Quick File 2 Select settings in the touch - Sharp MX-C311 | Quick Start Guide - Page 42
3 Set the number of copies and press the [COLOR START] key. Correct sets Cancel scanning Cancel copying 40 - Sharp MX-C311 | Quick Start Guide - Page 43
Special Modes 2-Sided Copy Output File Quick File 2 Select settings in the touch panel. (1) Touch the [Exposure] key. Exposure Auto Manual 1 3 5 (3) Original Image Type Text Text/ Prtd.Photo Printed Photo Photo Light Original (2) OK (4) Text/Photo Map Scan Resolution (2) Touch the - Sharp MX-C311 | Quick Start Guide - Page 44
3 Set the number of copies and then press the [COLOR START] key or the [BLACK & WHITE START] key. Correct sets Cancel scanning Cancel copying 42 - Sharp MX-C311 | Quick Start Guide - Page 45
be face up! Place the originals. When using the document glass, place the original with the side to be scanned face down. Color Mode Full Color Exposure Auto Copy Ratio 100% Plain 8½x11 (1) 1. 8½x11 2. 5½x8½ 3. 8½x14 4. 8½x11 (4) Original 5½x8½ Paper Select Auto 8½x14 Plain Special Modes - Sharp MX-C311 | Quick Start Guide - Page 46
Paper Select 8½x14 Plain Special Modes 2-Sided Copy Output File Quick File Select settings in the touch panel. (Continued) (7) Touch the [Auto Image] key. 3 Set the number of copies. Correct sets 4 Press the [COLOR START] key or the [BLACK & WHITE START] key. Cancel scanning Cancel copying 44 - Sharp MX-C311 | Quick Start Guide - Page 47
be face up! 1 Place the originals. When using the document glass, place the original with the side to be scanned face down. Color Mode Full Color Exposure Auto Copy Ratio 100% (2) Plain 8½x11 1. 8½x11 2. 5½x8½ 3. 8½x14 4. 8½x11 (1) Original Paper Select 8½x11 Auto 8½x11 Plain Special Modes - Sharp MX-C311 | Quick Start Guide - Page 48
ratio key that is 2 2 closest to 55% (the desired ratio). (5) Set the copy ratio to 55% with the key. The key decreases the ratio in increments of 1%, and 3 Set the number of copies. Correct sets 4 Press the [COLOR START] key or the [BLACK & WHITE START] key. Cancel scanning Cancel copying 46 - Sharp MX-C311 | Quick Start Guide - Page 49
. This feature is useful when you need to make an urgent copy during a long copy run. Original Printing Interrupt Copies in progress from tray 2. Ready to scan for next copy job. Interrupt 7 Color Mode Full Color Exposure Auto 1. 8½x11 2. 5½x8½ 3. 8½x14 4. 8½x11 Plain 8½x11 Special Modes - Sharp MX-C311 | Quick Start Guide - Page 50
STORING COPY OPERATIONS (Job Programs) You can store a group of copy settings. The settings can be retrieved and used whenever needed. When you frequently use the same group of settings, this saves you the trouble of manually selecting the settings each time you need to use them. Storing a job - Sharp MX-C311 | Quick Start Guide - Page 51
( ). Place the original. Job Programs Press program number. 1 2 4 5 7 8 10 11 Recall Exit 3 1 4 6 9 12 Store/Delete 2 Touch the key of the desired job program. After selecting the job program, set the number of copies and press the [COLOR START] key or [BLACK & WHITE START] key to - Sharp MX-C311 | Quick Start Guide - Page 52
are highlighted. A job program has been already stored in this location. Cancel Delete (3) Store Job Programs Press program number. 1 2 4 5 7 8 10 11 Recall Exit (4) 3 1 4 6 9 12 Store/Delete (3) Read the displayed message and touch the [Delete] key. (4) Touch the [Exit] key - Sharp MX-C311 | Quick Start Guide - Page 53
File 2nd screen Special Modes Proof Copy Business Card Scan OK Mixed Size Original Slow Scan Mode 2 2 Photo Repeat B/W Reverse Mirror Image Centering Color adjustments menu screen Color Adjustments OK RGB Adjust Color Balance Sharpness Brightness Suppress Background Intensity When - Sharp MX-C311 | Quick Start Guide - Page 54
. When using the document glass, place the original with the side to be scanned face down. Color Mode Full Color Exposure Auto Copy Ratio 100% (1) Special Modes 1. 8½x11 2. 5½x8½ 3. 8½x14 4. 8½x11 Plain 8½x11 2-Sided Copy Output File Quick File Original Paper Select Auto 8½x11 Plain 2 Select - Sharp MX-C311 | Quick Start Guide - Page 55
3 Set the number of copies and then press the [COLOR START] key or the [BLACK & WHITE START] key. Correct sets Cancel scanning Cancel copying 53 - Sharp MX-C311 | Quick Start Guide - Page 56
function to erase peripheral shadows that occur when making copies of books and other thick originals. Without erase With erase Making copies in pamphlet format (Pamphlet Copy) Use this function to make copies that can be folded into a pamphlet. Pamphlet copy makes it easy to create pamphlets - Sharp MX-C311 | Quick Start Guide - Page 57
function inserts sheets of paper between the sheets of transparency film to keep them from sticking together. Paper insert Paper insert Paper insert Copying two original pages onto one sheet of paper (2in1) Use this function to copy two original pages onto one sheet of paper. 1234 12 34 55 - Sharp MX-C311 | Quick Start Guide - Page 58
one sheet of paper. Back Printing the date or a stamp on copies (Stamp) Use this function to print the date, a stamp, the page number, or text on copies. A color can be selected to print a stamp or text in color. Date print 04/04/2010 Stamp CONFIDENTIAL Page number 1 2 3 Text Planning Meeting - Sharp MX-C311 | Quick Start Guide - Page 59
or weaken red, green, or blue (one color only) and thereby change the overall hue of the copy. An image of this function is shown at the end of this manual. Adjusting the sharpness of an image (Sharpness) Use this function to sharpen or soften a copy image. An image of this function is shown - Sharp MX-C311 | Quick Start Guide - Page 60
to whiten the background. An image of this function is shown at the end of this manual. Adjusting the color (Color Balance) Use this function to adjust the color balance in a color copy. The densities of the four colors, cyan, magenta, yellow, and black can be adjusted. An image of this function is - Sharp MX-C311 | Quick Start Guide - Page 61
all be printed on the same size of paper. 8-1/2x11 8-1/2x14 8-1/2x11 8-1/2x14 Copying thin originals (Slow Scan Mode) This function lets you scan thin originals, which are normally difficult to handle, in the automatic document feeder. Copying multiple business cards (Business Card Scan) Up to - Sharp MX-C311 | Quick Start Guide - Page 62
- Sharp MX-C311 | Quick Start Guide - Page 63
and procedures are primarily for Windows Vista® in Windows® environments, and Mac OS X v10.4 in Macintosh environments. The window varies depending on the operating system version, the printer driver version, and the application. XPRINTING 62 XCANCELING PRINTING (AT THE MACHINE 68 XSELECTING - Sharp MX-C311 | Quick Start Guide - Page 64
OF THE MACHINE" in "Chapter 3 - PRINTER" in the Operation Guide. 1 Select the print (1) command in the application. (1) Open the [File] menu. (2) (2) Select [Print]. 2 Open the printer driver properties window. (1) Select the printer driver of the machine. (2) Click the [Preferences - Sharp MX-C311 | Quick Start Guide - Page 65
(1) (2) (3) 3 Select print settings. (1) Click the [Paper] tab. (2) Select [Letter]. (3) Click the [OK] button. 4 Click the [Print] button. Printing begins. In Windows 98/Me/NT 4.0, click the [OK] button. 63 - Sharp MX-C311 | Quick Start Guide - Page 66
of the settings. (Only in Windows) 1 Open the printer driver properties window. (1) Select the printer driver of the machine. (2) Click the [Preferences] (1) (2) button. In Windows 2000, the [Preferences] button does not appear. Click the tabs in the "Print" dialog box to adjust the - Sharp MX-C311 | Quick Start Guide - Page 67
[F1] key. Help for that setting will appear. *To view Help for a particular setting in Windows 98/Me/NT 4.0/2000/XP/ Server 2003, click the button in the upper right-hand corner of the printer driver window and then click the setting. When the information icon ( ) appears The icon can be clicked to - Sharp MX-C311 | Quick Start Guide - Page 68
INSTALLATION" in the Installation Guide). Setting the paper size Select paper settings in the printer driver before selecting the print command. 1 Open the page setup (1) window in TextEdit. (1) Open the [File] menu. (2) Select [Page Setup]. In Mac OS 9, select [Print] from the [File] menu - Sharp MX-C311 | Quick Start Guide - Page 69
on your machine model.) (2) Select print settings. Click next to [Copies & Pages] and select each setting that you wish to configure from the pull-down menu. The screen for the selected setting will appear. If the settings do not appear in Mac OS X v10.5 to 10.5.1, click printer name. next to - Sharp MX-C311 | Quick Start Guide - Page 70
1 Press the [JOB STATUS] key. Print Job Scan to Fax Job Internet Fax (1) Job Queue Computer01 Sets / Progress Status 020 / 001 Printing Computer02 020 / 000 Waiting 1 0312345678 (3)002 / 000 Waiting 1 Copy 002 / 000 Waiting Spool Job Queue Complete (2) Copy Copy Copy 002 / 000 - Sharp MX-C311 | Quick Start Guide - Page 71
, the settings in the printer driver properties window must be configured. See "PRINTING" (page 62) for the procedure for opening the printer driver properties window and the basic procedure for printing. Windows The procedure for selecting settings in the printer driver is explained below using - Sharp MX-C311 | Quick Start Guide - Page 72
of printing two pages on one sheet of paper with borderlines is explained. The procedures for configuring printer driver settings vary by setting. For more information on each setting, see "FREQUENTLY USED FUNCTIONS" and "CONVENIENT PRINTING FUNCTIONS" in "Chapter 3 - PRINTER" in the Operation Guide - Sharp MX-C311 | Quick Start Guide - Page 73
CONVENIENT PRINTER FUNCTIONS Printing on both sides of the paper (2-sided printing) Use this function to print on both sides of the paper. You can use 2-sided printing to reduce the number of printed sheets when you are printing a large number of pages or when you wish to conserve paper. 1234 13 - Sharp MX-C311 | Quick Start Guide - Page 74
12 34 Stapling printed pages (Staple) Use this function to staple printed output. (When a finisher is installed.) Printing a color image in grayscale (Black and White Print) Use this function to print color images in grayscale. This lets you save color toner when color printing is not necessary - Sharp MX-C311 | Quick Start Guide - Page 75
) • Adding inserts when printing on transparency film (Transparency Inserts) • Printing a carbon copy (Carbon Copy) • Printing so that a specific page is the front page when using two-sided printing (Chapter Inserts) Convenient printer functions • Saving and using print files (Retention/Document - Sharp MX-C311 | Quick Start Guide - Page 76
- Sharp MX-C311 | Quick Start Guide - Page 77
expansion kit is required to use the fax function. XBASE SCREEN OF FAX MODE 76 XSENDING A FAX 78 XCHANGING THE SIZE OF A FAX 79 XCHANGING THE EXPOSURE 81 XCHANGING THE RESOLUTION 82 XSTORING A FAX NUMBER 83 XFORWARDING RECEIVED FAXES (Fax Data Forward 85 XCONVENIENT DIALING METHODS 87 - Sharp MX-C311 | Quick Start Guide - Page 78
to send. Speaker Resend Scan Internet Fax Fax USB Mem. Scan PC Scan Address Book Original Scan: 8½x11 Send: Auto Direct TX Exposure Auto Sub Address Resolution Standard Address Review Special Modes File Quick File Auto Reception Fax Memory:100% (7) (8) (9) (10) (11) (12) (13 - Sharp MX-C311 | Quick Start Guide - Page 79
Address] key. (9) Image settings Image settings (original size, exposure, resolution) can be selected. (10) key This key appears when a special mode or 2-sided scanning system settings (administrator), this will appear when a fax is received. : Only "Hold Setting for Received Data Print" is enabled - Sharp MX-C311 | Quick Start Guide - Page 80
DOCUMENT FILING Speaker Resend Scan Internet Fax Address Book Original Fax Scan: USB Mem. Scan (2) 8½x11 Send: PC Scan Auto Direct TX Exposure Auto Sub Address Resolution Standard Address Review Special Modes File Quick File Auto Reception Fax Memory:100% 2 Select settings in - Sharp MX-C311 | Quick Start Guide - Page 81
the side to be scanned face down. Scan Internet Fax Address Book Original Fax (1) Scan: USB Mem. Scan PC Scan 8½x11 Send: Auto Direct TX Exposure Auto Sub Address Resolution Standard Address Review Special Modes File Quick File Auto Reception Fax Memory:100% 2 Select settings in - Sharp MX-C311 | Quick Start Guide - Page 82
/Original Auto Manual 5½x8½ 8½x11 8½x13 8½x13 8½x14 11x17 (5) Select settings in the touch panel. (Continued) OK (6) (5) Touch the [11 x 17] key. (6) Touch the [OK] key. AB Inch Fax/Original Scan Size 8½x11 129% Send Size 11x17 OK (7) 2-Sided Booklet 2-Sided Tablet Image Orientation - Sharp MX-C311 | Quick Start Guide - Page 83
PC Scan Address Book Direct TX Original Exposure Scan: (A1ut)o 8½x11 Send: Auto Sub Address Resolution Standard Address Review Special Modes File Quick File Auto Reception Fax Memory:100% 2 Select settings in the touch panel. (1) Touch the [Exposure] key. Fax/Exposure Auto Manual - Sharp MX-C311 | Quick Start Guide - Page 84
Fax Fax USB Mem. Scan PC Scan Address Book Original Scan: 8½x11 Send: Auto Direct TX Sub Address Exposure Resolution Auto (1) Standard Address Review Special Modes File Quick File Auto Reception Fax Memory:100% Fax/Resolution Standard (2) Fine Super Fine Ultra Fine OK (4) Half Tone - Sharp MX-C311 | Quick Start Guide - Page 85
SETTINGS 1 Press the [SYSTEM SETTINGS] key. System Settings Total Count Paper Tray Settings Printer Condition Settings Admin Password Exit Default Settings (1) Address Control List Print (User) Fax Data Receive/Forward Document Filing Control USB-Device Check 2 Select settings in the touch - Sharp MX-C311 | Quick Start Guide - Page 86
System Settings Address Control Address Type: Cancel OK Fax (4) Search Number: Address Name (Required fax number that you wish to store. (9) Touch the [OK] key. The items in the above step must be entered. For details on items entered, see "Chapter 7 - SYSTEM SETTINGS" in the Operation Guide - Sharp MX-C311 | Quick Start Guide - Page 87
the system settings (administrator). SYSTEM SETTINGS 1 Press the [SYSTEM SETTINGS] key. System Settings Total Count Paper Tray Settings Printer Condition Settings Default Settings Address Control Document Filing Control Admin Password Exit List Print (User) Fax Data Receive/Forward (1) USB - Sharp MX-C311 | Quick Start Guide - Page 88
System Settings Fax Settings Receive Setting: Multiple Set Print Staple Forward Received Data: Auto Reception Cancel OK Execute (3) Select settings in the touch panel. (Continued) (3) Touch the [Execute] key in "Forward Received Data". Transfer the received data to another device? Cancel OK - Sharp MX-C311 | Quick Start Guide - Page 89
group. Scan Internet Fax (1) Address Book Original Fax USB Mem. Scan PC Scan Scan: 8½x11 Send: Auto (1) Touch the [Address Book] key. Direct TX Sub Address Exposure Auto Resolution Standard Address Review Special Modes File Quick File Auto Reception Fax Memory:100% 5 10 15 To - Sharp MX-C311 | Quick Start Guide - Page 90
Resend (1) Touch the [Resend] key. Scan Internet Fax Address Book Original Fax Scan: USB Mem. Scan PC Scan 8½x11 Send: Auto Direct TX Sub Address Exposure Auto Resolution Standard Address Review Special Modes File Quick File Auto Reception Fax Memory:100% Resend (2) No.01 AAA AAA - Sharp MX-C311 | Quick Start Guide - Page 91
Scan Internet Fax Address Book Original Fax Scan: USB Mem. Scan PC Scan 8½x11 Send: Auto Direct TX Sub Address Exposure Auto Resolution Standard Address Review Special Modes File Quick File (1) Auto Reception Fax Memory:100% Enter search number.(001-999) (2) Scan Internet Fax Fax - Sharp MX-C311 | Quick Start Guide - Page 92
Resend Scan Internet Fax Address Book Original Speaker Volume Exposure Fax USB Mem. Scan PC Scan Scan: 8½x11 Send: Auto Auto Resolution Standard Address Review Special Modes File Quick File Fax Memory:100% Fax Manual Reception Touch the [Speaker] key. You will hear the dial tone - Sharp MX-C311 | Quick Start Guide - Page 93
DESTINATIONS (Broadcast Transmission) The same document/image can be sent to multiple fax mode, scan mode, and Internet fax mode destinations in a single operation. If you frequently send documents/images to the same group of destinations, it is recommended that you store those destinations - Sharp MX-C311 | Quick Start Guide - Page 94
Address Book Original Fax USB Mem. Scan PC Scan Scan: 8½x11 Send: Auto Direct TX Exposure Auto Sub Address Resolution Standard Address Review Special Modes File Quick File Auto Reception Fax Memory:100% 3 Select settings in the touch panel. (1) Touch the [Address Book] key. 5 10 - Sharp MX-C311 | Quick Start Guide - Page 95
- FACSIMILE" in the Operation Guide. Special modes Scan Internet Fax Fax USB Mem. Scan PC Scan Address Book Original Scan: 8½x11 Send: Auto Direct TX Exposure Auto Sub Address Resolution Standard Address Review Special Modes File Quick File Auto Reception Fax Memory:100% To use - Sharp MX-C311 | Quick Start Guide - Page 96
Address Review File Special Modes (1) Quick File Auto Reception Fax Memory:100% 2 Select settings in the touch panel. (1) Touch the [Special Modes] key. Fax/Special Modes Program Card Shot File Transaction Report (2) Erase Job Build Quick File OK Timer 1 Slow Scan Mode 2 Business - Sharp MX-C311 | Quick Start Guide - Page 97
3 Enter the fax number of the receiving fax machine and press the [BLACK & WHITE START] key. Cancel scanning 95 - Sharp MX-C311 | Quick Start Guide - Page 98
shadows (Erase) Use this function to erase peripheral shadows that occur when faxing books and other thick originals. Transmission Transmission Without erase With erase Sending the front and reverse sides of a card as a single page (Card Shot) Use this function to send the front and reverse - Sharp MX-C311 | Quick Start Guide - Page 99
Scan Mode) • Sending business cards (Business Card Scan) • Calling a fax machine and initiating fax reception (Polling) • Sending a fax when another machine polls your machine (Polling Memory) ☞ Operation Guide "SPECIAL MODES" in "Chapter 4 - FACSIMILE" • Performing F-code communication ☞ Operation - Sharp MX-C311 | Quick Start Guide - Page 100
- Sharp MX-C311 | Quick Start Guide - Page 101
. In addition, special modes that can be used with the network scanner function are introduced. The Internet fax expansion kit is required to use the Internet fax function. XNETWORK SCANNER FUNCTION 100 XBASE SCREEN OF SCAN MODE 101 XSCANNING AN ORIGINAL 102 XCHANGING THE EXPOSURE AND ORIGINAL - Sharp MX-C311 | Quick Start Guide - Page 102
for an application-linked document solution • Modes that can be used will vary depending on your model and the expansion kits that are installed. • The explanations in this manual are centered on the Scan to E-mail function of scan mode. ☞ Operation Guide "Chapter 5 - SCANNER / INTERNET FAX" 100 - Sharp MX-C311 | Quick Start Guide - Page 103
Resend Scan Internet Fax Address Book Original Fax Scan: USB Mem. Scan PC Scan 8½x11 Send: Auto Address Entry Exposure Auto Send Settings Resolution 200X200dpi Address Review File Format PDF PDF File Color Mode Auto/Grayscale Mono2 Quick File Special Modes (7) (8) (9) (10 - Sharp MX-C311 | Quick Start Guide - Page 104
Scanned image COPY Ready to send. IMAGE SEND (1) Scan (2)Internet Fax DOCUMENT FILING Fax USB Mem. Scan Resend PC Scan Address Book Original Scan: 8½x11 Send: Auto Address Entry Exposure Auto Send Settings Resolution 200X200dpi Address Review File Format PDF PDF File Color - Sharp MX-C311 | Quick Start Guide - Page 105
4 Press the [COLOR START] key or [BLACK & WHITE START] key. Cancel scanning 103 - Sharp MX-C311 | Quick Start Guide - Page 106
with the side to be scanned face down. Scan Internet Fax Address Book Original Address Entry Exposure Fax Scan: (1Aut)o USB Mem. Scan PC Scan 8½x11 Send: Auto Send Settings Resolution 200X200dpi Address Review File Format PDF PDF File Color Mode Auto/Grayscale Mono2 Quick - Sharp MX-C311 | Quick Start Guide - Page 107
3 Select the destination and then press the [COLOR START] key or the [BLACK & WHITE START] key. Cancel scanning 105 - Sharp MX-C311 | Quick Start Guide - Page 108
with the side to be scanned face down. Scan Internet Fax Fax USB Mem. Scan PC Scan Address Book Original Scan: 8½x11 Send: Auto Address Entry Send Settings Exposure Resolution Auto (1) 200X200dpi Address Review File Format PDF PDF File Color Mode Auto/Grayscale Mono2 Quick - Sharp MX-C311 | Quick Start Guide - Page 109
with the side to be scanned face down. Scan Internet Fax Address Book Original Address Entry Exposure Fax Scan: Auto USB Mem. Scan PC Scan 8½x11 Send: Auto Send Settings Resolution 200X200dpi Address Review (1) File Format PDF PDF File Color Mode Auto/Grayscale Mono2 Quick - Sharp MX-C311 | Quick Start Guide - Page 110
the compression to high. A higher compression ratio creates a smaller file size. (6) Touch the [OK] key. 3 Select the destination and press the [COLOR START] key. If the file type is set to [Encrypt PDF], you will be prompted to enter a password when you start transmission. Cancel scanning 108 - Sharp MX-C311 | Quick Start Guide - Page 111
ADDRESSES FOR EACH SCAN MODE IN THE ADDRESS BOOK" in "Chapter 5 - SCANNER / INTERNET FAX" in the Operation Guide. Storing an individual key SYSTEM SETTINGS 1 Press the [SYSTEM SETTINGS] key. System Settings Total Count Paper Tray Settings Printer Condition Settings Admin Password Exit Default - Sharp MX-C311 | Quick Start Guide - Page 112
" text box. A text entry screen appears. Enter the E-mail address that you want to store. (9) Touch the [OK] key. The items in the above step must be entered. For details on items entered, see "Chapter 7 - SYSTEM SETTINGS" in the Operation Guide. When sending the same document or image to multiple - Sharp MX-C311 | Quick Start Guide - Page 113
Address Book Original Fax Scan: USB Mem. Scan PC Scan 8½x11 Send: Auto (1) Touch the [Address Book] key. Address Entry Exposure Auto Send Settings Resolution 200X200dpi Address Review File Format File Color Mode Quick File Special Modes PDF Auto/Grayscale PDF Mono2 (3) 5 10 - Sharp MX-C311 | Quick Start Guide - Page 114
. Ready to send. Scan Internet Fax Resend Fax USB Mem. Scan (1) PC Scan (1) Touch the [Resend] key. Address Book Original Scan: 8½x11 Send: Auto Address Entry Exposure Auto Send Settings Resolution 200X200dpi Address Review File Format PDF PDF File Color Mode Auto/Grayscale - Sharp MX-C311 | Quick Start Guide - Page 115
(1) (2) Enter search number.(001-999) Scan Internet Fax Address Book Original Address Entry Exposure Fax Scan: Auto USB Mem. Scan PC Scan 8½x11 Send: Auto Send Settings Resolution 200X200dpi Address Review File Format PDF PDF File Color Mode Auto/Grayscale Mono2 Quick File - Sharp MX-C311 | Quick Start Guide - Page 116
down. Scan Internet Fax (1) Address Book Original Address Entry Exposure Fax Scan: Auto USB Mem. Scan PC Scan 8½x11 Send: Auto Send Settings Resolution 200X200dpi Address Review File Format PDF PDF File Color Mode Auto/Grayscale Mono2 Quick File Special Modes (4) 5 10 15 - Sharp MX-C311 | Quick Start Guide - Page 117
Address Review 001 EEE EEE To 002 HHH HHH Cc OK Select settings in the touch (6) the [Yes] key. 3 Press the [COLOR START] key or the [BLACK & WHITE START] key. If fax or Internet fax destinations are included in the broadcast transmission, the [COLOR START] key cannot be pressed. Press the - Sharp MX-C311 | Quick Start Guide - Page 118
Chapter 5 - SCANNER / INTERNET FAX" in the Operation Guide. Scan Internet Fax Address Book Original Fax Scan: USB Mem. Scan PC Scan 8½x11 Send: Auto Address Entry Exposure Auto Send Settings Resolution 200X200dpi Address Review File Format PDF PDF File Color Mode Auto/Grayscale - Sharp MX-C311 | Quick Start Guide - Page 119
original with the side to be scanned face down. Scan Internet Fax Address Book Original Address Entry Exposure Fax Scan: Auto USB Mem. Scan PC Scan 8½x11 Send: Auto Send Settings Resolution 200X200dpi Address Review File Format PDF PDF File Color Mode Auto/Grayscale Mono2 Quick - Sharp MX-C311 | Quick Start Guide - Page 120
if sent by Black & White [Start]. (Mono2 selection) OK (3) Scan/Special Modes (5) OK Suppress Background Cancel OK Light areas of the OK] key. 3 Select the destination and press the [COLOR START] key. This function cannot be used when the color mode is set to [Mono2]. Cancel scanning 118 - Sharp MX-C311 | Quick Start Guide - Page 121
light background areas in the scanned image. This is convenient for Scan scanning an original that is printed on colored paper. This function does not operate in black and white mode. Scanning both sides of a card onto a single page (Card Shot) Use this function to scan the front and back - Sharp MX-C311 | Quick Start Guide - Page 122
(Timer Transmission) • Storing scan operations (Program) • Scanning thin originals (Slow Scan Mode) • Scanning business cards (Business Card Scan) • Changing the print settings for the transaction report (Transaction Report) • Forwarding a received Internet fax to a network address (Inbound Routing - Sharp MX-C311 | Quick Start Guide - Page 123
a copy, print, or other job. A stored file can be called up and used whenever needed. This section introduces several of the document filing functions. XDOCUMENT FILING 122 XQUICKLY SAVING A JOB (Quick File 124 XAPPENDING INFORMATION WHEN STORING A FILE (File 125 XSAVING A DOCUMENT ONLY (Scan to - Sharp MX-C311 | Quick Start Guide - Page 124
job, as a file on the machine's hard drive. The stored file can be retrieved and printed or transmitted as needed. Uses of the document filing function Copy Fax Print Scan Files that you want to store for later use Store quickly and easily Store and manage Quick File Using Quick File, you - Sharp MX-C311 | Quick Start Guide - Page 125
, users can obtain forms using the Web page or the operation panel of the machine. File Retrieve File Information Scan to HDD HDD Status Ex Data Access Original Scan: 8½x11 Store: Exposure Auto Resolution 200X200dpi Comp. Ratio Medium Color Mode Auto Mono2 Special Modes Auto Features - Sharp MX-C311 | Quick Start Guide - Page 126
be face up! 1 Place the originals. When using the document glass, place the original with the side to be scanned face down. Color Mode Full Color Exposure Auto Copy Ratio 100% 1. 8½x11 2. 5½x8½ 3. 8½x14 4. 8½x11 Plain 8½x11 Original 8½x11 Paper Select Auto 8½x11 Plain Special Modes 2-Sided - Sharp MX-C311 | Quick Start Guide - Page 127
scanned face down. Color Mode Full Color Exposure Auto Copy Ratio 100% Special Modes 1. 8½x11 2. 5½x8½ 3. 8½x14 4. 8½x11 Plain 8½x11 2-Sided Copy way as when making a regular copy. (1) Touch the [File] key. File Information Cancel OK Confidential Password User Name (2) User Unknown File - Sharp MX-C311 | Quick Start Guide - Page 128
key. Stored to: Main Folder User 1 User 3 User 5 User 7 User 9 (7) User 2 User 4 User 6 User 8 User 10 All Folders ABCD EFGHI JKLMN OPQRST UVWXYZ OK (8) 1 2 File Information Confidential Password User Name Name 1 File Name file-01 Stored to: User 1 Cancel OK (9) (7) Touch the [User 1] key - Sharp MX-C311 | Quick Start Guide - Page 129
3 Set the number of copies and then press the [COLOR START] key or the [BLACK & WHITE START] key. The file is stored on the hard drive at the same time as the copy is made. Correct sets Cancel scanning Cancel copying 127 - Sharp MX-C311 | Quick Start Guide - Page 130
to HDD) You can save a document without performing a copy, print, or send job. The procedure for storing a document in the main folder is explained below. COPY IMAGE SEND DOCUMENT FILING File Retrieve Scan to HDD Folder Select HDD Status Ex Data Access Main Folder Quick File Folder User - Sharp MX-C311 | Quick Start Guide - Page 131
4 Press the [COLOR START] key or [BLACK & WHITE START] key. 129 - Sharp MX-C311 | Quick Start Guide - Page 132
. COPY IMAGE SEND DOCUMENT FILING (1) File Retrieve Scan to HDD Folder Select HDD Status Ex Data Access Main Folder (2) User 1 User 3 User 5 User 7 User 9 All Folders ABCD Quick File Folder EFGHI User 2 User 4 User 6 User 8 User 10 JKLMN OPQRST UVWXYZ Search 1 2 Select the file and print - Sharp MX-C311 | Quick Start Guide - Page 133
The system settings let you adjust the operation of the machine to suit the needs of your workplace. This section briefly introduces several of the system settings. For detailed explanations of the system settings, see "Chapter 7 - SYSTEM SETTINGS" in the Operation Guide. XSYSTEM SETTINGS 132 131 - Sharp MX-C311 | Quick Start Guide - Page 134
" in the Operation Guide. Displaying the system settings screen SYSTEM SETTINGS Press the [SYSTEM SETTINGS] key. System Settings Total Count Paper Tray Settings Printer Condition Settings Default Settings Address Control Document Filing Control Admin Password Exit List Print (User) Fax Data - Sharp MX-C311 | Quick Start Guide - Page 135
printing without using the printer driver and settings for the printer function. This is used to store, edit, and delete custom folders for the document filing function. This is used to check the connection status of a USB device. System settings (administrator) The system settings (administrator - Sharp MX-C311 | Quick Start Guide - Page 136
- Sharp MX-C311 | Quick Start Guide - Page 137
Troubleshooting This sections contains answers to frequently asked questions and explains how to remove paper misfeeds. XFREQUENTLY ASKED QUESTIONS 136 XREMOVING MISFEEDS 142 135 - Sharp MX-C311 | Quick Start Guide - Page 138
the original on the document glass. When using the automatic document feeder, use "Slow Scan Mode" for a thin original. 2 Enter the original size. Original Size Input OK Cancel OK X 8 (1-14) inch Y 6 (1-8 1/2) inch From the base screen of copy mode, touch [Original] then [Size Input]. 136 - Sharp MX-C311 | Quick Start Guide - Page 139
8-1/2" x 11" 4 Select the bypass tray. From the base screen of copy mode, touch [Paper Select] and then "Bypass tray paper type". Paper Select Select the paper type. Plain Pre-Punched Heavy Paper Pre-Printed Color Transparency Recycled Thin Paper Envelope Cancel 1 Letter Head 2 Labels - Sharp MX-C311 | Quick Start Guide - Page 140
paper in the bypass tray. Print on the name and address side 2 Tray Settings. Tray Settings Type Size Fixed Paper Side Bypass Envelope COM-10 Paper Property Disable Duplex Disable Staple Back Change 5 5 Copy Print Feeding Approved Job Fax I-Fax Doc. Filing Type : Envelope Size - Sharp MX-C311 | Quick Start Guide - Page 141
3 Select settings in the printer driver. (1) (2) (3) (4) (1) Select the size of the envelope in "Paper Size". (2) Select "Bypass Tray" from "Paper Source" in "Paper Selection". (3) Select [Envelope] in "Paper Type". If needed, - Sharp MX-C311 | Quick Start Guide - Page 142
the paper size. Paper Empty 1 Check details on the job. Print Job Job Queue 1 Copy 2 Computer01 3 Copy 4 1234567890 Scan to Fax Job Internet Fax Sets / Progress 020 / 001 020 / 000 002 / 000 Status Copying Paper Empty Waiting Spool Job Queue (1)1 Complete 1 001 / 000 Waiting - Sharp MX-C311 | Quick Start Guide - Page 143
, follow the steps below to adjust the volume. The fax ringer volume is adjusted in the system settings (administrator). Press the [SYSTEM SETTINGS] key on the operation panel, touch [Image Send Settings] - [Fax Settings] - [Fax Default Settings] - [Speaker Settings] - [Ringer Volume] in that order - Sharp MX-C311 | Quick Start Guide - Page 144
printing and scanning will stop. In this event, touch the [Information] key in the touch panel. When the key is touched, instructions for removing the misfeed will appear. Follow the instructions removing misfeeds, see "REMOVING MISFEEDS" in "Chapter 8 - TROUBLESHOOTING" in the Operation Guide. 142 - Sharp MX-C311 | Quick Start Guide - Page 145
and the operation panel shown in this manual The peripheral devices are generally optional, however, some models include certain peripheral devices as standard equipment. The explanations in this manual assume that 500-sheet paper feed units (total of four trays) are installed on the MX-C401. For - Sharp MX-C311 | Quick Start Guide - Page 146
- Sharp MX-C311 | Quick Start Guide - Page 147
Sharpness Red R+ Green G+ Blue B+ Suppress Soft Sharp Color Balance Brightness C Cyan+ M Magenta+ Y Yellow+ K Black+ Intensity Darker Brighter Intensity - Intensity + For details on "Color Adjustments", see "[Color Adjustments] KEY" in "Chapter 2 - COPIER" in the Operation Guide - Sharp MX-C311 | Quick Start Guide - Page 148
MX-C311/MX-C401/DX-C311/DX-C401 Quick Start Guide SHARP ELECTRONICS CORPORATION 1 Sharp Plaza, Mahwah, New Jersey 07495-1163. www.sharpusa.com SHARP ELECTRONICS OF CANADA LTD. 335 Britannia Road East, Mississauga, Ontario, L4Z 1W9 This manual has been printed using a vegetable-based soy oil ink to
-
 1
1 -
 2
2 -
 3
3 -
 4
4 -
 5
5 -
 6
6 -
 7
7 -
8
-
9
-
10
-
11
-
12
-
13
-
14
-
15
-
16
-
17
-
18
-
19
-
20
-
21
-
22
-
23
-
24
-
25
-
26
-
27
-
28
-
29
-
30
-
31
-
32
-
33
-
34
-
35
-
36
-
37
-
38
-
39
-
40
-
41
-
42
-
43
-
44
-
45
-
46
-
47
-
48
-
49
-
50
-
51
-
52
-
53
-
54
-
55
-
56
-
57
-
58
-
59
-
60
-
61
-
62
-
63
-
64
-
65
-
66
-
67
-
68
-
69
-
70
-
71
-
72
-
73
-
74
-
75
-
76
-
77
-
78
-
79
-
80
-
81
-
82
-
83
-
84
-
85
-
86
-
87
-
88
-
89
-
90
-
91
-
92
-
93
-
94
-
95
-
96
-
97
-
98
-
99
-
100
-
101
-
102
-
103
-
104
-
105
-
106
-
107
-
108
-
109
-
110
-
111
-
112
-
113
-
114
-
115
-
116
-
117
-
118
-
119
-
120
-
121
-
122
-
123
-
124
-
125
-
126
-
127
-
128
-
129
-
130
-
131
-
132
-
133
-
134
-
135
-
136
-
137
-
138
-
139
-
140
-
141
-
142
-
143
-
144
-
145
-
146
-
147
-
148
 |
 |

Printing
Using the printer function.
Faxing
Using the fax function.
Quick Start Guide
Quick Start Guide
Quick Start Guide
DIGITAL FULL COLOR MULTIFUNCTIONAL SYSTEM
Before using the machine
Functions of the machine and
procedures for placing originals and
loading paper.
Copying
Using the copy function.
Scanning
Using the scan function.
Document filing
Storing jobs as files on the hard
drive.
System settings
Configuring settings to make
the machine easier to use.
Troubleshooting
Frequently asked questions and
how to clear paper misfeeds.
Keep this manual close at hand for
reference whenever needed.
DX-C311
DX-C401
MODEL: MX-C311
MX-C401