Sharp MX-M200D Operation Manual - Page 15
Warning, Caution - scanning
 |
View all Sharp MX-M200D manuals
Add to My Manuals
Save this manual to your list of manuals |
Page 15 highlights
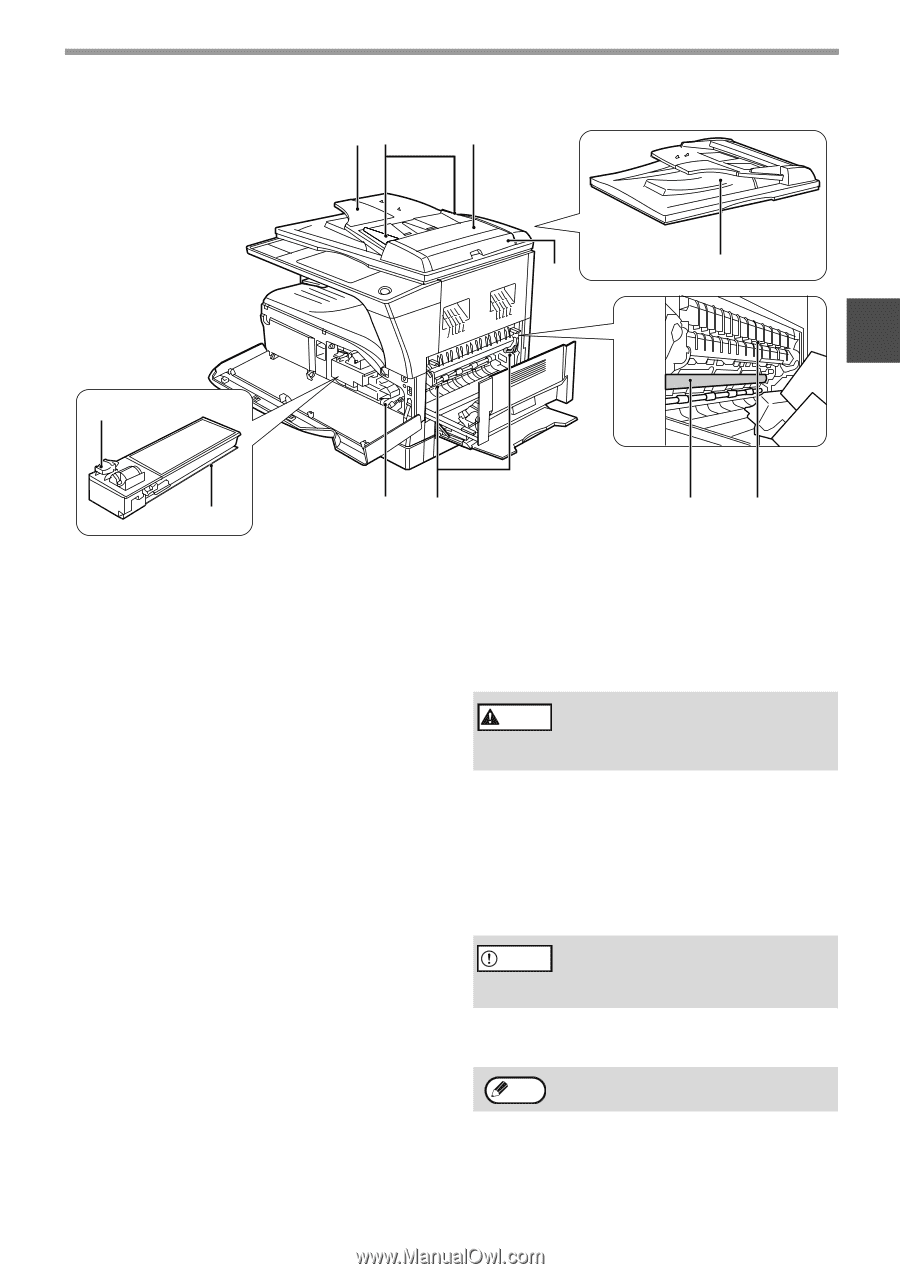
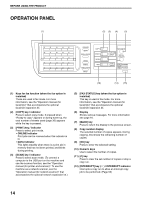
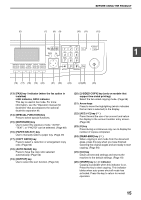
(21) (22) (23) BEFORE USING THE PRODUCT (24) (27) 1 (19) (26) (25) (20) (28) (29) (13) Document cover (when installed) Open to make a copy from the document glass. (14) Side cover Open to remove misfed paper. (15) Side cover handle Pull to open the side cover. (16) Bypass tray guides Adjust to the width of the paper when using the bypass tray. (17) Bypass tray Special paper (heavy paper or transparency film) can be fed from the bypass tray. (18) Bypass tray extension Pull out when feeding large paper such as A3 and B4 (11" x 17" and 8-1/2" x 14"). (19) Toner cartridge lock release lever To replace the toner cartridge, pull out the toner cartridge while pushing on this lever. (20) Toner cartridge Contains toner. (21) Document feeder tray (when the SPF is installed) Place the original(s) that you wish to scan face up here. Up to 40 sheets can be placed. (22) Original guides (when the SPF is installed) Adjust to the size of the originals. (23) Feeding roller cover (when the SPF is installed) Open to remove misfed originals. (24) Right side cover (when the SPF is installed) Open to remove misfed originals. (25) Fusing unit release levers To remove the paper misfed in the fusing unit, push down on these levers and remove the paper. Warning The fusing unit is hot. Do not touch the fusing unit when removing misfed paper. Doing so may cause a burn or injury. (26) Roller rotating knob Rotate to remove misfed paper. (27) Exit area (when the SPF is installed) Originals exit the machine here after copying/scanning when the SPF is used. (28) Photoconductive drum Images are formed on the photoconductive drum. Caution Do not touch the photoconductive drum (green portion) when removing the misfed paper. Doing so may damage the drum and cause smudges on copies. (29) Fusing unit paper guide Open to remove misfed paper. The model name is on the front cover of the Note machine. 13
-
 1
1 -
2
-
3
-
4
-
5
-
6
-
7
-
8
-
9
-
 10
10 -
 11
11 -
 12
12 -
 13
13 -
 14
14 -
 15
15 -
 16
16 -
 17
17 -
 18
18 -
 19
19 -
 20
20 -
21
-
22
-
23
-
24
-
25
-
26
-
27
-
28
-
29
-
30
-
31
-
32
-
33
-
34
-
35
-
36
-
37
-
38
-
39
-
40
-
41
-
42
-
43
-
44
-
45
-
46
-
47
-
48
-
49
-
50
-
51
-
52
-
53
-
54
-
55
-
56
-
57
-
58
-
59
-
60
-
61
-
62
-
63
-
64
-
65
-
66
-
67
-
68
-
69
-
70
-
71
-
72
-
73
-
74
-
75
-
76
-
77
-
78
-
79
-
80
-
81
-
82
-
83
-
84
-
85
-
86
-
87
-
88
-
89
-
90
-
91
-
92
-
93
-
94
-
95
-
96
-
97
-
98
-
99
-
100
 |
 |