Sharp MX-M200D Operation Manual - Page 40
Cleaning The Transfer Charger
 |
View all Sharp MX-M200D manuals
Add to My Manuals
Save this manual to your list of manuals |
Page 40 highlights
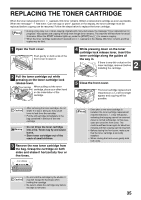
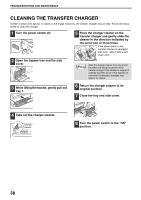
TROUBLESHOOTING AND MAINTENANCE CLEANING THE TRANSFER CHARGER If white or black lines appear in copies or the image is blotchy, the transfer charger may be dirty. Follow the steps below to clean the charger. 1 Turn the power switch off. 2 Open the bypass tray and the side cover. 5 Place the charger cleaner on the transfer charger and gently slide the cleaner in the direction indicated by the arrow two or three times. If the sheet metal on the transfer charger is smudged with toner, wipe it with a soft, clean cloth. Note Slide the charger cleaner from one end to the other end along the groove of the transfer charger. If the cleaner is stopped it reaches the other end or if the direction of movement is reversed, smudges may appear on copies. 3 While lifting the handle, gently pull out tray 1. 6 Return the charger cleaner to its original position. 7 Close the tray and side cover. 4 Take out the charger cleaner. Charger cleaner 8 Turn the power switch to the "ON" position. 38
-
 1
1 -
2
-
3
-
4
-
5
-
6
-
7
-
8
-
9
-
10
-
11
-
12
-
13
-
14
-
15
-
16
-
17
-
18
-
19
-
20
-
21
-
22
-
23
-
24
-
25
-
26
-
27
-
28
-
29
-
30
-
31
-
32
-
33
-
34
-
 35
35 -
 36
36 -
 37
37 -
 38
38 -
 39
39 -
 40
40 -
 41
41 -
 42
42 -
 43
43 -
 44
44 -
 45
45 -
46
-
47
-
48
-
49
-
50
-
51
-
52
-
53
-
54
-
55
-
56
-
57
-
58
-
59
-
60
-
61
-
62
-
63
-
64
-
65
-
66
-
67
-
68
-
69
-
70
-
71
-
72
-
73
-
74
-
75
-
76
-
77
-
78
-
79
-
80
-
81
-
82
-
83
-
84
-
85
-
86
-
87
-
88
-
89
-
90
-
91
-
92
-
93
-
94
-
95
-
96
-
97
-
98
-
99
-
100
 |
 |
