Sharp MX-M200D Operation Manual - Page 53
Using The Bypass Tray To Copy A Special Size Original
 |
View all Sharp MX-M200D manuals
Add to My Manuals
Save this manual to your list of manuals |
Page 53 highlights
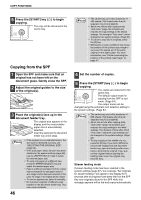
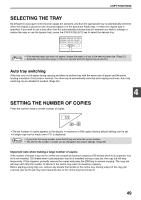
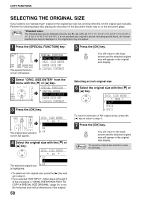
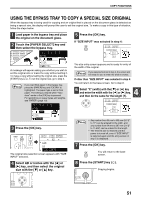
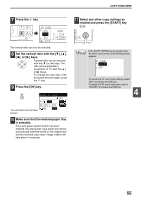
COPY FUNCTIONS USING THE BYPASS TRAY TO COPY A SPECIAL SIZE ORIGINAL When the bypass tray is being used for copying and an original that is placed on the document glass is detected as being a special size, the display will prompt the user to set the original size. To make a copy in this type of situation, follow the steps below. 1 Load paper in the bypass tray and place the original on the document glass. 2 Touch the [PAPER SELECT] key and then select the bypass tray. RE PAPER SELECT COPY RATIO AUTO IMAGE ODE RESOLUTION ADDRESS FORMAT O AM RESOLUTION ADDRESS BROADCAST O [OK]:ORIG. SIZE ENTER AUTO 100% EXTRA A message will appear asking you whether you wish to set the original size or make the copy without setting it. To make a copy without setting the original size, press the [START] key ( ). To set the original size, go to step 3. Note If you load thick paper in the bypass tray, press the [PAPER] key until "EXTRA" is highlighted. The paper type is set to thick paper. The setting is cleared when "Auto clear" works or the [CA] key is pressed. For restrictions on paper types and weights, see "PAPER" (page 18). [OK]:ORIG. SIZE ENTER AUTO 100% EXTRA 3 Press the [OK] key. BACK OK PY AN GHI PQRS ORIG. SIZE ENTER AB A4R A5 SIZE INPUT The original size selection screen appears with "SIZE INPUT" selected. 4 Select AB or inches with the [ ] or [ ] key, and then select the original size with the [ ] or [ ] key. PQ ED COPY LEX SCAN LEX SCAN ACC 5 Press the [OK] key. If "SIZE INPUT" was selected in step 4: OK SIZE INPUT SIZE(mm) X: 210 Y: 148 The size entry screen appears and is ready for entry of the width of the original. If you selected inches in step 4, the screen will Note be ready for you to enter the width in inches. If other than "SIZE INPUT" was selected in step 4: You will return to the base screen. Go to step 8. 6 4 Select "X" (width) with the [ ] or [ ] key and enter the width with the [ ] or [ ] key, and then do the same for the length (Y). SIZE INPUT SIZE(mm) X: 100 Y: 100 Note • Any number from 64 mm to 432 mm (2-1/2" to 17") can be entered for the width, and any number from 64 mm to 297 mm (2-1/2" to 11-5/8") can be entered for the length. • The entered size is retained until the power is turned off, even if "SIZE INPUT" is selected again and the entry screen of step 5 is displayed. 7 Press the [OK] key. OK You will return to the base screen. 8 Press the [START] key ( ). MNO Copying begins. WXYZ @.-_ AD-END 51
-
 1
1 -
2
-
3
-
4
-
5
-
6
-
7
-
8
-
9
-
10
-
11
-
12
-
13
-
14
-
15
-
16
-
17
-
18
-
19
-
20
-
21
-
22
-
23
-
24
-
25
-
26
-
27
-
28
-
29
-
30
-
31
-
32
-
33
-
34
-
35
-
36
-
37
-
38
-
39
-
40
-
41
-
42
-
43
-
44
-
45
-
46
-
47
-
 48
48 -
 49
49 -
 50
50 -
 51
51 -
 52
52 -
 53
53 -
 54
54 -
 55
55 -
 56
56 -
 57
57 -
 58
58 -
59
-
60
-
61
-
62
-
63
-
64
-
65
-
66
-
67
-
68
-
69
-
70
-
71
-
72
-
73
-
74
-
75
-
76
-
77
-
78
-
79
-
80
-
81
-
82
-
83
-
84
-
85
-
86
-
87
-
88
-
89
-
90
-
91
-
92
-
93
-
94
-
95
-
96
-
97
-
98
-
99
-
100
 |
 |
