Sharp MX-M200D Operation Manual - Page 70
Creating Margins When Copying
 |
View all Sharp MX-M200D manuals
Add to My Manuals
Save this manual to your list of manuals |
Page 70 highlights
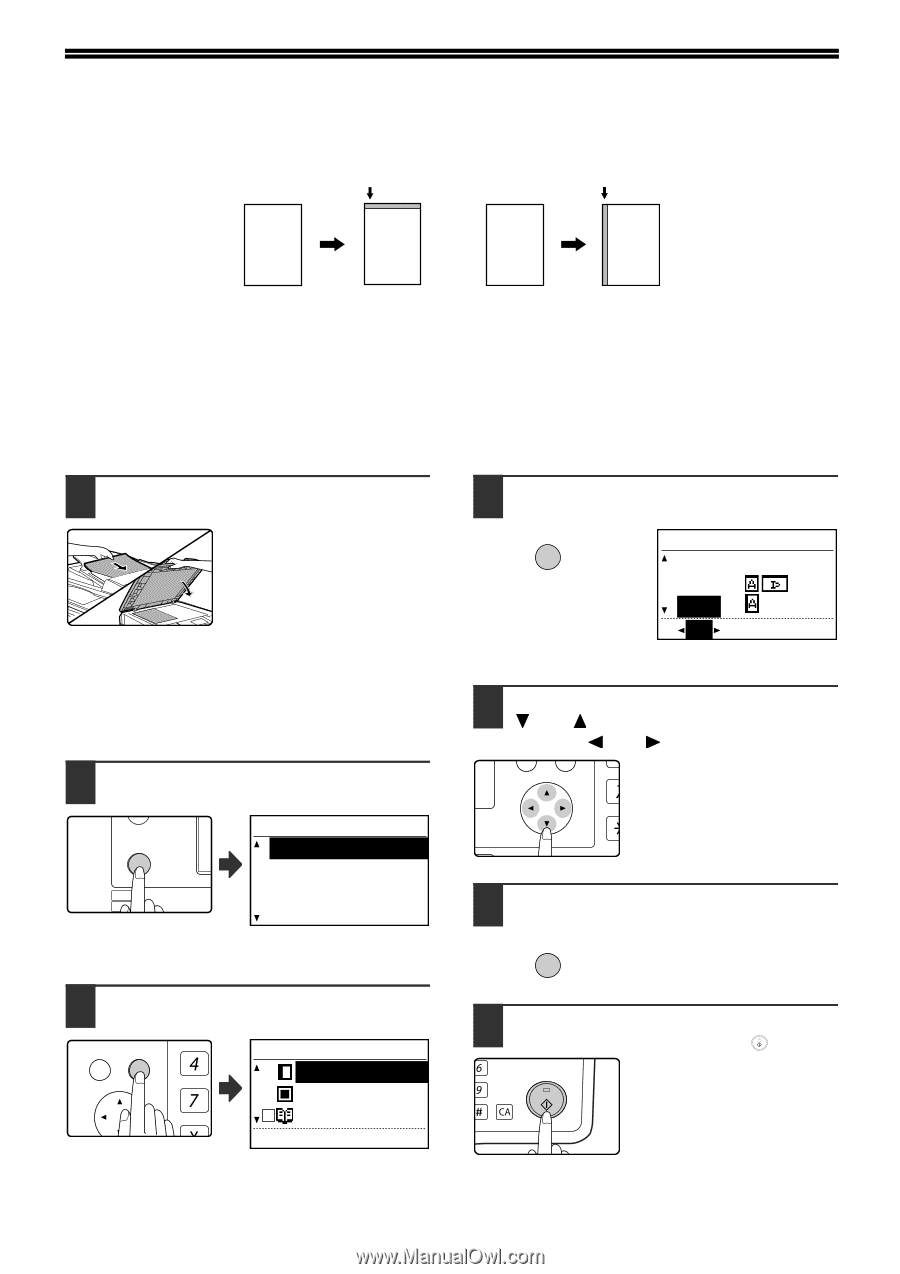
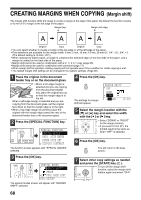
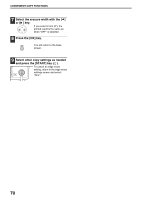
CREATING MARGINS WHEN COPYING (Margin shift) The margin shift function shifts the image to create a margin at the edge of the paper. By default the function creates a 10 mm (1/2") margin at the left edge of the paper. Margin (top) Margin (left edge) AA AA Original Copy Original Copy • You can select whether to create a margin at the top edge or at the left edge of the paper. • Five selections are available for the margin width: 0 mm, 5 mm, 10 mm, 15 mm, 20 mm (0", 1/4", 1/2", 3/4", 1"). (The default setting is 10 mm (1/2").) • When making two-sided copies, a margin is created at the selected edge on the front side of the paper, and a margin is created on the back side of the paper. • Margin shift cannot be used in combination with 2 in 1 / 4 in 1 copy (page 66). • Margin shift cannot be used in combination with card shot (page 71). • When margin shift is selected, rotating copying will not operate even if the condition for rotate copying is met. • The default margin shift setting can be changed in the system settings. (Page 86) 1 Place the original in the document feeder tray or on the document glass. • When a left-edge margin is selected and you are copying from the document feeder tray, place the original face up so that the margin edge is to the left. When a left-edge margin is selected and you are copying from the document glass, set the original face down so that the margin edge is to the right. • When a top-edge margin is selected, place the original with the margin edge toward the rear of the document feeder tray or the document glass. 2 Press the [SPECIAL FUNCTION] key. ON LINE DATA SPECIAL FUNCTION LINE DATA COPY EXPOSURE PAPER SE SCAN COLOUR MODE RESOLUT SPECIAL FUNCTION SPECIAL MODES ORIG. SIZE ENTER PAPER SIZE SET DISPLAY CONTRAST The function screen appears with "SPECIAL MODES" selected. 4 Press the [OK] key. OK The settings for margin shift will appear. MARGIN SHIFT OFF DOWN RIGHT 10 mm (0~20) 5 Select the margin location with the [ ] or [ ] key and select the width with the [ ] or [ ] key. ED COPY LEX SCAN LEX SCAN • Select "DOWN" or "RIGHT" PQ for the margin location. • If you select 0 mm (0"), the printed result is the same as when "OFF" is selected. ACC 6 Press the [OK] key. OK You will return to the base screen. 3 Press the [OK] key. BACK OK PY AN GHI PQRS SPECIAL MODES MARGIN SHIFT ERASE DUAL PAGE COPY [OK]:ADJUST The special modes screen will appear with "MARGIN SHIFT" selected. 7 Select other copy settings as needed and press the [START] key ( ). MNO To turn off the margin shift WXYZ function, select the margin shift @.-_ feature again and select "OFF". AD-END 68
-
 1
1 -
2
-
3
-
4
-
5
-
6
-
7
-
8
-
9
-
10
-
11
-
12
-
13
-
14
-
15
-
16
-
17
-
18
-
19
-
20
-
21
-
22
-
23
-
24
-
25
-
26
-
27
-
28
-
29
-
30
-
31
-
32
-
33
-
34
-
35
-
36
-
37
-
38
-
39
-
40
-
41
-
42
-
43
-
44
-
45
-
46
-
47
-
48
-
49
-
50
-
51
-
52
-
53
-
54
-
55
-
56
-
57
-
58
-
59
-
60
-
61
-
62
-
63
-
64
-
 65
65 -
 66
66 -
 67
67 -
 68
68 -
 69
69 -
 70
70 -
 71
71 -
 72
72 -
 73
73 -
 74
74 -
 75
75 -
76
-
77
-
78
-
79
-
80
-
81
-
82
-
83
-
84
-
85
-
86
-
87
-
88
-
89
-
90
-
91
-
92
-
93
-
94
-
95
-
96
-
97
-
98
-
99
-
100
 |
 |