Sharp MX-M450N Operation Manual - Page 147
Printing entered text on copies, sequences, touch the [RECALL] key.
 |
View all Sharp MX-M450N manuals
Add to My Manuals
Save this manual to your list of manuals |
Page 147 highlights
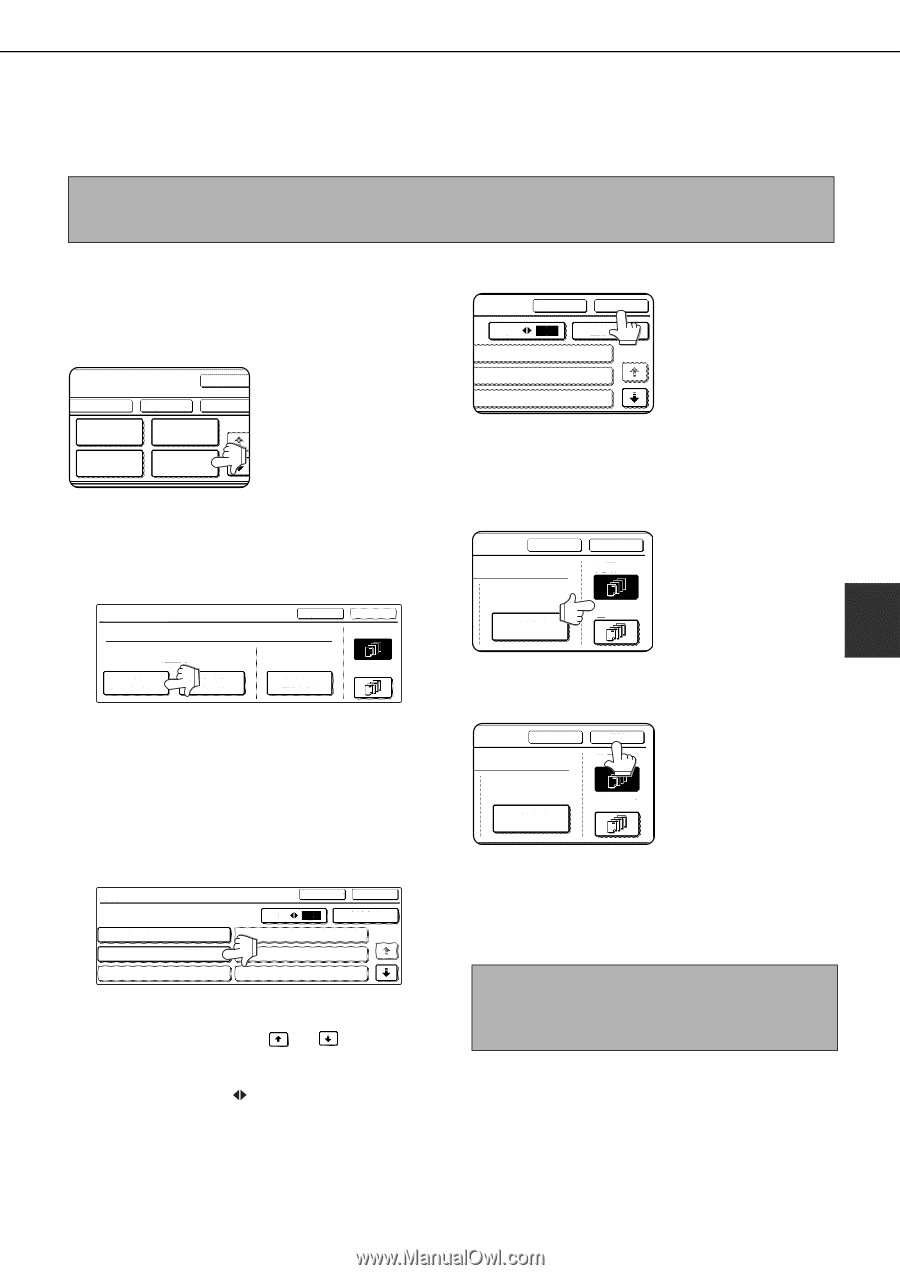
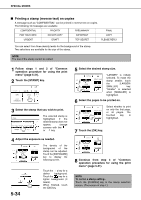
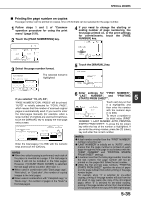
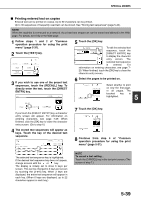
SPECIAL MODES ■ Printing entered text on copies Entered text can be printed on copies. Up to 50 characters can be printed. Up to 30 sequences of frequently used text can be stored. See "Storing text sequences" (page 5-40). NOTE When the machine is connected to a network, the printed text sequences can be stored and deleted in the Web page. For details, see Help in the Web page. 1 Follow steps 1 and 2 of "Common operation procedure for using the print menu" (page 5-31). 2 Touch the [TEXT] key. LAYOUT CANCEL DATE STAMP PAGE NUMBERING TEXT OK OK 1/2 5 Touch the [OK] key. CANCEL OK To edit the selected text 3 04 6 DIRECT ENTRY 1/5 sequence, touch the [DIRECT ENTRY] key to display the character 05 entry screen. The 06 selected text sequence is entered. For information on entering characters, see page 7- 29. When finished, touch the [OK] key to close the character entry screen. 3 If you wish to use one of the preset text sequences, touch the [RECALL] key. To directly enter the text, touch the [DIRECT ENTRY] key. TEXT CANCEL OK FIRST PAGE PRE-SET RECALL STORE/DELETE DIRECT ENTRY ALL PAGES If you touch the [DIRECT ENTRY] key, a character entry screen will appear. For information on entering characters, see page 7-29. When finished, click the [OK] key to close the character entry screen. (Go to step 6.) 4 The stored text sequences will appear as keys. Touch the key of the desired text sequence. TEXT RECALL No.01 TARO YAMADA No.02 Meeting No.03 3 No.04 No.05 No.06 CANCEL OK 6 DIRECT ENTRY 1/5 The selected text sequence key is highlighted. If the desired text sequence key does not appear, change screens with the or key. The display is initially set to show 6 keys per screen. This can be changed to 3 keys per screen by touching the [3 6] key. When 3 keys are displayed, the entire text sequence will appear in each key. (When 6 keys are displayed, up to 22 characters appear in each key.) 6 Select the pages to be printed on. CANCEL OK FIRST PAGE DIRECT ENTRY ALL PAGES Select whether to print on only the first page, or all pages. The touched key highlighted. is 5 7 Touch the [OK] key. CANCEL OK FIRST PAGE DIRECT ENTRY ALL PAGES 8 Continue from step 4 of "Common operation procedure for using the print menu" (page 5-31). NOTE To cancel a text setting... Touch the [CANCEL] key in the text print screen. (The screen of step 7.) 5-39
-
 1
1 -
2
-
3
-
4
-
5
-
6
-
7
-
8
-
9
-
10
-
11
-
12
-
13
-
14
-
15
-
16
-
17
-
18
-
19
-
20
-
21
-
22
-
23
-
24
-
25
-
26
-
27
-
28
-
29
-
30
-
31
-
32
-
33
-
34
-
35
-
36
-
37
-
38
-
39
-
40
-
41
-
42
-
43
-
44
-
45
-
46
-
47
-
48
-
49
-
50
-
51
-
52
-
53
-
54
-
55
-
56
-
57
-
58
-
59
-
60
-
61
-
62
-
63
-
64
-
65
-
66
-
67
-
68
-
69
-
70
-
71
-
72
-
73
-
74
-
75
-
76
-
77
-
78
-
79
-
80
-
81
-
82
-
83
-
84
-
85
-
86
-
87
-
88
-
89
-
90
-
91
-
92
-
93
-
94
-
95
-
96
-
97
-
98
-
99
-
100
-
101
-
102
-
103
-
104
-
105
-
106
-
107
-
108
-
109
-
110
-
111
-
112
-
113
-
114
-
115
-
116
-
117
-
118
-
119
-
120
-
121
-
122
-
123
-
124
-
125
-
126
-
127
-
128
-
129
-
130
-
131
-
132
-
133
-
134
-
135
-
136
-
137
-
138
-
139
-
140
-
141
-
 142
142 -
 143
143 -
 144
144 -
 145
145 -
 146
146 -
 147
147 -
 148
148 -
 149
149 -
 150
150 -
 151
151 -
 152
152 -
153
-
154
-
155
-
156
-
157
-
158
-
159
-
160
-
161
-
162
-
163
-
164
-
165
-
166
-
167
-
168
-
169
-
170
-
171
-
172
-
173
-
174
-
175
-
176
-
177
-
178
-
179
-
180
-
181
-
182
-
183
-
184
-
185
-
186
-
187
-
188
-
189
-
190
-
191
-
192
-
193
-
194
-
195
-
196
-
197
-
198
-
199
-
200
 |
 |