Sharp MX-M450N Operation Manual - Page 149
Checking and changing the print layout, To change the print position, touch
 |
View all Sharp MX-M450N manuals
Add to My Manuals
Save this manual to your list of manuals |
Page 149 highlights
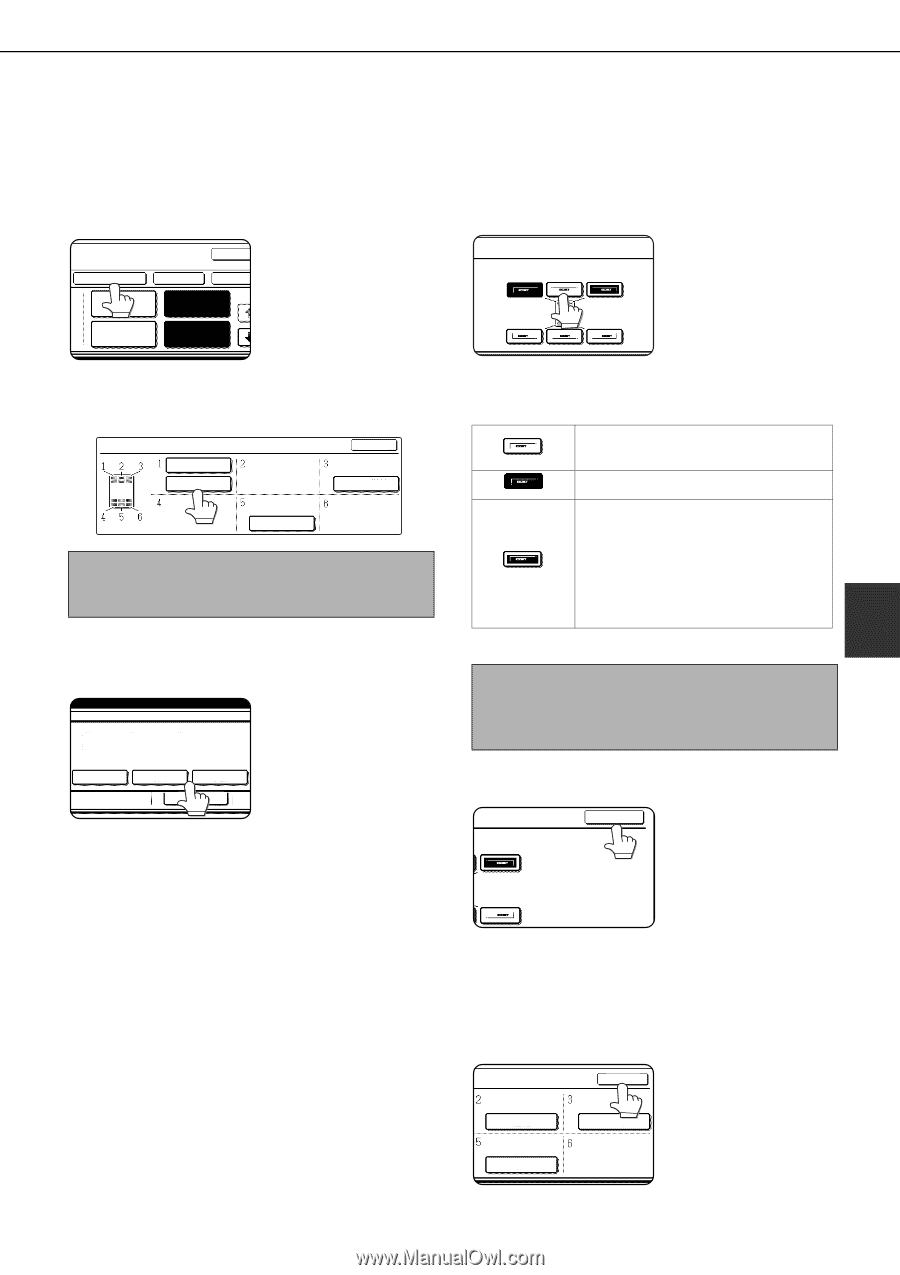
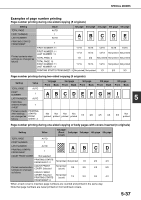
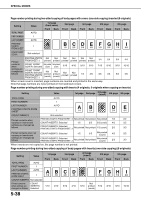
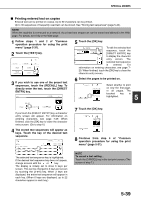
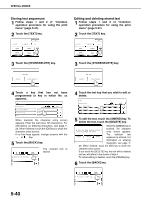
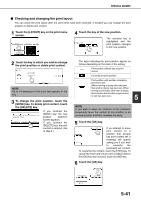
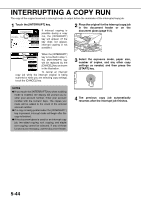
SPECIAL MODES ■ Checking and changing the print layout You can check the print layout after the print items have been selected. If needed you can change the print position or delete print content. 1 Touch the [LAYOUT] key on the print menu screen. LAYOUT DATE CANCEL STAMP OK OK 1/ PAGE NUMBERING TEXT 4 Touch the key of the new position. SELECTED ITEM. The selected key is highlighted and the print position changes to the new position. 2 Touch the key in which you wish to change the print position or delete print content. LAYOUT TARO YAMADA CONFIDENTIAL OK DO NOT COPY 1,2,3.. NOTE Up to 14 characters of the print text appears in the key. 3 To change the print position, touch the [MOVE] key. To delete print content, touch the [DELETE] key. DO YOU WANT TO MOVE OR DELETE THE SELECTED ITEM? CANCEL DELETE MOVE 1,2,3.. If you touched the [MOVE] key, the new position selection screen appears. If you touched the [DELETE] key, the print content is deleted. (Go to step 6.) The keys indicating the print position appear as follows depending on the state of the setting: Print position without any set print menus. Currently set print position. Print position with another competing print menu set. (When moving a stamp, this indicates that another stamp has been set. When moving a print menu other than a stamp, this indicates that the date, page number, or text has been set.) 5 NOTE If you wish to swap the contents of two positions, temporarily move the content of one position to an unused position and then complete the swap. 5 Touch the [OK] key. OK If you attempt to move print content to a position that already has print content set, a message will appear asking you if you wish to overwrite the previously set content. To overwrite the content, touch the [YES] key. To cancel the move and return to the condition before the [OK] key was touched, touch the [NO] key. 6 Touch the [OK] key. OK CONFIDENTIAL DO NOT COPY 1,2,3.. 5-41
-
 1
1 -
2
-
3
-
4
-
5
-
6
-
7
-
8
-
9
-
10
-
11
-
12
-
13
-
14
-
15
-
16
-
17
-
18
-
19
-
20
-
21
-
22
-
23
-
24
-
25
-
26
-
27
-
28
-
29
-
30
-
31
-
32
-
33
-
34
-
35
-
36
-
37
-
38
-
39
-
40
-
41
-
42
-
43
-
44
-
45
-
46
-
47
-
48
-
49
-
50
-
51
-
52
-
53
-
54
-
55
-
56
-
57
-
58
-
59
-
60
-
61
-
62
-
63
-
64
-
65
-
66
-
67
-
68
-
69
-
70
-
71
-
72
-
73
-
74
-
75
-
76
-
77
-
78
-
79
-
80
-
81
-
82
-
83
-
84
-
85
-
86
-
87
-
88
-
89
-
90
-
91
-
92
-
93
-
94
-
95
-
96
-
97
-
98
-
99
-
100
-
101
-
102
-
103
-
104
-
105
-
106
-
107
-
108
-
109
-
110
-
111
-
112
-
113
-
114
-
115
-
116
-
117
-
118
-
119
-
120
-
121
-
122
-
123
-
124
-
125
-
126
-
127
-
128
-
129
-
130
-
131
-
132
-
133
-
134
-
135
-
136
-
137
-
138
-
139
-
140
-
141
-
142
-
143
-
 144
144 -
 145
145 -
 146
146 -
 147
147 -
 148
148 -
 149
149 -
 150
150 -
 151
151 -
 152
152 -
 153
153 -
 154
154 -
155
-
156
-
157
-
158
-
159
-
160
-
161
-
162
-
163
-
164
-
165
-
166
-
167
-
168
-
169
-
170
-
171
-
172
-
173
-
174
-
175
-
176
-
177
-
178
-
179
-
180
-
181
-
182
-
183
-
184
-
185
-
186
-
187
-
188
-
189
-
190
-
191
-
192
-
193
-
194
-
195
-
196
-
197
-
198
-
199
-
200
 |
 |