Sharp MX-M450N Operation Manual - Page 154
USER MAINTENANCE, Cleaning the document glass and the automatic document feeder, Cleaning the main
 |
View all Sharp MX-M450N manuals
Add to My Manuals
Save this manual to your list of manuals |
Page 154 highlights
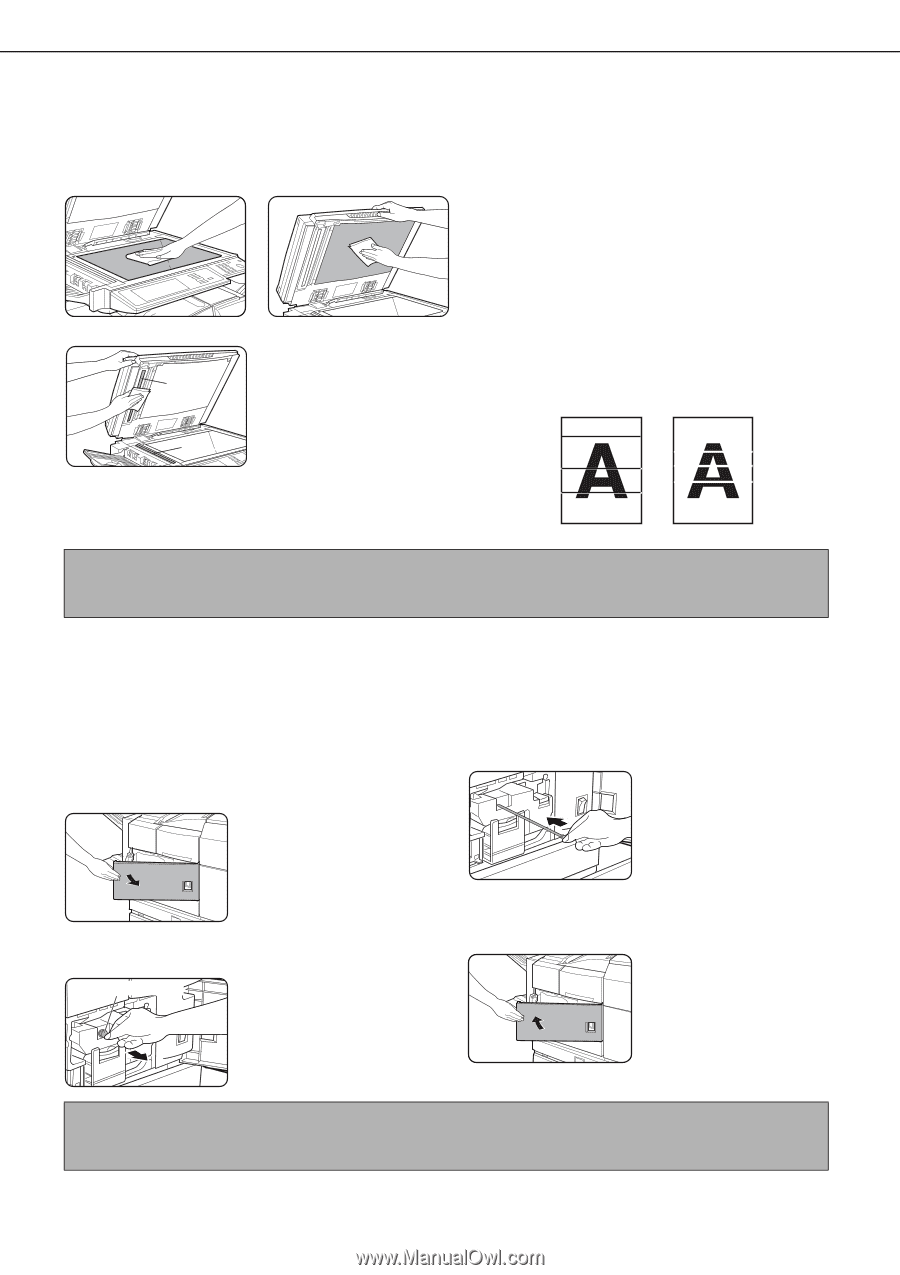
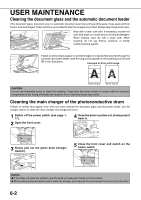
USER MAINTENANCE Cleaning the document glass and the automatic document feeder If the document glass, document cover or automatic document scanning unit have dirty spots, these spots will form lines in scanned images. These will show up as defects when the images are printed. Always keep these parts clean. \Wipe with a clean, soft cloth. If necessary, moisten the cloth with water or a small amount of neutral detergent. When finished, wipe dry with a clean cloth. When cleaning, do not use thinner, benzene, or similar volatile cleaning agents. (A) (B) If black or white stripes appear on printed images of originals that were fed through the automatic document feeder, wipe the long narrow glasses in the scanning unit ((A) and (B) in the illustration). Example of dirty print image Black stripes White stripes CAUTION Do not use flammable spray to clean the machine. If gas from the spray comes in contact with hot electrical components or the fusing unit inside the machine, fire or electrical shock may result. Cleaning the main charger of the photoconductive drum If black (or white) lines appear even after you have cleaned the document glass and document feeder, use the charger cleaner to clean the main charger that charges the drum. 1 Switch off the power switch (see page 117). 2 Open the front cover. 4 Once the knob is pulled out, slowly push it back in. 3 Slowly pull out the green knob (charger cleaner). Charger cleaner 5 Close the front cover and switch on the power switch. NOTES ● If this does not solve the problem, pull the knob out and push it back in 2 more times. ● When pulling and pushing the knob to clean the charger, pull and push the knob slowly from one end to the other. 6-2
-
 1
1 -
2
-
3
-
4
-
5
-
6
-
7
-
8
-
9
-
10
-
11
-
12
-
13
-
14
-
15
-
16
-
17
-
18
-
19
-
20
-
21
-
22
-
23
-
24
-
25
-
26
-
27
-
28
-
29
-
30
-
31
-
32
-
33
-
34
-
35
-
36
-
37
-
38
-
39
-
40
-
41
-
42
-
43
-
44
-
45
-
46
-
47
-
48
-
49
-
50
-
51
-
52
-
53
-
54
-
55
-
56
-
57
-
58
-
59
-
60
-
61
-
62
-
63
-
64
-
65
-
66
-
67
-
68
-
69
-
70
-
71
-
72
-
73
-
74
-
75
-
76
-
77
-
78
-
79
-
80
-
81
-
82
-
83
-
84
-
85
-
86
-
87
-
88
-
89
-
90
-
91
-
92
-
93
-
94
-
95
-
96
-
97
-
98
-
99
-
100
-
101
-
102
-
103
-
104
-
105
-
106
-
107
-
108
-
109
-
110
-
111
-
112
-
113
-
114
-
115
-
116
-
117
-
118
-
119
-
120
-
121
-
122
-
123
-
124
-
125
-
126
-
127
-
128
-
129
-
130
-
131
-
132
-
133
-
134
-
135
-
136
-
137
-
138
-
139
-
140
-
141
-
142
-
143
-
144
-
145
-
146
-
147
-
148
-
 149
149 -
 150
150 -
 151
151 -
 152
152 -
 153
153 -
 154
154 -
 155
155 -
 156
156 -
 157
157 -
 158
158 -
 159
159 -
160
-
161
-
162
-
163
-
164
-
165
-
166
-
167
-
168
-
169
-
170
-
171
-
172
-
173
-
174
-
175
-
176
-
177
-
178
-
179
-
180
-
181
-
182
-
183
-
184
-
185
-
186
-
187
-
188
-
189
-
190
-
191
-
192
-
193
-
194
-
195
-
196
-
197
-
198
-
199
-
200
 |
 |