Sharp MX-M450N Operation Manual - Page 37
Setting the paper type and paper size, User type - printer print labels
 |
View all Sharp MX-M450N manuals
Add to My Manuals
Save this manual to your list of manuals |
Page 37 highlights
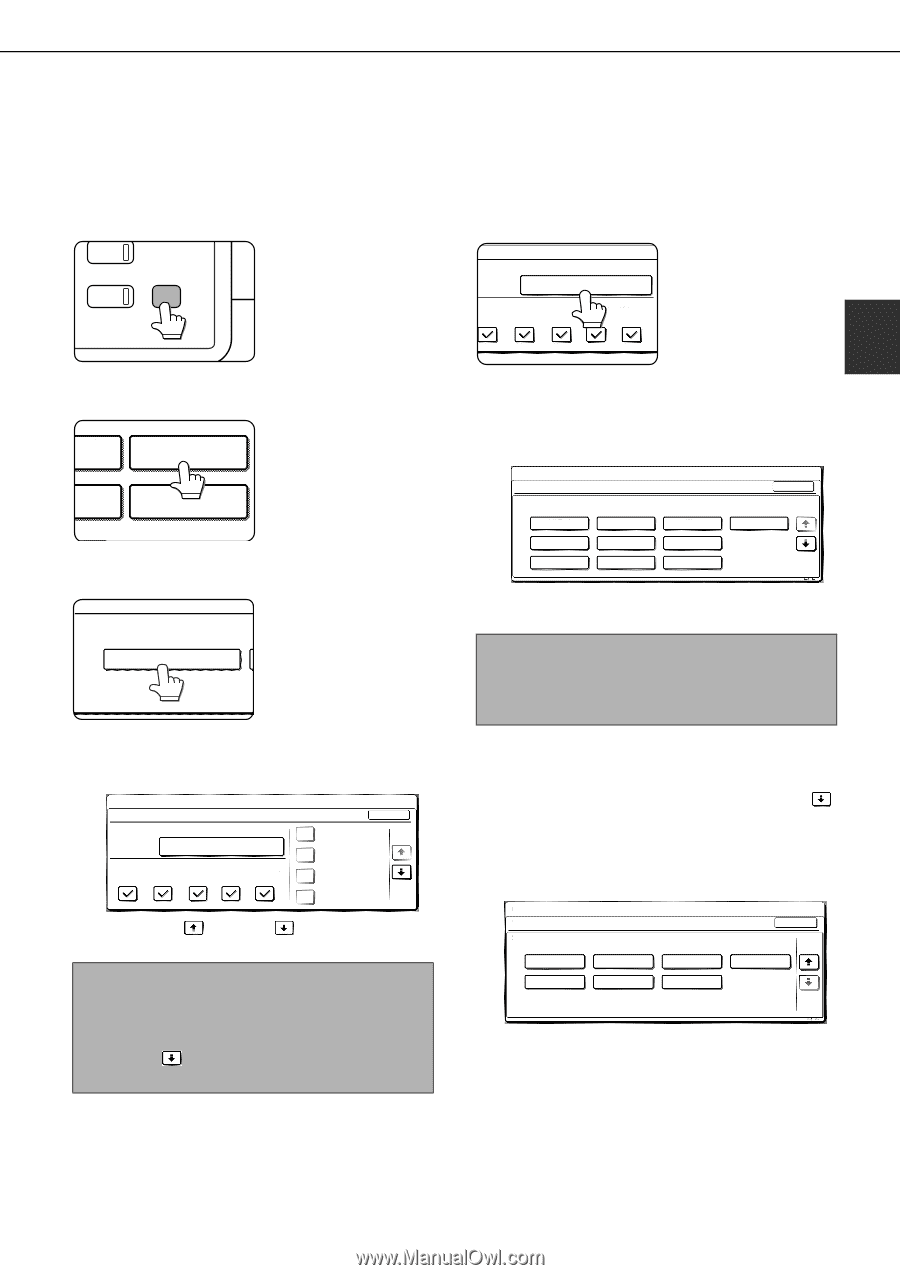
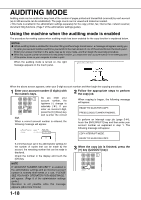
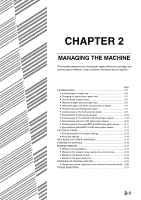
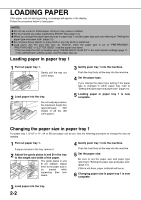
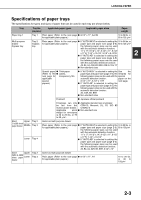
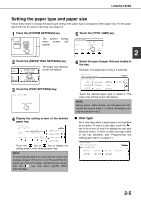
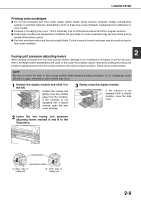
LOADING PAPER Setting the paper type and paper size Follow these steps to change the paper type setting if the paper type is changed in either paper tray. For the paper types that can be used in each tray, see page 2-3. 1 Press the [SYSTEM SETTINGS] key. PY SYSTEM JOB STATUS SETTINGS The system setting menu screen will appear. 5 Touch the [TYPE / SIZE] key. PER TRAY SETTINGS TYPE / SIZE TRAY 2 PLAIN / 81/2x11 PRINT COPY DOC. FAX I-FAX FILING 2 2 Touch the [PAPER TRAY SETTINGS] key. The paper tray selection RINT PAPER TRAY screen will appear. SETTINGS ATA ORWARD PRINTER CONDITION 3 Touch the [TRAY SETTINGS] key. PAPER TRAY SETTINGS TRAY SETTINGS 4 Display the setting screen of the desired paper tray. SYSTEM SETTINGS PAPER TRAY SETTINGS TYPE / SIZE TRAY 1 PLAIN / 81/2x11 PRINT COPY DOC. FAX I-FAX FILING OK FIXED PAPER SIDE 1/8 DISABLE DUPLEX DISABLE STAPLE DISABLE PUNCH Touch the key or key to display the setting screen of the desired paper tray. NOTE To automatically switch to a tray with the same size and type of paper (if there is one) in the event that the paper tray runs out of paper, display the last screen with the key and select [AUTO TRAY SWITCHING]. 6 Select the type of paper that was loaded in the tray. Example: The paper type of tray 2 is selected SYSTEM SETTINGS TRAY 2 TYPE/SIZE SETTING SELECT THE PAPER TYPE. PLAIN PRE-PRINTED RECYCLED LETTER HEAD PRE-PUNCHED COLOR HEAVY PAPER LABELS TRANSPARENCY CANCEL 1/2 TAB PAPER 1/2 Touch the desired paper type to select it. The paper size setting screen will appear. NOTE Heavy paper, label sheets and transparency film cannot be used in trays 1, 3, and 4. Envelopes can only be placed in tray 2. ■ User type Set a user type when a paper type is not available as an option. To select a user type, touch the key in the screen of step 6 to display the user type selection screen. To store or edit a user type name or set tray attributes, see "Programming and editing paper types" on page 2-7. CUSTOM SETTINGS TRAY 2 TYPE/SIZE SETTING SELECT THE PAPER TYPE USER TYPE 1 USER TYPE 5 USER TYPE 2 USER TYPE 6 USER TYPE 3 USER TYPE 7 CANCEL 2/2 USER TYPE 4 1/2 2-5
-
 1
1 -
2
-
3
-
4
-
5
-
6
-
7
-
8
-
9
-
10
-
11
-
12
-
13
-
14
-
15
-
16
-
17
-
18
-
19
-
20
-
21
-
22
-
23
-
24
-
25
-
26
-
27
-
28
-
29
-
30
-
31
-
 32
32 -
 33
33 -
 34
34 -
 35
35 -
 36
36 -
 37
37 -
 38
38 -
 39
39 -
 40
40 -
 41
41 -
 42
42 -
43
-
44
-
45
-
46
-
47
-
48
-
49
-
50
-
51
-
52
-
53
-
54
-
55
-
56
-
57
-
58
-
59
-
60
-
61
-
62
-
63
-
64
-
65
-
66
-
67
-
68
-
69
-
70
-
71
-
72
-
73
-
74
-
75
-
76
-
77
-
78
-
79
-
80
-
81
-
82
-
83
-
84
-
85
-
86
-
87
-
88
-
89
-
90
-
91
-
92
-
93
-
94
-
95
-
96
-
97
-
98
-
99
-
100
-
101
-
102
-
103
-
104
-
105
-
106
-
107
-
108
-
109
-
110
-
111
-
112
-
113
-
114
-
115
-
116
-
117
-
118
-
119
-
120
-
121
-
122
-
123
-
124
-
125
-
126
-
127
-
128
-
129
-
130
-
131
-
132
-
133
-
134
-
135
-
136
-
137
-
138
-
139
-
140
-
141
-
142
-
143
-
144
-
145
-
146
-
147
-
148
-
149
-
150
-
151
-
152
-
153
-
154
-
155
-
156
-
157
-
158
-
159
-
160
-
161
-
162
-
163
-
164
-
165
-
166
-
167
-
168
-
169
-
170
-
171
-
172
-
173
-
174
-
175
-
176
-
177
-
178
-
179
-
180
-
181
-
182
-
183
-
184
-
185
-
186
-
187
-
188
-
189
-
190
-
191
-
192
-
193
-
194
-
195
-
196
-
197
-
198
-
199
-
200
 |
 |