Sharp MX-M450N Operation Manual - Page 41
Printing onto envelopes, Fusing unit pressure adjusting levers, Lower the two fusing unit pressure - windows 7
 |
View all Sharp MX-M450N manuals
Add to My Manuals
Save this manual to your list of manuals |
Page 41 highlights
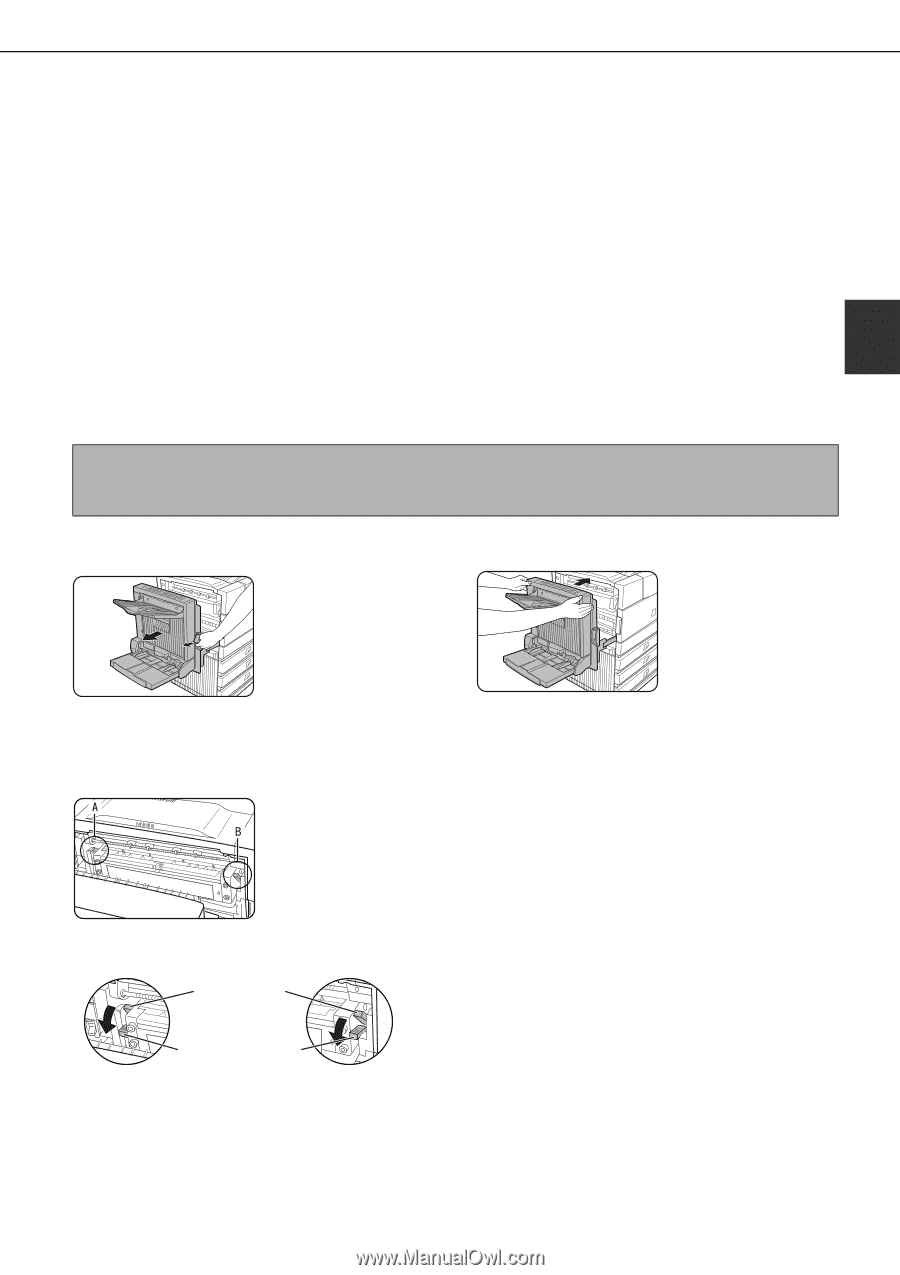
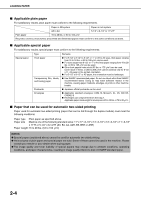
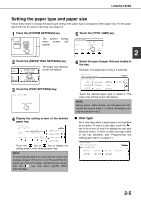
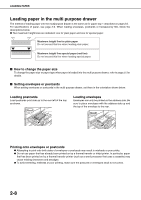
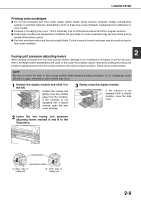
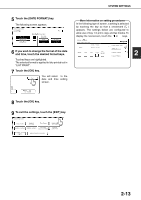
LOADING PAPER Printing onto envelopes ● Do not use envelopes that have metal clasps, plastic snaps, string closures, windows, linings, self-adhesive patches or synthetic materials. Attempting to print on these may cause misfeeds, inadequate toner adherence or other trouble. ● Creases or smudging may occur. This is especially true of embossed surfaces and other irregular surfaces. ● Under high humidity and temperature conditions the glue flaps on some envelopes may become sticky and be sealed closed when printed. ● Use only envelopes which are flat and crisply folded. Curled or poorly formed envelopes may be poorly printed or may cause misfeeds. 2 Fusing unit pressure adjusting levers When feeding envelopes from the multi purpose drawer, damage to the envelopes or smudges on prints may occur even if envelopes within specification are used. In this case, the problem may be reduced by shifting the fusing unit pressure adjusting levers from the normal position to the lower pressure position. Follow the procedure below. NOTE Be sure to return the lever to the normal position when finished feeding envelopes. If not, inadequate toner adherence, paper misfeeds or other trouble may occur. 1 Unlatch the duplex module and slide it to the left. Unlatch the module and gently move the module away from the machine. If the machine is not equipped with a duplex module, open the side cover similarly. 3 Gently close the duplex module. If the machine is not equipped with a duplex module, close the side cover. 2 Lower the two fusing unit pressure adjusting levers marked A and B in the illustration. Normal position Lower pressure position A: Rear side of fusing unit B: Front side of fusing unit 2-9
-
 1
1 -
2
-
3
-
4
-
5
-
6
-
7
-
8
-
9
-
10
-
11
-
12
-
13
-
14
-
15
-
16
-
17
-
18
-
19
-
20
-
21
-
22
-
23
-
24
-
25
-
26
-
27
-
28
-
29
-
30
-
31
-
32
-
33
-
34
-
35
-
 36
36 -
 37
37 -
 38
38 -
 39
39 -
 40
40 -
 41
41 -
 42
42 -
 43
43 -
 44
44 -
 45
45 -
 46
46 -
47
-
48
-
49
-
50
-
51
-
52
-
53
-
54
-
55
-
56
-
57
-
58
-
59
-
60
-
61
-
62
-
63
-
64
-
65
-
66
-
67
-
68
-
69
-
70
-
71
-
72
-
73
-
74
-
75
-
76
-
77
-
78
-
79
-
80
-
81
-
82
-
83
-
84
-
85
-
86
-
87
-
88
-
89
-
90
-
91
-
92
-
93
-
94
-
95
-
96
-
97
-
98
-
99
-
100
-
101
-
102
-
103
-
104
-
105
-
106
-
107
-
108
-
109
-
110
-
111
-
112
-
113
-
114
-
115
-
116
-
117
-
118
-
119
-
120
-
121
-
122
-
123
-
124
-
125
-
126
-
127
-
128
-
129
-
130
-
131
-
132
-
133
-
134
-
135
-
136
-
137
-
138
-
139
-
140
-
141
-
142
-
143
-
144
-
145
-
146
-
147
-
148
-
149
-
150
-
151
-
152
-
153
-
154
-
155
-
156
-
157
-
158
-
159
-
160
-
161
-
162
-
163
-
164
-
165
-
166
-
167
-
168
-
169
-
170
-
171
-
172
-
173
-
174
-
175
-
176
-
177
-
178
-
179
-
180
-
181
-
182
-
183
-
184
-
185
-
186
-
187
-
188
-
189
-
190
-
191
-
192
-
193
-
194
-
195
-
196
-
197
-
198
-
199
-
200
 |
 |