Sharp MX-M450N Operation Manual - Page 68
Staple cartridge replacement, the staple box.
 |
View all Sharp MX-M450N manuals
Add to My Manuals
Save this manual to your list of manuals |
Page 68 highlights
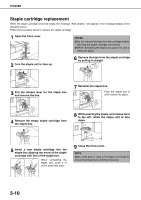
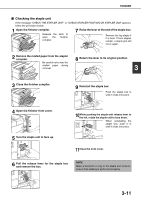
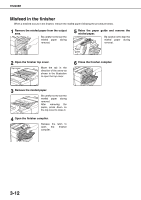
FINISHER Staple cartridge replacement When the staple cartridge becomes empty, the message "Add staples." will appear in the message display of the operation panel. Follow the procedure below to replace the staple cartridge. 1 Open the front cover. NOTES ● Do not remove the tape from the cartridge before inserting the staple cartridge into the box. ● When reinstalling the staple box, push it in until it clicks into place. 2 Turn the staple unit to face up. 6 Remove the tape from the staple cartridge by pulling it straight. 3 Pull the release lever for the staple box and remove the box. 7 Reinstall the staple box. Push the staple box in until it clicks into place. 4 Remove the empty staple cartridge from the staple box. 8 While pushing the staple unit release lever to the left, rotate the staple unit to face down. 5 Insert a new staple cartridge into the staple box aligning the arrow of the staple cartridge with that of the staple box. When reinstalling the staple box, push it in until it clicks into place. 9 Close the front cover. NOTE Make a test print or copy in the staple sort mode to ensure that stapling is performed properly. 3-10
-
 1
1 -
2
-
3
-
4
-
5
-
6
-
7
-
8
-
9
-
10
-
11
-
12
-
13
-
14
-
15
-
16
-
17
-
18
-
19
-
20
-
21
-
22
-
23
-
24
-
25
-
26
-
27
-
28
-
29
-
30
-
31
-
32
-
33
-
34
-
35
-
36
-
37
-
38
-
39
-
40
-
41
-
42
-
43
-
44
-
45
-
46
-
47
-
48
-
49
-
50
-
51
-
52
-
53
-
54
-
55
-
56
-
57
-
58
-
59
-
60
-
61
-
62
-
 63
63 -
 64
64 -
 65
65 -
 66
66 -
 67
67 -
 68
68 -
 69
69 -
 70
70 -
 71
71 -
 72
72 -
 73
73 -
74
-
75
-
76
-
77
-
78
-
79
-
80
-
81
-
82
-
83
-
84
-
85
-
86
-
87
-
88
-
89
-
90
-
91
-
92
-
93
-
94
-
95
-
96
-
97
-
98
-
99
-
100
-
101
-
102
-
103
-
104
-
105
-
106
-
107
-
108
-
109
-
110
-
111
-
112
-
113
-
114
-
115
-
116
-
117
-
118
-
119
-
120
-
121
-
122
-
123
-
124
-
125
-
126
-
127
-
128
-
129
-
130
-
131
-
132
-
133
-
134
-
135
-
136
-
137
-
138
-
139
-
140
-
141
-
142
-
143
-
144
-
145
-
146
-
147
-
148
-
149
-
150
-
151
-
152
-
153
-
154
-
155
-
156
-
157
-
158
-
159
-
160
-
161
-
162
-
163
-
164
-
165
-
166
-
167
-
168
-
169
-
170
-
171
-
172
-
173
-
174
-
175
-
176
-
177
-
178
-
179
-
180
-
181
-
182
-
183
-
184
-
185
-
186
-
187
-
188
-
189
-
190
-
191
-
192
-
193
-
194
-
195
-
196
-
197
-
198
-
199
-
200
 |
 |