Sharp MX-M450N Operation Manual - Page 69
Checking the staple unit, Pull the release lever for the staple box
 |
View all Sharp MX-M450N manuals
Add to My Manuals
Save this manual to your list of manuals |
Page 69 highlights
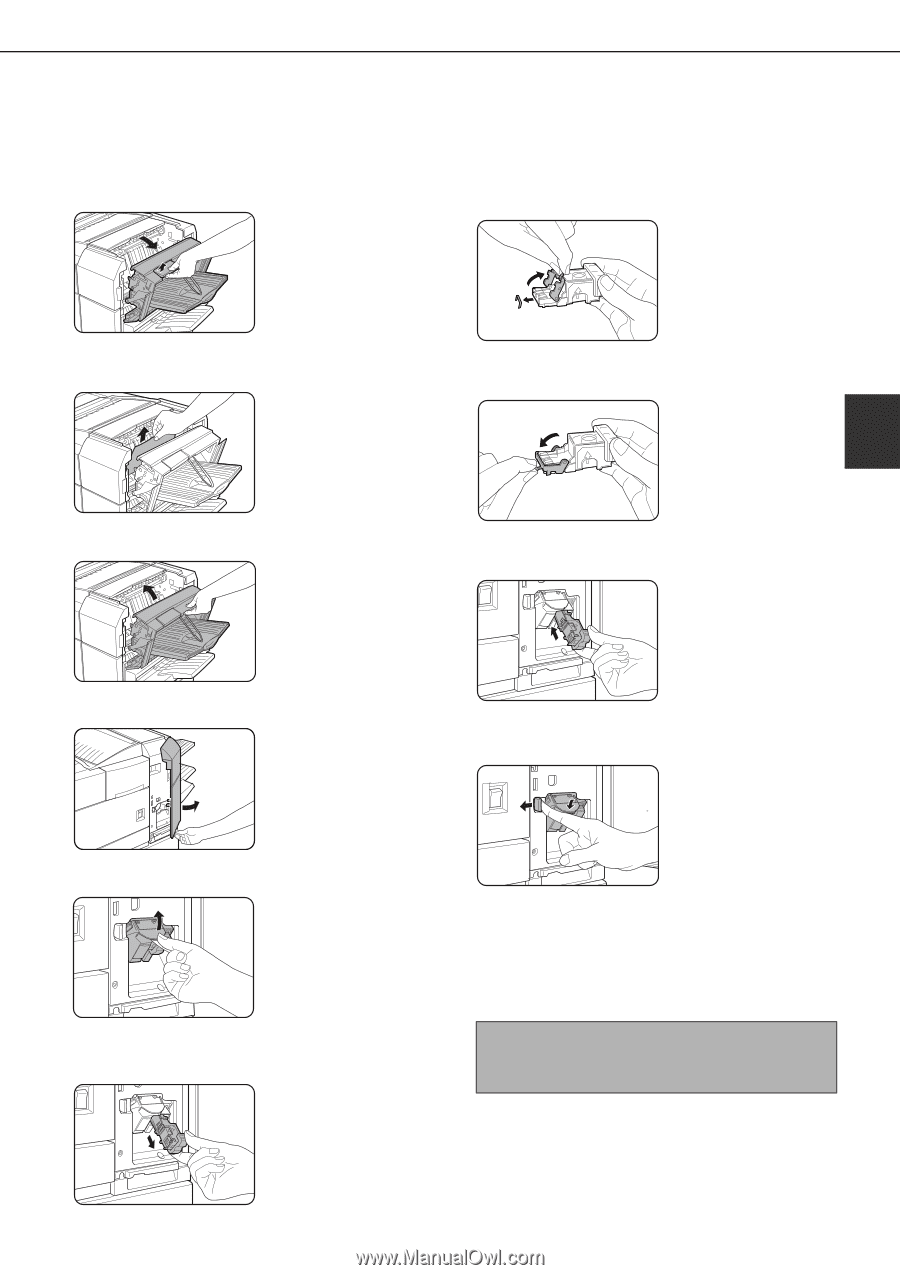
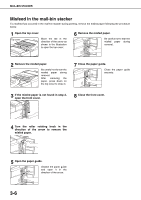
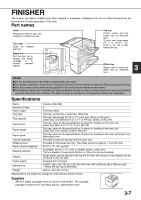
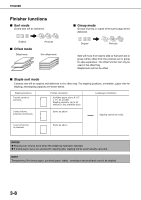
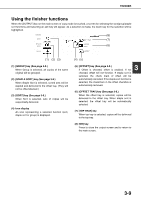
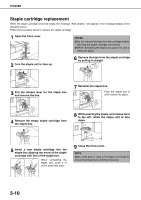
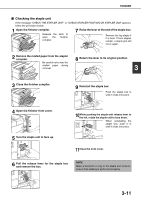
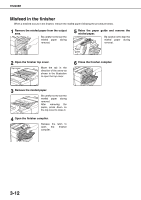
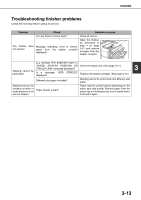
FINISHER ■ Checking the staple unit If the message "CHECK THE STAPLER UNIT" or "CHECK STAPLER POSITION OR STAPLER JAM" appears, follow the procedure below. 1 Open the finisher compiler. Release the open the compiler. latch to finisher 7 Raise the lever at the end of the staple box. Remove the top staple if it is bent. If bent staples remain, a staple jam will occur again. 2 Remove the misfed paper from the stapler compiler. Be careful not to tear the misfed paper during removal. 8 Return the lever to its original position. 3 3 Close the finisher compiler. 9 Reinstall the staple box. Push the staple box in until it clicks into place. 4 Open the finisher front cover. 5 Turn the staple unit to face up. 10While pushing the staple unit release lever to the left, rotate the staple unit to face down. When reinstalling the staple box, push it in until it clicks into place. 11Close the front cover. 6 Pull the release lever for the staple box and remove the box. NOTE Make a test print or copy in the staple sort mode to ensure that stapling is performed properly. 3-11
-
 1
1 -
2
-
3
-
4
-
5
-
6
-
7
-
8
-
9
-
10
-
11
-
12
-
13
-
14
-
15
-
16
-
17
-
18
-
19
-
20
-
21
-
22
-
23
-
24
-
25
-
26
-
27
-
28
-
29
-
30
-
31
-
32
-
33
-
34
-
35
-
36
-
37
-
38
-
39
-
40
-
41
-
42
-
43
-
44
-
45
-
46
-
47
-
48
-
49
-
50
-
51
-
52
-
53
-
54
-
55
-
56
-
57
-
58
-
59
-
60
-
61
-
62
-
63
-
 64
64 -
 65
65 -
 66
66 -
 67
67 -
 68
68 -
 69
69 -
 70
70 -
 71
71 -
 72
72 -
 73
73 -
 74
74 -
75
-
76
-
77
-
78
-
79
-
80
-
81
-
82
-
83
-
84
-
85
-
86
-
87
-
88
-
89
-
90
-
91
-
92
-
93
-
94
-
95
-
96
-
97
-
98
-
99
-
100
-
101
-
102
-
103
-
104
-
105
-
106
-
107
-
108
-
109
-
110
-
111
-
112
-
113
-
114
-
115
-
116
-
117
-
118
-
119
-
120
-
121
-
122
-
123
-
124
-
125
-
126
-
127
-
128
-
129
-
130
-
131
-
132
-
133
-
134
-
135
-
136
-
137
-
138
-
139
-
140
-
141
-
142
-
143
-
144
-
145
-
146
-
147
-
148
-
149
-
150
-
151
-
152
-
153
-
154
-
155
-
156
-
157
-
158
-
159
-
160
-
161
-
162
-
163
-
164
-
165
-
166
-
167
-
168
-
169
-
170
-
171
-
172
-
173
-
174
-
175
-
176
-
177
-
178
-
179
-
180
-
181
-
182
-
183
-
184
-
185
-
186
-
187
-
188
-
189
-
190
-
191
-
192
-
193
-
194
-
195
-
196
-
197
-
198
-
199
-
200
 |
 |