Sharp R-209FW Service Manual - Page 8
Appearance View, Control Panel - microwave oven
 |
View all Sharp R-209FW manuals
Add to My Manuals
Save this manual to your list of manuals |
Page 8 highlights
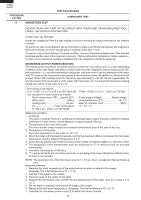
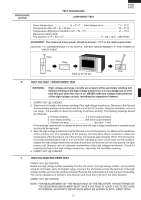
R-209(IN) R-209(W) R-209(Y) OVEN 9 APPEARANCE VIEW 10 1 11 8 13 12 2 76 5 4 3 7 Turntable 1. Control panel 2. Door opening button 3. Waveguide cover 4. Seal packing 5. Oven cavity 6. Door 7. Door safety latch 8. Door hinges 9. Door seals and sealing surfaces 10.Oven lamp 11.Ventilation openings 12.Outer case 13.Power cord Roller stay Seal packing 1. Place the roller stay on the floor of the oven cavity, engaging shaft into turntable motor shaft. 2. Then place the turntable on the roller stay. CONTROL PANEL MICROWAVE POWER CONTROL knob TIMER knob (0 - 30 minutes) DOOR OPENING BUTTON 6
-
 1
1 -
2
-
 3
3 -
 4
4 -
 5
5 -
 6
6 -
 7
7 -
 8
8 -
 9
9 -
 10
10 -
 11
11 -
 12
12 -
 13
13 -
14
-
15
-
16
-
17
-
18
-
19
-
20
-
21
-
22
-
23
-
24
-
25
-
26
-
27
-
28
-
29
-
30
-
31
-
32
-
33
-
34
-
35
-
36
 |
 |
R-209(IN)
R-209(W)
R-209(Y)
6
MICROWAVE POWER
CONTROL knob
TIMER knob (0 - 30 minutes)
DOOR OPENING BUTTON
APPEARANCE VIEW
OVEN
1.
Control panel
2.
Door opening button
3.
Waveguide cover
4.
Seal packing
5.
Oven cavity
6. Door
7.
Door safety latch
CONTROL PANEL
8.
Door hinges
9.
Door seals and sealing surfaces
10.Oven lamp
11.Ventilation openings
12.Outer case
13.Power cord
Turntable
Roller stay
Seal packing
1.
Place the roller stay on the floor of the oven cavity,
engaging shaft into turntable motor shaft.
2.
Then place the turntable on the roller stay.
12
11
13
5
10
9
8
7
6
4
3
7
1
2