Sharp R520KST R-428JK/JW Microwave Operation Manual - Page 18
Other Convenient Features
 |
UPC - 074000612716
View all Sharp R520KST manuals
Add to My Manuals
Save this manual to your list of manuals |
Page 18 highlights
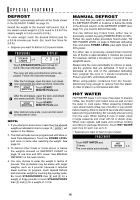
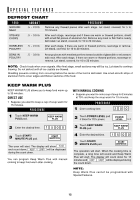
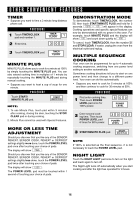
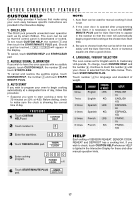
OTHER CONVENIENT FEATURES TIMER • Suppose you want to time a 3 minute long distance phone call. PROCEDURE 1 Touch TIMER/CLOCK pad and number 1. TIMER CLOCK 1 2 Enter time. 300 3 Touch TIMER/CLOCK pad. TIMER CLOCK MINUTE PLUS MINUTE PLUS allows you to cook for a minute at 100% by simply touching the MINUTE PLUS pad. You can also extend cooking time in multiples of 1 minute by repeatedly touching the MINUTE PLUS pad during manual cooking. • Suppose you want to heat a cup of soup for one minute. PROCEDURE Touch START/ MINUTE PLUS pad. START MINUTE PLUS NOTE: 1. To use Minute Plus, touch pad within 3 minutes after cooking, closing the door, touching the STOP/ CLEAR pad or during cooking. 2. Minute Plus cannot be used with Special Features. MORE OR LESS TIME ADJUSTMENT Should you discover that you like any of the SENSOR REHEAT, SENSOR COOK, REHEAT or DEFROST settings slightly more done, touch the POWER LEVEL pad once after touching your choice of pads. The display will show MORE . Should you discover that you like any of the SENSOR REHEAT, SENSOR COOK, REHEAT or DEFROST settings slightly less done, touch the POWER LEVEL pad twice after touching your choice of pads. The display will show LESS . The POWER LEVEL pad must be touched within 1 second of touching your choice of pads. DEMONSTRATION MODE To demonstrate, touch TIMER/CLOCK, the number 0, then touch START/MINUTE PLUS and hold for 3 seconds. DEMO ON will appear in the display. Cooking operations and specific special features can now be demonstrated with no power in the oven. For example, touch MINUTE PLUS and the display will show 1:00 and count down quickly to END . To cancel, touch TIMER/CLOCK, then the number 0 and STOP/CLEAR. If easier, unplug the oven from the electrical outlet and replug. MULTIPLE SEQUENCE COOKING Your oven can be programmed for up to 4 automatic cooking sequences, switching from one power level setting to another automatically. Sometimes cooking directions tell you to start on one power level and then change to a different power level. Your oven can do this automatically. • Suppose you want to cook for 5 minutes at 100% and then continue to cook for 30 minutes at 50%. PROCEDURE 1 First enter cooking time. Then touch POWER LEVEL pad once for 100% power. 500 POWER LEVEL 2 Enter second cooking time. Then touch POWER LEVEL pad 6 times for 50% power. 3000 POWER LEVEL x 6 3 START/MINUTE PLUS pad. START MINUTE PLUS NOTE: If 100% is selected as the final sequence, it is not necessary to touch the POWER LEVEL pad. NIGHT LIGHT Touch the NIGHT LIGHT pad once to turn on the light and touch again to turn off. The Night Light turns off automatically when you start cooking and after the light has operated for 9 hours. 16
-
 1
1 -
2
-
3
-
4
-
5
-
6
-
7
-
8
-
9
-
10
-
11
-
12
-
 13
13 -
 14
14 -
 15
15 -
 16
16 -
 17
17 -
 18
18 -
 19
19 -
 20
20 -
 21
21 -
 22
22 -
 23
23 -
24
 |
 |