Sharp UX-P200 UX-P200 Operation Manual - Page 8
A Look at the Operation Panel - reviews
 |
View all Sharp UX-P200 manuals
Add to My Manuals
Save this manual to your list of manuals |
Page 8 highlights
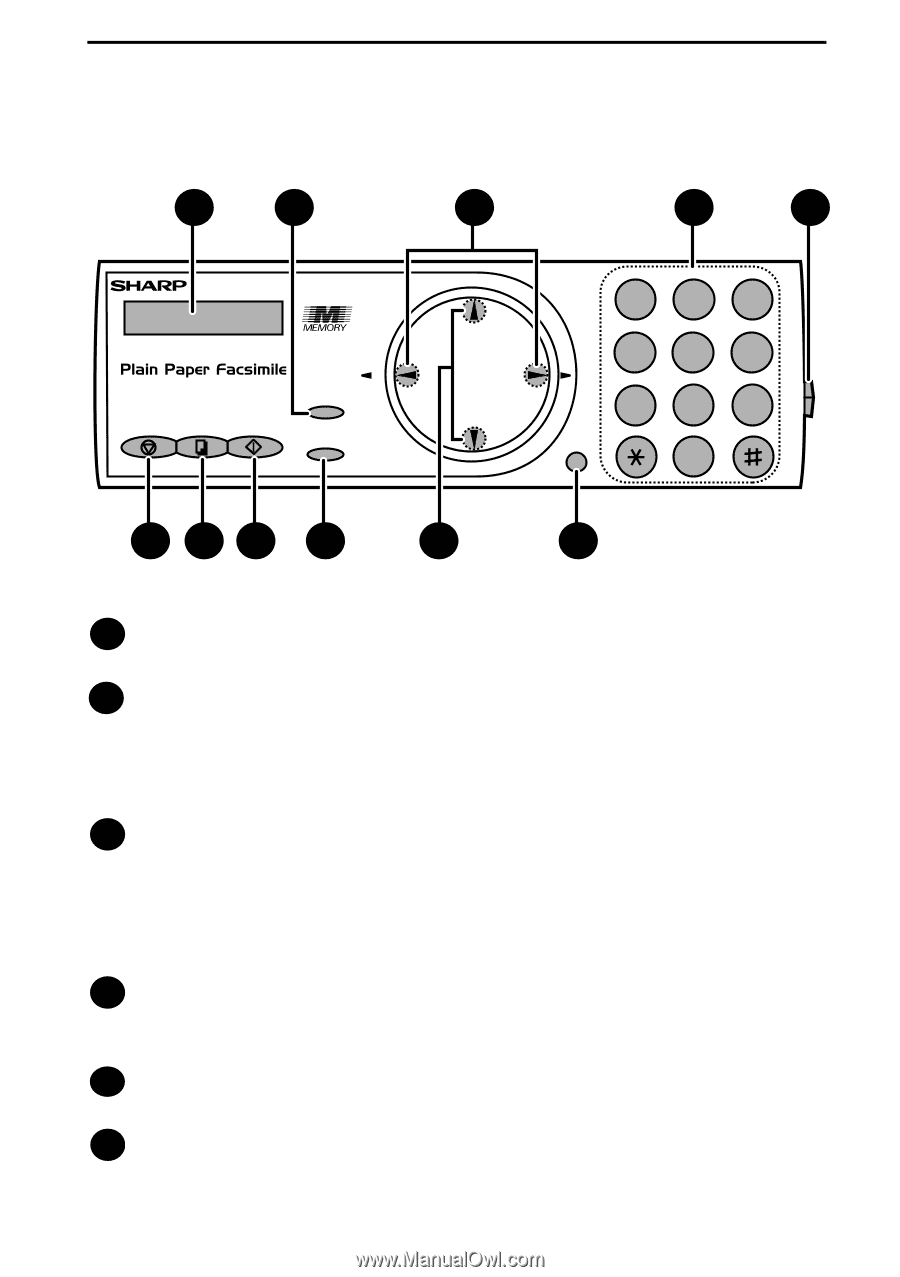
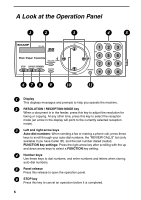
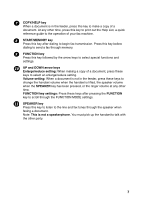
A Look at the Operation Panel 1 2 3 UP TEL FAX Z RESOLUTION/ REDIAL RECEPTION MODE STOP COPY/HELP START/MEMORY FUNCTION DOWN 678 9 10 4 5 ABC DEF 123 GHI JKL MNO 456 A PQRS TUV WXYZ 789 SPEAKER 0 11 1 Display This displays messages and prompts to help you operate the machine. 2 RESOLUTION / RECEPTION MODE key When a document is in the feeder, press this key to adjust the resolution for faxing or copying. At any other time, press this key to select the reception mode (an arrow in the display will point to the currently selected reception mode). 3 Left and right arrow keys Auto-dial numbers: When sending a fax or making a phone call, press these keys to scroll through your auto-dial numbers, the "REVIEW CALLS" list (only available if you have Caller ID), and the last number dialed (redial). FUNCTION key settings: Press the right arrow key after scrolling with the up and down arrow keys to select a FUNCTION key setting. 4 Number keys Use these keys to dial numbers, and enter numbers and letters when storing auto-dial numbers. 5 Panel release Press this release to open the operation panel. 6 STOP key Press this key to cancel an operation before it is completed. 6
-
 1
1 -
2
-
 3
3 -
 4
4 -
 5
5 -
 6
6 -
 7
7 -
 8
8 -
 9
9 -
 10
10 -
 11
11 -
 12
12 -
 13
13 -
14
-
15
-
16
-
17
-
18
-
19
-
20
-
21
-
22
-
23
-
24
-
25
-
26
-
27
-
28
-
29
-
30
-
31
-
32
-
33
-
34
-
35
-
36
-
37
-
38
-
39
-
40
-
41
-
42
-
43
-
44
-
45
-
46
-
47
-
48
-
49
-
50
-
51
-
52
-
53
-
54
-
55
-
56
-
57
-
58
-
59
-
60
-
61
-
62
-
63
-
64
-
65
-
66
-
67
-
68
-
69
-
70
-
71
-
72
-
73
-
74
-
75
-
76
-
77
-
78
-
79
-
80
 |
 |