Sharp VLAH150U Operation Manual - Page 19
Inserting and Removing a, Cassette
 |
UPC - 074000352735
View all Sharp VLAH150U manuals
Add to My Manuals
Save this manual to your list of manuals |
Page 19 highlights
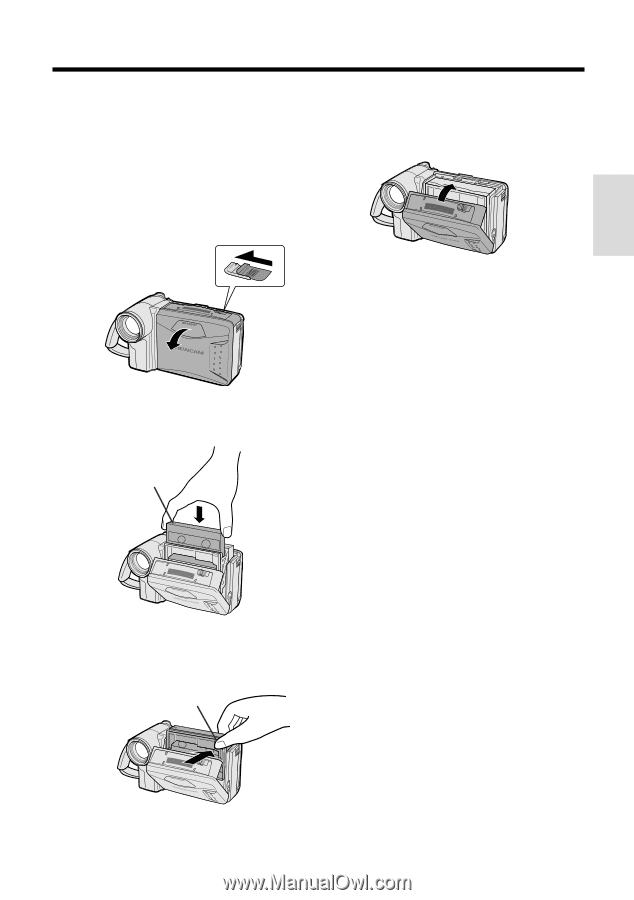
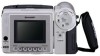
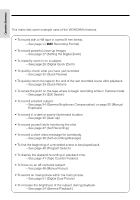
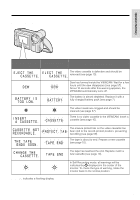
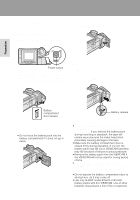
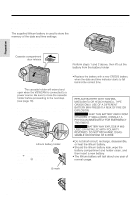
Preparation Inserting and Removing a Cassette Inserting a Cassette 1 Supply power to the VIEWCAM, then slide the release and open the cassette compartment door. • The cassette holder extends and opens automatically. Cassette compartment door release 2 Insert the cassette fully with the window facing outwards, and with the erasure protect tab facing upwards. Erasure protect tab 3 Press the PUSH mark gently until the cassette holder clicks into place. • The cassette holder retracts automatically. PUSH mark 4 Wait for the cassette holder to fully retract. Close the compartment door by pressing the center until it clicks into place. Removing a Cassette Perform step 1 above, then take out the cassette. Cautions: • Do not try to close the cassette compartment door while the cassette holder is extending or retracting. • Be careful not to get your fingers caught in the cassette holder. • Do not apply force to the cassette holder except when pressing the PUSH mark to close it. • Do not tilt the VIEWCAM or hold it upside down when you are inserting or removing a cassette. It may damage the tape. • Remove the cassette if you will not use the VIEWCAM for a long period of time. • If you do not correctly close the cassette holder in step 3, the VIEWCAM's cassette protection mechanism might eject the cassette. If this happens, repeat the insertion procedure. • Do not attempt to pick up the VIEWCAM by the cassette compartment door. Notes: • If the battery power is too low, you may not be able to eject the cassette. Replace the battery pack with a fully charged one. • See page 59 for more information on the video cassette tapes for use with this VIEWCAM. 10
-
 1
1 -
2
-
3
-
4
-
5
-
6
-
7
-
8
-
9
-
10
-
11
-
12
-
13
-
 14
14 -
 15
15 -
 16
16 -
 17
17 -
 18
18 -
 19
19 -
 20
20 -
 21
21 -
 22
22 -
 23
23 -
 24
24 -
25
-
26
-
27
-
28
-
29
-
30
-
31
-
32
-
33
-
34
-
35
-
36
-
37
-
38
-
39
-
40
-
41
-
42
-
43
-
44
-
45
-
46
-
47
-
48
-
49
-
50
-
51
-
52
-
53
-
54
-
55
-
56
-
57
-
58
-
59
-
60
-
61
-
62
-
63
-
64
-
65
-
66
-
67
-
68
-
69
-
70
-
71
-
72
-
73
-
74
-
75
-
76
-
77
-
78
-
79
-
80
 |
 |