Sharp XE-A407 XE-A407 XE-A43S Operation Manual in English - Page 106
Installing Batteries - no power
 |
View all Sharp XE-A407 manuals
Add to My Manuals
Save this manual to your list of manuals |
Page 106 highlights
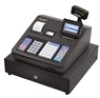
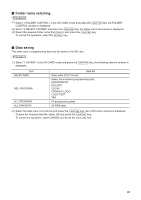
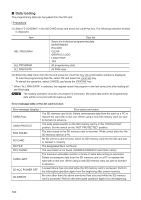
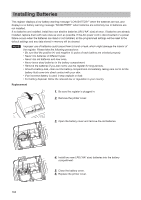
Installing Batteries This register displays a low battery warning message "LOW BATTERY" when the batteries are low, and displays a no battery warning message "NO BATTERY" when batteries are extremely low or batteries are not installed. If no batteries are installed, install two new alkaline batteries LR6 ("AA" size) at once. If batteries are already installed, replace them with new ones as soon as possible. If the AC power cord is disconnected or a power failure occurs when the batteries are dead or not installed, all the programmed settings will be reset to the default settings and any data stored in memory will be cleared. NOTE Improper use of batteries could cause them to burst or leak, which might damage the interior of the register. Please take the following precautions: • Be sure that the positive (+) and negative (-) poles of each battery are oriented properly. • Never mix batteries of different types. • Never mix old batteries and new ones. • Never leave dead batteries in the battery compartment. • Remove the batteries if you plan not to use the register for long periods. • Should a battery leak, clean out the battery compartment immediately, taking care not to let the battery fluid come into direct contact with your skin. • If an incorrect battery is used, it may explode or leak. • For battery disposal, follow the relevant law or regulation in your country. Replacement 1. Be sure the register is plugged in. 2. Remove the printer cover. 3. Open the battery cover and remove the old batteries. 4. Install two new LR6 ("AA" size) batteries into the battery compartment. 5. Close the battery cover. 6. Replace the printer cover. 104
-
 1
1 -
2
-
3
-
4
-
5
-
6
-
7
-
8
-
9
-
10
-
11
-
12
-
13
-
14
-
15
-
16
-
17
-
18
-
19
-
20
-
21
-
22
-
23
-
24
-
25
-
26
-
27
-
28
-
29
-
30
-
31
-
32
-
33
-
34
-
35
-
36
-
37
-
38
-
39
-
40
-
41
-
42
-
43
-
44
-
45
-
46
-
47
-
48
-
49
-
50
-
51
-
52
-
53
-
54
-
55
-
56
-
57
-
58
-
59
-
60
-
61
-
62
-
63
-
64
-
65
-
66
-
67
-
68
-
69
-
70
-
71
-
72
-
73
-
74
-
75
-
76
-
77
-
78
-
79
-
80
-
81
-
82
-
83
-
84
-
85
-
86
-
87
-
88
-
89
-
90
-
91
-
92
-
93
-
94
-
95
-
96
-
97
-
98
-
99
-
100
-
 101
101 -
 102
102 -
 103
103 -
 104
104 -
 105
105 -
 106
106 -
 107
107 -
 108
108 -
 109
109 -
 110
110 -
 111
111 -
112
-
113
-
114
-
115
-
116
 |
 |