Sharp XE-A407 XE-A407 XE-A43S Operation Manual in English - Page 110
Replacing the paper roll, Removing a Paper Jam
 |
View all Sharp XE-A407 manuals
Add to My Manuals
Save this manual to your list of manuals |
Page 110 highlights
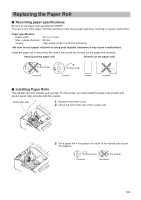
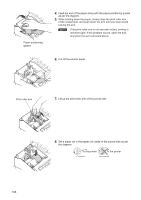
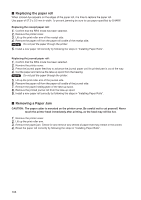
■■ Replacing the paper roll When colored dye appears on the edges of the paper roll, it is time to replace the paper roll. Use paper of 57.5 ± 0.5 mm in width. To prevent jamming be sure to use paper specified by SHARP. Replacing the receipt paper roll: 1. Confirm that the REG mode has been selected. 2. Remove the printer cover. 3. Lift up the print roller arm of the receipt side. 4. Remove the paper roll from the paper roll cradle of the receipt side. NOTE Do not pull the paper through the printer. 5. Install a new paper roll correctly by following the steps in "Installing Paper Rolls". Replacing the journal paper roll: 1. Confirm that the REG mode has been selected. 2. Remove the printer cover. 3. Press the journal paper feed key to advance the journal paper until its printed part is out of the way. 4. Cut the paper and remove the take-up spool from the bearing. NOTE Do not pull the paper through the printer. 5. Lift up the print roller arm of the journal side. 6. Remove the paper roll from the paper roll cradle of the journal side. 7. Remove the paper holding plate of the take-up spool. 8. Remove the printed journal roll from the take-up spool. 9. Install a new paper roll correctly by following the steps in "Installing Paper Rolls". ■■ Removing a Paper Jam CAUTION: The paper cutter is mounted on the printer cover. Be careful not to cut yourself. Never touch the printer head immediately after printing, as the head may still be hot. 1. Remove the printer cover. 2. Lift up the print roller arm. 3. Remove the paper jam. Check for and remove any shreds of paper that may remain in the printer. 4. Reset the paper roll correctly by following the steps in "Installing Paper Rolls". 108
-
 1
1 -
2
-
3
-
4
-
5
-
6
-
7
-
8
-
9
-
10
-
11
-
12
-
13
-
14
-
15
-
16
-
17
-
18
-
19
-
20
-
21
-
22
-
23
-
24
-
25
-
26
-
27
-
28
-
29
-
30
-
31
-
32
-
33
-
34
-
35
-
36
-
37
-
38
-
39
-
40
-
41
-
42
-
43
-
44
-
45
-
46
-
47
-
48
-
49
-
50
-
51
-
52
-
53
-
54
-
55
-
56
-
57
-
58
-
59
-
60
-
61
-
62
-
63
-
64
-
65
-
66
-
67
-
68
-
69
-
70
-
71
-
72
-
73
-
74
-
75
-
76
-
77
-
78
-
79
-
80
-
81
-
82
-
83
-
84
-
85
-
86
-
87
-
88
-
89
-
90
-
91
-
92
-
93
-
94
-
95
-
96
-
97
-
98
-
99
-
100
-
101
-
102
-
103
-
104
-
 105
105 -
 106
106 -
 107
107 -
 108
108 -
 109
109 -
 110
110 -
 111
111 -
 112
112 -
 113
113 -
 114
114 -
 115
115 -
116
 |
 |
