Sharp XE-A407 Quick Start Guide
Sharp XE-A407 Manual
 |
View all Sharp XE-A407 manuals
Add to My Manuals
Save this manual to your list of manuals |
Sharp XE-A407 manual content summary:
- Sharp XE-A407 | Quick Start Guide - Page 1
logo, refer to "INSTRUCTION MANUAL". • The HELP function instructs you how to set the logo message. After select the HELP menu, enter "4" to print the guidance messages. 2 Installing Batteries Batteries must be installed in the cash register to prevent data and programmed contents from being lost - Sharp XE-A407 | Quick Start Guide - Page 2
comes out of the printer cover and clean paper appears. 4 Now, you are ready! ■■Prior to Making Entries ● Mode selection In the REG mode, you can operate the entries. If another mode is selected, press the a key to return to the REG mode. ● Clerk entry L Enter a clerk code (1 to 40) and press
-
 1
1 -
 2
2
 |
 |
XE-A407/XE-A43S Quick Start Guide
For safe use of the register, be sure to read the precautions, etc. in the instruction manual.
The following describes how to get the cash register ready for operation. Follow these steps before using the cash register for the first time.
Place the cash register on a stable, flat surface not subject to direct sunlight.
1
Initializing the Cash Register and Basic Programming
■
Initializing the Cash Register
For your register to operate properly, you must initialize it before
programming for the first time. Follow this procedure.
1. Remove the register from its packing carton.
2. Insert the plug into the AC outlet.
IMPORTANT:
This operation must be performed without batteries
loaded.
Never install the batteries into the register before initializing it.
Before you start operating the register, you must first initialize it, then
install two new alkaline batteries LR6 (“AA” size) on the register.
Otherwise, distorted memory contents and malfunction of the
register will occur.
■
Language Selection
1. Display the “Language Selection” after turning on the power.
2. Press the numeric key for the number of your language.
After selecting the language, the register is initialized.
According to the displayed instruction, perform the setting.
■
Setting the Date and Time
1. Display the “DATE/TIME setting”.
2. Enter the date in 6 digits. For example, enter “060511” for
June 5, 2011.
3. Press the
I
key to select the time setting.
4. Enter the time in 4 digits. For example, enter “1430” for
2:30pm.
5. Press the
A
key to set the date and time.
■
Setting the Tax Rate
1. Select the tax number (1 to 4) to set the tax rate.
2. Enter the tax rate in 7 digits (leading zeros may be omitted).
For example, press the “7” key to set 7%.
3. To set the second and later tax rates, press the
I
key.
4. Press the
A
key to set the tax rate.
For details, refer to “INSTRUCTION MANUAL”.
■
Setting the Mode Pass Code
1. Select the mode to set the pass code using the
F
or
I
keys.
2. Enter the code in 4 digits using the numeric keys.
3. Press the
A
key to set the mode pass code.
If no pass code is set, press the
A
key.
■
Setting the Manager Pass Code
1. Enter the code in 4 digits using the numeric keys.
2. Press the
A
key to set the manager pass code.
If no pass code is set, press the
A
key.
■
Setting the Receipt Logo
1. To change the default logo text, press the
D
key to delete
the texts in each line.
Enter the text using the character keys to print on the receipt.
2. Press the
A
key to set the receipt logo.
If no receipt logo is set, press the
A
key.
<Text entry method>
There are two ways for programming text; using character keys on
the keyboard or entering character codes with numeric keys on the
keyboard. You can enter characters according to the small figures
printed in the lower position of the numeric keys. For the layout,
please refer to “Keyboard Layout”.
For example to enter “A”, press the 8 key. To enter “B”, press the 8
key twice.
NOTE
• For details of the receipt logo, refer to “INSTRUCTION MANUAL”.
• The HELP function instructs you how to set the logo message. After
select the HELP menu, enter “4” to print the guidance messages.
2
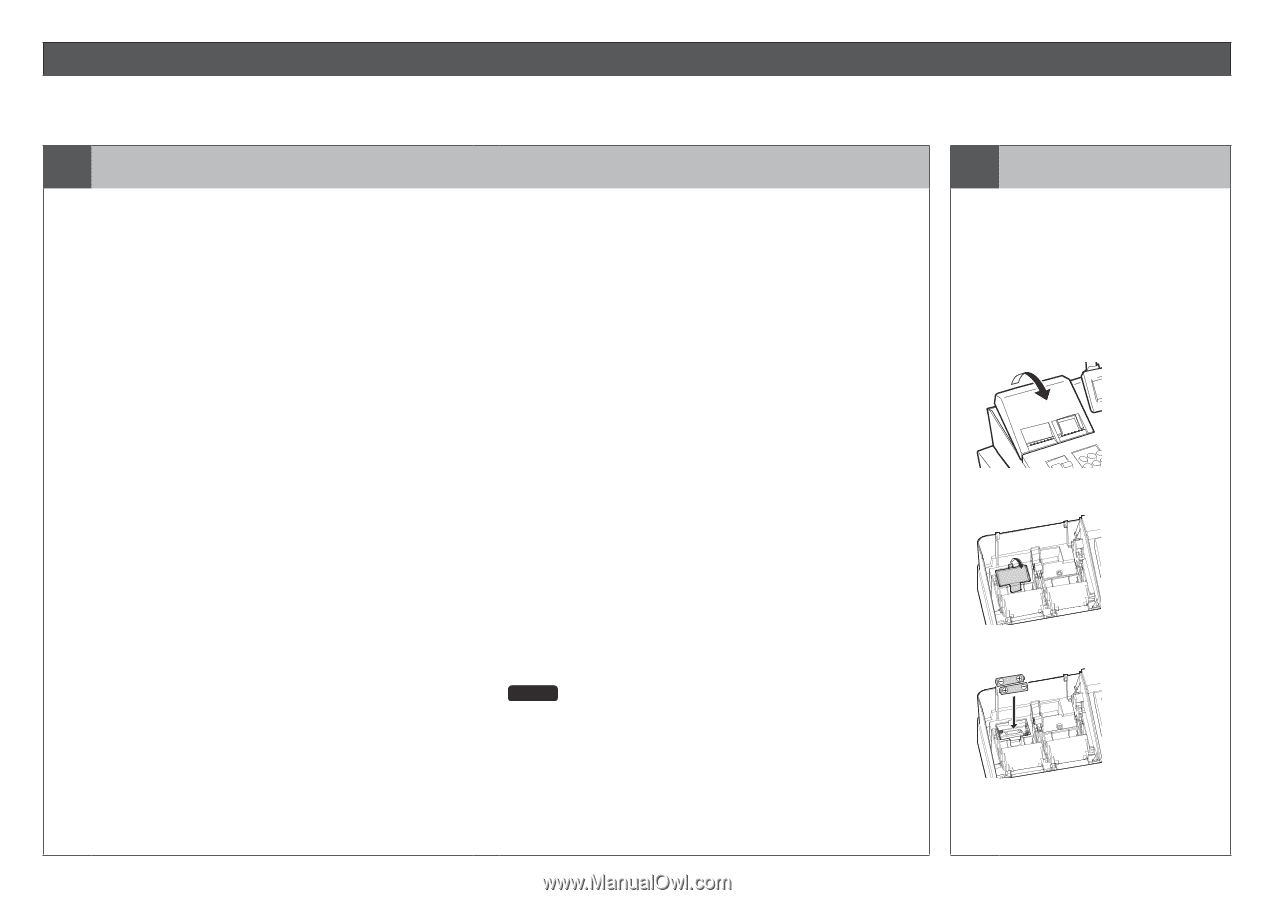
Installing Batteries
Batteries must be installed in the cash
register to prevent data and programmed
contents from being lost from the memory
in case of accidental disconnection of the
AC cord or power failure.
Please install two new LR6 (“AA” size)
batteries before programming and
operating the cash register.
1. Remove the printer cover.
2. Open the battery cover next to the
paper roll cradle.
3. Install two new LR6 (“AA” size)
batteries.
4. Close the battery cover.
5. Replace the printer cover.