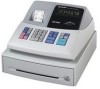
Sharp XEA102 XE-A102 Operation Manual in English and Spanish - Page 2
PLU Price Look Up - xe a102 manual
 |
UPC - 074000049093
View all Sharp XEA102 manuals
Add to My Manuals
Save this manual to your list of manuals |
Page 2 highlights
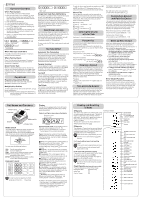
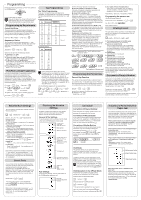
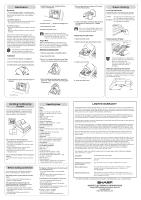
Entries Operation Examples When Paid by Cash 1. Turn the mode switch to the REG position. 2. Enter the clerk code (1 to 4) and press CLK# . (Once the clerk code is entered, you need not enter the clerk code at the start of each transaction until the clerk is changed.) 3 Enter the price for the first item. 4. Press the appropriate department key. 5. Repeat steps 2 and 3 for all the remaining items. 6. Press #/ SBTL to display the amount due including any tax (you can omit this step). 7. Enter the amount received from the customer (you can omit this step if the amount tendered is the same as the subtotal). 8. Press , and the change due is displayed and the drawer opens. 9. Close the drawer. CLK# 5 1 7 3 #/ SBTL Clerk code Price and dept. Price and dept. @/TM #/ SBTL CHK 1 5 3 @/TM 3 7 3 Single Item Cash Sale (SICS) Entry This function is used for the sale of one item to be paid by cash. It is applicable only to departments programmed for single-item cash sales or to PLUs associated with such departments. After the appropriate department or P key is pressed, the transaction is complete and the drawer opens. For the programming of SICS, see the Department Status section in "Programming." PLU (Price Look Up) The PLU function allows speedy key entries. When a PLU code has been assigned to an item and a price for it has been programmed, entry of the code automatically calls up the price for the item. Up to 80 PLU codes are programmable. See the PLU programming section in "Programming" To enter a sale of a PLU item, simply enter its code and press P. Amount tendered When Paid by a Credit Card Press CH at the end of the transaction. The amount tendered cannot be entered. When Paid by Check Press CHK at the end of the transaction. The amount tendered can be entered like a cash sale and the change due is displayed. Mixed Tender Sale When the amount tendered by cash or check is less than the sales amount including tax, the display shows a deficit and "o". To compensate for the deficit, make an additional amount-tendered entry or make a charge entry. Department Repetitive Department Entries To enter two or more of the same item, press the appropriate department key repeatedly. Multiplication Entries To enter a sale of two or more of the same item, use @/TM key for multiplication. Example: Selling five pieces of $1.50 item (department 1) and three pieces of $3.50 item (department 3) for check payment. Tax Calculation Automatic Tax Calculation When the register is programmed with a tax table or tax rate method and the tax status of a department is programmed as taxable, the register automatically computes the tax on any item entered using the department key for that department or a PLU code associated with that department. Taxable Subtotal You can display the taxable 1 or taxable 2 subtotal by pressing either tax shift key and then . #/ SBTL The subtotal of taxable 1 or taxable 2 entries is displayed. You cannot display the subtotal of taxable 3 or 4 items. Tax Shift You can change the programmed taxable 1 or 2 status of each department key by pressing one or both of the two tax shift keys TAX1 SHIFT /RA and . To TAX2 SHIFT /PO change the taxable status, press the appropriate tax shift key just before the department, P or % key. In case of repetitive entries, the shifted tax status is used. Tax Delete This function is used when the taxable item or items once entered need to be made non-taxable. Press TAX1 SHIFT /RA or , TAX2 SHIFT /PO then s, and v and all entries made so far in the transaction for items with the specified taxable status will be made non-taxable. To make all entries up to that point non-taxable, press TAX1 SHIFT /RA v. and , then , and TAX2 SHIFT /PO #/ SBTL Subsequent entries in the transaction remain unaffected and will be taxed normally. Manual Tax You can apply tax manually when the automatic tax calculation function cannot be used. Each manual tax entry (for Tax 1 or Tax 2) can be made only once during a transaction. After a manual tax entry, you cannot make any further item entries. Manual tax 1 entry: and ➝ tax amount ➝ TAX1 SHIFT /RA #/ SBTL #/ SBTL Manual tax 2 entry: and ➝ tax amount ➝ TAX2 SHIFT /PO #/ SBTL #/ SBTL Opening the Drawer with No Sale Just press and the drawer opens. Percent Key The percent key is used to apply a discount or premium to an item or to a subtotal. You can manually enter a discount (or premium) rate. Once the rate is preset for % , you can skip the step of entering the rate. Discount for an item: entry of an item ➝ percentage rate ➝ % (ex. For 20%, enter 2 0 0 0 .) Discount for a subtotal: entry of all items➝ #/ SBTL ➝ percentage rate ➝ % (ex. For 5%, enter 5 0 0 .) Entering a Refund The cash register has no refund key. You must use the following alternative method to make a refund entry: A negative department for refund must be programmed in advance. Check the taxable status of the returned item is the same as that of the programmed negative department. If not, use the appropriate tax shift key to change the taxable status. Procedure unit price of the returned item ➝ negative dept. key ➝ or g. Non-add Code Number Non-add code numbers can be entered and printed on the journal (or receipt) during the entry of a sale. Nonadd codes can be used for credit numbers, check numbers, serial numbers, product codes, service charge codes or any other numbers for reference to specific transactions. Non-add code numbers can be entered in the REG or VOID mode. Non-add code number entry procedure: a code number of up to 8 digits ➝ s. Received-on-Account and Paid-Out Entries The received-on-account (RA) entry function is used for entering the cash received not directly connected with a sale. The paid-out (PO) entry function is used for recording the money taken from the drawer for payment not directly connected with a sale. These functions are available in the X/Flash mode. Received-on-account entry (X/Flash mode): amount received (up to $799999.99) ➝ TAX1 SHIFT /RA Paid-out entry (X/Flash mode): amount paid out (up to $799999.99) ➝ . TAX2 SHIFT /PO When an Error Occurs When your register goes into an error mode, it will display the error symbol "e" accompanied with a warning beep. Clear the error state by pressing the CL key and take the appropriate action. 1. You enter a number of more than 7 digits for the department price or a number larger than the 79999999 (8 digits) for other amounts. Press CL and re-enter a correct number. 2. You make an error in key operation: Press CL and operate keys correctly. 3. You make an entry beyond a programmed entry digit limit: Press CL and check if the entered amount is correct. If not correct, re-enter a correct number. If correct, check the setting of the entry digit limit. 4. A subtotal exceeds 79999999 (eight digits): Press CL and then press , g or k to finish the transaction. 5. The number of an item exceeds 3 digits in multiplication entry: Press CL and re-enter the correct number. Error Escape Function When an error or something uncontrollable occurs during a transaction entry and you cannot keep the customer waiting, press ESC twice (following CL when in the error state). You can escape the situation and finalize the transaction as a cash sale at that time. Transaction entries to that point are registered. Part Names and Functions Printer cover Keyboard Display Drawer Mode switch Drawer lock Mode Switch The mode switch enables the register to perform a variety of functions. The mode switch can be operated by inserting one of the two supplied mode keys. These keys can be inserted into or withdrawn from the switch only in the REG or OFF position. REG OFF X/Flash Z/PGM VOID You can select the following functions: REG: Permits transaction entries. OFF: Turns the display off. VOID: Permits you to cancel transaction entries. X/Flash: Permits printing of sales reports and displaying of flash reports. Z/PGM: Permits printing of sales reports, resetting of sales data and programming. Keyboard Layout TAX1 SHIFT @/TM /RA TAX2 SHIFT % /PO VOID ESC SHIFT PLU 7 8 34 6 2 5 1 CHK CLK# #/ CH SBTL CA/AT/NS D In order to enter the departments 5 to 8, press SHIFT and then the 1 5 to 4 8 keys. Display The XE-A102 is equipped with a front LED (LightEmitting Diode) display that affords easy visibility during transactions. Symbols and figures appearing on the display: Department code PLU code 87654321 Repeat Departments/PLU Code: The department code or PLU code entered appears on the left. For example, if the key for department 1 is pressed, "1" would appear in the extreme left position. Repeat: Indicates the number of times the same department key is pressed. If an entry is repeated more than ten times, only the first digit is displayed (12 displays as "2"). (e) Error: This symbol appears, accompanied by a warning beep, when an error is made. If this occurs during a transaction because of an excessive digit entry, simply press CL and re-enter correctly. (p) Program: This symbol remains on the display when the cash register is being programmed in the Z/PGM mode. (f) Finalization: This symbol appears when a transaction is finalized by pressing ,g or k. (o) Subtotal: This symbol appears when #/ SBTL is pressed and the cash register computes the subtotal, and also when the amount tendered is less than the total sale amount. (c) Change: This symbol appears whenever the change due amount is displayed. (l) Low battery: This symbol appears when the power of the installed batteries is below a certain level or you need to replace the batteries with new ones. (see the "Maintenance" section for explanation.) ( ) No battery: This symbol appears when no batteries are installed. (see "Maintenance" and "Getting Started" sections for explanation.) In addition, the following appear when appropriate: • The minus sign (-) can appear in positions 2 to 8. • The decimal point appears in positions 1 to 3. • When entry of the secret code is necessary, "----" appears in positions 1 to 4 . Reading and Resetting of Sales X Reports X/Z Report Sample This report, when taken in the X/Flash mode, prints the accumulated information of sales. Taking an X report is a good way to do a mid-day check on daily sales. You can take X reports any number of times, because they do not affect the cash register's memory. To issue an X report, turn the mode switch to the X/Flash position and press . Z Reports The contents of Z reports are the same as those of X reports, but issuance of a Z report resets all the transaction totals to zero. To issue a Z report, turn the mode switch to the Z/PGM position. D If the secret code is programmed, you must enter the secret code and press after this step. For Z reports without grand total resetting Press . D If the secret code is programmed, you have to enter the secret code and press again after this step. For Z reports with grand total resetting If you want to reset the grand total(GT)when taking the Z report, press k instead of . Other than resetting the grand total, this report is the same as the normal Z reports. D If the secret code is programmed, you have to enter the secret code and press k again after this step. Flash Reports (displayed but not printed) Press the following key in the X/Flash mode: Department Total Department key Sales Total #/ SBTL Cash in Drawer CH Reset counter Reset symbol ("X" is printed in the case of X reports.) Grand total Quantity Dept. code Amount All Depts. counter and total Percent counter and total Item void counter and total Void mode counter and total Taxable 1 total Tax 1 total Taxable 2 total Tax 2 total Taxable 3 total Tax 3 total Taxable 4 total Tax 4 total Count of transactions Sales total Cash sale total Check sale counter and total Charge sale counter and total Received-on-account total Paid-out total No sale counter Cash in drawer Clerk 1 sale total Clerk 2 sale total Clerk 3 sale total Clerk 4 sale total
-
 1
1 -
 2
2 -
 3
3 -
 4
4 -
 5
5 -
 6
6
 |
 |