Sharp XEA102 XE-A102 Operation Manual in English and Spanish - Page 4
Liimited Warranty - xe a102 ink roller
 |
UPC - 074000049093
View all Sharp XEA102 manuals
Add to My Manuals
Save this manual to your list of manuals |
Page 4 highlights
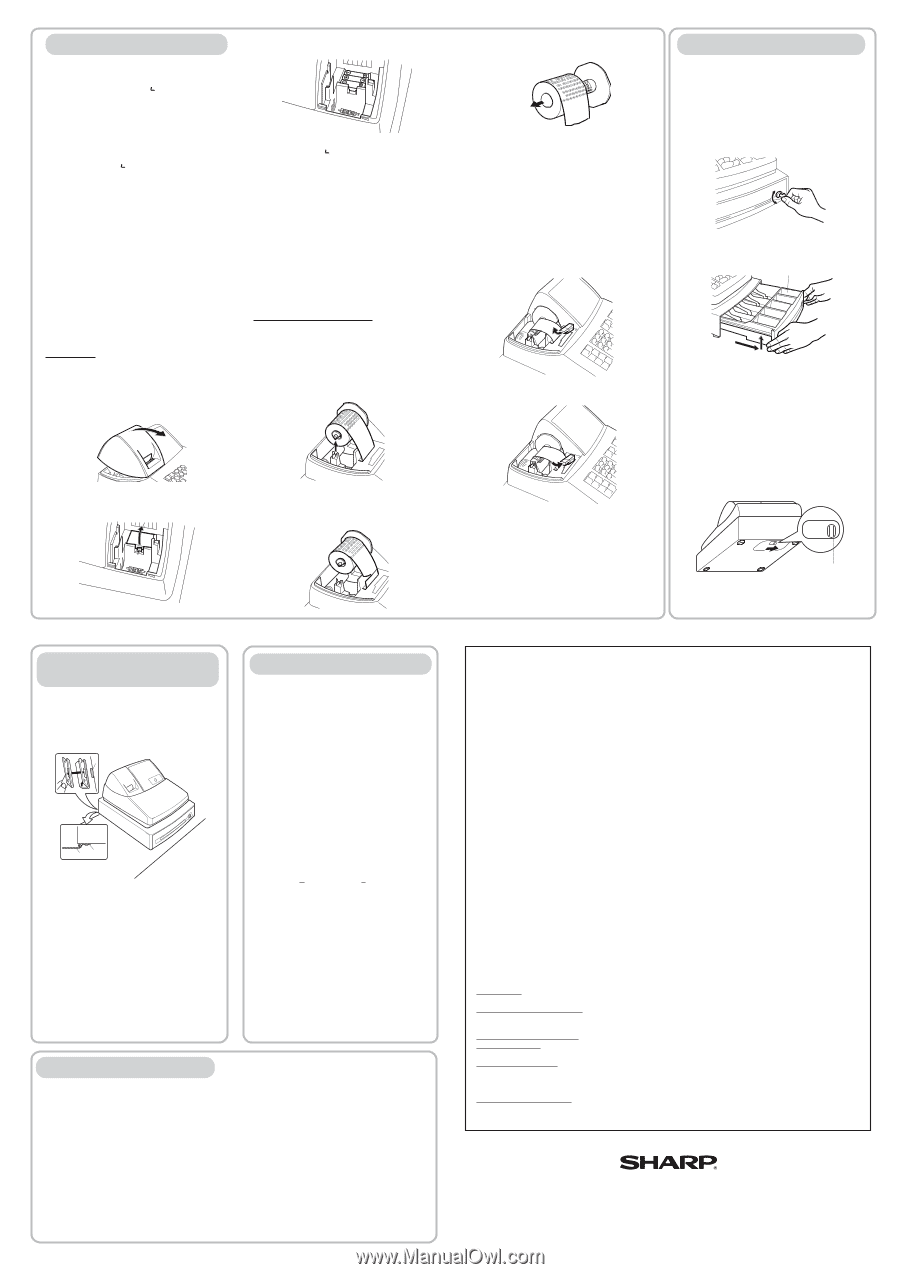
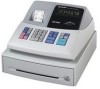
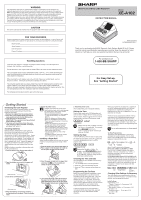
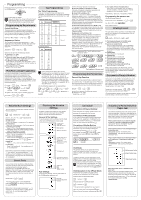
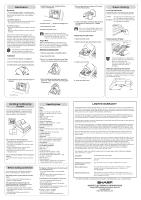
Maintenance Batteries This cash register provides a low battery symbol (l) and a no battery symbol ( ) which appears on the far left of the display in one of the following situations: Low battery symbol (l) • When the voltage of the batteries installed in the cash register is under the required level. No battery symbol ( ) • When three batteries are not installed in the cash register. • When the batteries installed in the cash register are dead. When either of these symbols appear, check batteries. If no batteries are installed, install three new "AA" batteries at once. If batteries are already installed, replace them with new ones as soon as possible. If the AC power cord is disconnected or a power failure occurs when the batteries are dead or not installed, all the programmed settings will be reset to the default settings and any data stored in memory will be cleared. D If the low battery symbol appears while making a transaction, complete the transaction before replacing the batteries. Replacement 1. Be sure the cash register is plugged in. 2. Turn the mode switch to the REG position. 3. Pull the printer cover upward and detach it. 5. Install three new "AA" batteries into the battery compartment. View from rear 6. Check that the " " symbol has disappeared. 7. Close the battery cover. 8. Replace the printer cover. C Improper use of batteries could cause them to burst or leak, which might damage the interior of the machine. See the cautions in the "Getting Started" section. Paper Roll When colored dye appears on the edges of the paper roll, it is time to replace the roll. Use paper of 2 1/4" (57 mm) in width. To prevent jamming be sure to use paper specified by SHARP. Replacement (Journal printing) 1. Turn the mode switch to the REG position. 2. Open the printer cover. 3. Press f to advance the paper several lines. Remove the take-up spool from the bearing. 4. Open the battery cover and remove the old batteries. 4. After cutting the existing paper, remove the paper roll. Then remove the remaining paper by pressing f. 5. Remove the used journal paper roll (if used) from the take-up spool. 6. Install a new paper roll and the take-up spool according to the instructions in "Getting Started." C In the case of receipt printing, steps 3 and 5 should be omitted and the take-up spool need not be installed in step 6. Replacing the Ink Roller 1. Open the printer cover. 2. Remove the ink roller by pulling it upward. Drawer Handling Locking the Drawer Develop the habit of locking the drawer when not using the register for any extended period of time. To lock: Insert the key into the drawer lock and turn it 90 degrees counter-clockwise. To unlock: Insert the key into the drawer lock and turn it 90 degrees clockwise. Removing the Drawer To remove the drawer, pull it out and lift it up. Coin case 3. Install a new ink roller. 4. Close the printer cover. D • To prevent burglary, it is a good idea to empty the drawer after work and leave it open at the end of the day. • Coin case is detachable. Also the separators of the coin case are removable. Manually Opening the Drawer In case of a power failure or if the machine is out of order, locate the lever at the bottom of the machine and move it in the direction of the arrow to open the drawer. The drawer will not open if it is locked with the drawer lock key. View from rear Lever Installing the Mounting Bracket A mounting bracket which prevents the register from moving accidentally is supplied with your XE-A102 register. Attach the bracket to a table where the register rests, as follows: B A BA How to attach the mounting bracket 1.Thoroughly clean the table surface where you wish to place the bracket (B). 2.Peel off the release paper of the adhesive tape on the bracket. 3.Hook the bracket onto the hook (A) at the bottom of the back of the register. 4.Hold down the bracket so that it firmly sticks to the table surface. How to release the register from the mounting bracket Lift up the front of the register and pull it towards you. Before Calling for Service If you encounter any of the following problems, please read below before calling for service. The display shows symbols that do not make sense. • Has the machine been initialized properly as shown in "Getting Started"? The display will not illuminate while the machine is turned on. The machine will not operate when any key is pressed. • Is the power supplied to the electrical outlet? (Plug another electrical device into the outlet for confirmation.) • Is the power cord firmly connected to the electrical outlet? Specifications Model: XE-A102 Size: Inches: 13.0 (W) x 14.3 (D) x 9.21 (H) Millimeters: 330 (W) x 363 (D) x 234 (H) Weight: Approx. 11.0 lbs. (5.0 kg) Power Source: 120V AC±10%, 60Hz Power Consumption: Stand-by: 4 W, Operating: 12.5 W Working Temperature: 32 to 104˚F (0 to 40˚C) Display: LED (Light-Emitting Diode) numeric display Printer: 1 station, print wheel selective type Printing Capacity: Max. 13 characters Paper Roll: Width: 2 1/4" + 1/64" (57.5mm + 0.5mm) Max. external diameter: 3-5/32" (80mm) Min. internal diameter: 15/32" (12mm) Cash Drawer: 4 slots for bills, 5 for coins Accessories (supplied): Paper roll: 1 roll Mode key: 2 Drawer lock key: 2 Instruction manual (English): 1 copy Instruction manual (Spanish): 1 copy Quick Start Guide (English/Spanish): 1 copy Ink roller: 1 (installed) Take-up spool: 1 Mounting bracket: 1 • Specifications and appearance are subject to change without notice for improvement. The display is illuminated, but the machine will not accept key entries. • Is the mode switch properly set to the REG position? • Has the machine been initialized properly as shown in "Getting Started"? Journal paper will not feed properly in the printer. • Is the take-up spool installed properly? • Is there a paper jam? • Is the journal format selected in the printing format programming? (If the receipt format is selected, the paper is not wound around the take-up spool.) Printing is faded or illegible. • Is the ink roller used up? • Has the ink roller been installed properly? LIIMITED WARRANTY SHARP ELECTRONICS CORPORATION warrants to the first consumer purchaser that this Sharp brand product (the "Product"), when shipped in its original container, will be free from defective workmanship and materials and agrees that it will, at its option, either repair the defect or replace the defective Product or part thereof at no charge to the purchaser for parts or labor for the time period(s) set forth below. This warranty does not apply to any appearance items of the Product nor to the additional excluded item(s) set forth below nor to any product the exterior of which has been damaged or defaced, which has been subjected to misuse, abnormal service or handling or which has been altered or modified in design or construction. In order to enforce the rights under this limited warranty, the purchaser should follow the steps set forth below and provide proof of purchase to the servicer. The limited warranty described herein is in addition to whatever implied warranties may be granted to purchasers by law. ALL IMPLIED WARRANTIES INCLUDING THE WARRANTIES OF MERCHANTABILITY AND FITNESS FOR USE ARE LIMITED TO THE PERIOD(S) FROM THE DATE OF PURCHASE SET FORTH BELOW. Some states do not allow limitations on how long an implied warranty lasts, so the above limitation may not apply to you. Neither the sales personnel of the seller nor any other person is authorized to make any warranties other than those described herein or to extend the duration of any warranties beyond the time period described herein on behalf of Sharp. The warranties described herein shall be the sole and exclusive warranties granted by Sharp and shall be the sole and exclusive remedy available to the purchaser. Correction of defects, in the manner and for the period of time described herein, shall constitute complete fulfillment of all liabilities and responsibilities of Sharp to the purchaser with respect to the Product and shall constitute full satisfaction of all claims, whether based on contract, negligence, strict liability or otherwise. In no event shall Sharp be liable, or in any way responsible, for any damages or defects in the Product which were caused by repairs or attempted repairs performed by anyone other than an authorizezd servicer. Nor shall Sharp be liable, or in any way responsible, for any incidental or consequential economic or property damage. Some states do not allow the exclusion or incidental or consequential damages, so the above exclusion may not apply to you. THE WARANTY GIVES YOU SPECIFIC LEGAL RIGHTS. YOU MAY ALSO HAVE OTHER RIGHTS WHICH VARY FROM STATE TO STATE. Your Product: XE series Electronic Cash Register Warranty Period of this Product: One (1) year for parts and ninety (90) days parts and labor from the date of purchase. Additional items excluded from warranty coverage: Any consumable items such as paper supplied with the Product. Where to obtain service: At a Sharp Authorized Servicer located in the United States. To find the location of the nearest Sharp Authorized Servicer, call toll free at 1-800-BE-SHARP. What to do to obtain service: Ship (prepaid) or carry your Product to a Sharp Authorized Servicer. Be sure to have proof of purchase available. If you ship or mail the Product, be sure it is packaged carefully. TO OBTAIN SUPPLIES, ACCESSORIES OR PRODUCT INFORMATION, CALL 1-800-BE-SHARP. SHARP ELECTRONICS CORPORATION Sharp Plaza, Mahwah, New Jersey 07430-2135 1-800-BE-SHARP http://www.sharpusa.com
-
 1
1 -
 2
2 -
 3
3 -
 4
4 -
 5
5 -
 6
6
 |
 |