Sharp XG-P10XU XGP10XU Operation Manual - Page 23
MOUSE/ADJUSTMENT, Use as a Wireless Mouse, Use as a Laser Pointer, LASER POINTER, Wired Remote Control - does not power on
 |
View all Sharp XG-P10XU manuals
Add to My Manuals
Save this manual to your list of manuals |
Page 23 highlights
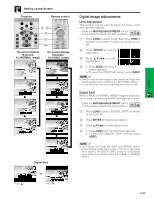
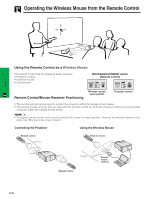
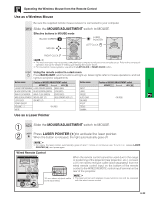
Operation Operating the Wireless Mouse from the Remote Control Use as a Wireless Mouse Be sure the supplied remote mouse receiver is connected to your computer. MOUSE ADJ. Slide the MOUSE/ADJUSTMENT switch to MOUSE. Effective buttons in MOUSE mode BLACK SCREEN LASER POINTER MOUSE LEFT-CLICK RIGHT-CLICK • The wireless mouse may not operate correctly if your computer serial port is not correctly set up. Refer to the computer's operation manual for details of setting up/installing the mouse driver. • For one-button mouse systems, use either the LEFT-CLICK or RIGHT-CLICK button. Using the remote control in a dark room Press BACKLIGHT, and the buttons will light up. Green lights refer to mouse operations, and red lights to projector adjustments. Button name Position of MOUSE/ADJUSTMENT switch MOUSE ADJ. LASER POINTER/MENU LASER POINTER (GREEN) MENU (RED) BLACK SCREEN/LENS BLACK SCREEN (GREEN) LENS (RED) RIGHT-CLICK/ENTER RIGHT-CLICK (GREEN) ENTER (RED) MOUSE/ADJUSTMENT MOUSE (NOT LIT) ADJUSTMENT (NOT LIT) LEFT-CLICK ON (NOT LIT) - POWER ON/OFF VOLUME ON (RED) MUTE Button name INPUT UNDO FREEZE AUTO SYNC ENLARGE RESIZE TOOLS GAMMA Position of MOUSE/ADJUSTMENT switch MOUSE ADJ. ON (RED) Use as a Laser Pointer 1 MOUSE ADJ. Slide the MOUSE/ADJUSTMENT switch to MOUSE. 2 Press LASER POINTER ( ) to activate the laser pointer. When the button is released, the light automatically goes off. • For safety, the laser pointer automatically goes off after 1 minute of continuous use. To turn it on, release LASER POINTER ( ) and press again. Wired Remote Control 1 3 L AUDIO R VIDEO When the remote control cannot be used due to the range or positioning of the projector (rear projection, etc.), connect a 3.5 mm stereo minijack cable (sold separately) from the wired remote control input on the bottom of the remote control to the WIRED REMOTE control input terminal on the rear of the projector. 3.5 mm stereo minijack cable • The laser pointer and wireless mouse functions can still be operated (sold separately) with the wired remote control. E-22
-
 1
1 -
2
-
3
-
4
-
5
-
6
-
7
-
8
-
9
-
10
-
11
-
12
-
13
-
14
-
15
-
16
-
17
-
 18
18 -
 19
19 -
 20
20 -
 21
21 -
 22
22 -
 23
23 -
 24
24 -
 25
25 -
 26
26 -
 27
27 -
 28
28 -
29
-
30
-
31
-
32
-
33
-
34
-
35
-
36
-
37
-
38
-
39
-
40
-
41
-
42
-
43
-
44
-
45
-
46
-
47
-
48
-
49
-
50
-
51
-
52
-
53
-
54
-
55
-
56
-
57
-
58
-
59
-
60
-
61
-
62
-
63
-
64
-
65
 |
 |
