Sharp XG-P10XU XGP10XU Operation Manual - Page 38
Black Screen Function, On-screen Display Override Function, Blacking out the Projected Image
 |
View all Sharp XG-P10XU manuals
Add to My Manuals
Save this manual to your list of manuals |
Page 38 highlights
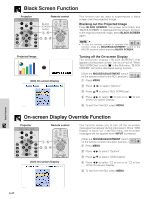
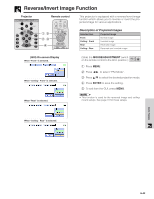
Black Screen Function Projector Remote control BLACK SCREEN button 1, 5 2, 3, 4 Projected Image sg (GUI) On-screen Display This function can be used to superimpose a black screen over the projected image. Blacking out the Projected Image Press BLACK SCREEN. The screen turns black and "BLACK SCREEN" is displayed on the screen. To return to the original projected image, press BLACK SCREEN again. MOUSE ADJ. • To use the remote control to operate this function, slide the MOUSE/ADJUSTMENT switch to the MOUSE position before pressing BLACK SCREEN. Turning off the On-screen Display The On-screen Display ("BLACK SCREEN") that appears during black screen can be turned off. When "BLK SCRN Disp" is set to " " in the GUI menu, "BLACK SCREEN" will not be displayed during function. (Slide the MOUSE/ADJUSTMENT switch MOUSE ADJ. on the remote control to the ADJ. position.) 1 Press MENU. 2 Press ß /© to select "Options". 3 Press ∂/ƒ to select "BLK SCRN Disp". 4 Press ß/© to select " " to turn on or " " to turn off the On-screen Display. 5 To exit from the GUI, press MENU. On-screen Display Override Function Projector Remote control 1, 5 2, 3, 4 (GUI) On-screen Display This function allows you to turn off the on-screen messages that appear during input select. Once "OSD Display" is set to " " in the GUI menu, the on-screen messages will not appear when INPUT is pressed. (Slide the MOUSE/ADJUSTMENT switch MOUSE ADJ. on the remote control to the ADJ. position.) 1 Press MENU. 2 Press ß/© to select "Options". 3 Press ∂/ƒ to select "OSD Display". 4 Press ß/© to select " " to turn on or " " to turn off the On-screen Display. 5 To exit from the GUI, press MENU. Useful Features E-37
-
 1
1 -
2
-
3
-
4
-
5
-
6
-
7
-
8
-
9
-
10
-
11
-
12
-
13
-
14
-
15
-
16
-
17
-
18
-
19
-
20
-
21
-
22
-
23
-
24
-
25
-
26
-
27
-
28
-
29
-
30
-
31
-
32
-
 33
33 -
 34
34 -
 35
35 -
 36
36 -
 37
37 -
 38
38 -
 39
39 -
 40
40 -
 41
41 -
 42
42 -
 43
43 -
44
-
45
-
46
-
47
-
48
-
49
-
50
-
51
-
52
-
53
-
54
-
55
-
56
-
57
-
58
-
59
-
60
-
61
-
62
-
63
-
64
-
65
 |
 |