Sharp XG-P10XU XGP10XU Operation Manual - Page 44
Using the Presentation Tools, Using
 |
View all Sharp XG-P10XU manuals
Add to My Manuals
Save this manual to your list of manuals |
Page 44 highlights
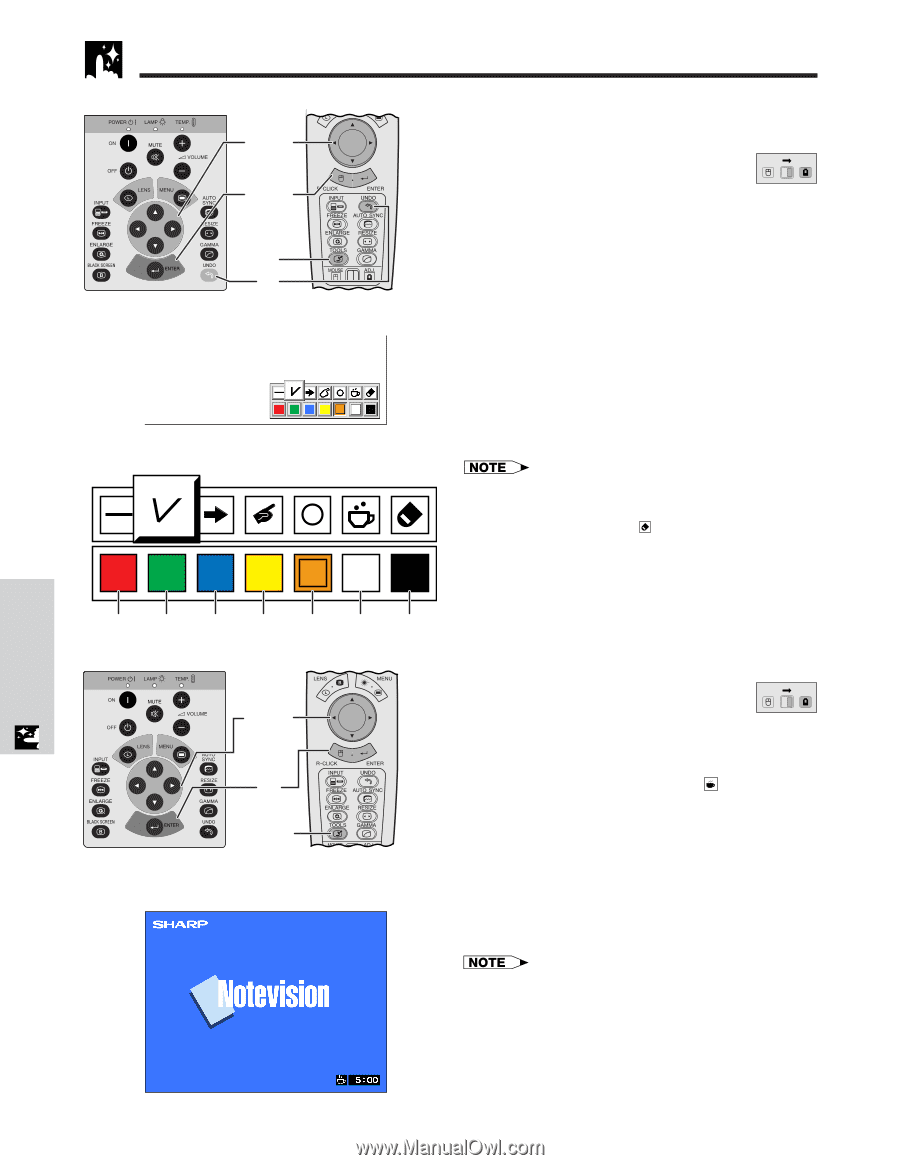
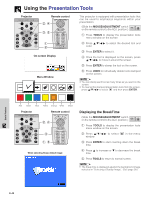
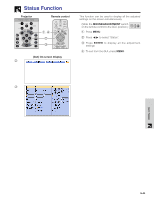
Using the Presentation Tools Projector Remote control 2, 4 3, 5 1 6 On-screen Display Menu Window This projector is equipped with presentation tools that can be used to emphasize keypoints within your presentation. (Slide the MOUSE/ADJUSTMENT switch MOUSE ADJ. on the remote control to the ADJ. position.) 1 Press TOOLS to display the presentation tools menu window on the screen. 2 Press to select the desired tool and color. 3 Press ENTER to select it. 4 Once the tool is displayed on the screen, press to move it around the screen. 5 Press ENTER to stamp the tool on the screen. 6 Press UNDO to individually delete tools stamped on the screen. • You can stamp each tool as many times as you want on the screen. • To clear all the stamped presentation tools from the screen, press to select " " and then press ENTER. Red Green Blue Yellow Orange White Black Projector Remote control 2, 4 3 1, 5 When selecting Sharp default image Displaying the BreakTime (Slide the MOUSE/ADJUSTMENT switch MOUSE ADJ. on the remote control to the ADJ. position.) 1 Press TOOLS to display the presentation tools menu window on the screen. 2 Press to select " " in the menu window. 3 Press ENTER to start counting down the break time. 4 Press ∂ to increase or ƒ to decrease the break time. 5 Press TOOLS to return to normal screen. • The break time is displayed against the background image selected in "Selecting a Startup Image". (See page 38.) Useful Features E-43
-
 1
1 -
2
-
3
-
4
-
5
-
6
-
7
-
8
-
9
-
10
-
11
-
12
-
13
-
14
-
15
-
16
-
17
-
18
-
19
-
20
-
21
-
22
-
23
-
24
-
25
-
26
-
27
-
28
-
29
-
30
-
31
-
32
-
33
-
34
-
35
-
36
-
37
-
38
-
 39
39 -
 40
40 -
 41
41 -
 42
42 -
 43
43 -
 44
44 -
 45
45 -
 46
46 -
 47
47 -
 48
48 -
 49
49 -
50
-
51
-
52
-
53
-
54
-
55
-
56
-
57
-
58
-
59
-
60
-
61
-
62
-
63
-
64
-
65
 |
 |