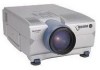
Sharp XG-P10XU XGP10XU Operation Manual - Page 49
Replacing the Projection Lamp, Removing and installing the lamp unit - bqc 1 lamp
 |
View all Sharp XG-P10XU manuals
Add to My Manuals
Save this manual to your list of manuals |
Page 49 highlights
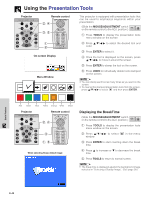
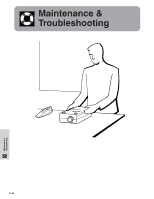
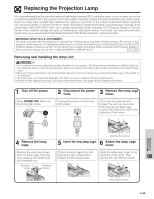
Replacing the Projection Lamp It is recommended that the lamp be replaced after approximately 900 cumulative hours of use or when you notice a significant deterioration of the picture and color quality. Carefully change the lamp by following the steps below. If the new lamp does not light after replacement, take your projector to the nearest Authorized Sharp Industrial LCD Products Dealer or Service Center for repair. Purchase a replacement lamp unit (lamp/cage module) of the current type BQC-XGP10XU/1 from your nearest Authorized Sharp Industrial LCD Products Dealer or Service Center. Then carefully change the lamp by following the instructions below. If you wish, you may have the lamp replaced at your nearest Authorized Sharp Industrial LCD Products Dealer or Service Center. IMPORTANT NOTE TO U.S. CUSTOMERS: The lamp included with this projector is backed by a 90-day parts and labor limited warranty. All service of this projector under warranty, including lamp replacement, must be obtained through an Authorized Sharp Industrial LCD Products Dealer or Service Center. For the name of the nearest Authorized Sharp Industrial LCD Products Dealer or Service Center, please call toll-free: 1-888-GO-SHARP (1-888-467-4277). U.S.A. ONLY Removing and installing the lamp unit CAUTION • Do not remove the lamp cage directly after operation of the projector. The lamp may be extremely hot. Wait at least one hour after the power cord is disconnected to allow the surface of the lamp cage to fully cool before removing the lamp cage. • Be sure to remove the lamp cage by the handle. Be sure not to touch the glass surface of the lamp cage or the inside of the projector. • To avoid injury to yourself and damage to the lamp, be sure to carefully follow the steps below. • Before or after replacing the lamp, be sure to clean the air filters. See page 46 for cleaning the air filters. 1 Turn off the power. Press POWER OFF. Wait until the cooling fan stops. or 2 3 Disconnect the power cord. Remove the lamp cage cover. Unplug the power cord from the AC socket. Turn over the projector and loosen the user service screw that secures the lamp cage cover. Then slide the cover in the direction of the arrow. Maintenance & Troubleshooting 4 Remove the lamp cage. Remove the securing screws from the lamp cage. Hold the lamp cage by the handle and pull it towards you. Securing screw Securing screws User service screw 5 6 Insert the new lamp cage. Attach the lamp cage cover. Press the lamp cage firmly into the lamp cage compartment. Fasten the securing screws. Slide the lamp cage cover in the direction of the arrow. Then tighten the user service screw. User service screw E-48
-
 1
1 -
2
-
3
-
4
-
5
-
6
-
7
-
8
-
9
-
10
-
11
-
12
-
13
-
14
-
15
-
16
-
17
-
18
-
19
-
20
-
21
-
22
-
23
-
24
-
25
-
26
-
27
-
28
-
29
-
30
-
31
-
32
-
33
-
34
-
35
-
36
-
37
-
38
-
39
-
40
-
41
-
42
-
43
-
 44
44 -
 45
45 -
 46
46 -
 47
47 -
 48
48 -
 49
49 -
 50
50 -
 51
51 -
 52
52 -
 53
53 -
 54
54 -
55
-
56
-
57
-
58
-
59
-
60
-
61
-
62
-
63
-
64
-
65
 |
 |
