Sharp XG-P25X XG-P25X Operation Manual - Page 21
Plug and Play function when connecting to a 15-pin terminal - hd projector
 |
View all Sharp XG-P25X manuals
Add to My Manuals
Save this manual to your list of manuals |
Page 21 highlights
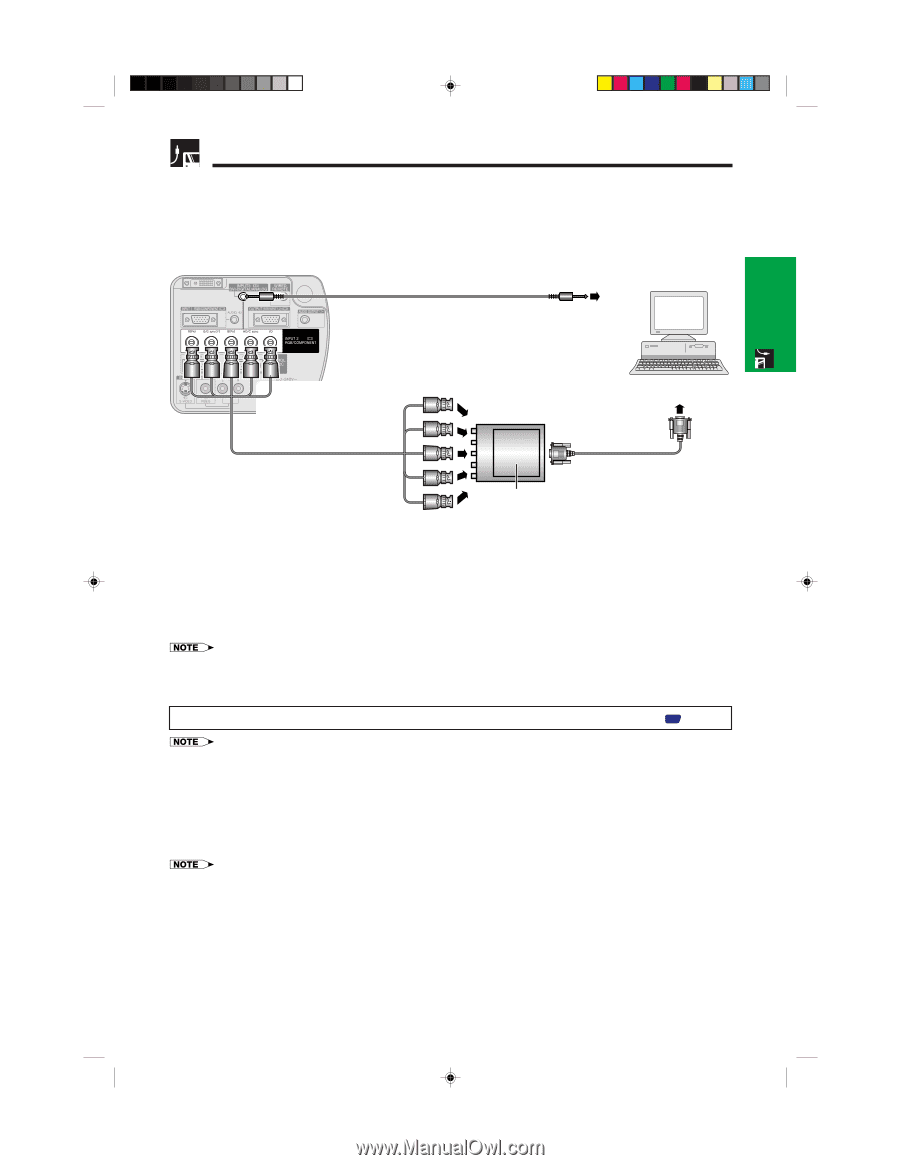
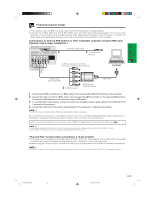
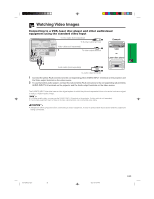
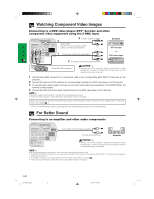
Setup & Connections Projecting Computer Images • This projector uses a 5 BNC computer input to prevent deterioration of image quality. • Connect the R (PR), G/G sync (Y), B (PB), HD/C sync and VD cables (sold separately) to the correct input terminals on the projector and an RGB switcher (sold separately) connected to the computer, or connect a 5 BNC cable (sold separately) directly from the input terminals on the projector to the computer. Connecting to an external RGB switcher or other compatible computers using the BNC Input (Typically used in larger installations ) Computer audio cable 3 4 To audio output terminal To R (PR), G/G sync (Y), B (PB), HD/C sync and VD output terminals Computer 1 5 BNC cable (sold separately) 2 To RGB switcher RGB switcher (sold separately) RGB cable 1 Connect each BNC connector of a 5 BNC cable to the corresponding INPUT 2 terminals on the projector. 2 Connect the other end of the 5 BNC cable to the corresponding BNC terminals on the external RGB switcher. Connect the RGB switcher to the computer using a RGB cable. 3 To use the built-in audio system, connect one end of the supplied computer audio cable to the AUDIO INPUT 2/ 3 terminal on the projector. 4 Connect the other end to the audio output terminal on the computer or external audio system. • A ø3.5 mm stereo minijack to stereo RCA audio cable adaptor may be necessary. When connecting the projector to a compatible computer other than a PC (VGA/SVGA/XGA/SXGA/UXGA) or Macintosh (i.e. Workstation), a separate cable may be needed. Please contact your dealer for more information. When connecting this projector to a computer, select "RGB" for "Signal Type" on the GUI menu. (See page 41 .) • Connecting computers other than the recommended types may result in damage to the projector, the computer, or both. • AUDIO INPUT 2/3 can be used to input audio corresponding to the INPUT 2/3. "Plug and Play" function (when connecting to a 15-pin terminal) • This projector is compatible with VESA-standard DDC 1/DDC 2B. The projector and a VESA DDC compatible computer will communicate their setting requirements, allowing for quick and easy setup. • Before using the "Plug and Play" function, be sure to turn on the projector first and the connected computer last. • The DDC "Plug and Play" function of this projector operates only when used in conjunction with a VESA DDC compatible computer. XG-P25X/CD (E)-b 18 02.3.19, 7:04 PM E-18
-
 1
1 -
2
-
3
-
4
-
5
-
6
-
7
-
8
-
9
-
10
-
11
-
12
-
13
-
14
-
15
-
 16
16 -
 17
17 -
 18
18 -
 19
19 -
 20
20 -
 21
21 -
 22
22 -
 23
23 -
 24
24 -
 25
25 -
 26
26 -
27
-
28
-
29
-
30
-
31
-
32
-
33
-
34
-
35
-
36
-
37
-
38
-
39
-
40
-
41
-
42
-
43
-
44
-
45
-
46
-
47
-
48
-
49
-
50
-
51
-
52
-
53
-
54
-
55
-
56
-
57
-
58
-
59
-
60
-
61
-
62
-
63
-
64
-
65
-
66
-
67
-
68
-
69
-
70
-
71
-
72
-
73
-
74
-
75
-
76
-
77
-
78
-
79
-
80
 |
 |