Sharp XG-P25X XG-P25X Operation Manual - Page 24
Watching Component Video Images, For Better Sound
 |
View all Sharp XG-P25X manuals
Add to My Manuals
Save this manual to your list of manuals |
Page 24 highlights
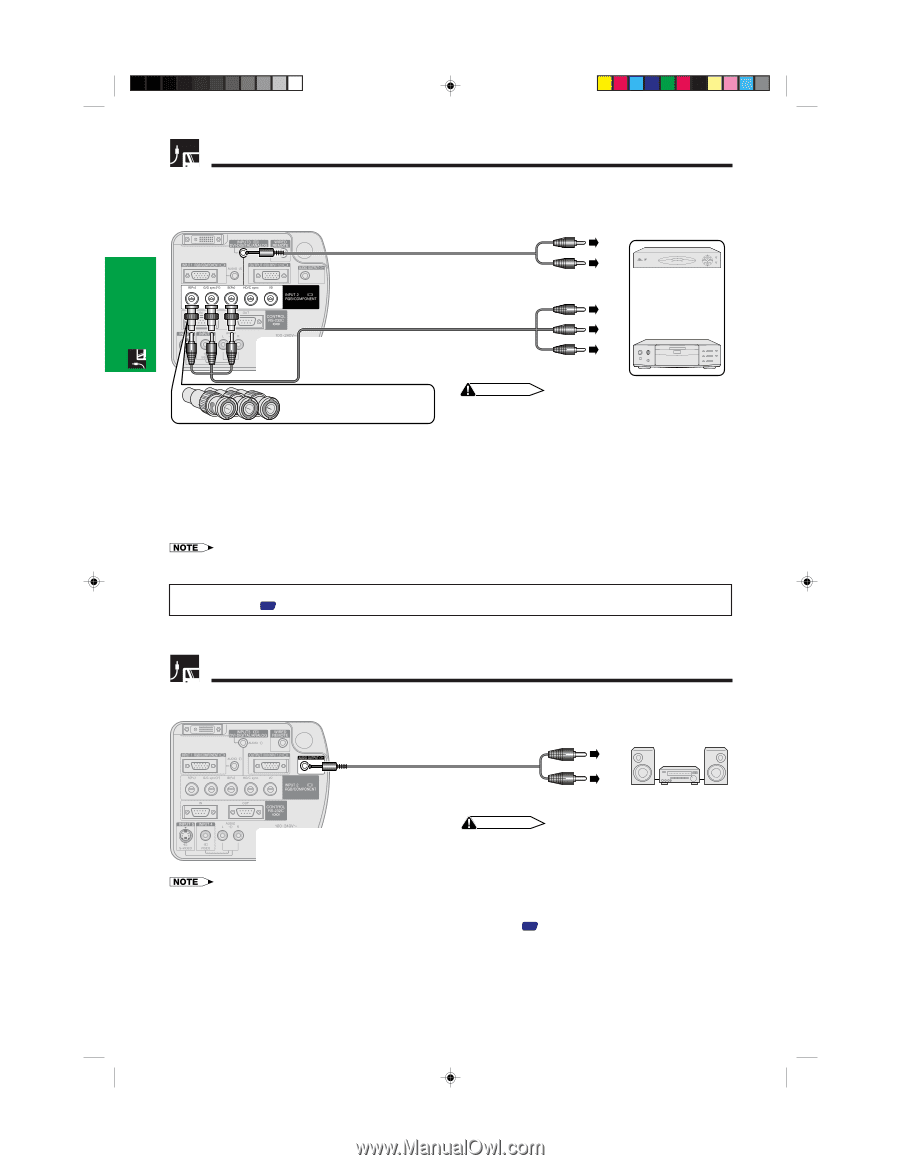
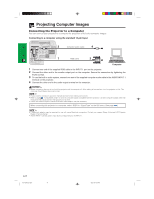
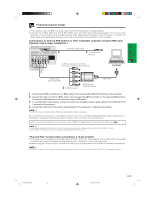
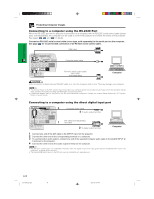
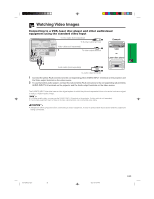
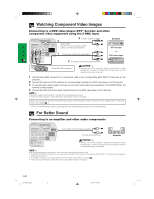
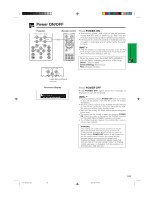
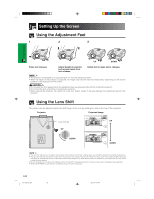
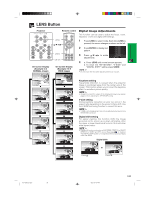
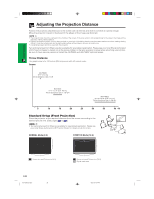
Setup & Connections Watching Component Video Images Connecting to a DVD video player, DTV* decoder and other component video equipment using the 5 BNC Input 4 To audio output terminals 3 Audio cable (ø3.5 mm stereo minijack to RCA cable, commercially available) Example DTV decoder 1 Component cable (sold separately) or DVD video player 2 To analog component output terminals Three BNC-RCA adaptors CAUTION • Always turn off the projector before connecting to video equipment, in order to protect both the projector and the equipment being connected. 1 Connect each BNC connector of a component cable to the corresponding BNC INPUT 2 terminals on the projector. 2 Connect the other end of the cable to the corresponding terminals on a DVD video player or DTV decoder. 3 To use the built-in audio system, connect one end of an audio cable (sold separately) to the AUDIO INPUT 2/3 terminal on the projector. 4 Connect the other end to the audio output terminal on the DVD video player or DTV decoder. • BNC-RCA adaptors are included for use with RCA type cables and sources. • A ø3.5 mm stereo minijack to stereo RCA audio cable adaptor may be necessary. When connecting this projector to a DVD video player or DTV decoder, select "Component" for "Signal Type" on the GUI menu. (See page 41 .) *DTV is the umbrella term used to describe the new digital television system in the United States. For Better Sound Connecting to an amplifier and other audio components Audio cable (commercially available) To audio input terminals Amplifier CAUTION • Always turn off the projector before connecting to audio components, in order to protect both the projector and the components being connected. • By using external audio components, the volume can be amplified for better sound. • The AUDIO OUTPUT terminal allow you to output audio to audio components from the selected AUDIO INPUT 1 to 5 terminals connected to audiovisual equipment. • For details on Variable Audio Output (VAO) and Fixed Audio Output (FAO), see page 46 . • A ø3.5 mm stereo minijack to stereo RCA audio cable adaptor may be necessary. E-21 XG-P25X/CD (E)-b 21 02.3.19, 7:04 PM
-
 1
1 -
2
-
3
-
4
-
5
-
6
-
7
-
8
-
9
-
10
-
11
-
12
-
13
-
14
-
15
-
16
-
17
-
18
-
 19
19 -
 20
20 -
 21
21 -
 22
22 -
 23
23 -
 24
24 -
 25
25 -
 26
26 -
 27
27 -
 28
28 -
 29
29 -
30
-
31
-
32
-
33
-
34
-
35
-
36
-
37
-
38
-
39
-
40
-
41
-
42
-
43
-
44
-
45
-
46
-
47
-
48
-
49
-
50
-
51
-
52
-
53
-
54
-
55
-
56
-
57
-
58
-
59
-
60
-
61
-
62
-
63
-
64
-
65
-
66
-
67
-
68
-
69
-
70
-
71
-
72
-
73
-
74
-
75
-
76
-
77
-
78
-
79
-
80
 |
 |