Sharp XG-P25X XG-P25X Operation Manual - Page 67
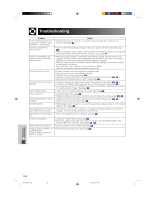
Replacing the Air Filter - troubleshooting
 |
View all Sharp XG-P25X manuals
Add to My Manuals
Save this manual to your list of manuals |
Page 67 highlights
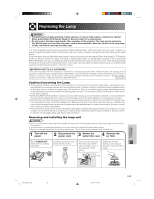
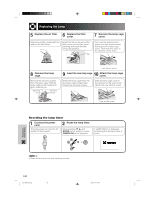
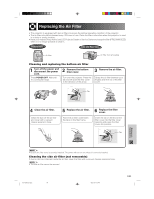
Replacing the Air Filter • This projector is equipped with two air filters to ensure the optimal operating condition of the projector. • The air filters should be cleaned every 100 hours of use. Clean the filters more often when the projector is used in a dusty or smoky location. • Have your nearest Sharp Authorized LCD Projector Dealer or Service Center exchange the filter (PFILD0080CEZZ) when it is no longer possible to clean it. Bottom View Side and Rear View Air filter Air filter (not removable) Cleaning and replacing the bottom air filter 1 Turn off the power and disconnect the power cord. Press POWER OFF. Wait until the cooling fan stops. 2 Remove the bottom filter cover. Turn over the projector. Press the tab and lift open the filter cover in the direction of the arrow. 3 Remove the air filter. Grasp the air filter between your fingers and lift it out of the filter cover. Tab 4 Clean the air filter. Clean the dust off the air filter and cover with a vacuum cleaner extension hose. 5 Replace the air filter. Place the air filter underneath the tabs on the filter frame. 6 Replace the filter cover. Insert the tab on the end of the filter cover into the filter cover opening and press the filter cover into position. Tab Maintenance & Troubleshooting • Be sure the filter cover is securely installed. The power will not turn on unless it is correctly installed. Cleaning the side air filter (not removable) If dust or dirt has collected inside the air filter, clean the filter with a vacuum cleaner extension hose. • The side air filter cannot be removed. XG-P25X/CD (E)-g 64 02.3.19, 7:12 PM E-64
-
 1
1 -
2
-
3
-
4
-
5
-
6
-
7
-
8
-
9
-
10
-
11
-
12
-
13
-
14
-
15
-
16
-
17
-
18
-
19
-
20
-
21
-
22
-
23
-
24
-
25
-
26
-
27
-
28
-
29
-
30
-
31
-
32
-
33
-
34
-
35
-
36
-
37
-
38
-
39
-
40
-
41
-
42
-
43
-
44
-
45
-
46
-
47
-
48
-
49
-
50
-
51
-
52
-
53
-
54
-
55
-
56
-
57
-
58
-
59
-
60
-
61
-
 62
62 -
 63
63 -
 64
64 -
 65
65 -
 66
66 -
 67
67 -
 68
68 -
 69
69 -
 70
70 -
 71
71 -
 72
72 -
73
-
74
-
75
-
76
-
77
-
78
-
79
-
80
 |
 |
