Singer 1 One Instruction Manual 39
Singer 1 One Manual
 |
View all Singer 1 One manuals
Add to My Manuals
Save this manual to your list of manuals |
Singer 1 One manual content summary:
- Singer 1 One | Instruction Manual 39 - Page 1
14 U44B/244B 3.4•THREAD OVERLOCK MACHINE Operator's Guide io _ SINGER - Singer 1 One | Instruction Manual 39 - Page 2
for proper use and optimum service. To get the most out of your sewing machine, read the entire operator's manual before attempting to operate the machine sewing machine when considered necessary without notification or obligation. *A Trademark of THE SINGER COMPANY Copyright C) 1992 SI NG ER SEWING - Singer 1 One | Instruction Manual 39 - Page 3
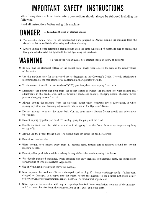
care is required around the sewing machine needle. ■ Do not pull or push fabric while stitching. It may deflect the needle causing it to break. ■ For double insulated machines, when servicing use only identical replacement parts. See instructions for Servicing of Double-Insulated Appliances. ■ Use - Singer 1 One | Instruction Manual 39 - Page 4
product. A double-insulated product is marked with the words "DOUBLE-INSULATION" or "DOUBLE-INSULATED." SAVE THESE INSTRUCTIONS Servicing should be performed by an authorized service representative. This product is intended for household use. FOR EUROPEAN AND SIMILAR TERRITORIES : This product is - Singer 1 One | Instruction Manual 39 - Page 5
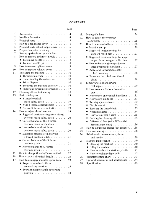
6 5. Principal parts behind looper cover 6 6. Preparation prior to sewing 6 7. Setting up the thread guide holder 7 8. How to remove and insert needle 8 • To How to exchange light bulb 42 26. Troubleshooting chart 43 27. Optional accessories and attachments 44 28. Specification 45 3 - Singer 1 One | Instruction Manual 39 - Page 6
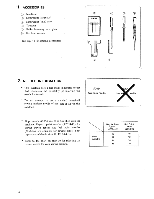
the possibility of inserting the needle backwards. * Do not attempt to use a standard household sewing machine needle of any size or type in this overlock. #2054 Overlock needle 20 House needle * Singer needle #2054 size 14 is furnished with the machine. Regular point needles (#2054-42) for - Singer 1 One | Instruction Manual 39 - Page 7
3. PRINCIPAL PARTS © Thread guides and holder O Handle 0 Pressure regulating screw © Left needle thread tension dial (blue) O Right needle thread tension dial (green) © Upper looper thread tension dial (orange) ® Lower looper thread tension dial (yellow) ® Flip and sew convertible bed plate ® Throat - Singer 1 One | Instruction Manual 39 - Page 8
"0" mark side to turn "OFF" * To run the machine and control the speed, press the controller. * The harder you press, the faster the machine will sew. * To stop the machine from sewing, remove your foot from the controller. 6 ON OFF gig Be sure to make reference to "Warning" on following page. - Singer 1 One | Instruction Manual 39 - Page 9
your machine, disconnect the powerline plug from the electric outlet. 7. SETTING UP THE THREAD GUIDE HOLDER * This machine is shipped with the thread guide holder in the lowered position. * Fully extend the thread guide holder. * The two joints on the telescope will click into place when they are - Singer 1 One | Instruction Manual 39 - Page 10
8 HOW TO REMOVE AND INSERT NEEDLES • TO REMOVE NEEDLE (S) * Be sure to disconnect the machine from the electric outlet before removing needle(s). in * Turn the hand wheel toward you until the needle is at its highest position. * Loosen, but do not remove the needle set screw with the small - Singer 1 One | Instruction Manual 39 - Page 11
and to the right C). Warning: Do not hold the cylinder cover when lifting or carrying the machine. Caution: Be sure cylinder cover is replaced when sewing. 1. 00 0 40° V (i) 0 IL_ ® 9 - Singer 1 One | Instruction Manual 39 - Page 12
1 1. THREADING THE MACHINE • THREADING DIAGRAM * A color coded threading diagram is located inside the looper cover for quick reference. * Thread the machine in the order 0 to 0 as shown. • UNDERSTANDING THE COLOR CODE * Left needle thread - Blue C * Right needle thread - Green C) * Upper looper - Singer 1 One | Instruction Manual 39 - Page 13
Bring thread up and insert through top of left hole * Hold the thread above the tension disc to stabilize it. ®-A * Pass thread down through thread guide 0 -B. * Pass the thread between the tension discs. C) -C * Pull thread up and over the top of the metal finger. C)-ID * Pull thread down to make - Singer 1 One | Instruction Manual 39 - Page 14
thread up and insert through top of left hole * Hold the thread above the tension disc to stabilize it. ®-A * Pass thread down through thread guide 0 -B. * Pass the thread between the tension discs. (1)-C * Pull thread up and over the top of the metal Finger. ®-D * Pull thread down to make certain - Singer 1 One | Instruction Manual 39 - Page 15
threading. * Turn the hand wheel toward you until the lower looper is at the far left. O - Singer 1 One | Instruction Manual 39 - Page 16
(3) Threading the Left Needle (Blue) * Thread the left needle as indicated 0 ® . 7 * Pass thread from back to the front through the thread guide O. * Insert thread down through the right hole. * Bring thread up and insert through top of left hole O- 0.) * Hold the thread above tension disc to - Singer 1 One | Instruction Manual 39 - Page 17
* Continue to thread points C) Note: Lower needle bar when threading ® and ® * Pass thread through notch ®-A of thread guide ® * Thread the eye of the left needle ®. * The needle may be easier to thread when the upper knife is disengaged and placed in the nonoperating - Singer 1 One | Instruction Manual 39 - Page 18
(4) Threading the Right Needle (Green) * Thread the right needle as indicated (D -O . * Pass thread from back to the front through the thread guide C). Insert thread down through the right hole. * Bring thread up and insert through top of left hole * Hold the thread above tension disc to stabilize - Singer 1 One | Instruction Manual 39 - Page 19
: Lower needle bar when threading O and C) . * Pass thread through notchCI-B of thread guide ® 6 la 7 • 0, N/ • * Thread the eye of the right needle. ® the nonoperating position (see page 23). - Be sure to engage knife before sewing. * Place the thread to the back, under the presser foot. C) -A - Singer 1 One | Instruction Manual 39 - Page 20
control until the chain is 5. 7.5 cm (2 - 3 inches) in length. * Place fabric under the front of the presser foot and sew a test sample. Note: Do not pull on the fabric while sewing as this may deflect the needle, causing it to break. 5, ''' 7.5cry7 0 ¢". * At the end of the sample, continue to - Singer 1 One | Instruction Manual 39 - Page 21
. * When making adjustments to balance the tensions, it is recommended that 1) Adjustments be made in no greater than half a number at a time. 2) Sew a test sample after each adjustment. 5.7mm (7/32") 3.5mm (9/64") 9 Current Setting is 1%. Adjustment would be to 1 or 2 for 12/ turn adjustment. 19 - Singer 1 One | Instruction Manual 39 - Page 22
• SUGGESTED TENSION SETTINGS FOR 4 THREAD OVERLOCK MOCK SAFETY STITCH Note: * These are suggested tension settings only. * Tension settings are effected by 1) Type and thickness of fabric 2) Needle size 3) Size, type and fiber content of thread • CORRECT BALANCE OF THE 4 THREAD OVERLOCK MOCK SAFETY - Singer 1 One | Instruction Manual 39 - Page 23
• SUGGESTED TENSION SETTINGS FOR THE 3 THREAD OVERLOCK STITCH Note: * These are suggested tension settings only. * Tension settings are effected by 1) Type and thickness of fabric 2) Needle size 3) Size, type and fiber content of thread. Left Needle/Wide 3 Thread Overlock Stitch Fabric Light - Singer 1 One | Instruction Manual 39 - Page 24
15. HOW TO CHANGE THREADS/TIE ON METHOD * To change thread type or color, clip thread near the spool. C Place new thread on stand. Tie new thread and old thread ends together. Clip thread tails to 2 - 3 cm (1 inch) length. If clipped too short, threads may come untied. Firmly pull both threads to - Singer 1 One | Instruction Manual 39 - Page 25
threads through the machine one at a time. * If threads do not pull easily, check for tangles on thread guides or looping under thread most sewing conditions. Adjust the stitch length to 4mm (5/32 inch) when sewing heavy weight fabrics. * Adjust the stitch length to 2mm (5/64 inch) when sewing - Singer 1 One | Instruction Manual 39 - Page 26
into the operating position. Caution: Always close looper cover before operating machine. 18. SEAM GUIDE LINES * When the left needle is inserted, the thick line on the left of the looper cover is 16.0mm (5/8 inch). When sewing with the right needle, the thick line on the left of the looper cover - Singer 1 One | Instruction Manual 39 - Page 27
plate. (2) Throat plate (2) * Tighten set screws. (3) * Replace the cylinder cover (page 9). * Return the movable knife to its original position (page 24). * Test sew and adjust tensions as necessary to com- (3) pensate for the increase or decrease in stitch width. Note: Do not set the overedge - Singer 1 One | Instruction Manual 39 - Page 28
20. HOW TO SEW A ROLLED HEM * Rolled hemming is done by rolling and overedging the fabric edge. * Light weight fabrics such as lawn, voiL organdy, crepe, etc. perform the - Singer 1 One | Instruction Manual 39 - Page 29
UPPER LOOPER THREAD WRAPPED ROLLED HEM * For medium and heavy weight fabrics that are difficult to roll. * Always sew a test sample, and if neccessary, adjust tension balance as instructed below. * For a beautiful rolled hem thread the upper looper with wooly nylon and the needle and lower looper - Singer 1 One | Instruction Manual 39 - Page 30
ABOUT ROLLED HEMMING * Hold the thread chain when you begin sewing to keep it from curling into the seam. \. * Place a slight tension on the material in the sewing direction and a finer seam finish can be obtained. * The minimum overedge stitch - Singer 1 One | Instruction Manual 39 - Page 31
tension (yellow) generously. • is fps ItIf 4 0 0 Remove (2) Flatlocking a Seam * Place the fabric wrong sides together to sew a decorative stitch on the right side of the garment. * Sew the seam, trimming the excess fabric. /- * The needle thread (green or blue) will form a V on the underside - Singer 1 One | Instruction Manual 39 - Page 32
thread in the flatlock stitch. Place a decorative thread in the upper looper and inconspicuous threads in the lower looper and needle. * For a ladder stitch, sew seam with right sides together. The needle thread will be the prominent thread that creates the ladder (A). Note: An optional Edge - Singer 1 One | Instruction Manual 39 - Page 33
OVERLOCK BLIND HEM The excess fabric is trimmed and the hem is sewn and the raw edges are overlocked in one operation. The overlock blind hem is best suited for sewing knit wear. It provides a durable finish that is almost invisible. Topside * Remove the left needle and adjust machine for a narrow - Singer 1 One | Instruction Manual 39 - Page 34
direction. * TURNING SQUARE CORNERS ( 1) Outside Corner * Cut out approximately 2 cm (51/64 inch) from the corner, in line with the overedge seam edge. * Sew one stitch beyond point (A) and stop. * Raise needle and presser foot. * Pull the fabric to the rear of the machine just enough to release - Singer 1 One | Instruction Manual 39 - Page 35
over pins will damage and/or destroy the cutting edge of the knives. • SECURING THE THREAD CHAIN * Thread a large eye, hand sewing needle (such as a tapestry needle) with the thread chain. * Insert the needle into the end of the seam to secure thread. Note: To secure a rolled - Singer 1 One | Instruction Manual 39 - Page 36
plate. Elastic should be sewn using the 3 thread overlock stitch or the 4 thread overlock mock safety stitch. After securing with 2 - 3 stitches, continue sewing, allowing the fabric to feed through the machine while gently stretching elastic (a quarter at a time) with the right hand. * Use the left - Singer 1 One | Instruction Manual 39 - Page 37
. * Insert the tape through the hole in the front of the foot. * Position the tape under the foot to the back of the machine and sew the garment seam. * The tape is attached as the seam is sewn. • BRAIDING BY CHAINING OFF * Place the movable upper knife in non-operating position - Singer 1 One | Instruction Manual 39 - Page 38
* DIFFERENTIAL FEED (with differential feed machine only) * Differential feed is a system which "stretches" or "gathers" the fabric, when amount of feed of front feed dog in relation to the rear feed dog is changed. * The differential feed ratio ranges from 1:0.77 1:2.0. Adjustment is made by means - Singer 1 One | Instruction Manual 39 - Page 39
thumb screw. * Slide adjusting lever upward above the center mark, as required, to stretch, and tighten the thumb screw. Stretch Tighten (ril% Loosen * To sew a seam, apply gentle tension to the fabric by holding the seam lightly in front and back of the presser foot. Note: If amount of "stretch - Singer 1 One | Instruction Manual 39 - Page 40
pressure. For heavy weight fabric -increase pressure. Pressure regulating thumb screw irTIIIIf 71_ Less pressure More pressure 23. FREE ARM SEWING Convertible' bed Sewing hard-to-reach garment areas such as arm ael holes and overcasting trouser cuffs, is made easier by using the free-arm - Singer 1 One | Instruction Manual 39 - Page 41
- #80 Tetron #60 - #80 Cotton #60 - #80 Spun #60 - #80 Tetron #50 - #60 Woolly nylon Woolly tetron Note: For additional needle information see page 4. Needle Singer Cat. No. 2054 #10 #10, #14 #14,#16 #10, #14 #10, #14 #10, #14 39 - Singer 1 One | Instruction Manual 39 - Page 42
: Before lubricating your machine, disconnect power line plug from the wall receptacle. * The oiling points shown in the diagram, should be oiled periodically. Note: Use sewing machine oil. Do not use any other oil or damage could result. ( \ 2-3 drops 4 40 - Singer 1 One | Instruction Manual 39 - Page 43
becomes dull. * The stationary knife can be replaced according to the directions provided, however if there are any difficulties experienced, consult your Singer representative to make the adjustments. * Be sure that the power line plug is disconnected from the electric source. Open the looper cover - Singer 1 One | Instruction Manual 39 - Page 44
• HOW TO EXCHANGE LIGHT BULB Danger: Always unplug before relamping. * First of all, be sure to disconnect power-line plug. * Remove light cover as shown in figure, turn bulb to left and remove. To replace, push bulb into socket and turn to right. * Light bulb is a bayonet type and be sure to - Singer 1 One | Instruction Manual 39 - Page 45
26. TROUBLESHOOTING CHART Problem Fabric does not feed well Needle breaks Thread breaks Stitches skip foot pressure for light weight fabrics - Check alignment of knives - Replace one or both knives - Close looper cover before sewing - Check for tangled or caught thread - Compress thick layers of - Singer 1 One | Instruction Manual 39 - Page 46
information, the following book is recommended. Sewing with an Overlock-From The Singer Sewing Reference Library, published by Cy Decosse Incorporated. O ≥ (2) Edge Guide (P/N 376559) * Attaches to the looper cover to aid in seaming and decorative sewing such as flatlocking and pin tucking - Singer 1 One | Instruction Manual 39 - Page 47
machine will trim the excess fabric, finish off the edge and sew a hem in one operation. (See page 31) (6) Clean Pocket (P/N 370292) machine) Rolled hemming 1.5mm, ordinary overedge 3.5 - 7.2mm (standard 3.5mm) 27mm 5mm Singer Cat. No. 2054 (#10), #14 4 Width 257mm x depth 231mm x height 313mm - Singer 1 One | Instruction Manual 39 - Page 48
Form U6237 (992) Part No. 379417-002 Printed in Japan
-
 1
1 -
 2
2 -
 3
3 -
 4
4 -
 5
5 -
 6
6 -
 7
7 -
8
-
9
-
10
-
11
-
12
-
13
-
14
-
15
-
16
-
17
-
18
-
19
-
20
-
21
-
22
-
23
-
24
-
25
-
26
-
27
-
28
-
29
-
30
-
31
-
32
-
33
-
34
-
35
-
36
-
37
-
38
-
39
-
40
-
41
-
42
-
43
-
44
-
45
-
46
-
47
-
48
 |
 |
14
U44B/244B
3.4•THREAD
OVERLOCK
MACHINE
Operator's
Guide
io
_
SINGER