Singer 1004 VIVO Instruction Manual
Singer 1004 VIVO Manual
 |
View all Singer 1004 VIVO manuals
Add to My Manuals
Save this manual to your list of manuals |
Singer 1004 VIVO manual content summary:
- Singer 1004 VIVO | Instruction Manual - Page 1
needle halfway, clamp it down and think it is installed correctly.) Also, the flat part of the needle should be positioned towards the back. If the needle is not installed correctly, it will not be able to pull up the bobbin thread and will cause skipped stitches. VivoTM - 1004 INSTRUCTION MANUAL - Singer 1004 VIVO | Instruction Manual - Page 2
needle, changing the needle, threading the bobbin, changing the presser foot, etc. 13. Always unplug the sewing machine from the electrical outlet when removing covers, lubrication, or when making any other user servicing adjustments mentioned in the instruction manual. 14. Never drop or insert any - Singer 1004 VIVO | Instruction Manual - Page 3
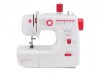
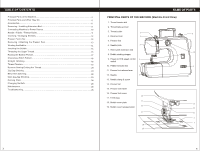
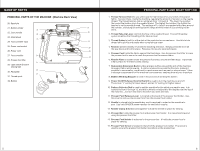
...25 Troubleshooting...26 NAME OF PARTS PRINCIPAL PARTS OF THE MACHINE (Machine Front View) 1. Thread tension dial 2. Thread take-up lever 3. Thread cutter 1 8 4. Reverse lever 2 5. Presser foot 6. Needle plate 3 7. Removable extension bed 10 8. Bobbin winding stopper 9. Power on - Singer 1004 VIVO | Instruction Manual - Page 4
PARTS OF THE MACHINE (Machine Back View) 20. Spool pin 21. Bobbin winder 30 21 22. Carry handle 20 22 23. Hand wheel 23 24. Foot controller input 31 25. Power cord socket 29 26. Power cord 28 27. Foot controller 24 32 28. Presser foot lifter 25 29. Light switch & built-in sewing - Singer 1004 VIVO | Instruction Manual - Page 5
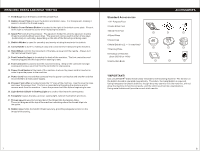
All Purpose Foot 2.Satin Stitch Foot 3.Blind Hem Foot 4.Spool Base 5.Spool Cap 6.Metal Bobbins (2 + 1 in machine)* 7.Darning Plate 8.Package of Needles (Style 2020/Size 14/90) 9.Instruction Book ACCESSORIES 8 9 *IMPORTANT! Use only SINGER® brand metal Class 15 bobbins in this sewing machine. The - Singer 1004 VIVO | Instruction Manual - Page 6
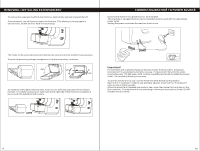
to sew pants or sleeve hems, as well as other hard-to-reach areas. CONNECTING MACHINE TO POWER SOURCE Connect the machine to a power source, as illustrated. This machine is equipped with an electric plug that must be used with the appropriate power outlet. Unplug the power cord when the machine is - Singer 1004 VIVO | Instruction Manual - Page 7
NEEDLES Change the needle regularly, especially if it is showing signs or wear or causing problems. For best sewing results, always use SINGER® brand needles. To insert a new needle, first turn the Power On/Off & Speed Control Switch to the "off" position. Loosen the needle clamp screw. Remove - Singer 1004 VIVO | Instruction Manual - Page 8
cut-out is directly above the pin. The presser foot will engage automatically. WINDING THE BOBBIN The Vivo create & repair machine by SINGER®uses metal bobbins.The bobbin case is magnetized. When the metal bobbin is used, correct tension for the bobbin thread can be achieved. Therefore, do not use - Singer 1004 VIVO | Instruction Manual - Page 9
, first remove the bobbin cover plate. Place the bobbin into the bobbin case. Pull the thread tail to check that the bobbin turns in a counter-clockwise direction. If it turns in a clockwise direction, remove it from the bobbin case, turn it over and replace it into the bobbin case. Pull the thread - Singer 1004 VIVO | Instruction Manual - Page 10
toward the back of the machine, under the presser foot, leaving about 6" clear. Replace the bobbin cover plate. (1) (2) (3) (4) (5) (6) (7) (8) 17 STRAIGHT STITCHING The straight stitch is the most frequently used stitch for all types of sewing. 1.To begin sewing, first raise the presser - Singer 1004 VIVO | Instruction Manual - Page 11
the seam so that the seam does not unravel. Set the machine for straight stitch sewing, depending on the fabric you are sewing. Place the fabric under the presser foot, just inside the top raw edges of the fabric. Lower the presser foot and sew about 3 stitches. NOTE: The length of the stitch when - Singer 1004 VIVO | Instruction Manual - Page 12
é work or decorative sewing. Seam Finishing Seam edges support the garment and should Seam Finish Set the machine for Stitch #7 or #8 and attach the Satin Foot. Sew, with the right side Chart for recommendations). Thread the top of the machine and bobbin with a thread color that matches or blends - Singer 1004 VIVO | Instruction Manual - Page 13
. Remove the Darning Plate to return to normal sewing. Sewing on a Button Set the machine for Stitch #8 or #9, depending on the distance between the holes of the button. Position the fabric and button under the presser foot. Lower the presser foot. Turn the handwheel to make sure the needle clears - Singer 1004 VIVO | Instruction Manual - Page 14
and take out the bobbin, place the bobbin cover back after cleaning with a small brush. 3.Keep the machine away from high temperatures. 4.Do not drop. 5.Please turn to the instruction manual when changing the accessories, and make sure these are installed correctly. How to solve common problems
-
 1
1 -
 2
2 -
 3
3 -
 4
4 -
 5
5 -
 6
6 -
 7
7 -
8
-
9
-
10
-
11
-
12
-
13
-
14
 |
 |
INSTRUCTION
MANUAL
Why is the thread looping/bunching under my fabric?
Thread looping under your fabric is usually caused by not threading the upper tension
correctly. With the presser foot lever in the UP position and tension set at 4, follow the
threading guides/graphics on the top of the machine.
1.Place the thread spool on the spool pin and secure with a thread spool cap.
2.While holding the thread with your right hand, use your left hand to take the thread and
take the thread and follow the thread path by bringing the thread down into the tension
channel around the bottom and up the other side.Continue to thread the machine, but do
not thread the needle.
Before threading the needle, perform this easy test to make sure the upper thread is
threaded correctly. Making sure the presser foot is raised, pull the thread. It should pull
easily. Now lower the presser foot, the thread should now resist when you pull it. There
should be a significant increase in the tension of the thread. If there is no increased
tension, the machine is not threaded correctly.
Why is my machine skipping stitches?
Skipped stitches can occur if needles are damaged or dull, or if they are incorrectly
inserted into the machine.
First, your needle may be dull or damaged and need to be replaced. You should also
check that you are using the correct needle for the type of fabric you are sewing. Refer
to the Needle/Fabric/Thread/Guide on page 11 of this manual.
Next, check that the needle is installed correctly. The needle needs to be pushed as far up
the needle shaft as possible. (It's easy to insert the needle halfway, clamp it down and think
it is installed correctly.) Also, the flat part of the needle should be positioned towards the
back. If the needle is not installed correctly, it will not be able to pull up the bobbin thread
and will cause skipped stitches.
Vivo
-
1004
TM