Singer 4411 Heavy Duty Instruction Manual - Page 19
Winding the Bobbin
 |
View all Singer 4411 Heavy Duty manuals
Add to My Manuals
Save this manual to your list of manuals |
Page 19 highlights
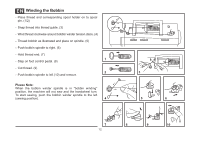
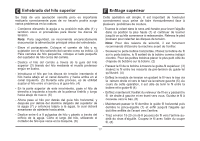
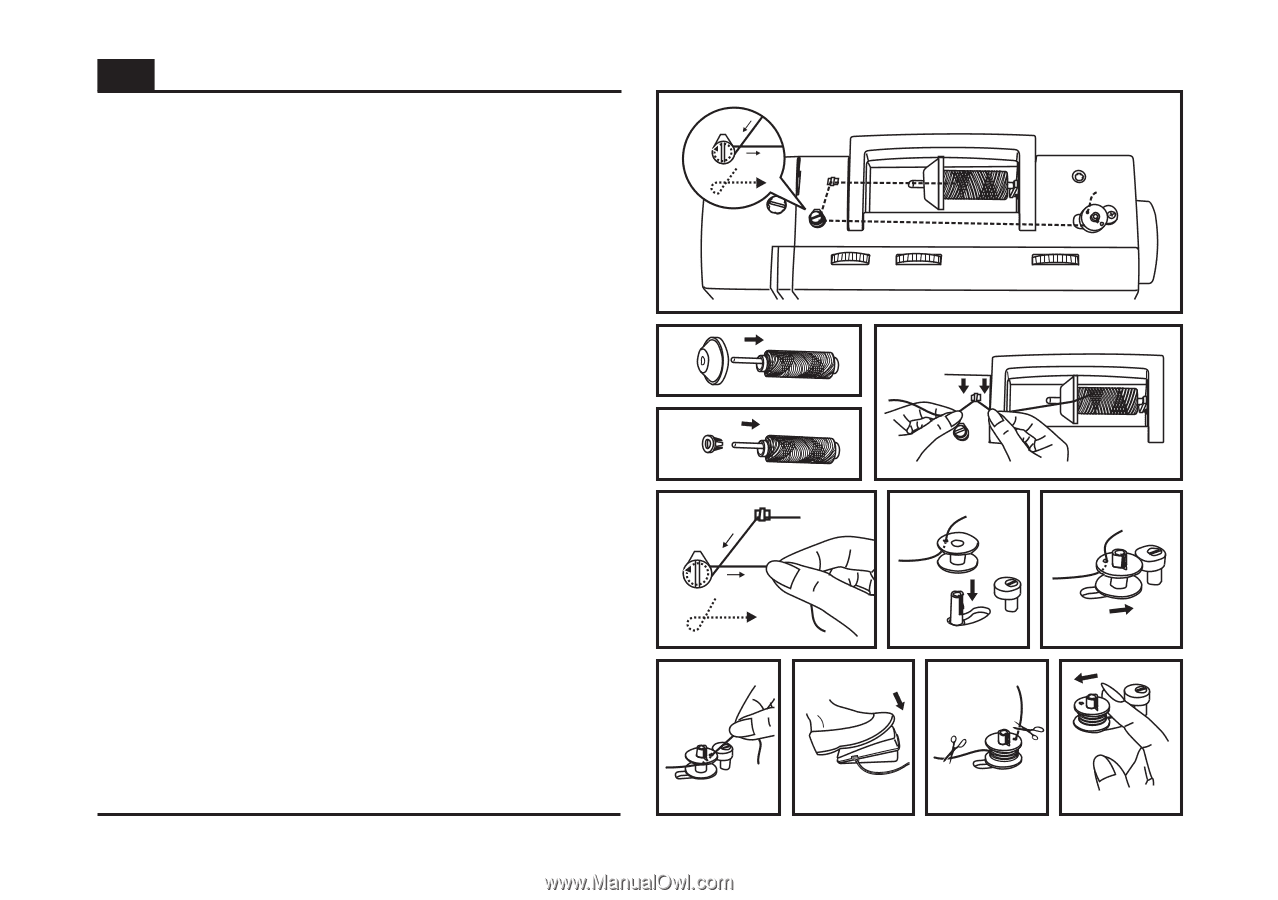
EN Winding the Bobbin - Place thread and corresponding spool holder on to spool pin. (1/2) - Snap thread into thread guide. (3) - Wind thread clockwise around bobbin winder tension discs. (4) - Thread bobbin as illustrated and place on spindle. (5) - Push bobbin spindle to right. (6) - Hold thread end. (7) 1 - Step on foot control pedal. (8) - Cut thread. (9) 2 - Push bobbin spindle to left (10) and remove. Please Note: When the bobbin winder spindle is in "bobbin winding" position, the machine will not sew and the handwheel turn. To start sewing, push the bobbin winder spindle to the left (sewing position). 4 3 5 6 7 8 9 10 12
-
 1
1 -
2
-
3
-
4
-
5
-
6
-
7
-
8
-
9
-
10
-
11
-
12
-
13
-
 14
14 -
 15
15 -
 16
16 -
 17
17 -
 18
18 -
 19
19 -
 20
20 -
 21
21 -
 22
22 -
 23
23 -
 24
24 -
25
-
26
-
27
-
28
-
29
-
30
-
31
-
32
-
33
-
34
-
35
-
36
-
37
-
38
-
39
-
40
-
41
-
42
-
43
-
44
-
45
-
46
-
47
-
48
-
49
-
50
-
51
-
52
-
53
-
54
-
55
-
56
-
57
-
58
-
59
-
60
-
61
-
62
-
63
 |
 |
-
corresponding
. (1/2)
- Snap thread into thread guide. (3)
- Wind thread clockwise around bobbin winder tension discs. (4)
- Thread bobbin as illustrated and place on spindle. (5)
- Push bobbin spindle to right. (6)
- Hold thread end. (7)
- Step on foot control pedal. (8)
- Cut thread. (9)
- Push bobbin spindle to left (10) and remove.
When the bobbin winder spindle is in "bobbin winding"
position, the machine will not sew and the
.
To start sewing, push the bobbin winder spindle to the left
(sewing position).
Please Note:
Place thread and
spool holder on to spool
pin
handwheel turn
1
2
4
7
8
9
5
6
3
10
Winding the Bobbin
EN
12