Singer 4411 Heavy Duty Instruction Manual - Page 21
Inserting the Bobbin
 |
View all Singer 4411 Heavy Duty manuals
Add to My Manuals
Save this manual to your list of manuals |
Page 21 highlights
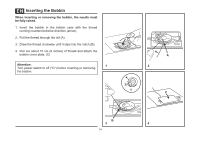
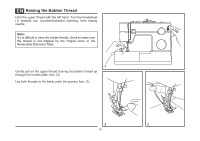
EN Inserting the Bobbin When inserting or removing the bobbin, the needle must be fully raised. 1. Insert the bobbin in the bobbin case with the thread running counterclockwise direction (arrow). 2. Pull the thread through the slit (A). 3. Draw the thread clockwise until it slips into the notch (B). 4. Pull out about 15 cm (6 inches) of thread and attach the bobbin cover plate. (C) Attention: 1 Turn power switch to off ("O") before inserting or removing the bobbin. B 3 14 A 2 C 4
-
 1
1 -
2
-
3
-
4
-
5
-
6
-
7
-
8
-
9
-
10
-
11
-
12
-
13
-
14
-
15
-
 16
16 -
 17
17 -
 18
18 -
 19
19 -
 20
20 -
 21
21 -
 22
22 -
 23
23 -
 24
24 -
 25
25 -
 26
26 -
27
-
28
-
29
-
30
-
31
-
32
-
33
-
34
-
35
-
36
-
37
-
38
-
39
-
40
-
41
-
42
-
43
-
44
-
45
-
46
-
47
-
48
-
49
-
50
-
51
-
52
-
53
-
54
-
55
-
56
-
57
-
58
-
59
-
60
-
61
-
62
-
63
 |
 |
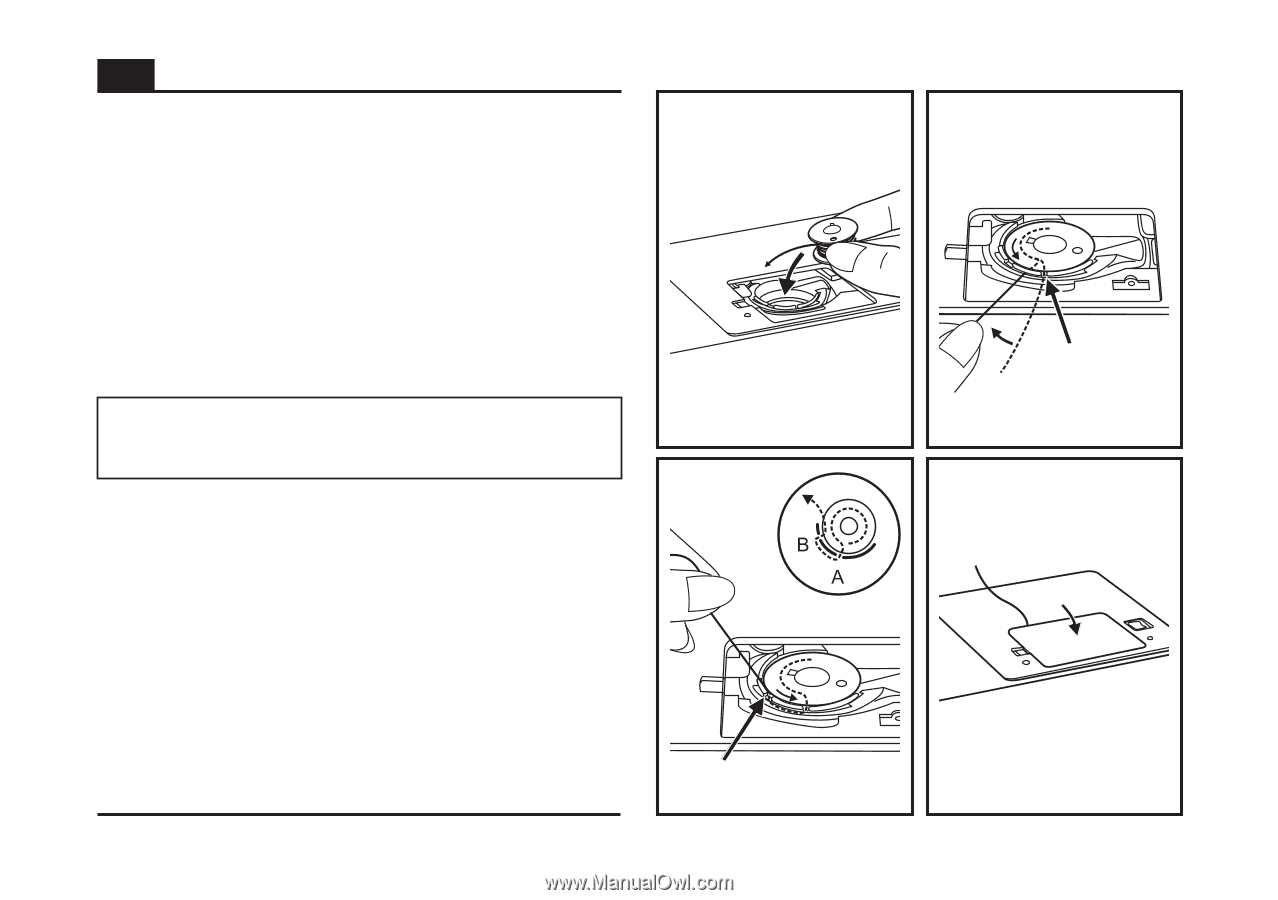
When inserting or removing the bobbin, the needle must
be fully raised.
Attention:
1. Insert the bobbin in the bobbin case with the thread
running counterclockwise direction (arrow).
2. Pull the thread through the slit (A).
3. Draw the thread clockwise until it slips into the notch (B).
4. Pull out about 15 cm (6 inches) of thread and attach the
bobbin cover plate. (C)
Turn power switch to off ("O") before inserting or removing
the bobbin.
A
B
C
1
3
4
2
Inserting the Bobbin
EN
14