Singer 9970 Instruction Manual - Page 14
Bobbin Setting
 |
View all Singer 9970 manuals
Add to My Manuals
Save this manual to your list of manuals |
Page 14 highlights
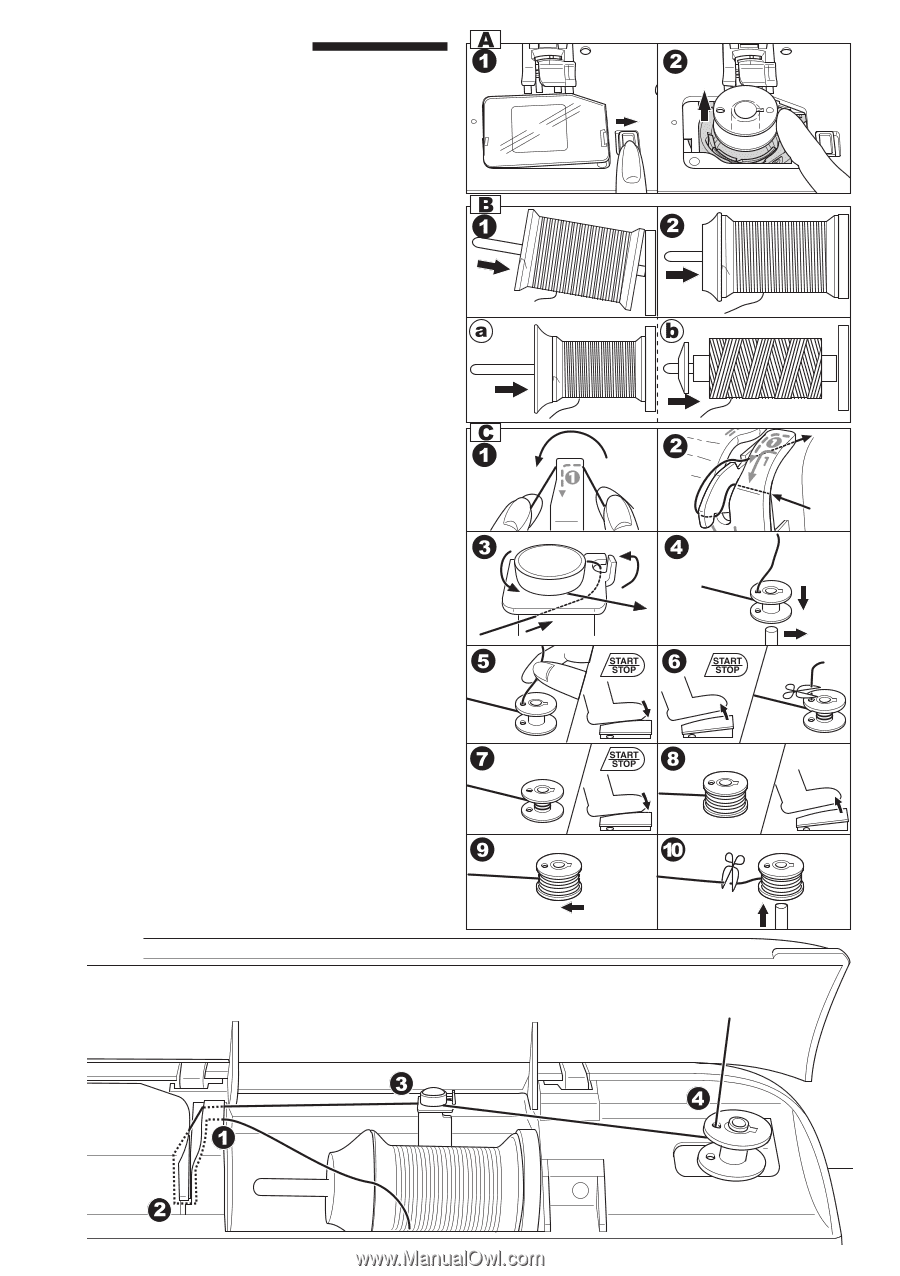
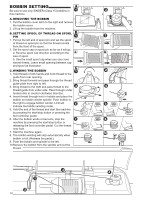
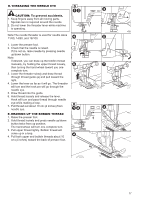
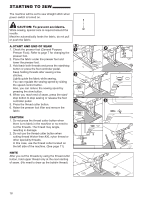
BOBBIN SETTING Be sure to use only SINGER (Class 15) bobbins in this machine. A. REMOVING THE BOBBIN 1. Pull the bobbin cover latch to the right and remove the bobbin cover. 2. Lift up the bobbin from the machine. B. SETTING SPOOL OF THREAD ON SPOOL PIN 1. Pull up the left end of spool pin and set the spool of thread on spool pin so that the thread unrolls from the front of the spool. 2. Set the spool cap on spool pin as far as it will go. a: Reverse spool cap direction according to the size of spool. b. Use the small spool cap when you use cross wound thread. Leave small opening between cap and spool as illustration. C. WINDING THE BOBBIN 1. Hold thread in both hands and hook thread to the guide from rear opening. 2. Bring thread forward and pass through the thread guide plate from right to left. 3. Bring thread to the right and pass thread to the thread guide from under side. Pass through under tension disc in counter-clockwise direction. 4. Insert thread through hole in bobbin and place the bobbin on bobbin winder spindle. Push bobbin to the right to engage bobbin winder. LCD will indicate the bobbin winding mode. 5. Hold the end of the thread and start the machine by pressing the start/stop button or pressing the foot controller pedal. 6. After the bobbin winds a few turns, stop the machine by pressing the start/stop button or releasing the foot controller pedal. Cut the thread near hole. 7. Start the machine again. 8. The bobbin winding will stop automatically when bobbin is full. (Release the pedal.) 9. Push the bobbin and spindle to the left. 10 Remove the bobbin from the spindle and cut the thread. 14
-
 1
1 -
2
-
3
-
4
-
5
-
6
-
7
-
8
-
 9
9 -
 10
10 -
 11
11 -
 12
12 -
 13
13 -
 14
14 -
 15
15 -
 16
16 -
 17
17 -
 18
18 -
 19
19 -
20
-
21
-
22
-
23
-
24
-
25
-
26
-
27
-
28
-
29
-
30
-
31
-
32
-
33
-
34
-
35
-
36
-
37
-
38
-
39
-
40
-
41
-
42
-
43
-
44
-
45
-
46
-
47
-
48
-
49
-
50
-
51
-
52
-
53
-
54
-
55
-
56
-
57
-
58
-
59
-
60
 |
 |